AI Agent Assist Application
The AI Agent Assist application provides Agents with an intuitive, powerful runtime gateway to U-Assist analysis and automation capabilities.
The application is designed to be instantly productive for an Agent, enabling quick access to the features that they need, as they are needed.
Note
The AI Agent application can be run from an Agent web browser tab, or as a standalone app from the Agent desktop. The functionality of both applications is identical.
Using the AI Agent
When the AI Agent is running, all incoming Agent calls are routed directly to the application. The Agent has the ability to accept each call, as well as end an existing call. With U-Assist, the entire work process for handling a call is set by the Agent's organization.
During a call, U-Assist analyzes the conversation to understand a customer's goals, based on the current Business Process. Using our natural language processing (NLP) and advanced AI, U-Assist can semantically determine customer goals and suggest one or more relevant Flows that might be used to achieve those goals. U-Assist can also provide helpful real-time Alerts.
The application captures key data from the conversation (for example, the name and ID of customer) as well as other values that the customer may provide (such as a payment amount or a travel destination) and suggests this data as clickable AI-based fill-ins.
Following a conversation, U-Assist typically displays a comprehensive AI-based Call Summary according to predefined or generative AI guidelines, which may be reviewed by the Agent before submission. The Summary can also include details about Agent Steps taken or Promises made during the call, among other features.
The AI Agent provides a window on all U-Assist activity. It organizes the many aspects of a call flow in real time, provides various options to manage the conversation, supplies answers to frequently asked questions (FAQs), and also supports external functionality when needed.
About the AI Agent UI
After logging in to the application, the AI Agent Assist window is displayed:
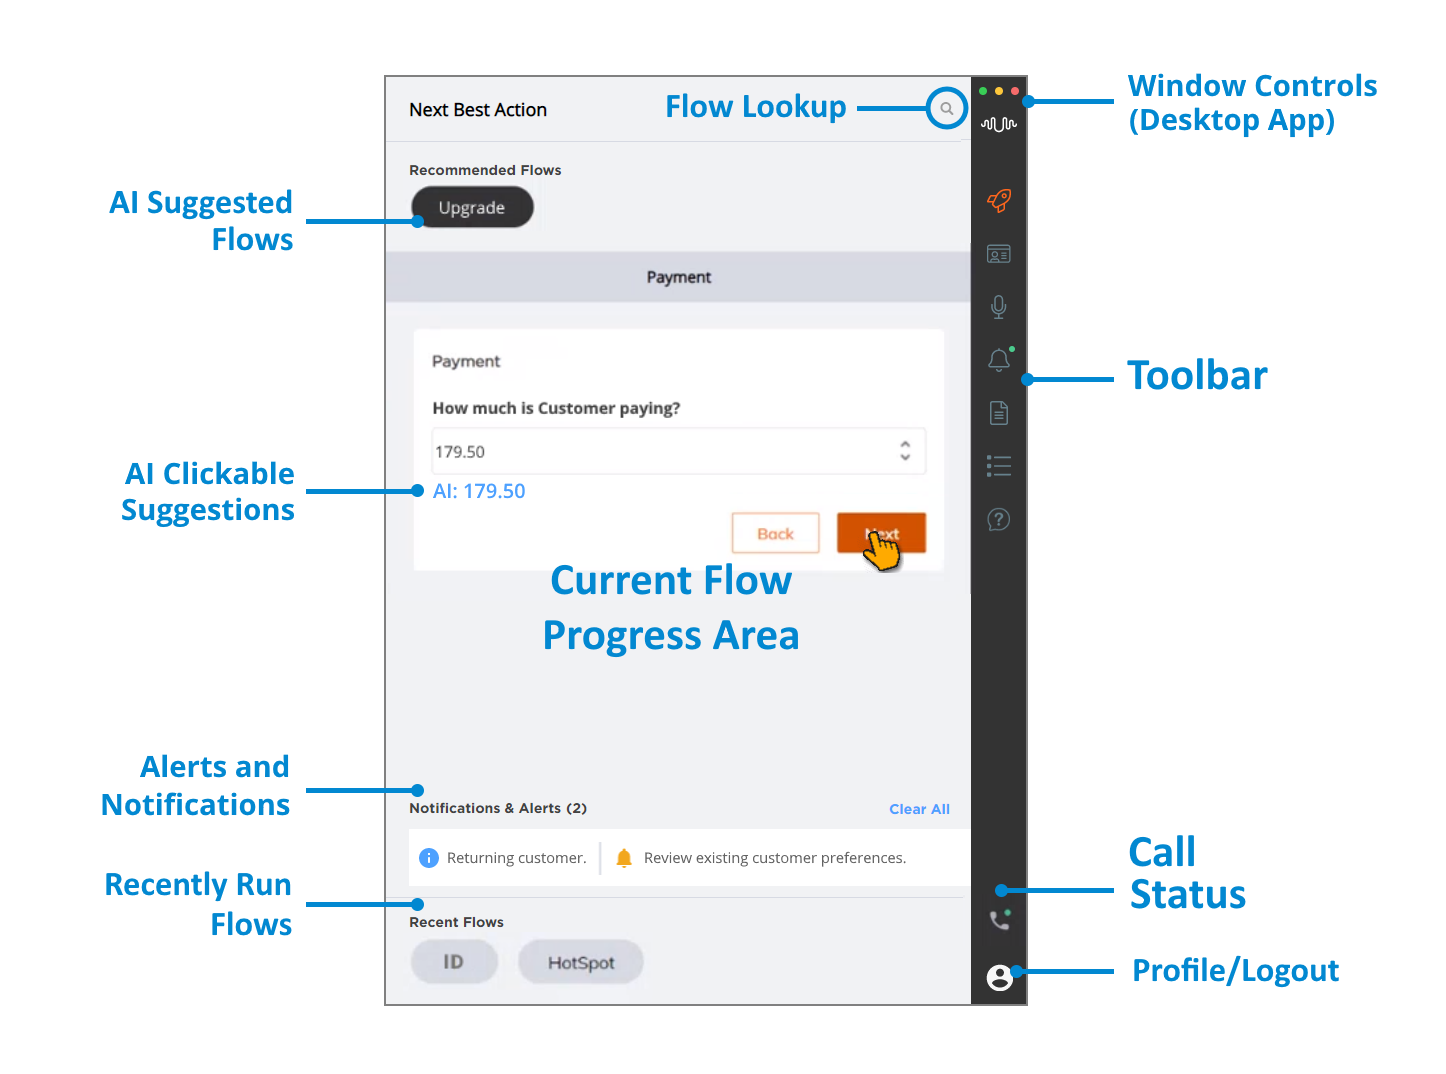
AI Suggested Flows | During a call, U-Assist will automatically recommend one or more Flows to the Agent in the Next Best Action section at the top of the page. The Agent can then click on a specific capsule to execute the desired Flow. When a Flow is running, its Steps are displayed in the Current Flow Progress Area. |
AI Clickable Suggestions | During a call, U-Assist can automatically display AI-based data suggestions next to relevant fields, providing the Agent with a quick and error-free way to fill-in standard information. |
Current Flow Progress Area | During a call, the progress of Flow Steps for the active Flow are displayed here. Each Step will typically require input or similar interaction from the Agent. U-Assist will automatically insert or display AI-generated values for a Step, when they are available. When the Flow has completed execution, it will be stored in the Recent Flows section, at the bottom of the page. |
Alerts and Notifications | During a call, an Agent will see Alerts that are triggered based on real-time speech analysis or changes to specific call attributes. Alerts are preconfigured in U-Assist for each Business Process and can include information, coaching and critical messages. The Agent can review all Alerts and Notifications for the current call in the Alerts and Notifications panel, accessed from the Toolbar. For complete details, click here. |
Recently Run Flows | During a call, when a Flow has completed execution, it will be displayed in the Recent Flows section as a capsule. AI Agent Assist stores all details of an executed Flow, including the last Step executed and variable values that were used during the Flow. If needed, the Agent can view and optionally resume execution of a selected Flow. When the current customer session ends, the Recent Flows section is cleared and all Flow values are reset. |
Flow Lookup | If none of the Recommended Flows are suitable for the current conversation, the Agent can use the built-in search feature to locate and select another available Flow from the dropdown list. |
Toolbar | A clickable menu of actions available to the Agent. During a call, the actions available in the Toolbar are determined by your organization. All Toolbar features can be customized to suit your organization's workflow and branding requirements. |
Call Status | Indicates when the AI Agent Assist application currently has an incoming or active call. During an active call, clicking on this icon will end the current call.  |
Profile/Logout | Clicking on this icon opens the AI Agent Assist Logout dialog. NoteWhen the AI Agent browser-based application is being accessed from within another browser application (i.e., embedded) the Logout dialog is disabled. Clicking on an Agent's Account Profile Picture, they can view two options: Logout - Allows an Agent to logout from AI Agent Assist Application. Authorize Teams - Allows an Agent to authenticate using their Microsoft Account and receive conversation data from Microsoft Teams calls. For more information on Agent Authorization for Microsoft Teams access, click here. |
Window Controls (Desktop Agent App Only) | Clicking on a colored dot controls the AI Agent Assist application window as follows:
|
Basic Workflow for AI Agent Assist Session
The following describes the typical workflow for a generic AI Agent Assist customer session.
The Agent accesses the AI Agent application using their web browser or the desktop application and logs in to the AI Agent application to open the AI Agent Assist window. U-Assist is ready to work.
While the application client is running, calls will be routed automatically to an Agent. U-Assist will listen to the conversation and begin performing its analysis.
When U-Assist can determine the customer's goal for contacting the Agent, it provides one or more Recommended Flows for the Agent.
The Agent can choose one of U-Assist's suggested Flows, or search for and select a different Flow for execution.
As the call progresses, each Step of the running Flow is displayed in the window. U-Assist will automatically enter values it has collected from the conversation into relevant data fields of a Step. The Agent proceeds through the Flow until its completion, or until another Flow is selected. If needed, the Agent can select other actions to perform from the Toolbar, such as viewing Customer details or a live conversation transcript.
During the call, U-Assist will also send AI-based Alerts that it produces to assist the Agent. A history of Alerts and Notifications can be viewed at anytime in a dedicated Alerts and Notifications panel.
When needed, the Agent can receive AI-based answers to Frequently Asked Questions, instantly supplied by the built-in Knowledge Assist FAQ Panel.
All previously-run Flows for the current session are listed in the Recent Flows for reference by the Agent. The Agent can select one of these Flows to view or to re-run at any time during the session.
When the current customer session is finished, the Agent is typically presented with a Call Summary. Summary format is configurable and its content is comprehensive. The Agent can edit the Summary to assign a disposition and add or change details before submitting it and moving to another call. U-Assist always stores a record of Flow execution, Agent actions and all key conversation data for post-call access and analysis.
The current customer session window will be reset, together with all values, whenever a new call is started.
Accessing the AI Agent Application
The AI Agent Application can be accessed either from a web browser or as a standalone desktop program.
Note
For complete details about configuring access and other settings for the AI Agent Application in the X-Console , click here.
Enter the relevant URL in the browser address bar. Typically, an Agent receives this URL from the Uniphore Account Admin. For details on how this URL is created and shared, click here.
Open the AI Agent desktop application by double-clicking on its desktop icon, shown below. Typically, the Uniphore Account Admin will install this program on the Agent desktop.

Note
When running Uniphore product applications, make sure that your screen resolution is at least 1280 × 1024.
Logging In to the AI Agent
Typically, an Agent needs to log in to the Agent AI client in order to begin a work session. When the Agent AI client application starts, the Agent AI Login will look something like this:
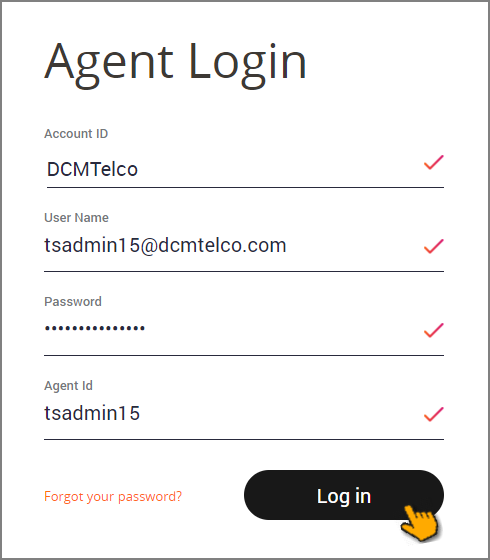 |
Double-click on the Agent AI Desktop icon, or click on the browser URL that you received (or manually enter the URL in the browser address bar). The Agent AI Login page is displayed.
Enter the Account ID, User Name, Password and optionally Agent ID in the appropriate fields.
Your login procedure and screen may differ, depending on your organization's requirements and setup. For example, your company may not require entering an Agent ID, or the Login dialog may be embedded inside of another browser tab or window.
Click Log in. When all entered values are valid, the Agent AI client window will open, showing the U-Assist Menu Bar and the Agent landing page.
Note
When a Login uses an embedded tab in a Firefox browser, an additional Login tab will be displayed. Click the Log in button in this tab to open the application.
To help ensure the security of an account, Uniphore uses strict password security requirements.
Important
Security Lockouts: To protect your work and the integrity of your account, the Agent App will lock a user Account when the number of unsuccessful login attempts exceeds a set limit. If notified that you are locked out, it may indicate an unauthorized attempt to access your account. To unlock your account, you will need the Account Admin to reset your password. For more information, see Security Lockouts.
If you have forgotten your password, click Forgot Password to initiate a secure password reset procedure.
Using Autofill in the AI Agent
U-Assist can automatically display clickable, AI-based data suggestions underneath specific input questions in a Flow, providing an Agent with a quick way to fill in information, while also reducing entry errors.
U-Assist suggests data values based on its analysis of the current conversation, using Entities from the relevant AI Model.During the call, an AI-suggested data value is displayed as a clickable link directly under its relevant field:
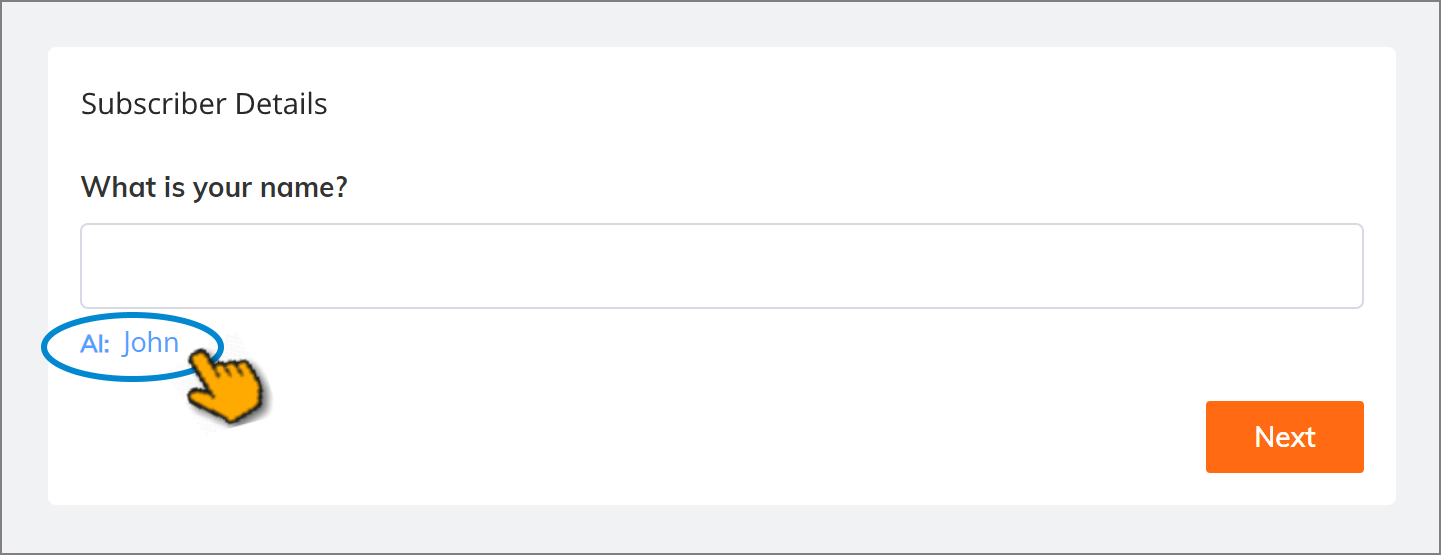
When an Agent wants to use the AI suggestion, they can simply click on the link to inject the value into the field:
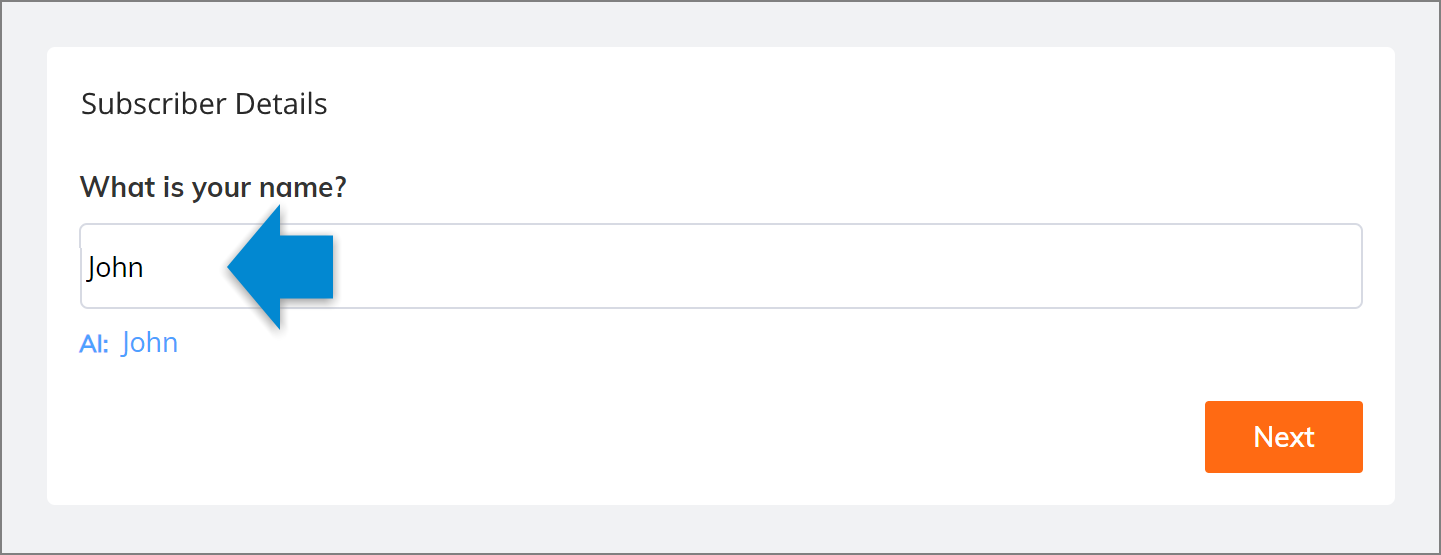
When an Agent wants to change the AI suggestion, they can click on the link and edit the value, or ignore the suggestion and enter a new value directly in the field:
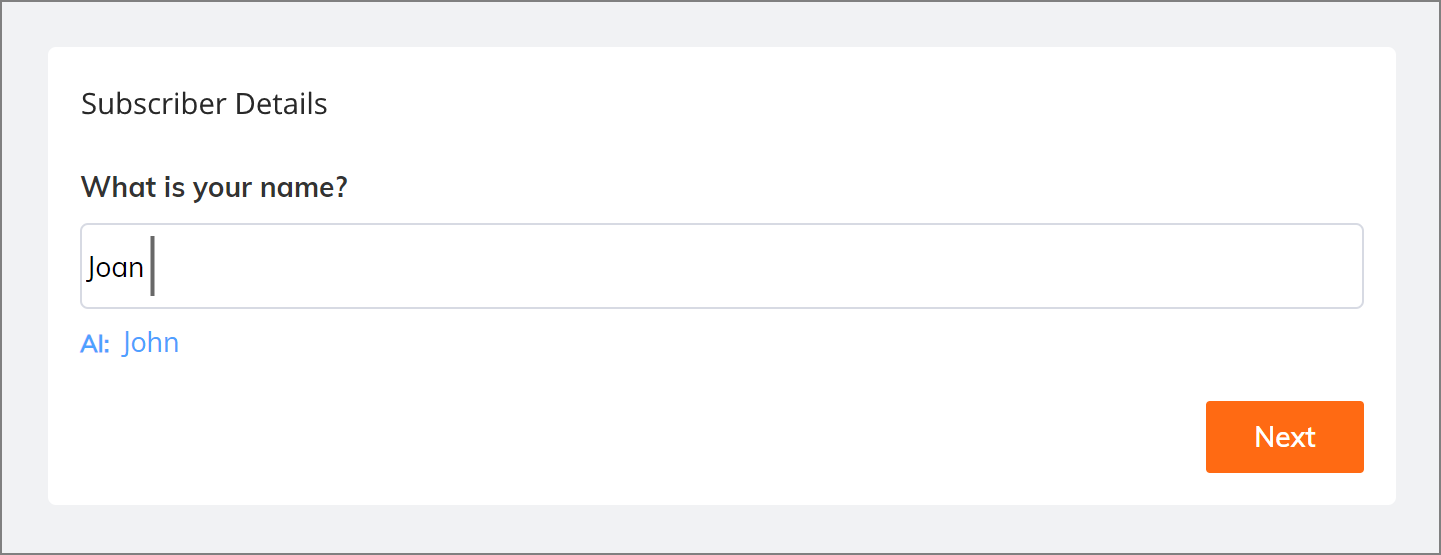
In each scenario, clicking Next accepts and stores the value that is entered in the field.
Note
Currently, U-Assist supports AI-based runtime suggestions for only selected fields. For more information, click here.
Viewing Alerts and Notifications
A U-Assist Alert is a predefined notification that is displayed to an Agent while a call is in progress.
An Alert is triggered using U-Assist AI capabilities, based on real-time speech key phrases used during the conversation, call attributes, and speech-based and tonal attributes. It typically indicates when an important event has occurred, or when a preassigned attribute value is reached.
For example, if a caller verbally requests escalation, if the call has been placed on hold for too long or if the caller expresses emotions (joy, anger, sadness, etc.), an Alert can be displayed to ensure that the Agent is quickly informed.
In the U-Assist AI Data Model, each Alert is given its own display message and is assigned as one of the following types:
Information Alerts - Provide information about the caller, their account, or a real-time event, that is relevant to the call.
Coaching Alerts - Prompt the Agent to perform a task based on events in the call, or other AI-based data.
Critical Alerts - Notify the Agent and/or Supervisor about an event or status change that requires immediate attention.
Receiving and Viewing Alerts in AI Agent Assist
While a call is in progress, the Agent will automatically receive Alerts in real time. Alerts are displayed in their own section of the main AI Agent window:
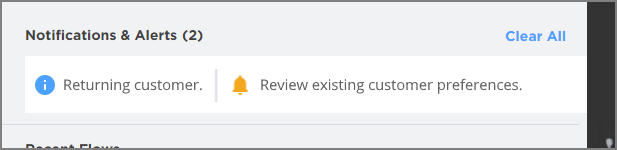
When more than one Alert is received during the call, they will be displayed in a 'tickertape' animation loop, to enable the Agent to view them more than once. Hovering over an Alert shows its complete message in a tooltip.
When a Critical Alert with pop-up presentation is triggered during a call, a pop-up alert message is displayed on top of the AI Agent Assist. To close the Alert pop-up message, the Agent can click the OK button.
Note
The Agent needs to click the confirmation button on the pop-up Alert, before submitting the Summary.
To view all Alerts received during the session, click the Alerts and Notifications icon in the AI Agent Toolbar:
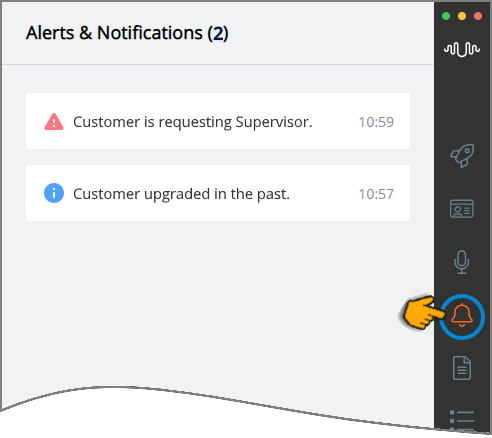
The most recent Alerts will appear at the top of the panel.
Each time an Alert is received, the Alerts and Notifications icon in the Toolbar of AI Agent will display a green dot.  The dot remains visible until the Agent opens the Alerts and Notifications panel to view the details of existing Alerts.
Like all data displayed in the AI Agent window, Alerts will be cleared when the call session ends and the Agent moves to another call. Alerts data is also stored with the session data for subsequent processing and reference.
Viewing a Live Transcript of the Call
While a call is in progress, the AI Agent application automatically receives a real-time transcript of the full conversation, generated by U-Assist.
To view the Call Transcript, while the session is active, click the Call Transcript icon in the AI Agent Toolbar:
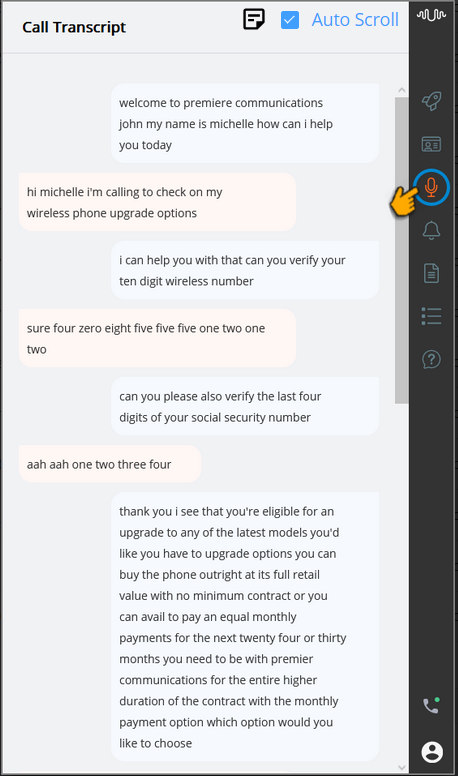
While viewing the Call Transcript, the Agent can enable or disable the Auto Scroll checkbox. This checkbox is enabled by default and the Agent automatically views the most recent sentences in the Call Transcript, while the call is in progress. When this checkbox is disabled, the Agent is able to manually scroll up or down to view previous sentences in the Call Transcript.
The Agent can use the Notes section to capture their own notes during a call. Click the Notes ( ) icon to jot down any information that they need to refer to later. For complete details about adding Agent Notes, click here.
The Agent can switch to other panels and return to the Call Transcript panel at anytime during the call. The current call transcript will be preserved.
Important
When the current customer session ends, the Call Transcript panel is cleared and its content will no longer be available.
The CTI-based language code used to transcribe a call session is configured in U-Assist, as detailed here.
Viewing a Call Summary
A U-Assist Call Summary is an auto-generated set of information and notes that is displayed to an Agent while a call is in progress. During a call, the AI Agent Assist Call Summary is updated automatically based on the Intent and other source details defined in the Call Summary template. The values of Entities and Session Variables are populated dynamically while the call is in progress.
In real time, an Agent can view and edit the Call Summary based on current call status. When the Agent updates a Session Variable in the Summary, the value of this variable is also updated in the current Intent Flow.
At the end of a call, the Call Summary is presented to the Agent for a final review, enabling the Agent to make corrections and updates as required. When the review is completed, the Agent can submit the Summary to the X‑Platform server, together with all other details of the conversation.
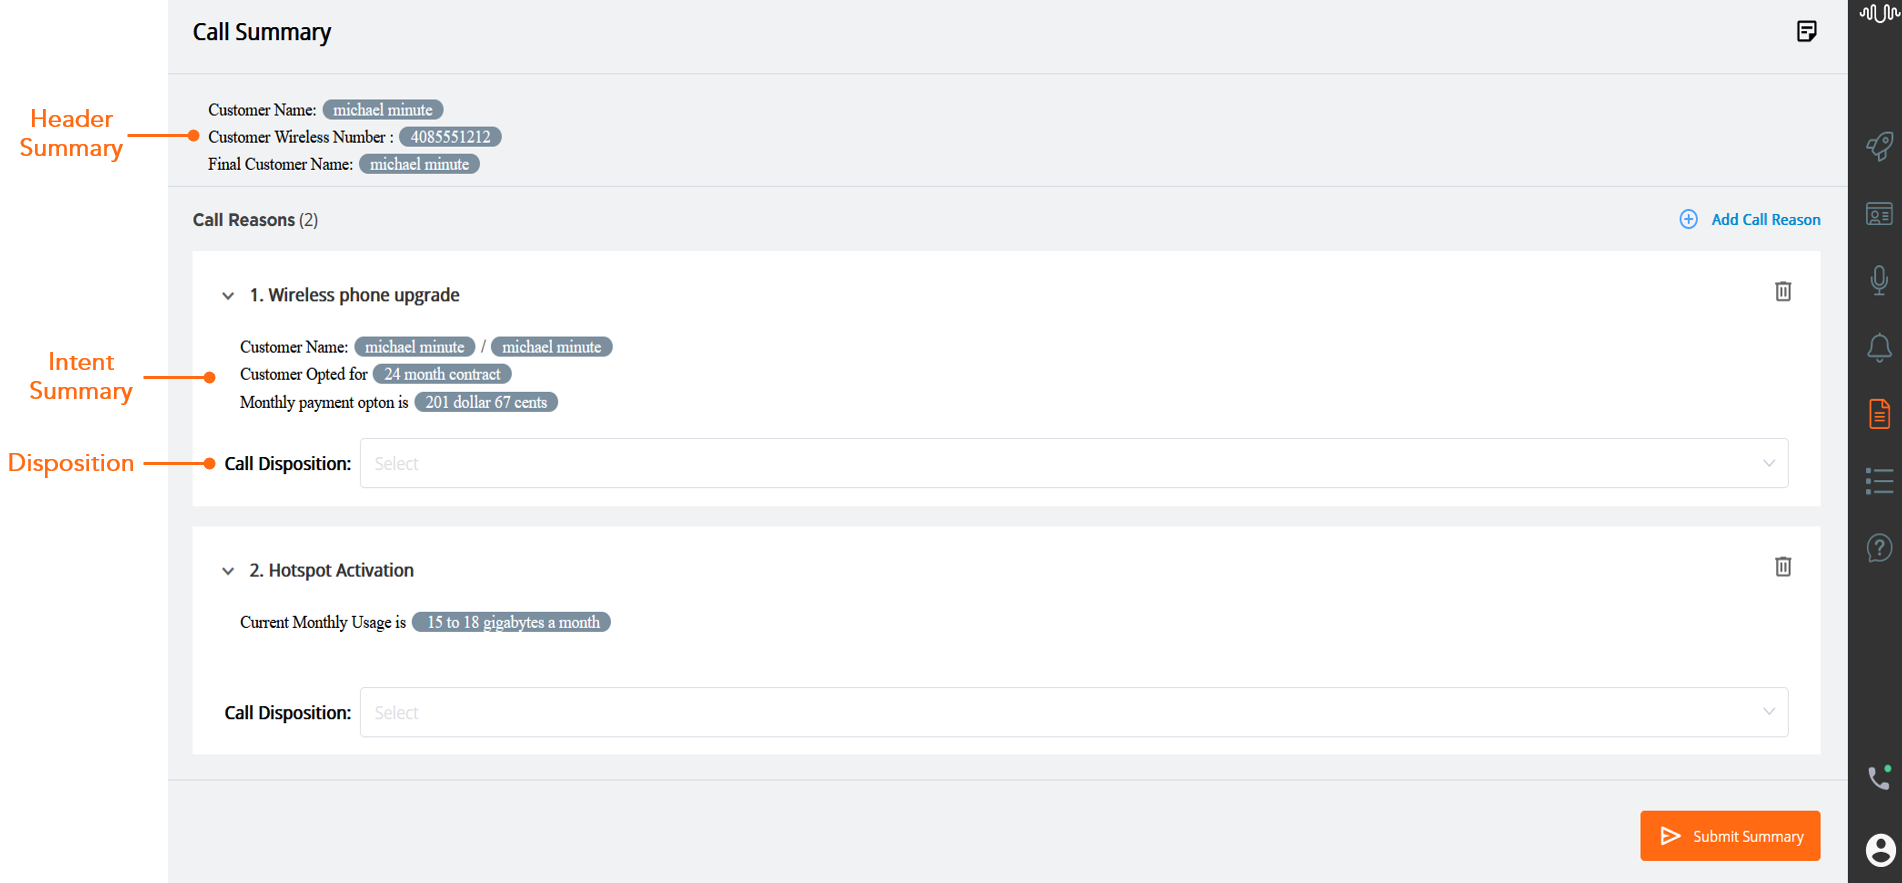
The Conversation Summary contains the following components:
Header Summary – Enables Agent to view the customer and general information about a call in respective to the Business Process.
Intent Summary – Enables Agent to view and update the real time summary generated for each call reason type Intent identified during the call.
Call Disposition – Enables Agent to select the Call Disposition value from the list based on the Intent detected and the call outcome. The Disposition values defined for the specific Business Process are listed.
Agent Steps - Enables Agent to view and update the configured resolution or troubleshooting steps whenever they are identified during the call.
Promises - Enables Agent to view and update the associated promise details for each promise type intent identified during the call.
Viewing the Header Summary
This section helps the Agent to view general information about the call or customer, generated in real time. The Header Summary is generated based on a single template defined for the entire Business Process. For complete details about creating the Header Summary template, click here.
To view the Header Summary generated during the session, click the Call Summary ( ) icon in the AI Agent Toolbar.
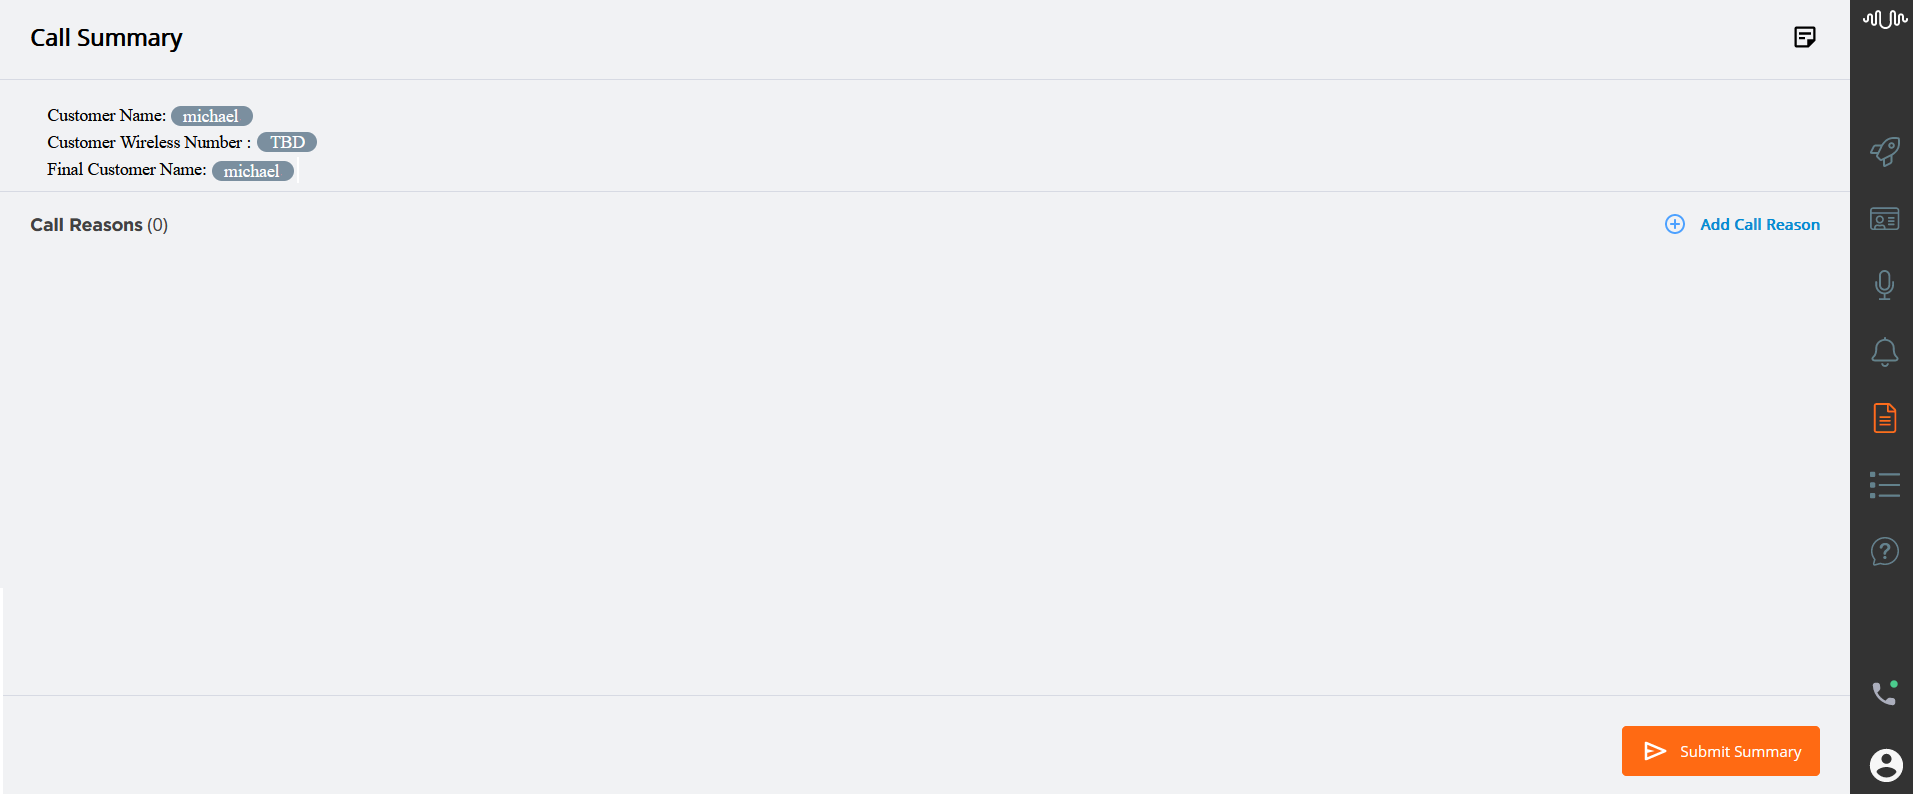
In the Header Summary, the entities or session variables that have already been collected during the call are displayed, and those that have not yet been collected are represented as To Be Determined (TBD). Whenever the entity or variable is detected, the 'TBD' is replaced with the detected value.
The entity and session variable values in the Header Summary are continuously updated with the most recent values within the same call.
Viewing the Intents Summary
During the call, an Agent can view the real time summary generated for each Intent (Call Reason type Intent or Rule with Call Reason type) in the Call Reasons section as soon as U-Assist identifies that a selected Intent has been triggered.
For complete details about creating the Intent Summary template, click here.
For complete details about creating the Rule with Call Reason type, click here.
To view the real time summary generated during the session, click the Call Summary () icon in the AI Agent Toolbar.
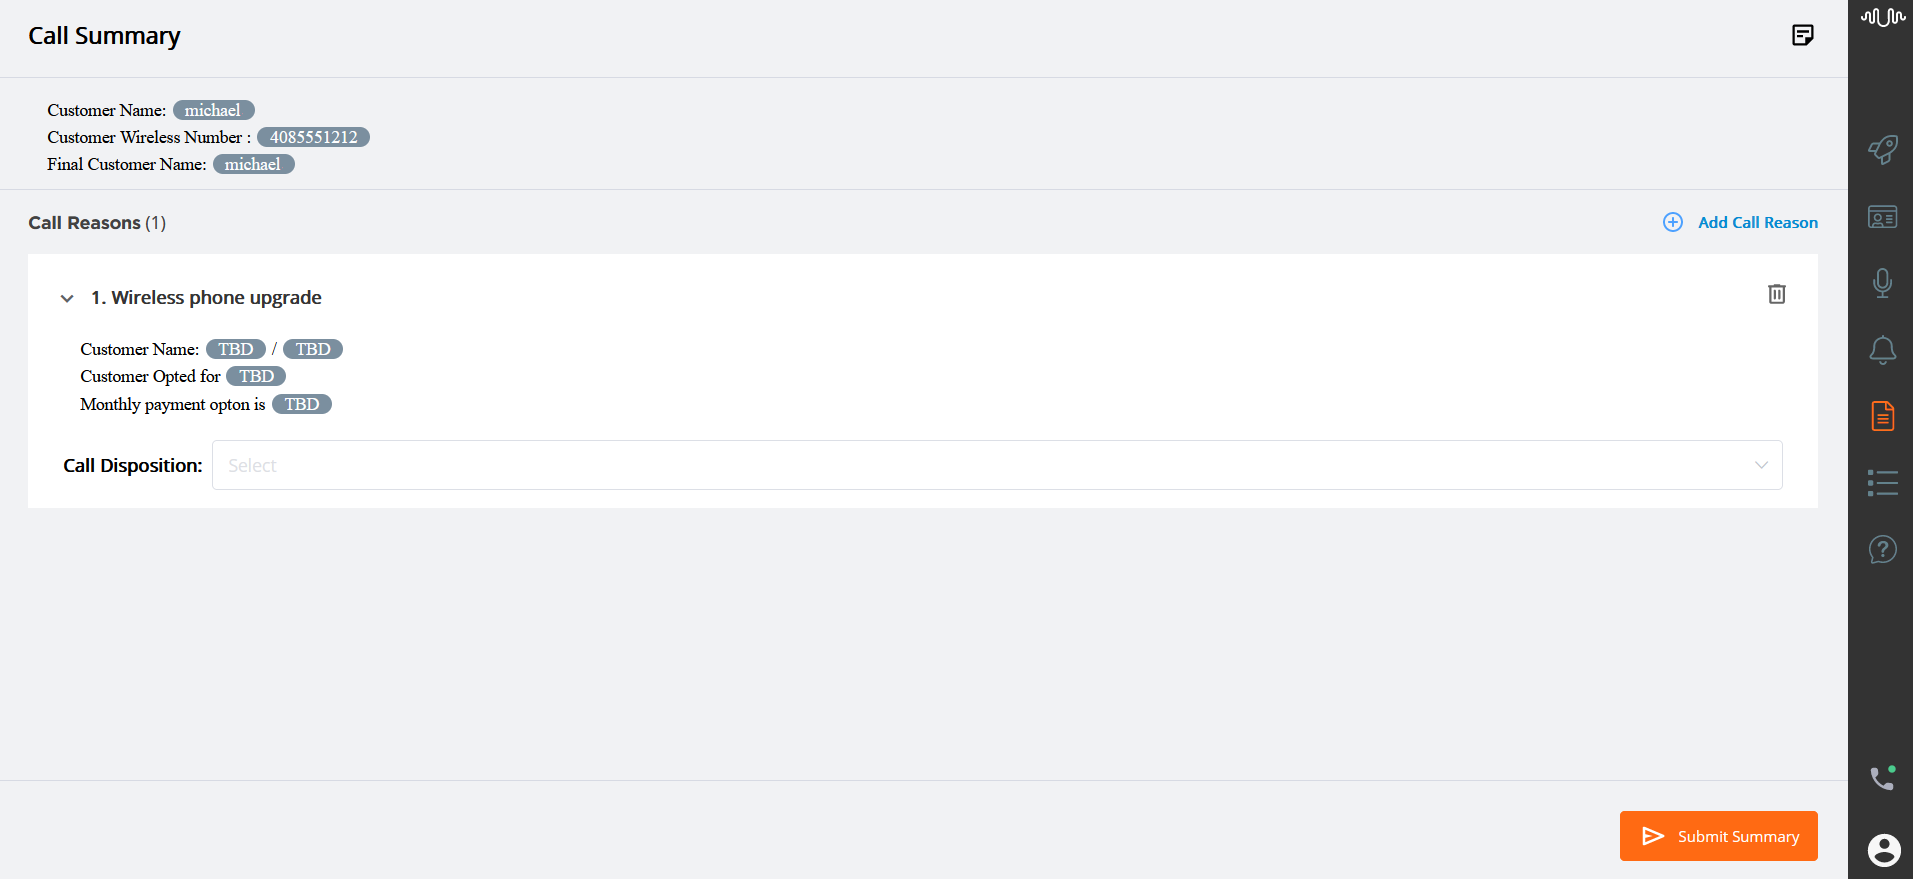
In the summary, the entities or session variables that have already been detected or collected during the call are displayed, and those that have not yet been detected or collected are represented as To Be Determined (TBD). Whenever the entity or variable is detected then the TBD is updated with the values in real time.
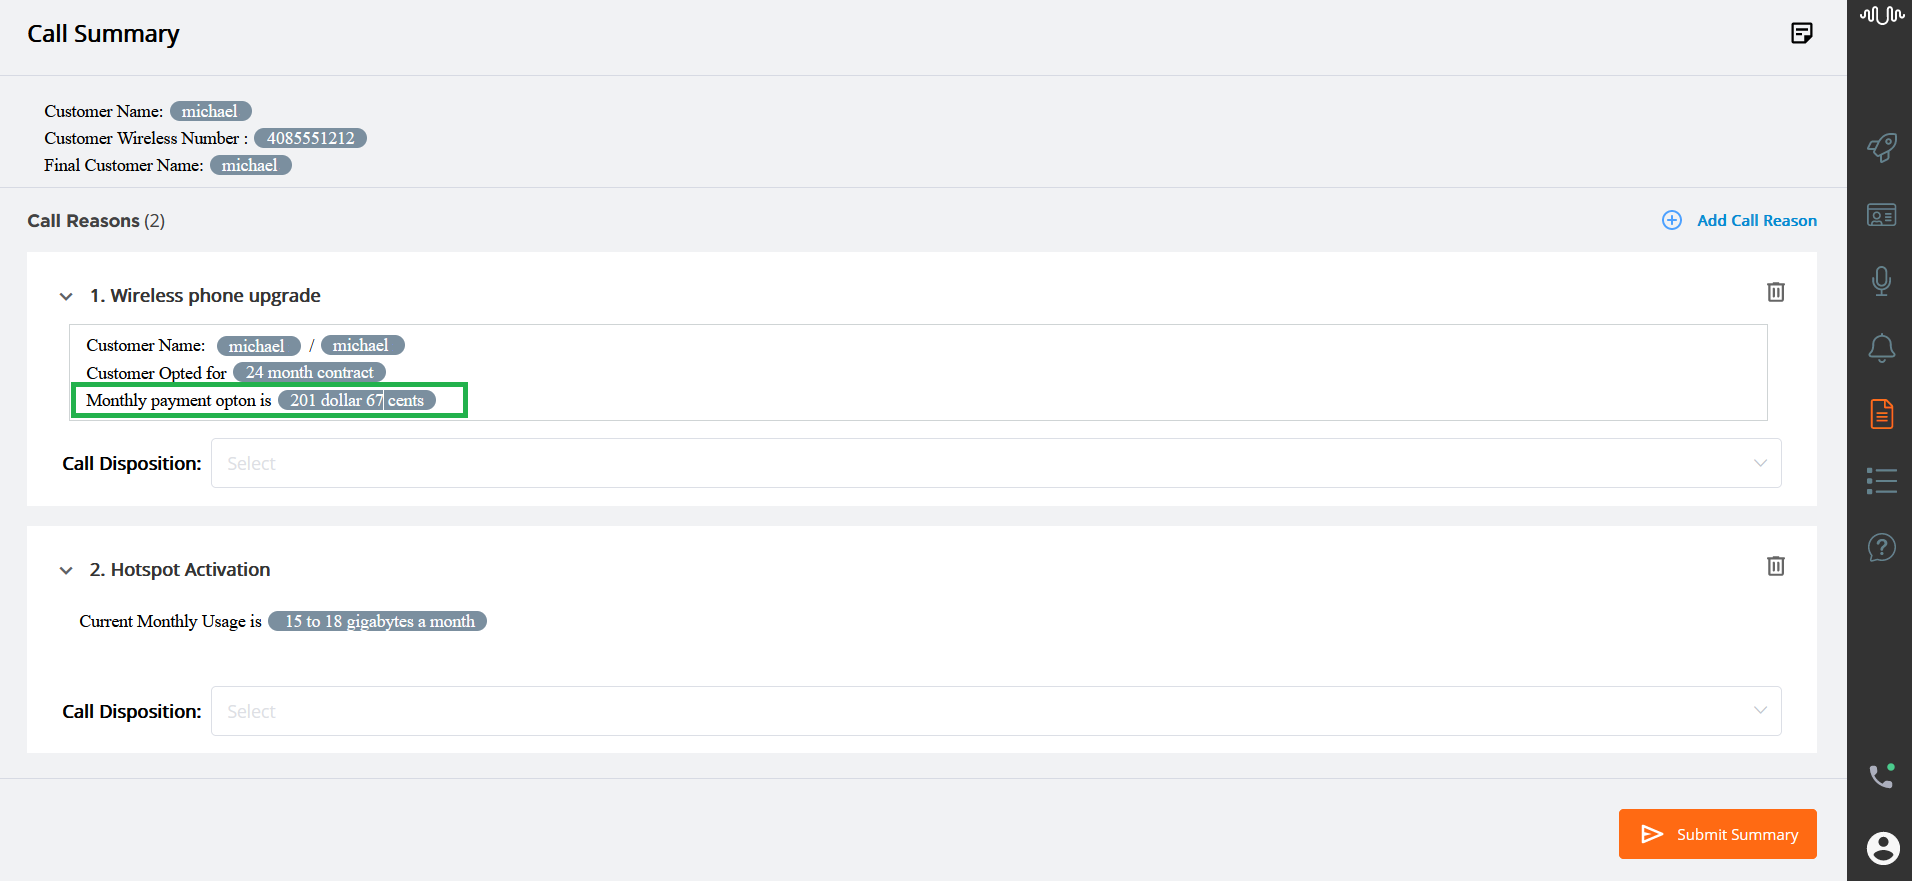
If U-Assist sees that the current Intent has ended and the conversation has moved to a different Intent, a new Intent Summary is generated and displayed in the Call Reasons section.
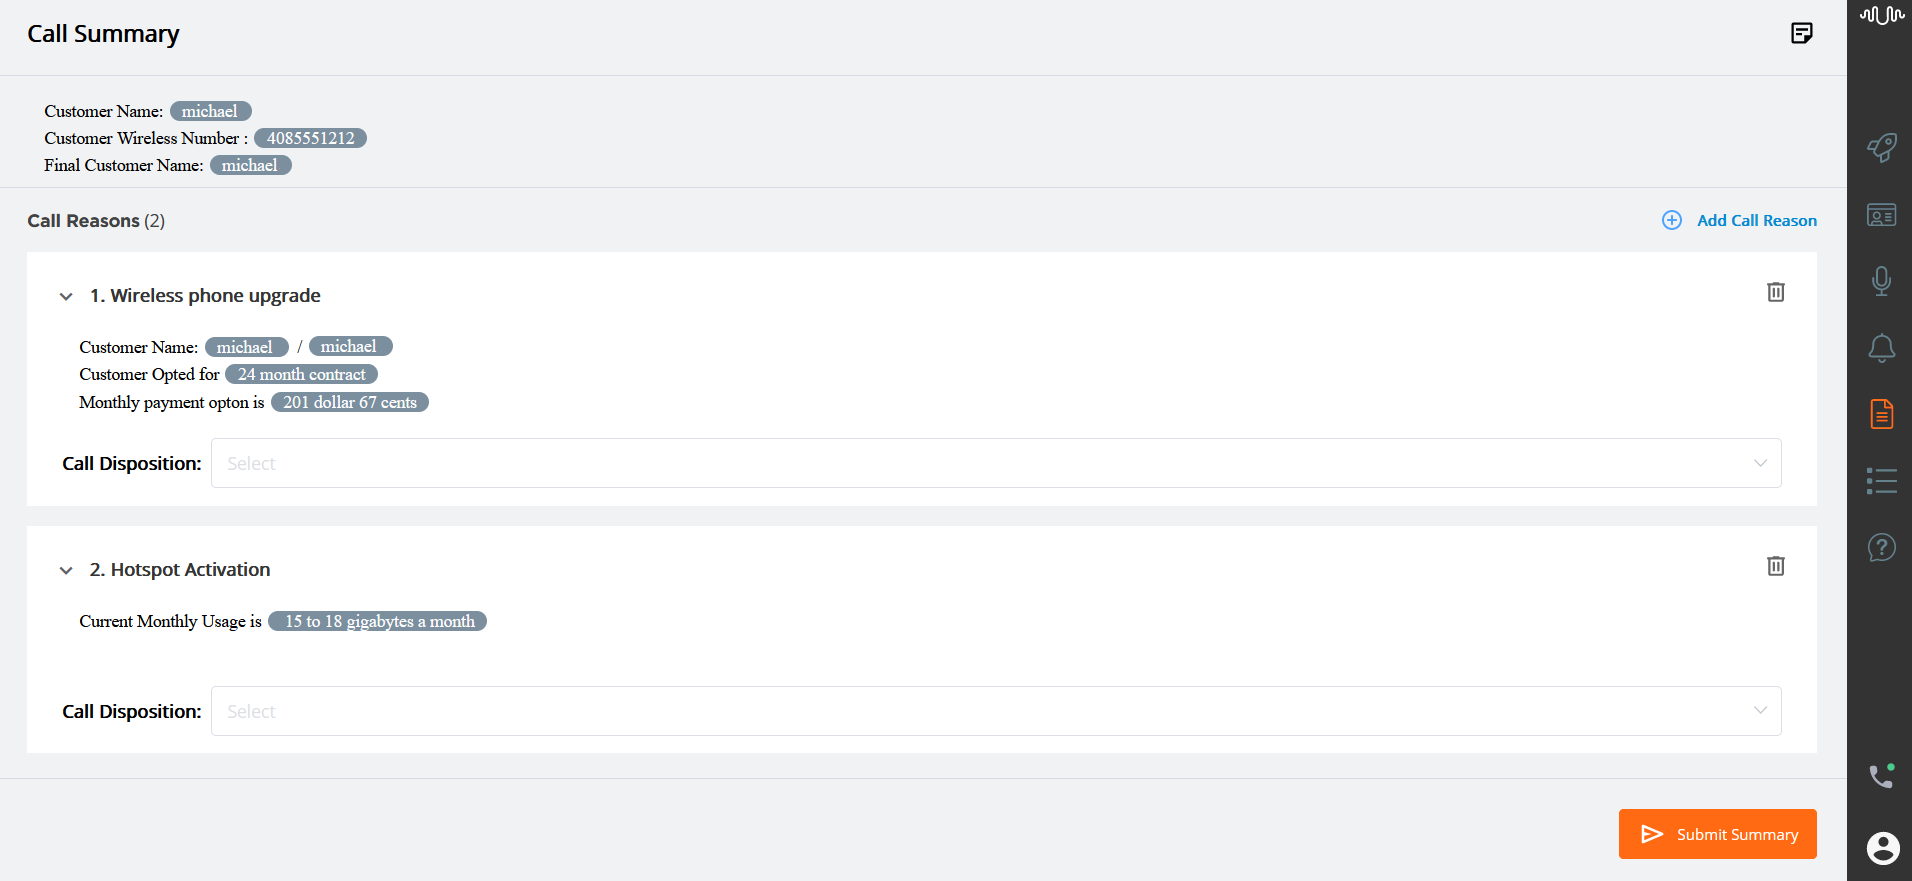
The number of Intents detected in the call is shown next to the Call Reasons label. When the Agent adds an Intent or removes an Intent from the Call Reasons section, the count is automatically updated.
Important
U-Assist provides an option to view multiple instances of same Intent during a call. Contact your Uniphore Support team to enable this option, if required.
For more information on how Entities and Variables are updated during a call, click here.
Selecting a Call Disposition
Agent can select a Call Disposition value irrespective of whether he is editing an Intent Summary or not. The Disposition values for its parent business process are listed.
Based on the Call Disposition settings under Client Settings in the Application page, the selection of Call Disposition choices are mandatory or optional in the Call Summary. For more details on Client Settings, click here.
Adding a New Call Reason
In real time, an Agent can add a new call reason (i.e., Intent) to the Call Summary at any time if any of the following scenarios occur:
The Intent is not detected in the call.
There is a delay in the Intent detection.
The system incorrectly recognizes the Intent.
Click Add Call Reason button in the Call Reasons section to add a new call reason. A new Call Reason box is added below the existing call reason boxes.
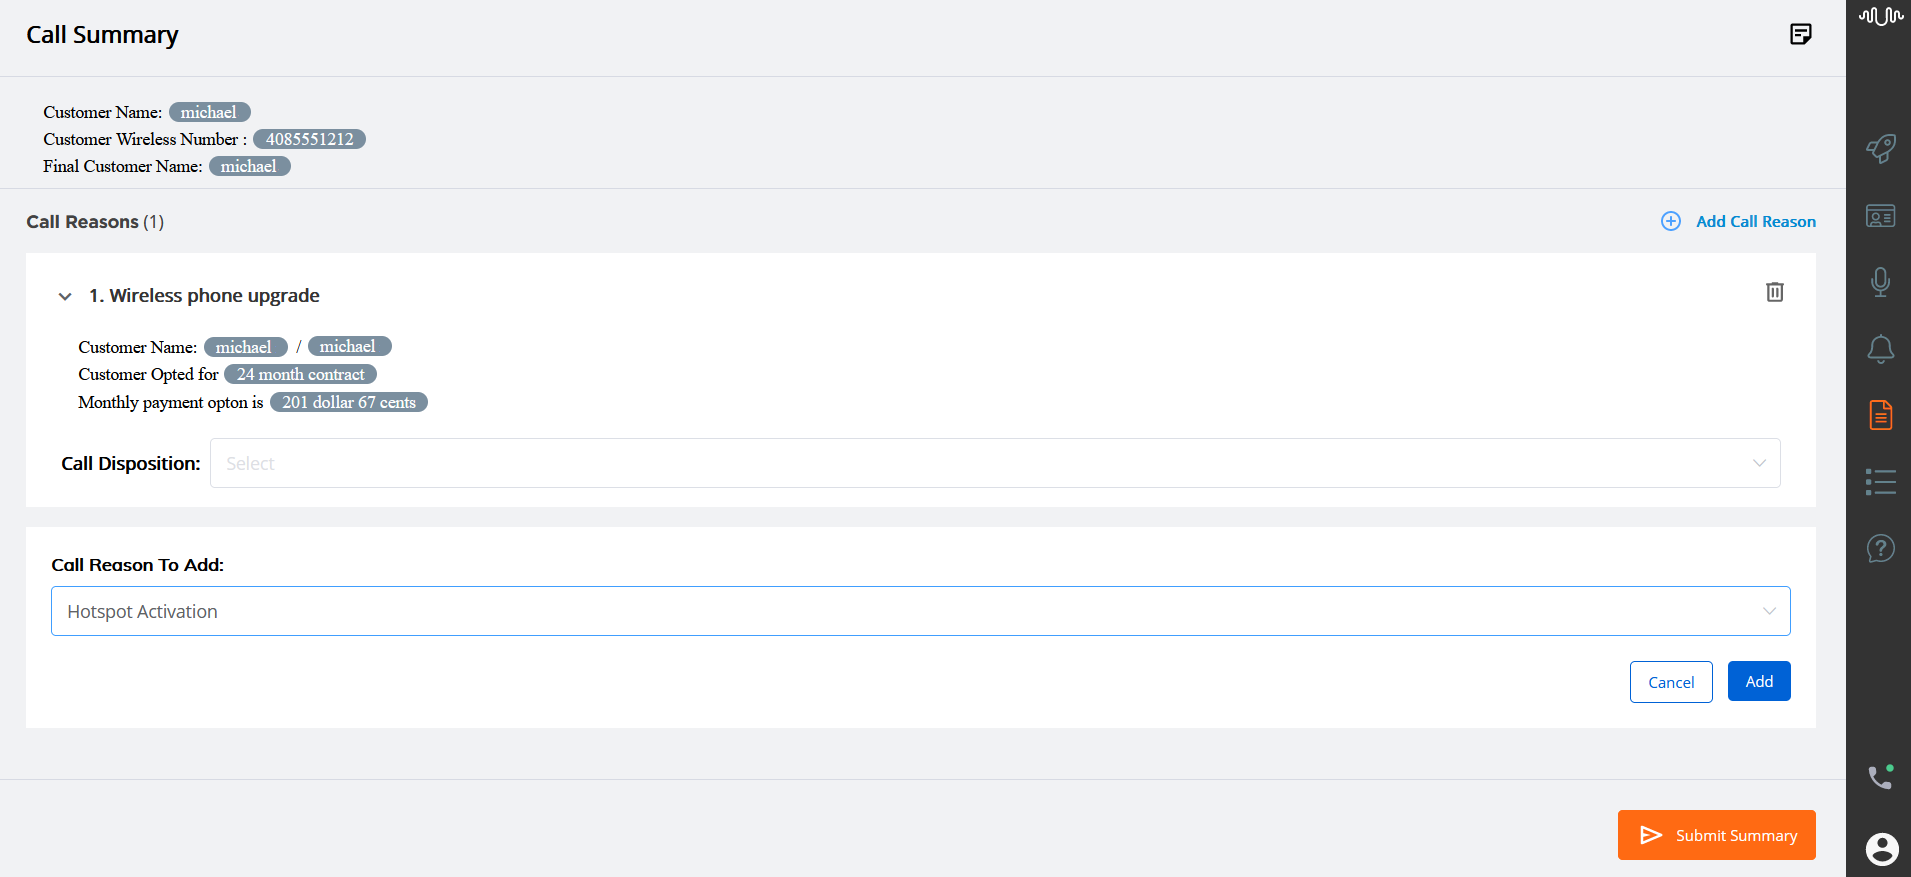
From the Call Reason drop-down list, select the specific Intent relevant to the call. The Intents which exist for its parent business process are listed.
The Intents which are already recognized on the call and presented in the Summary, do not appear in the drop-down list.
Click Add at the lower right corner of the page to add the call reason to the Call Summary. To exit adding at anytime, click Cancel.
If the summary is configured for the selected Intent, an Agent can view the summary along with the text, entities and Session Variables. The Agent can also edit the free text, entities and variables, as required.
Updating the Intent Summary
In real time, an Agent can edit the real time summary (free text, entities, session variables) configured under each Intent (i.e., call reason). The name of the Intent cannot be edited.
Note
If the account has been configured to automatically submit the Summary, the Intent Summary can only be edited until the current call ends. For more details, click here.
Whenever a Session Variable is updated in the generated summary, the value of this variable is also updated in the current Intent Flow. For example, if the Agent updates the value of the Session Variable "Billing amount" during the call, the updated variable value will be reflected in the Intent Flow.
To modify/change the real time summary, double click the specific Call Reason box:
Edit the summary as required. The name of the Intent (call reason) cannot be edited, but the summary can.
Note
If the Agent edits the entity or session variable value in an Intent Summary, the value will change in the current Intent as well as in the Header Summary, but not in any other Intent Summary.
After making the changes in the summary, click anywhere outside of the Call Reason box to save the Intent Summary.
From the Call Disposition drop-down list which is available under each call reason box, select the Call Disposition value based on the Intents, actions and resolutions detected on the call. The Disposition values for its parent business process are listed.
Removing Call Reasons
To remove a specific call reason (i.e.,Intent) from the Call Summary, click the Delete (
 ) icon at the right side of that Intent.
A confirmation message appears. Click Yes to remove the selected Intent along with its Call Disposition value.
After removing the Intent, it will no longer be shown on the Call Summary. The Call Reasons count is automatically updated according to the new order.
How Entities and Variables are Updated During a Call
While the call is in progress, the values of Entities and Session Variables are dynamically populated and updated with their most recent values.
As soon as U-Assist detects that an Intent has been triggered, an Agent can view the real-time summary generated for each Intent (i.e., call reason) in the Call Reasons section and the suggested Flows appearing in the Recommended Flows section if the detected Intent is mapped to any X-Designer Flows.
The Entity or Session Variable values displayed in the Header Summary are continuously updated with the most recent values from the current call.
The Intent Summary recognizes a 'boundary' for each received Intent, meaning that Entity or Session Variable values will display the most recent values until the another Intent is triggered.
Note
When an Agent manually modifies entity or variable values, the amended values are reflected in the Header Summary and associated Intent Summary.
When an Agent deletes an intent, the previous intent becomes the current intent, and entity value updating resumes.
Caution
The entity values are carried over and not reset for each intent.
In the Intent Summary, the Entity values are updated with their most recent values until the next Intent is triggered. Should the same Entity be used in the newly-triggered Intent, the previously set value is carried over to the new Intent Summary. If that Entity is detected once again with a new value, the new Intent Summary will be updated with the newer Entity value. The Entity value displayed for the prior Intent Summary will remain unchanged.
If the Entity is mapped to a Session Variable, when the value of the Entity changes, its associated variable is automatically updated in real time. The variable will continue to be updated in accordance with changes to its Entity value until the next Intent is triggered.
Should the same Session Variable be used in the newly-triggered Intent, the variable value will be updated according to its detected Entity value.
During a call, U-Assist automatically recommends one or more Flows to the Agent if the detected Intent is mapped to these Flows.
When the value of the Entity is changed, if the Entity is mapped to an associated Session Variable, it is automatically updated in the currently-active Flow. When a new Flow is triggered, the Session Variable value will be reset and automatic updating will resume in accordance with the Entity value,
When an Agent manually changes the Session Variable value in the currently-active Flow, the Session Variable value modified by the Agent will be considered as its final value for the Flow. After Agent modification, even if a change is detected in the Entity value, the Session Variable will not be updated with the new Entity value.
During a call, the rules are evaluated with all existing nested Entities in the conversation, detected from start to end.
Let us consider a rule entity with type 'Other' (R1) written with a condition involving 'AND' with NLP entities (E2, E5, and E6). If E2, E5, and E6 are true, then display "Customer opted for new plan".
When this rule is used in the Call Summary, the following will occur during runtime:
Sample Conversation between Customer and Agent | NLP Entity | Rule Entity |
|---|---|---|
Agent: Welcome to Signal Communications. My name is Brenda. how can i help you today? | ||
Customer: hi Brenda I'm calling to check on my wireless phone upgrade options | ||
Agent: Sure. Before we do that, can you please verify your ten digit wireless number? | ||
Customer: Sure four zero eight five five five one two one two | E1: 4085551212 | |
Agent: Can you also verify the last 4 digits of your social security number? | ||
Customer: Aah aah one two three four | E2: 1234 | R1: <evaluates to FALSE> |
Agent: Great, may I have your name? | ||
Customer: Michael Smith | E3: Michael Smith | |
Agent: Thank you. i see that you're eligible for an upgrade to any of the latest models you'd like. You have two upgrade options. You can buy the phone out right at its full retail value with no minimum contract or you can avail to pay equal monthly payments for the next 24 or 30 months. Which option would you like to choose?", | ||
Customer: I think I’ll go in for the 24 month contract. | E4: 24 month | |
Agent: Okay. Which phone would you like to upgrade to? | ||
Customer: I'll go in for the two hundred and fifty six gigabyte iphone twelve | E5: 256 GB | R1: <evaluates to FALSE> |
Agent: Great thanks . For 24 months, the equal monthly payment option is thirty one dollars sixty seven cents which will be added to your monthly bill. I'll go ahead and process the order. would you like to add any accessories. | E6: $31.67 | R1: evaluates to TRUE, output is "Customer opted for new plan" |
When a new value of any Entity used in the rule is identified, the rule will be re-evaluated and re-processed.
This is for the ACW rule entities of type "Other".
The above behavior will work irrespective of type or number of conditions used in rules.
When the rule is used in the Intent Summary or Header Summary, the rule's most recent value will always be presented.
If the Agent updates the value of this rule output during runtime, the value will not be updated further.
Caution
Rule evaluation does not recognize Intent boundaries. It considers different output values of all Entities used in the rule-based Intent.
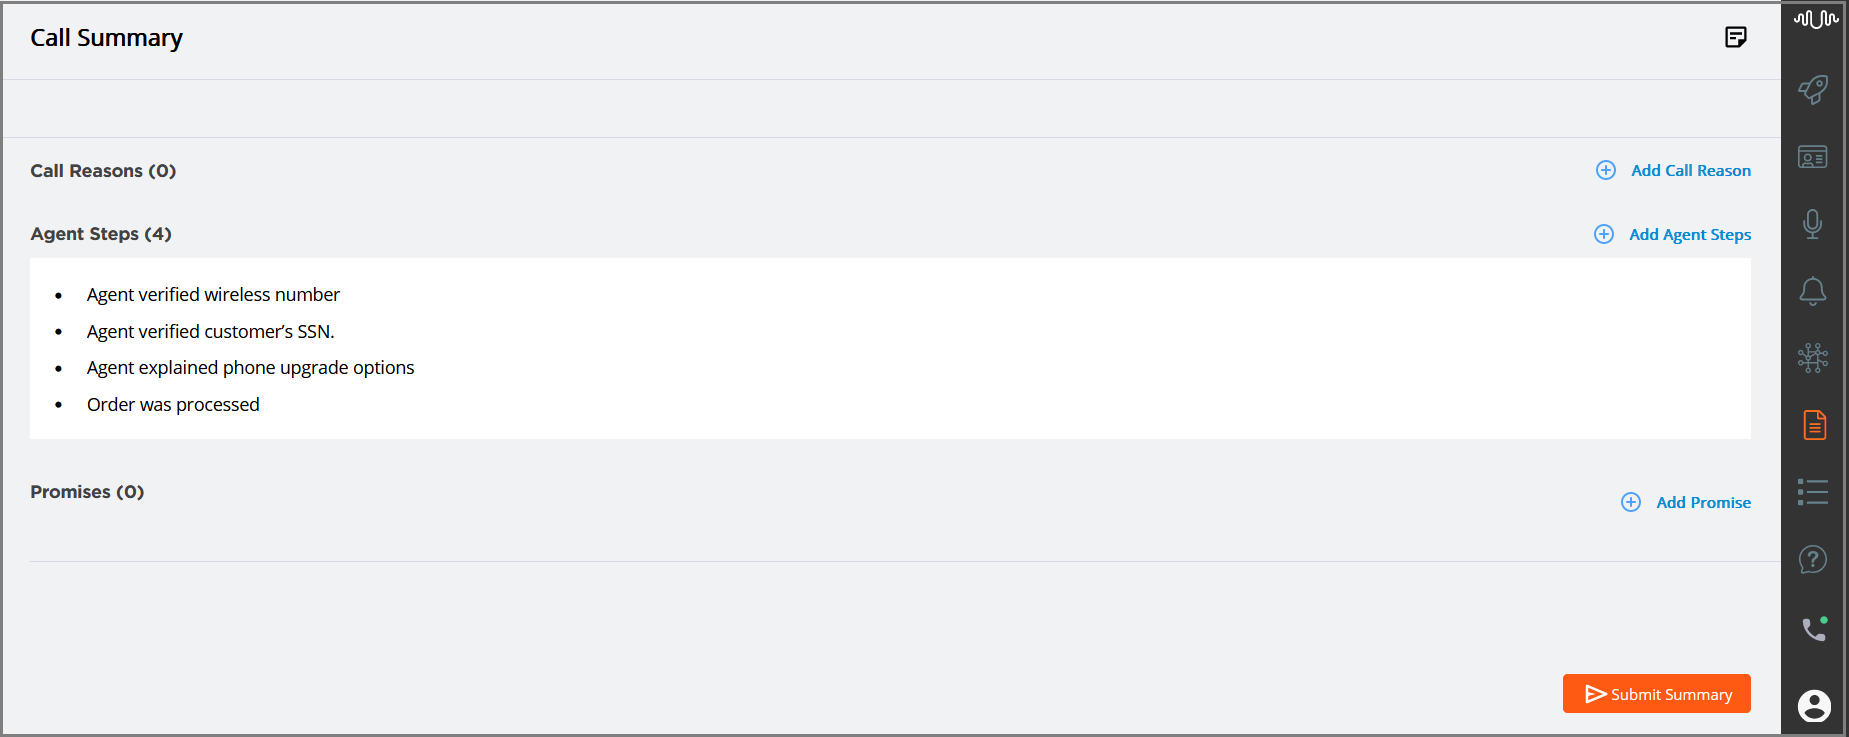
Viewing Agent Steps
In real time, an Agent can view the Agent Steps being automatically detected during the course of a live conversation with the customer. The Agent Steps are a collection of recommendation or troubleshooting steps spoken by the Agent during the call to resolve the customer's issue, and they appear on the AI Agent Assist Call Summary page in the order in which they were spoken.
Depending on the format specified in the AI Agent Application Settings page, the Agents Steps are displayed in any one of the formats given below:
Bulleted List - Shows a list of Agent's troubleshooting steps in an unordered list.
Numbered List - Shows a list of Agent's troubleshooting steps in an ordered list.
Check List - Shows all of the Agent's troubleshooting steps configured for the Experience and checks off each item as it is detected from the conversation.
When the Agent Step intent is detected in the call based on the configured training phrases, the Agent can view the associated Agent's Step Intent name without interrupting the call processing. The agent can add and/or delete the Agent Step Intent during the call or after the call.
If U-Assist sees that the current Agent Step Intent has ended and the conversation has moved to a different Intent, a new Intent is generated and displayed in the next line.
Note
In order for the Agent Steps section to appear in the Call Summary, the Business Analyst must enable this option in the AI Agent Application settings, using the X-Console.
To view the Agent Steps generated during the session, click the Call Summary () icon in the AI Agent Toolbar. The Agent Steps are displayed in a bulleted format by default, when the format is not set in the Agent AI Assist's Client Settings tab.
If the format of the Agent Steps is specified as Check List, all Agent Steps configured for the specific Experience will be displayed at the beginning of the conversation, and the steps are highlighted in Green as and when they are detected from the conversation.

Adding an Agent Step
In real time, an Agent can add a new Agent Step to the Call Summary at any time when the Agent Step is not automatically detected.
Click Add Agent Steps button in the Agent Steps section to add a new Agent Step. A new box is added below the existing Agent Step.
Select any one of the Agent Steps you wish to add from the drop-down list. All the Agent Steps defined for the current experience are listed in the drop-down.
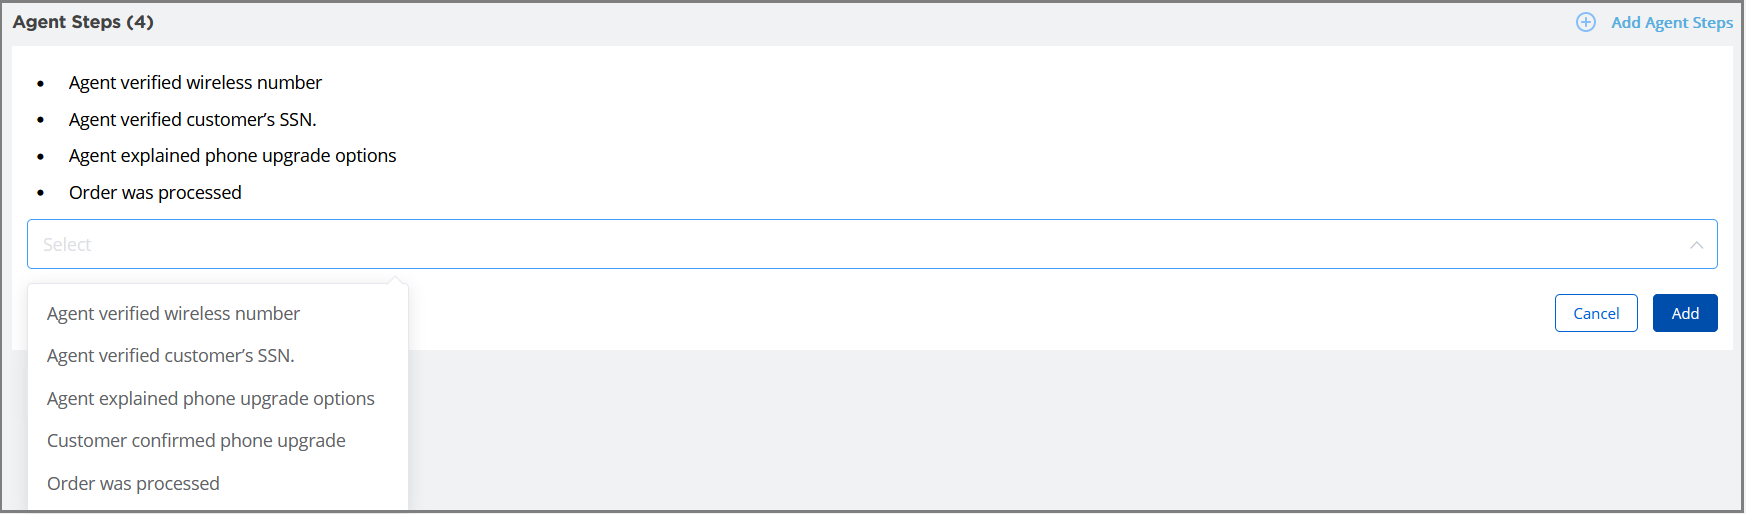
Click Add at the lower right corner of the page to add the Agent Step to the Call Summary. To exit adding at anytime, click Cancel.
Editing an Agent Step
In real time, an Agent can edit the Agent Steps
To update a specific Agent Step, hover the mouse over the Agent Step and click the Edit (
 )icon at the right side of that Intent.
Modify the auto-detected or newly added Agent Steps as required.

Press Enter to save the modified Agent Steps. A confirmation message is displayed as "updated successfully".
Removing an Agent Step
To remove a specific Agent Step (i.e.,Intent) from the Call Summary, hover the mouse over the Agent Step and click the Delete (
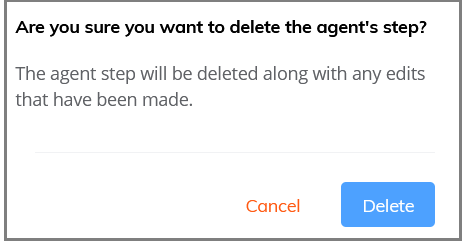
) icon at the right side of that Intent.A confirmation message appears. Click Delete to remove the selected Intent.
After removing the Agent Step, it will no longer be shown on the Call Summary. The Agent Steps count is automatically updated according to the new order.
When the Agent submits the call summary, the Agent Steps will be stored in the built-in X‑Platform Conversation Summary Session Variable, making this data available for other X‑Platform Flows.
For more details on submitting conversation summary, click here.
Viewing and Updating Promises
In real time, an Agent can view the Promises (i.e., Promise-type Intents) being automatically detected during the course of a live conversation with the customer. Every statement made by the Agent and customer is analyzed in real time for Promises made and then categorized based on the nature of the Promise. These Promises are presented to the Agent on the AI Agent Assist Call Summary page.
When the Promise is detected, the Agent can view its associated details without interrupting the call processing. The Agent can update and/or correct the detected Promise details both during the call and after the call. In the event that a Promise was fulfilled during the call, or a duplicate or incorrect Promise was detected, the Agent can reject them so that they will not be processed further.
Below is a detailed explanation of the Agent’s entire experience.
Viewing Promises
To view the Promises generated during the session, click the Call Summary () icon in the AI Agent Toolbar.
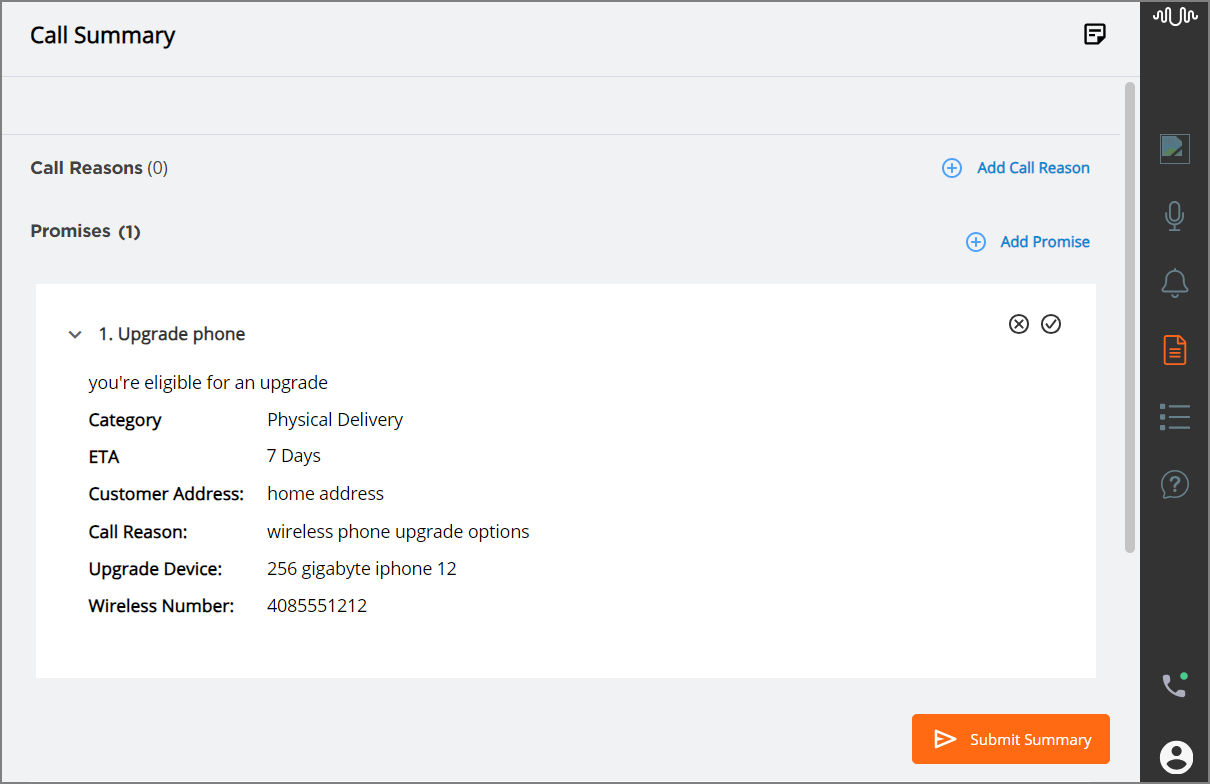
When the Promise is detected during the call, the Agent can view the respective Promise-type Intent name along with the following details:
Transcription of the specific turn in which the Promise is detected
Promise category
Date and time of the Promise completion
Entities and Session Variables associated with that specific Promise-type Intent
Tip
Clicking the Minimize ( ) icon displays only the Promise name.
The Agent has an option to accept or reject any of the Promises that detected by U-Assist.
To accept the Promise, click the Accept ( ) icon. To reject the Promise, click the Reject (
 ) icon. An accepted Promise icon color changes to green; a rejected Promise icon color changes to Red. Both accepted and rejected Promises are listed in the Promises section. The Agent can modify their acceptance or rejection any number of times prior to submitting the call summary.
If the Promise is mapped to a tracking flow, that Flow is executed in accordance with its recurrence settings when the Agent accepts the Promise.
If U-Assist detects that the current Promise-type Intent has ended and the conversation has moved to a different Intent, a new Promise is generated and displayed in the Promises section.
Below is the sample conversation between customer and Agent, along with the Promises generated in the AI Agent application:
Conversation between Customer and Agent | Slots, Variables or U-Assist ACW Entities Identified in the Call | Promise Intent Detected in the Call | Description | Promises Shown in the Call Summary |
|---|---|---|---|---|
Customer: I'm calling to check on my wireless phone upgrade options. Agent: Sure. Can you please verify your ten digit wireless number? Customer: Sure four zero eight five five five one two one two Agent: Thank you Mr. John Smith. You're eligible for an upgrade to any of the latest models you'd like. You can avail to pay equal monthly payments for the next 24 or 30 months. Which option would you like to choose? Customer:24 month contract. Agent:Which phone would you like to upgrade to? Customer: two hundred and fifty six gigabyte iphone twelve Agent: Great. For 24 months, the equal monthly payment option is thirty one dollars sixty seven cents which will be added to your monthly bill. Shall I process the order. Customer: Sure, can you deliver to my address? Agent: Yes. I have processed your order. The phone will be shipped to your home address which is 21, 2nd Cross, BLVD Lane, San Francisco, US within 3-4 business days. Customer: Ok, Thanks. |
| Upgrade Device (Category: Physical Delivery) | When the Promise-type Intent “Upgrade device” is detected in the call, the Promise details defined for this Intent is displayed on the Call Summary as shown in the next column: |
|
Important
If an entity 'Customer Name' is mapped to two different Promise categories (for example: Physical Delivery and Remote Service), the entity will be extracted only once at first time, even when both the Promises are detected in a single call. The entity value for the second line item of Promise will be blank as it is already recognized and mapped with first time detected Promise. The Agent can copy and paste the values wherever the entity values are not populated.
Adding a New Promise
In real time, an Agent can add a new Promise to the Call Summary at any time when the Promise is not automatically categorized into one of the trained Promise types.
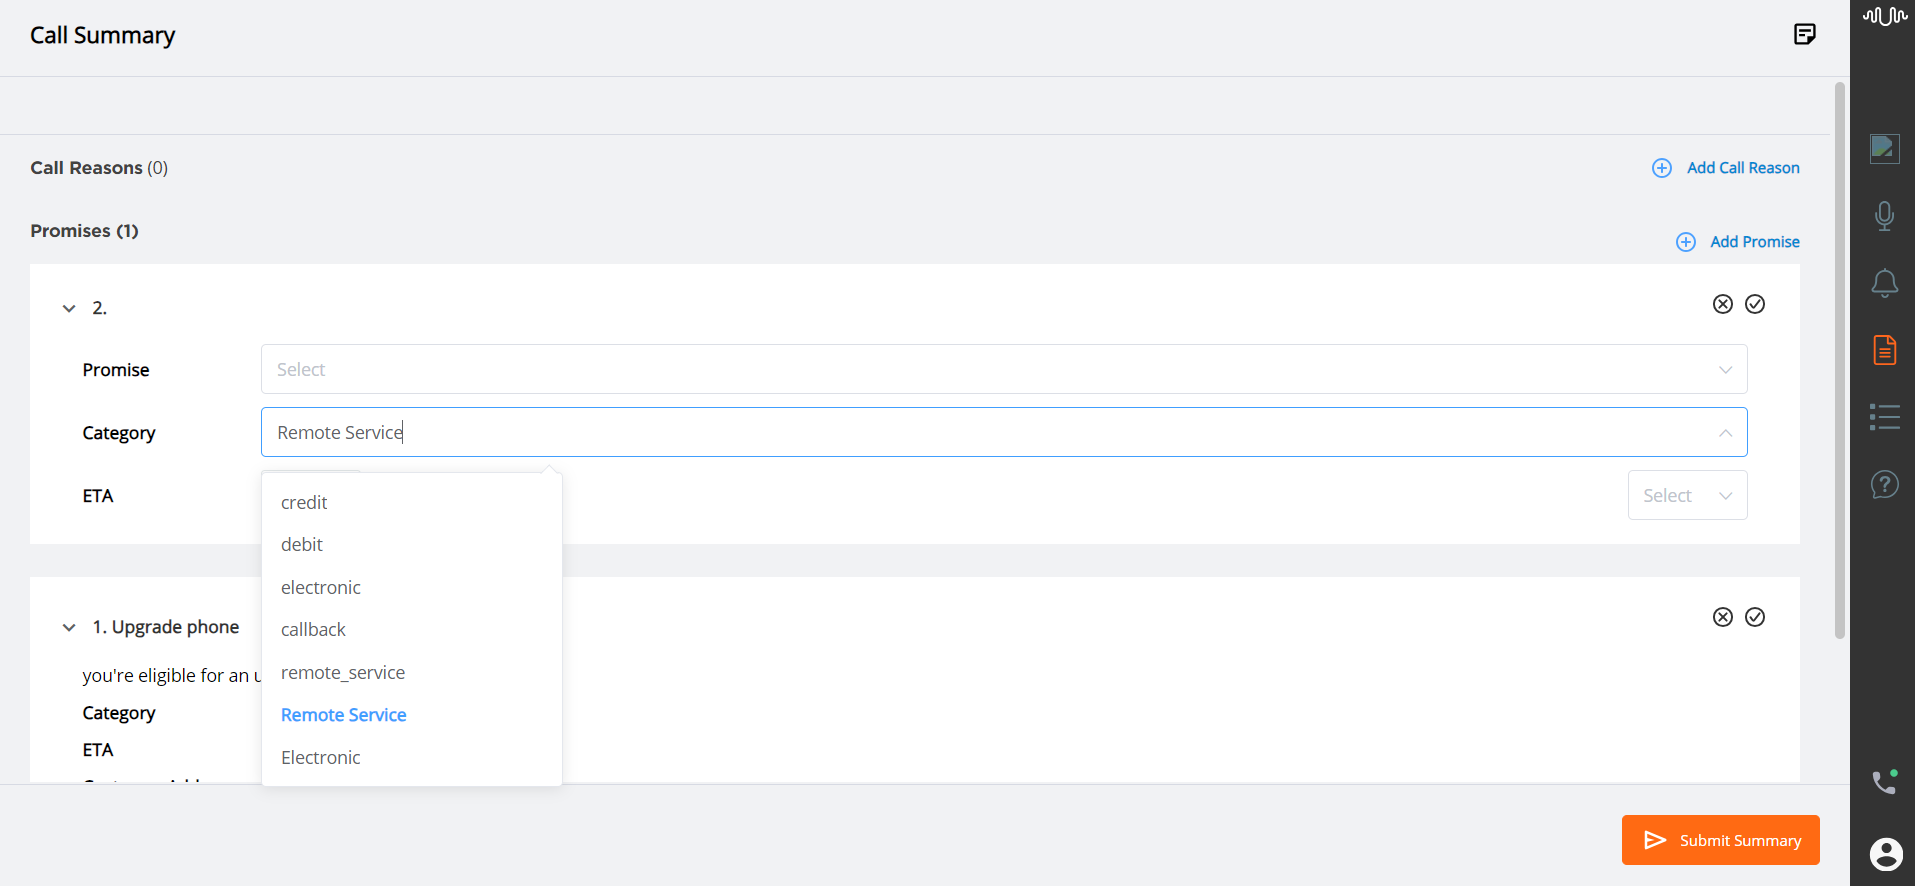
Click Add Promise button in the Promises section to add a new Promise. A new Promise box is added above the existing Promise boxes.
From the Promise Category drop-down list, select any one of the system defined or custom defined Promise categories. All the Promises categories defined for the current experience are listed in the drop-down. Based on the selection of Promise category, the corresponding Promise-type Intents are listed in the Promise Name drop-down list as shown below.
From the Promise Name drop-down list, select the specific Promise-type Intent.
In the ETA field, the value is populated by default based on selection of Promise Category and Intent. Change the value, if required.
Based on the selected Promise-type Intent, the associated Entities and Session Variables are displayed under the ETA field. Mention the values for the same.
After adding the Promises to the summary, click anywhere outside of the Promises box to save the Promise details.
Updating Promises
In real time, an Agent can edit the Promise Category, ETA, Entities, and Session Variables associated to the detected Promise. The name of the Promise-type Intent cannot be edited.
Whenever a variable is updated in the detected Promise, the value of this variable is also updated in the current Intent Flow. For example, if the Agent is updating the value of the variable 'Billing amount' during the call, the updated variable value is reflected in the Intent Flow.
To modify/change the Promise details, click the specific field:

Edit the Promise details as required.
After making the changes in the Promise, click anywhere outside of the Promise box to save the Promise details.
When the Agent submits the call summary, the Promise data will be stored in the built-in X‑Platform Conversation Summary Session Variable, making this data available for other X‑Platform Flows.
Submitting a Call Summary
Important
Call Summary and GenAI Summary submission activity is determined by the settings configured in the associated AI Agent Application. For more details, click here.
U-Assist supports both manual and automatic submission of a real-time call summary for after-call handling. The following submission options are relevant for both the template-based Call Summary and GenAI Summary:
Whenever a Summary is submitted, if the Summary is mapped to a specific Service Flow in the account settings, that Flow will be triggered. In addition, Summary data will be stored and made available for other Flow elements or X‑Platform activities. For example, a Business Analyst might use this data for customer service tracking on an external CRM platform.
Note
Whenever the Agent is on call, the Call ( ) icon is active at the lower right corner of the AI Agent window. If the Agent terminates the current call by clicking this icon before submitting the Summary, autogeneration of the Call Summary stops in the AI Agent window and a warning message is displayed.
When Manual submission is active for the account, the Agent can view and edit the template-based Call Summary at any time during the call. A GenAI Summary can be viewed and edited only at the end of the call.
The Summary is submitted only upon the Agent's request:
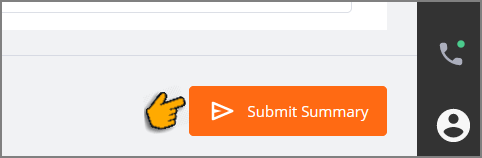
To submit the Summary manually, click the Submit Summary (or similarly named) button at the lower right corner of the page. This button is enabled while an Agent is still on the call:
If the Agent does not submit a Summary for the current call but clicks the Call (
) icon to answer a new call waiting in the queue, a warning message is displayed requesting them to review and submit the current Summary before proceeding to the next call.If the Agent submits a Call Summary without saving the related Agent Notes, a warning message is displayed. Click Continue to Submit Summary to submit without saving the Agent Notes. Clicking Cancel will return to the Agent Notes panel and enable saving them before submission. For complete details about adding Agent Notes, click here.
Note
The Submit Summary button will be enabled only when the summary contains all required components.
After successful Summary submission, a confirmation message is displayed.
When the Auto-Submit option is active, there is no Submit Summary button to click. Summary submission will happen automatically at one of the following times, as configured for the account:
End of Current Call - The Summary is submitted immediately when the current call ends.
When using the template-based Call Summary, an Agent can still view and edit the Summary while the call is in progress.
When using the GenAI Summary, an Agent cannot view or edit the generative Summary before it is submitted.
Start of Next Call - The Summary is submitted only when the next call becomes the active call.
When using the template-based Call Summary, an Agent can view and edit the Summary any time before the next call begins.
When using the GenAI Summary, an Agent can view and edit the generative Summary any time before the next call begins.
After automatic Summary submission, a success confirmation message is displayed.
Viewing a GenAI Summary
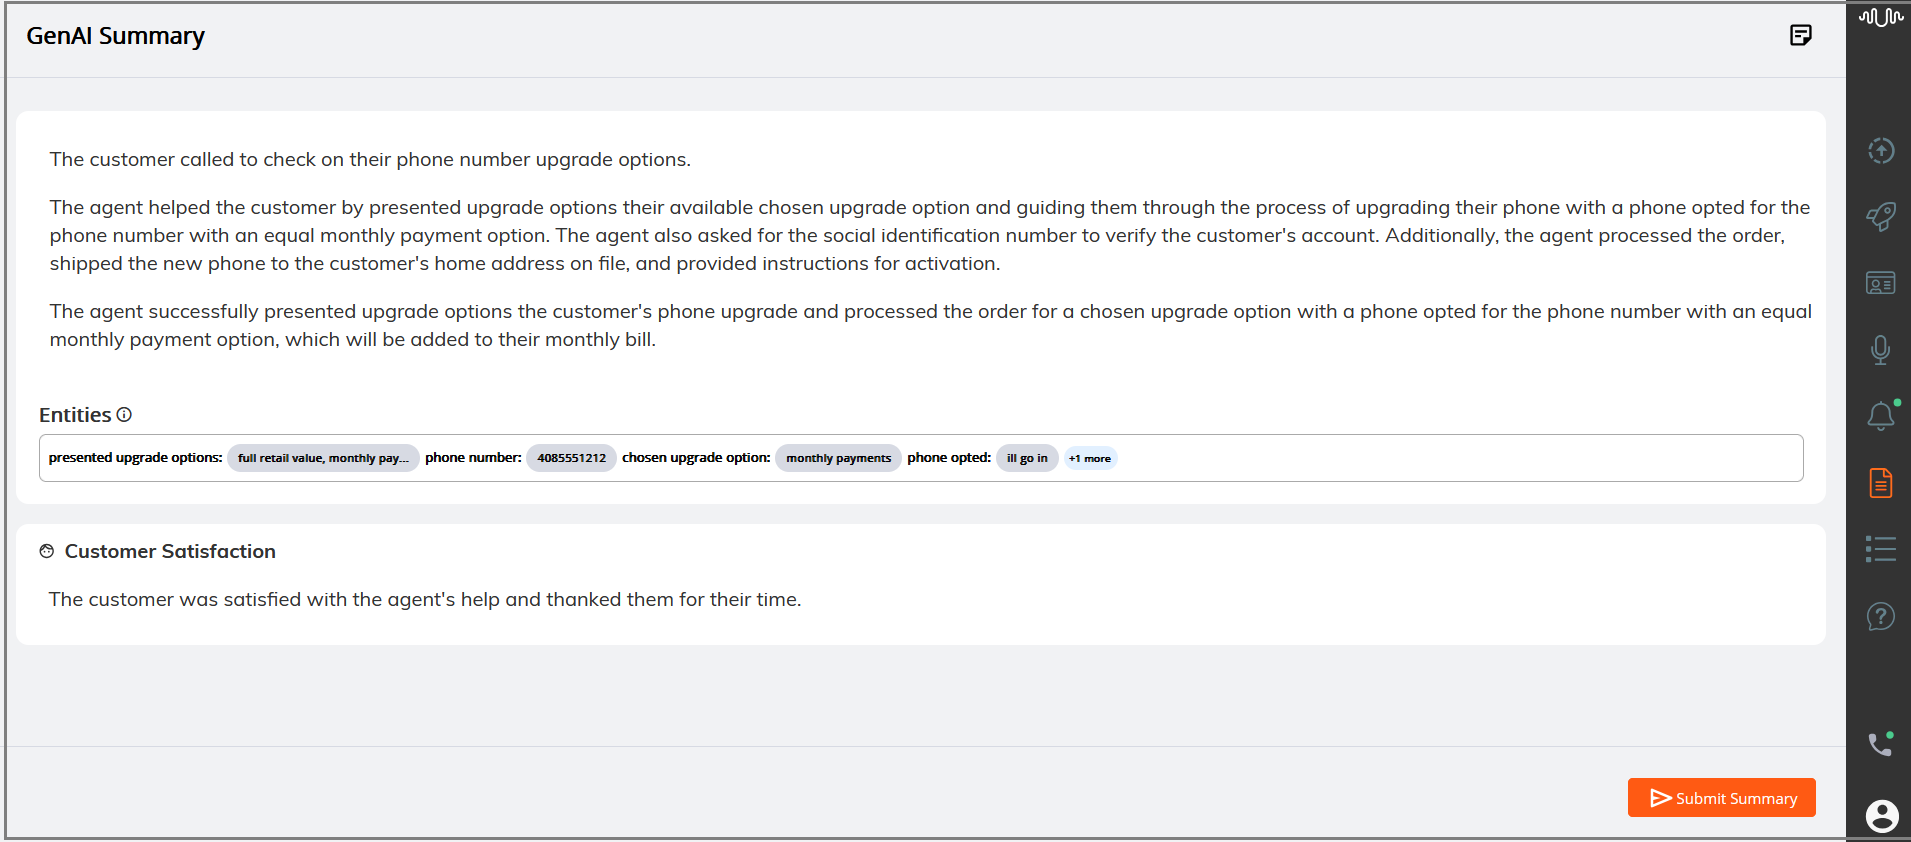
U-Assist's advanced generative AI-based GenAI-based Call Summary is an auto-generated compilation of all conversation content that is displayed to an Agent. Although it is similar to the template-based Call Summary, the GenAI Call Summary presents a more dynamic summary using the most relevant real-time data, based on the AI guidelines that have been configured specifically for the current Experience.
Accessing the GenAI Summary
When the GenAI Summary is enabled, clicking the GenAI Summary  icon in the AI Agent application toolbar will display it.
The GenAI Summary displays the following components:
Call Reasons - The purpose of the call (typically one or more detected Intents), along with any secondary issues or customer requests that may arise during the call.
Resolution Steps - A detailed description of the responses and actions taken by the Agent during the call.
Call Outcome - Describes the final resolution of the customer’s issue(s).
Customer Satisfaction - Describes how the customer felt at the end of the call.
Entities - Optionally, the Entities that were uttered by the Customer or the Agent while the call was in progress.
Promises - Optionally, the Promises that were uttered by the Agent while the call was in progress and detected by U-Assist for continued tracking.
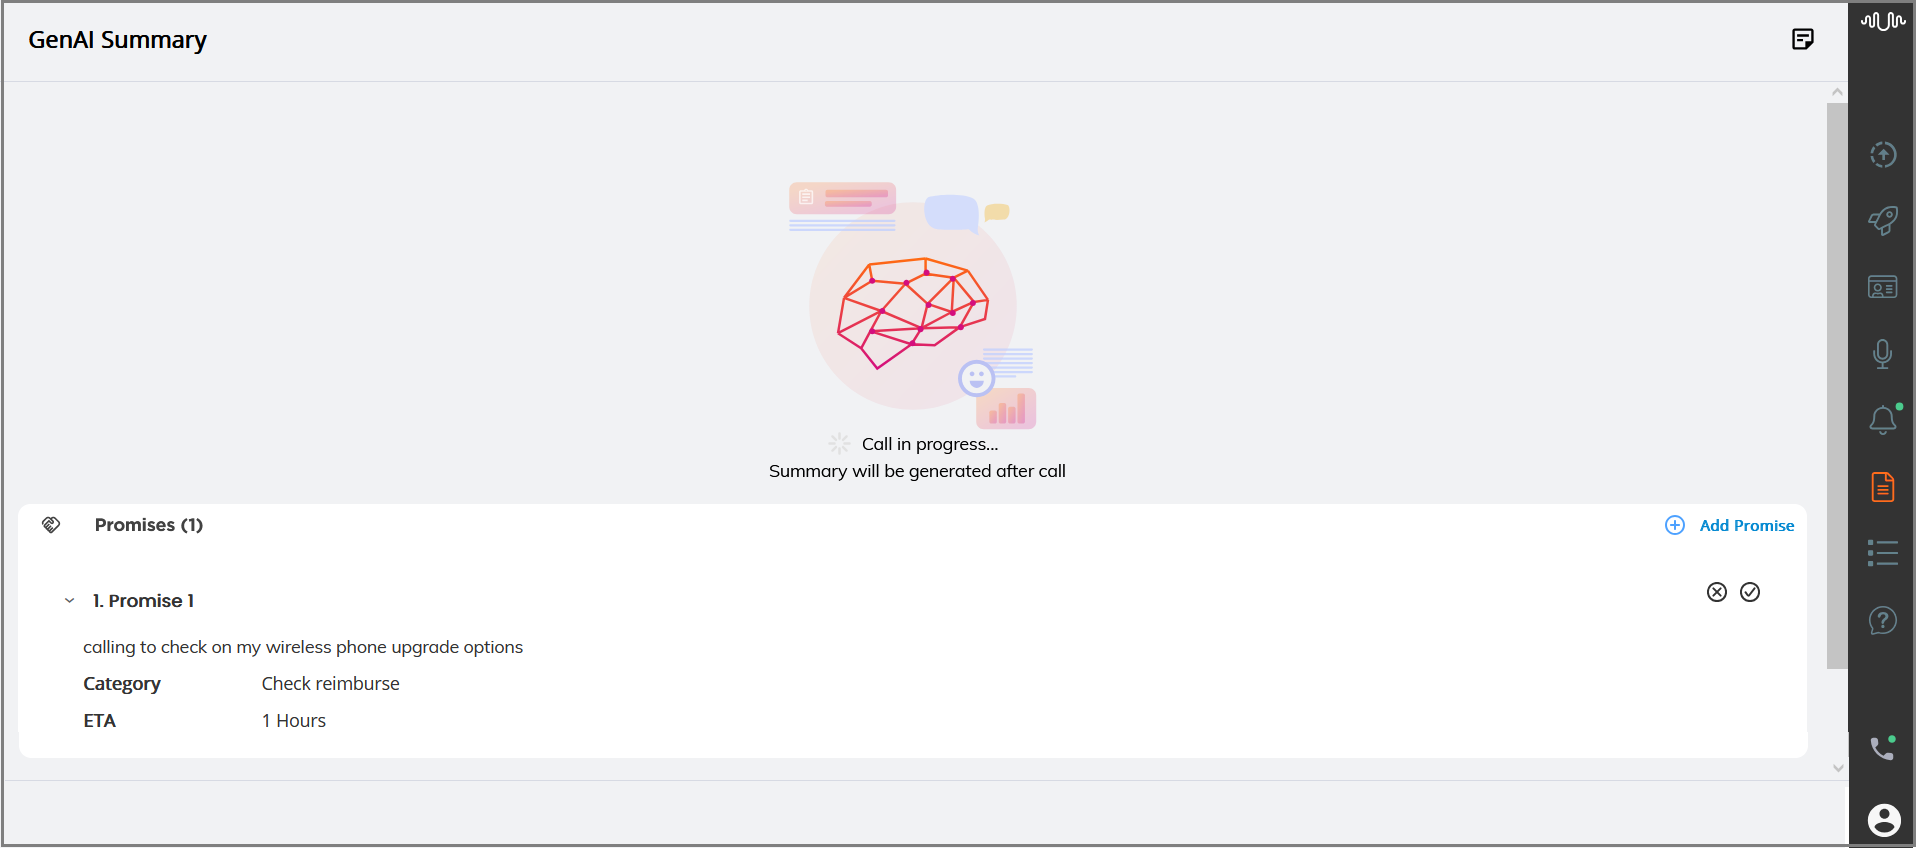
The GenAI-based Call Summary is produced for the Agent only at the end of the call. However, Agent Promises will be displayed as they are detected during the call.
Note
If you click on the GenAI Summary while the call is in progress, you will see the message "Call in progress. Summary will be generated after call".
Based on the format configured by the Analyst, the GenAI Summary is displayed either in Unformatted or Separate block for each section:
Unformatted GenAI Summary
The Unformatted GenAI Summary displays Call Reasons, Resolution Steps, and Call Outcome in a single text block as shown below.
Separate block for each section
In this format, the GenAI Summary displays Call Reasons, Resolution Steps, and Call Outcome in separate blocks along with the associated Entities as shown below.

After reviewing the generated summary, click the Submit Summary button at the lower right corner of the page to submit the Summary.
At any time before submission, you can also update one or more GenAI Summary components, if needed.
Updating the GenAI Summary
While the GenAI Summary is displayed, you can manually change any component.
Note
The GenAI Summary cannot be edited if the account has been configured to submit the Summary automatically when the call ends. For more details, click here.
Click on any of the components to focus it and use the Tab and Shift+Tab keys to move the focus back and forth between them. To edit GenAI Summary texts, double click on the component or press the Enter key on the focused component. You can completely replace the generated text if needed.

When you are finished editing, click anywhere outside of the component box to save the changes. On success, a confirmation message will be displayed.
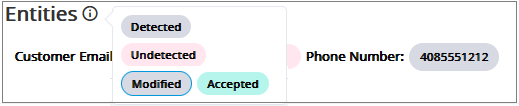
In the Entities component, the Entities which are detected, undetected, modified and approved are shown in different colored capsules:
Note
By default, the Entities legend displays capsule colors relevant to that Entities component.
 | Detected Entities - Entities that are detected in the call are displayed in a gray capsule. For each detected Entity, the Entity value is displayed in the gray capsule next to the Entity Label Name. Hover the mouse pointer over the gray capsule to view the Entity label name and its entire corresponding Entity value. |
 | Undetected Entities - When the option to Show Undetected Entities is configured for the GenAI Summary, relevant Entities that were not detected in the call are displayed with an empty pink capsule. For each undetected Entity, the empty pink capsule is displayed next to its Entity Label Name. This helps an Agent to view all the configured Entities, whether detected or not, and use them for call wrap-up activities, if required. NoteIf no value is provided for Undetected Entities, no value will be passed to the Conversation Summary variable on Submit. |
 | Modified Entities - In real time, whenever an Agent modifies Session Variable values in the currently-active flow, the corresponding Entity values are updated with the same value in the GenAI Summary. The modified Entity values are shown in a gray capsule with a blue border. For example, if an Agent replaces a specific field value in the Flow by selecting an AI-based Autofill suggestion, the field's associated Entity value in the GenAI Summary will be shown with a blue border. (For details about using Autofill in the AI Agent, click here.) ImportantModified Entities are only shown when their values are changed during the call, prior to the summary being generated. |
 | Approved Entities - The Entity values which are updated and approved by the Agent after the call are shown in a green capsule. For details on approving the Entity values, click here. |
Tip
At anytime, you can hover the mouse pointer over a capsule to view its related Entity Label Name as well as view its unshortened Entity value (if any).
Click on any capsule to focus a specific Entity and use the Tab and Shift+Tab keys to move the focus back and forth between Entities. To change the Entity value, double click the capsule you wish to edit or press the Enter key on the focused Entity and update its value as desired. You can edit the detected Entity values, as well as add values for undetected Entities.
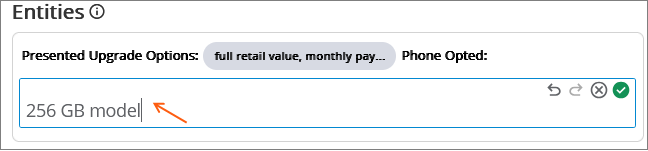
You can also perform multiple levels of Undo and Redo actions:
To Undo, press the Ctrl+Z keys, or click (
 ) icon.
To Redo, press the Ctrl+X keys or click (
 ) icon.
When you are finished editing, click anywhere outside of the box to save the Entities. On success, a confirmation message is displayed and the Entities are marked as Approved (i.e., shown in a green capsule).
Whenever an Entity value is modified, its associated Session Variable value is updated as well.
To approve a detected or modified Entity value, click the Approve ( ) icon or press the CTRL+Enter keys. An approved Entity value is indicated by a green capsule, allowing Agents to confirm that each Entity value has been reviewed and addressed.
Tip
To confirm that each Entity value in the current summary has been checked, the Agent can also optionally click its Approve button. After being approved, an Entity value becomes static and will not revert to a previously-used value.
Note
To cancel any changes, click the Discard ( ) icon at the right side of that Entity box or press the Escape key. After discarding the changes, the most recent approved values will be restored.
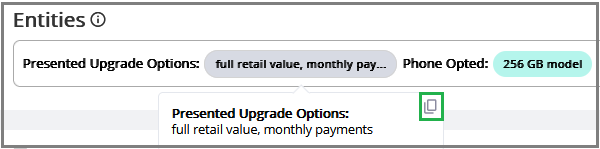
Agents can copy Entities from the generated summary and paste them into any third-party tool as needed, helping them to complete any additional after call tasks quickly and accurately.
Hover the mouse pointer over a capsule and click the Copy icon ( ) to copy the text.
Viewing and Updating Promises
During a call, Agents can view automatically-recognized Promises (Promise-type Intents) on the GenAI Summary page, similar to the template-based Call Summary. Promises will be displayed as they are detected in real time.
 |
When a Promise is detected, the Agent can view its associated details without interrupting the call processing. The Agent can add, update and/or correct the detected Promise details both during the call and after the call, as well as accept or reject any Promises detected by U-Assist.
For more details on viewing and updating promises, click here.
Promises are only shown on the GenAI Summary page when its sub-component is enabled in Client Settings of the Agent AI Assist Application page. For details on customizing GenAI Summary Components, click here.
Submitting a Call Summary
Important
Call Summary and GenAI Summary submission activity is determined by the settings configured in the associated AI Agent Application. For more details, click here.
U-Assist supports both manual and automatic submission of a real-time call summary for after-call handling. The following submission options are relevant for both the template-based Call Summary and GenAI Summary:
Whenever a Summary is submitted, if the Summary is mapped to a specific Service Flow in the account settings, that Flow will be triggered. In addition, Summary data will be stored and made available for other Flow elements or X‑Platform activities. For example, a Business Analyst might use this data for customer service tracking on an external CRM platform.
Note
Whenever the Agent is on call, the Call () icon is active at the lower right corner of the AI Agent window. If the Agent terminates the current call by clicking this icon before submitting the Summary, autogeneration of the Call Summary stops in the AI Agent window and a warning message is displayed.
When Manual submission is active for the account, the Agent can view and edit the template-based Call Summary at any time during the call. A GenAI Summary can be viewed and edited only at the end of the call.
The Summary is submitted only upon the Agent's request:
To submit the Summary manually, click the Submit Summary (or similarly named) button at the lower right corner of the page. This button is enabled while an Agent is still on the call:
If the Agent does not submit a Summary for the current call but clicks the Call (
) icon to answer a new call waiting in the queue, a warning message is displayed requesting them to review and submit the current Summary before proceeding to the next call.If the Agent submits a Call Summary without saving the related Agent Notes, a warning message is displayed. Click Continue to Submit Summary to submit without saving the Agent Notes. Clicking Cancel will return to the Agent Notes panel and enable saving them before submission. For complete details about adding Agent Notes, click here.
Note
The Submit Summary button will be enabled only when the summary contains all required components.
After successful Summary submission, a confirmation message is displayed.
When the Auto-Submit option is active, there is no Submit Summary button to click. Summary submission will happen automatically at one of the following times, as configured for the account:
End of Current Call - The Summary is submitted immediately when the current call ends.
When using the template-based Call Summary, an Agent can still view and edit the Summary while the call is in progress.
When using the GenAI Summary, an Agent cannot view or edit the generative Summary before it is submitted.
Start of Next Call - The Summary is submitted only when the next call becomes the active call.
When using the template-based Call Summary, an Agent can view and edit the Summary any time before the next call begins.
When using the GenAI Summary, an Agent can view and edit the generative Summary any time before the next call begins.
After automatic Summary submission, a success confirmation message is displayed.
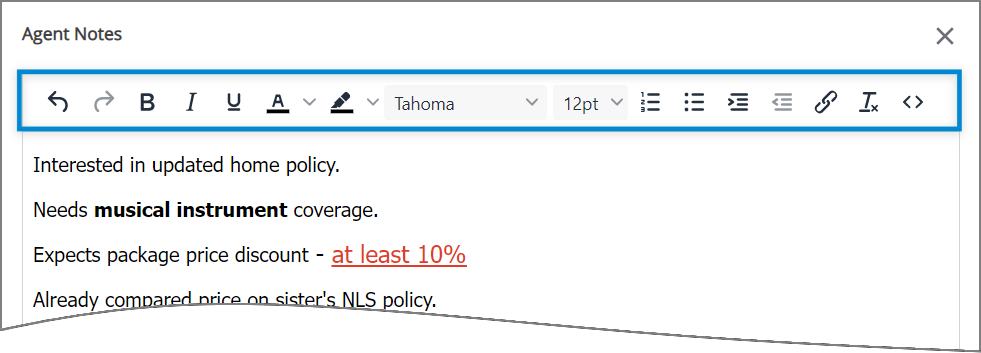
Adding Notes
In addition to using the auto generated summary, Agents can use the Notes section to capture their own notes during a call. In the Notes section, the Agents can quickly jot down any information that they need to refer to later. At the end of the call, Agent Notes will be submitted to the same external databases/systems as the auto generated summary.
This Notes icon is only shown in the AI Agent window when this feature is enabled in Client Settings under the Applications page. For more details on Client Settings, click here.
Click the Notes (
)icon at the top right corner of the page. The Agent Notes window is opened from the left side.Add any notes related to the call by entering free text or adding other elements. Use the Rich Text editor to customize the formatting, add hyperlinks, and more. For complete details about using the built-in Rich Text editor, click here.
Note
Entering the '@' symbol to add Session Variables and Entities in the Agent Notes window is not supported.
The Agent can add, remove or edit notes as long as the current customer session is active.
After adding notes, clicking anywhere outside of the Agent Notes window will save them. If the Agent submits the Call Summary without first saving the notes added in the Agent Notes window, a warning message will be displayed in the AI Agent window.
Click the Close icon to close the Agent Notes window.
Getting Answers to Frequently Asked Questions (FAQs)
While a call is in progress, the Agent can get instant answers to any covered question using the Knowledge Assist Q&A bot.
The AI Agent Assist client uses a separate panel to access the Q&A capabilities.
Note
Before an AI Agent Assist client can use the Q&A bot, the Account Admin must configure its Knowledge Assist AI Experience and map it to the client.
Click the Knowledge Assist Q&A icon in the AI Agent toolbar:

The Knowledge Assist Questions and Answers panel is displayed.
Enter a question or phrase in the text box at the top of page. The AI Agent uses the Knowledge AI platform to interpret and extract all key language information from the entered text:
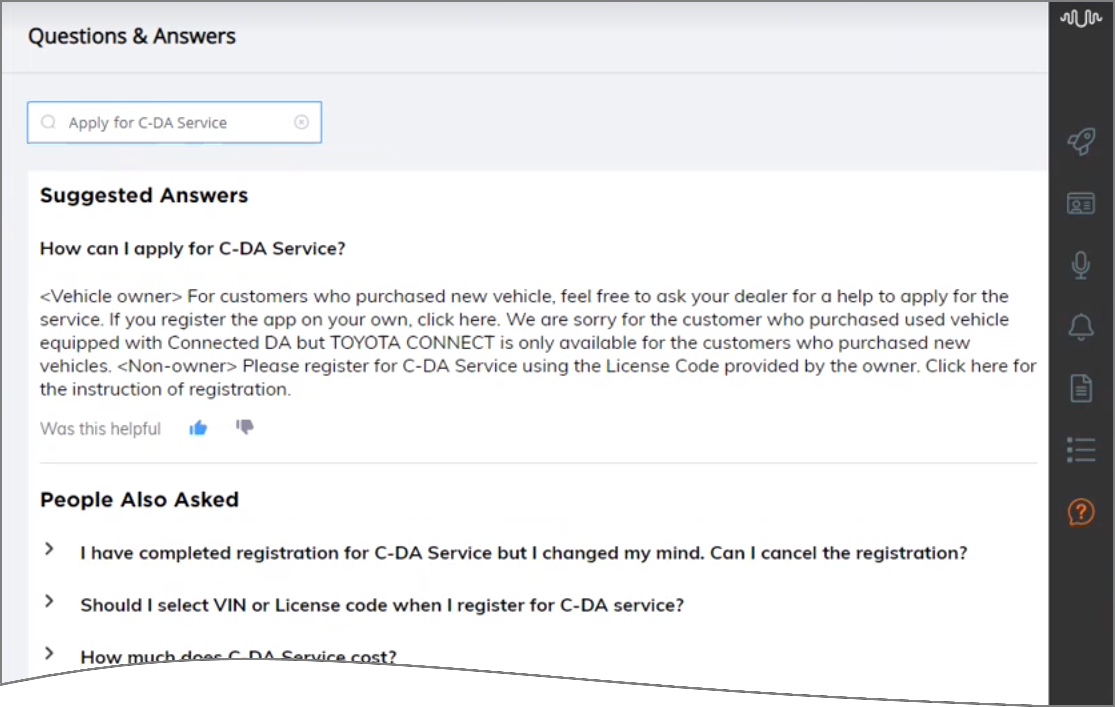
The Question and Answer panel displays:
One or more suggested answers to your question, based on Knowledge AI language analysis and contextual processing. The answers will include any pre-defined FAQs, as well as content found in documents that were added to the related Knowledge AI LLM knowledge base.
A collapsed list of related questions that are typically asked along with your original question. This list might assist you in providing more details or information to a customer, when needed.
Simple 'thumbs up' and 'thumbs down' feedback buttons for you to indicate whether the suggested answer met your needs. Knowledge AI uses this feedback to help provide more relevant answers to similar questions in the future.
Working with the Knowledge Assist QA Panel
The Knowledge Assist QA bot can only provide answers while a call is active.
The bot only suggests answers that are related to the Knowledge AI Experience that is currently mapped to the AI Agent Assist client.
You can continue to enter additional related questions in the Q&A panel text box. The bot will remain active as long as the Q&A panel is displayed.
Returning to the main Flow Progress panel or switching to another AI Agent panel during the call will end the current Q&A bot session and empty panel contents. Suggested answers are not stored in the AI Agent.