Security Lockouts
X‑Platform uses a precautionary lockout mechanism to help protect user accounts from unauthorized access.
User Lockout Scenario and Remedy
When a user attempts to access their account (i.e., the X-Designer, X-Console or an Agent application), should the number of login attempts exceed the Login Attempt Limit set by the Account Admin, access will be locked and the user will be unable to log in to the account without first having their password reset by the Admin.
The following indicators occur on account lockout:
An email is sent informing the user of the lockout, with instructions for remedy.
The Status of the affected user will display Locked on the Users page in the X-Console.
A lockout message is displayed at the top of the affected user's account settings in the X-Console.
Unlocking a User Account
In the Account section of the X-Console, click Users. The Users page is displayed.
From the Users page, click the Full Name of the user you wish to update. The selected user Details page is displayed, with a lockout indication message at the top.
Click Reset Password. An email will be sent to the user containing a link enabling the user to choose a new password.
Note
The user account will remain locked at this time.
After the user uses the email link to access and completes the Choose Your Password page, the user account will automatically be unlocked and normal access status will resume.
Configuring the Login Attempt Limit
Important
Configuration of the login attempt limit is not supported when Auth0 authentication is enabled. Auth0 will lock the account following approximately 5 login attempts.
In the Settings section of the X-Console, click Authentication. The Authentication page is displayed.
In the field Login attempts before lockout enter the attempt limit before an account lockout occurs. The default value for this field is 10.
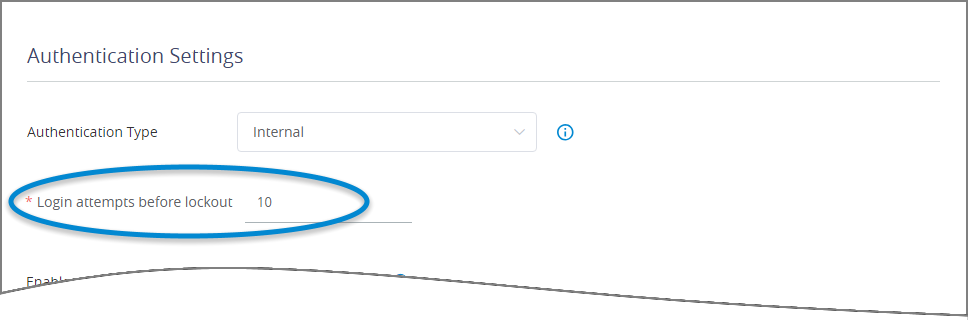
This field is displayed only if Internal is currently selected in the Authentication Type dropdown list.
Click Save to save the new settings.