Working with the AI Model
Synchronizing the U-Assist AI Model
After your U-Assist account is created, you'll need to synchronize any preexisting account AI data with the U-Assist AI Model that will be used at runtime.
Note
Before initial synchronization can be performed, your System Admin needs to set up U-Assist AI connections for your account. For more information, contact your Uniphore Support representative.
The first AI Model sync is always performed at the Account level, by Environment. A user must have both Account Admin and U Applications Admin roles to perform a sync.
Access to the AI Model page is from the U-Assist menu of the Admin Console:
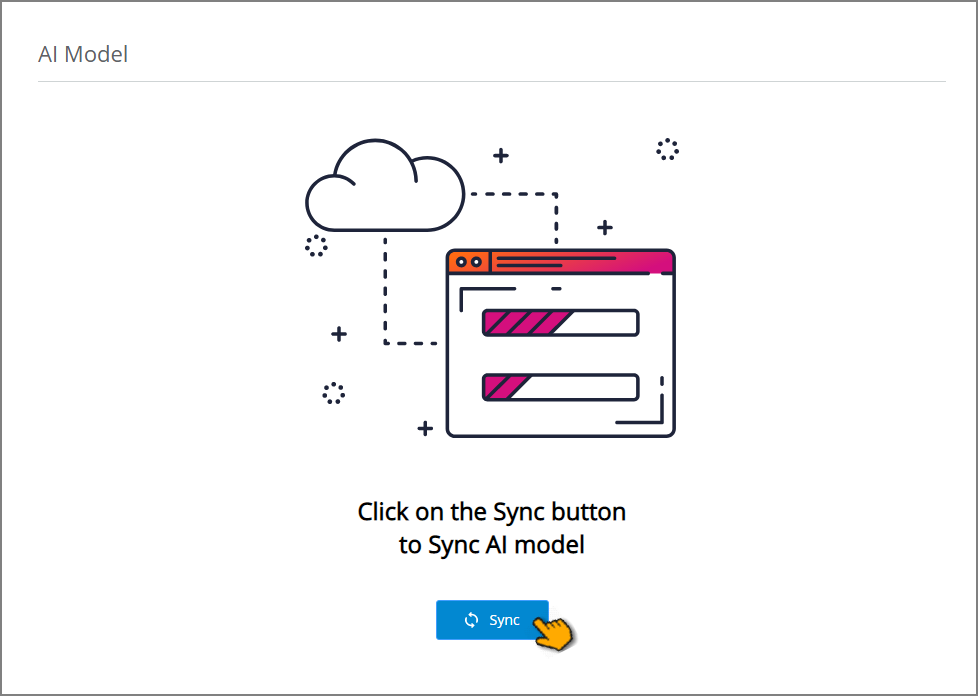
To perform the initial synchronization, click Sync. A message is displayed and the synchronization process will begin. You can continue working on other activities in X-Console while the sync is executing.
The duration of the sync process will depend on the size of your AI data model. A popup message will be displayed to notify you when the process has completed, along with its final status.
Note
In the event a synchronization fails, please contact your Uniphore Support representative.
After the Account has been synced successfully, the AI Model page will display all existing components of the AI data model:
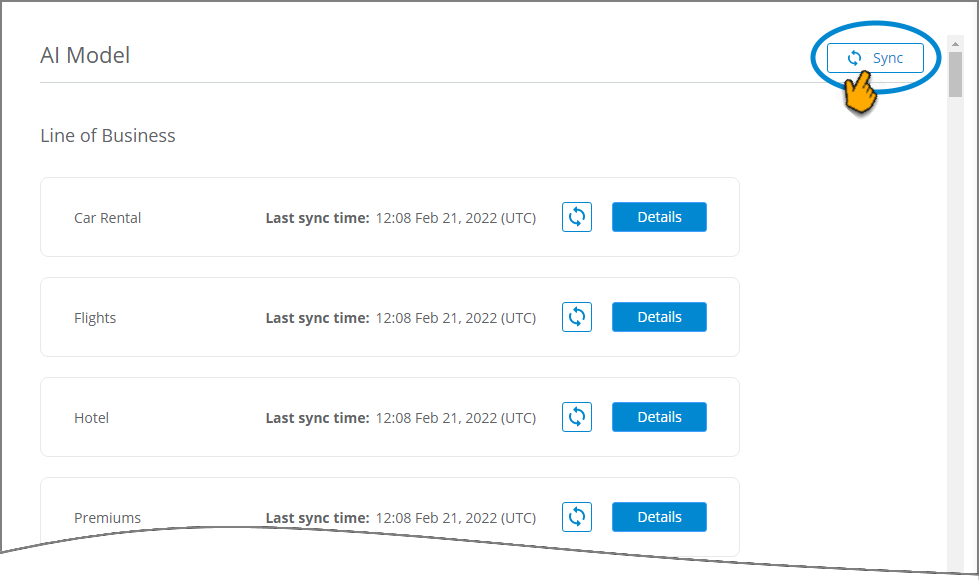
After the sync, each LOB will show the precise time and date of the synchronization in the Last sync time field.
You can now view and map sub-component details of the AI Model.
Whenever the account's U-Assist AI Model is updated with a new LOB or sub-components, you can perform a subsequent synchronization operation at the account level by clicking Sync in the upper right corner.
If a rule-based intent has the same name as another intent in the Business Process, the sync is not successful.
Note
A user with the Designer role is able to view the AI Model, but cannot perform synchronization or mapping.
Synchronizing Multi-Environments
To ensure data consistency and promote ease of usability in your X-Console Multi Environment setup, you will need to maintain separate AI Models for each working environment (e.g., Dev, Test and Prod).
To achieve this, first go to each of these environments and perform the initial synchronization that is described above.
Subsequently, when you deploy your environment (e.g., from Dev to Test or Test to Prod), the deployment will have the required mapping to accurately synchronize the AI Model for the target environment.
Synchronizing a Specific LOB Component
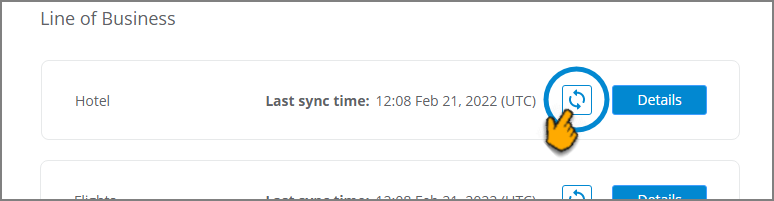
After the Account AI Model has been synchronized successfully, you can choose to sync any of its component LOBs individually at any time. Syncing a specific LOB typically requires less time than syncing the complete AI Model.
Locate the LOB you want to sync and click the Sync icon:
A message is displayed and the synchronization process will begin. You can continue working on other activities in X-Console while the sync is executing. A popup message will be displayed to notify you when the process has completed, along with its final status.
After a sync, the Last sync time field is updated to reflect the precise time and date of the synchronization.
Note
You can also synchronize a LOB by clicking the Sync button on its details page.
Viewing and Mapping the U-Assist AI Model
After synchronizing the AI Model for your account, a user with the Flow Admin role (or higher) can view its components and add mappings to associate them with X‑Designer components (i.e., Flows, Steps and Variables). The mappings you configure will determine the associations and actions that X‑Platform performs, using U-Assist, during runtime.
U-Assist uses natural language processing (NLP) to understand a customer's goal for contacting the Agent. In the AI Model, each Line of Business (LOB) contains one or more Business Processes (BP), with each BP designed to achieve a unique goal. Using NLP, U-Assist semantically translates the goal of a BP into one or more Intents, which in turn use dedicated Entities to provide the specific data that is needed to achieve the goals of a conversation.
Tip
To learn more about U-Assist AI Model component hierarchy and structure, click here.
U-Assist provides customizable domains, called Experiences, to assign multiple user languages and manage unique subsets of AI data components for BPs in an account.
Mapping LOB Business Process Components
Every BP contained in an LOB contains one or more Intents. Each Intent can be mapped to a specific X‑Designer Flow to provide the connections that are needed to achieve the goal of a Business Process.
Similarly, you map each Entity to a Session Variable to provide the connections that pass the various data values that are used to achieve the goal.
From the Admin Console U-Assist In Call menu, select AI Model. The AI Model page will be displayed.
On the right side of the LOB that you want to view, click Details:

The LOB Details page will be displayed, listing all of its Business Processes:
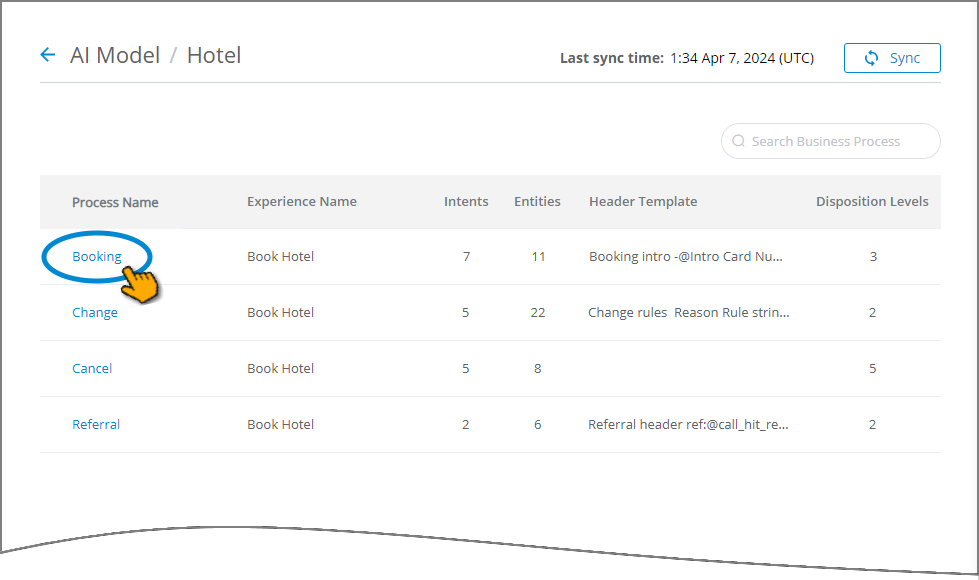
Each Business Process displays its associated Experience name, along with the number of Intents, Entities, Header template for the contact summary and disposition levels that is uses. For details on assigning an Experience to a BP, click here.
When the list is long, you can locate a specific BP by entering a few letters from its name in the Search field, located at the upper right corner of the list.
To begin mapping, click the name of the Business Process you want to configure. The sub-components are displayed for the chosen BP, showing its Intents, Entities and Settings tabs:
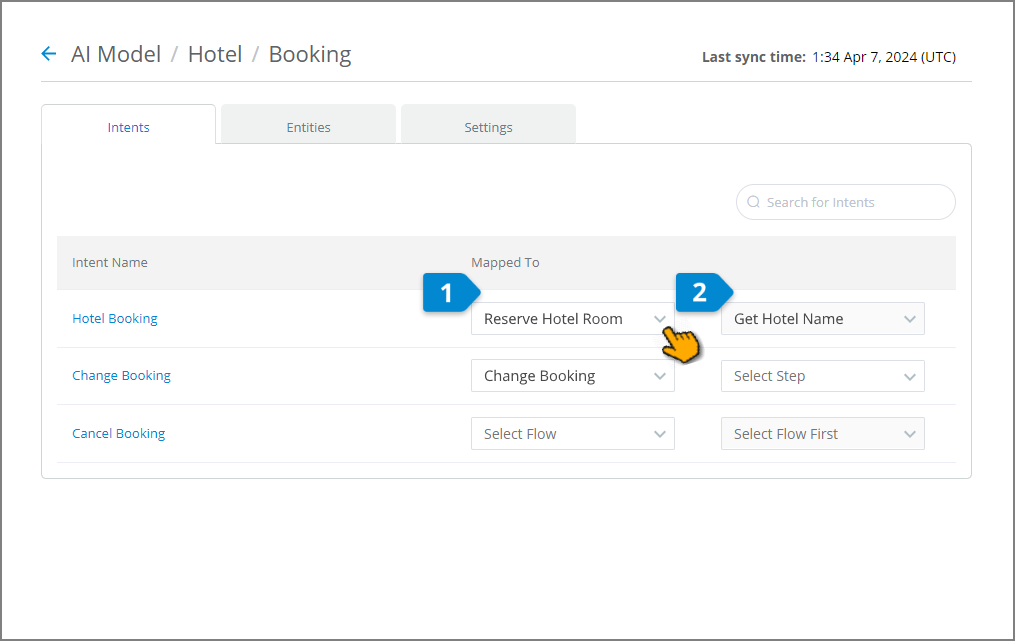
In the Intents panel, all Intents that were created for the selected BP are listed, along with any rule entities that were created with the type of 'Call reason'.
For each Intent Name:
From the Select Flow dropdown list, choose the X‑Designer Flow that will be triggered when that Intent is specified at runtime by U-Assist. Only approved Flows will be listed.
Optionally, from the Select Step dropdown list, choose the specific X‑Designer Flow Step where execution will begin.
When mapping an Intent Name, you must first select the Flow before you can select its Step.
In the Entities panel, for each Entity Name, from the Select Variable dropdown list, choose the X‑Platform Session Variable that will be used to store the value provided by U-Assist at runtime:
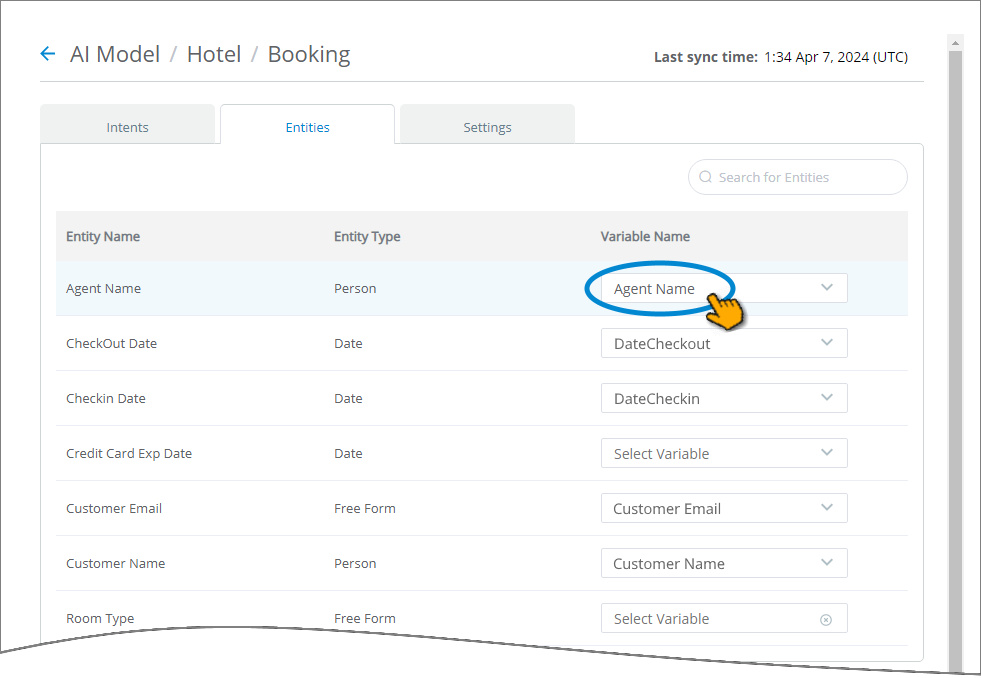
Only variables that match the current Entity Type will be displayed. For example, when mapping an Entity of type Date, the Session Variable you select also will be of the type Date.
When the list is long, you can locate a specific Entity Name by entering a few letters from its name in the Search field, located at the upper right corner of the list.
In the Settings panel, you can optionally define the following components that will be displayed in the Call Summary:
Header Template – Enables you to create the Header summary template for each Business Process. For more details on configuring a Header, click here.
Disposition – Enables you to configure Call Disposition choices for each Business Process. The values Resolved and Unresolved are provided as default choices. For more details on defining disposition choices, click here.
To complete the basic mapping, perform Step 1 through Step 5 above for each Business Process in the current LOB.
Your mapping is saved incrementally as you work. You can also edit your mapping configurations at any time, as needed.
When mapping is completed, U-Assist is ready to provide all mapped details to the Agent AI Assist client application at runtime. For details about using the application, click here.
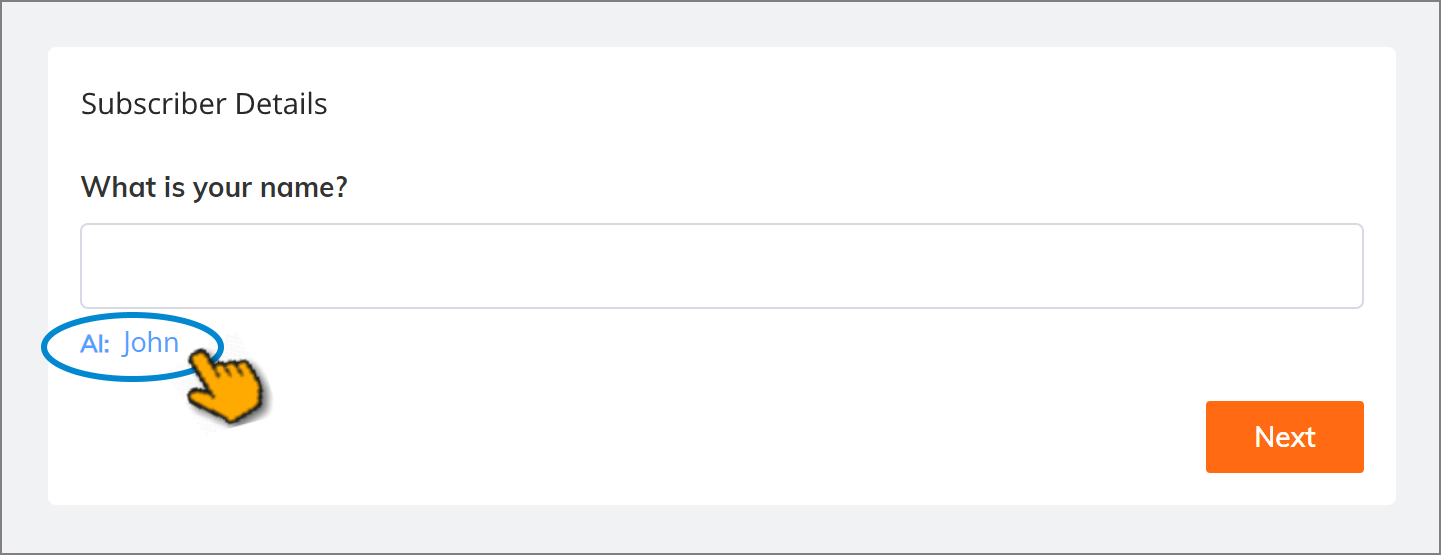
Mappings for AI-Based Suggestions
U-Assist can automatically display AI-based data suggestions underneath specific input questions in an Interaction Flow at runtime. This provides an Agent with a quick way to fill in information, and can greatly reduce entry errors during a call:
To support the display of AI-based field suggestions:
An Intent that uses the relevant Entity is mapped to an Interaction Flow in the BP.
Map the relevant Entity to the Session Variable that stores the value of the input question field.
In the desired Flow, assign this Session Variable as the Variable Name for the element that will display the field.
U-Assist suggests data values for certain field types using the Entity data from the relevant AI Model, based on its analysis of the current conversation.
For details on using the AI-based suggestions in the AI Agent Assist client, click here.
For details on adding AI-based suggestions to elements in your X‑Designer Flow, click here.
Defining the Call Summary Templates
Every U-Assist AI Agent Assist conversation is summarized using the Call Summary, available for viewing and editing in real time.
Note
Because the AI Agent Assist Call Summary is updated automatically while the call is still in progress, unlike the Agent Desktop Disposition and Summary, an Agent does not have to wait until the end of the call to view it.
Call Summary content, formatting and display settings can be customized to suit the exact needs of its associated Business Process and Intents. Any user with the Flow Admin role or higher can define and update the Call Summary template directly from the AI Model in their account.
The Call Summary is built from the following components:
a Header Summary template, maintained with each Business Process;
an Intent Summary template, maintained with each Intent; and
a Call Disposition selector, maintained with each Business Process.
The elements and information that an Agent sees are determined by the Call Summary component design.
During a call, the Agent AI Assist application updates the Call Summary content in real time, and the Agent can view and edit it on demand. The Call Summary is an excellent way to see live information and get a conversation overview of the conversation with a single click.
At the end of a call, the Call Summary is presented to the Agent for a final review, enabling the Agent to make corrections and updates as required. When the review is completed, the Agent submits the Call Summary to the X‑Platform server, together with all other details of the conversation.
Creating and Updating the Header Summary Template
The Header Summary template can be used to configure high level, customer and general information about a call, for example, Customer Name, Customer ID, Email, Account Type, Call Duration, etc. The template design can include free text as well as dynamic content, such as variables and links.
Because the configuration is common to its parent Business Process, information presented in the Header Summary is meant to be generic, and not based on call Intents or Entities.
A Flow Admin configures the Header Summary template for each Business Process from the AI Model for an account using the built-in X‑Console rich text editor.
The Rich Text Editor enables you to format the template according to your needs, as well as add available Session Variables, Slots and U-Assist ACW Entities for an account (by entering the '@' symbol), insert hyperlinks and more. For complete details on using the X‑Console Rich Text Editor, click here.
The Header Summary is accessed in the AI Agent Assist Application, as a component in the Call Summary. All of its values are populated dynamically while the call is in progress, based on the defined template.
Creating a New Header Summary Template
From the U-Assist AI Model page for your account, locate and click Details on the right side of the specific Line of Business (LOB) where you want to add a new Header Summary template. The Line of Business Details page is displayed.
Click the name of the specific Business Process where you want to add a new Header Summary template. The Business Process details page is displayed.
Click the Settings tab. The Settings panel for the selected Business Process is displayed.
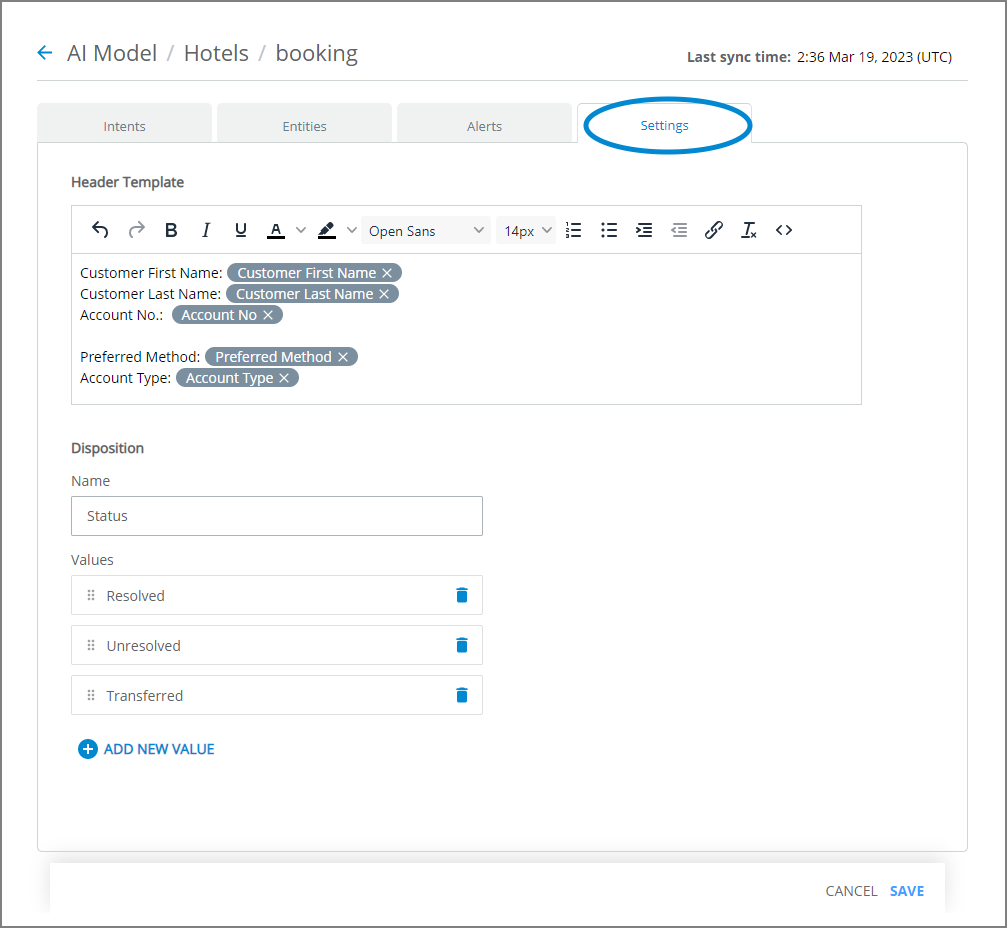
In the Header Template section, provide template content by entering free text and adding other elements. Use the rich text editor to customize the formatting, add hyperlinks, and more. For complete details about using the rich text editor, click here.
To add one or more Session Variables, Slots or U-Assist ACW Entities, enter the '@' symbol at the cursor. An autocomplete dropdown list will appear with all Session Variables, Slots, and U-Assist ACW Entities that are available to the current Business Process:
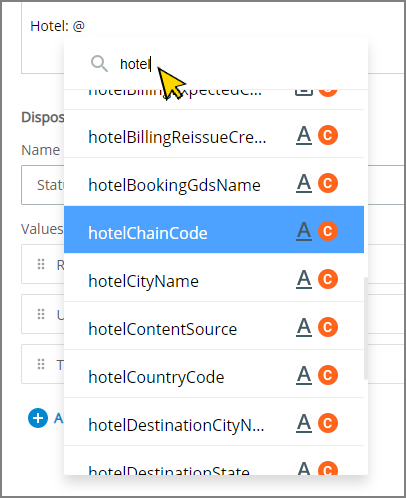
The dropdown list includes all Business Process-related variables that point to X‑Platform AI, NLP and Rule values, as well as to X‑Designer Flow element values.
Locate and select the item that you want to insert. When needed, you can insert multiple instances of the same Variable or Slot in the template.
When the autocomplete list is long, you can locate a specific Variable or Slot by entering a few letters from its name in the Search field, located at the top of the list.
Click the selected item. A variable field representing your selection will be inserted at the cursor in the editor.
You can remove an inserted Variable or Slot by clicking the X on the right side of the field. Alternatively, you can use the delete or backspace keys in the editor.
When you finish adding content to the Header Summary Template, click Save at the lower right corner of the page. A confirmation message appears, and changes are saved. To exit at anytime without saving changes, click Cancel.
After creation, on its parent Line of Business (LOB) page, a preview of the Header Template is displayed alongside its respective Business Process.
Updating a Header Summary Template
From the U-Assist AI Model page for your account, locate and click Details on the right side of the specific Line of Business (LOB) where you want to edit a Header Summary template. The Line of Business Details page is displayed.
Click the name of the specific Business Process where you want to edit a Header Summary template. The Business Process details page is displayed.
Click the Settings tab. The Settings panel for the selected Business Process is displayed.
In the Header Template section, change the template content as required using the rich text editor and other functions described above.
Click Save at the lower right corner of the page. A confirmation message appears, and changes are saved.
Defining Disposition Values
Dispositions provide a way for Agents to record the outcome of each call reason. They can help to indicate next steps and also provide information for processing and analysis downstream, to improve insights on how a call reason was handled.
Multiple dispositions can be captured in a call based on the Intents, actions and resolutions detected on the call.
A Flow Admin can define custom Intent disposition choice values for each Business Process, based on business needs. The disposition choice list is shown in the AI Agent Assist Application during runtime, as a component in the Call Summary. The Agent can select the appropriate disposition value for each intent or call reason from the list.
One example might be a hospitality client taking calls to reserve rooms as well as cancel reservations. A Flow Admin might configure the Disposition choices as below:
If a call was identified to be of the category "Reservation / Booking", then the Disposition choices can be defined as "Booking confirmed" and "Booking rejected".
If a call was identified to be of the category "Reservation / Cancel", then the Disposition choices can be defined as "Initiate refund" and "Alternate Booking".
From the U-Assist AI Model page for your account, locate and click Details on the right side of the specific Line of Business (LOB) where you want to add a new Header Summary template. The Line of Business Details page is displayed.
Click the name of the specific Business Process where you want to add a new Header Summary template. The Business Process details page is displayed.
Click the Settings tab. The Settings panel for the selected Business Process is displayed.
In the Disposition section, in the Name field, optionally enter a descriptive name for the Disposition you want to define.
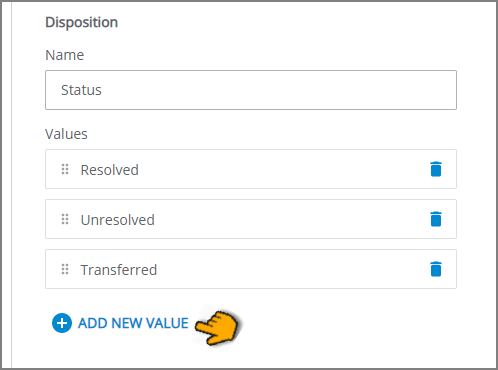
By default, in the Name field, the Business Process name is displayed, followed by the word 'name'.
To add a new disposition value based on your own Business Process requirements, click Add New Value . An empty Value choice field will be displayed.
Enter a new choice value by clicking inside the empty field. (The new value will be confirmed when the cursor leaves the field.) Continuing adding more choice values, as needed.
To delete an existing choice, click the Delete (
 ) icon at the right side of a disposition value.
Note
Once a disposition choice value is added, you cannot modify the added value. If you want to change it, remove the value by clicking the Delete icon, and then add a new, modified value.
After adding all Call Disposition values, click Save at the lower right corner of the page. A confirmation message appears, and changes are saved.
Creating and Updating the Intent Summary Template
The Intent Summary template provides real time information that relates to a specific Intent during a call. A Flow Admin can configure intent-specific templates to be displayed in real time to an agent during a call, using the built-in X‑Console rich text editor. The template design can include free text as well as dynamic content, such as Variables, legacy U-Assist ACW Entities, Slots and links.
The rich text editor enables you to format the template according to your needs, as well as add available Session Variables, Slots and U-Assist ACW Entities for an account (by entering the '@' symbol), insert hyperlinks and more. For complete details on using the X‑Console rich text editor, click here.
The Intent Summary is accessed in the AI Agent Assist Application, as a component in the Call Summary. All of its values are populated dynamically while the call is in progress, based on the defined template.
During the call, an Agent can view the real time summary generated for each Intent as soon as U-Assist identifies that a selected Intent has started. If U-Assist sees that the current Intent has ended and the conversation has moved to a different Intent, a new Intent Summary is generated and displayed in Call Summary.
Creating a New Intent Summary Template
From the U-Assist AI Model page for your account, locate and click Details on the right side of the specific Line of Business (LOB) where you want to add a new Intent Summary template. The Line of Business Details page is displayed.
Click the name of the specific Business Process where you want to add a new Intent Summary template. The Business Process details page is displayed, showing all of its current Intents.
In the Intents panel, click the name of the Intent where you want to add the Intent Summary. The Intent Details page appears.
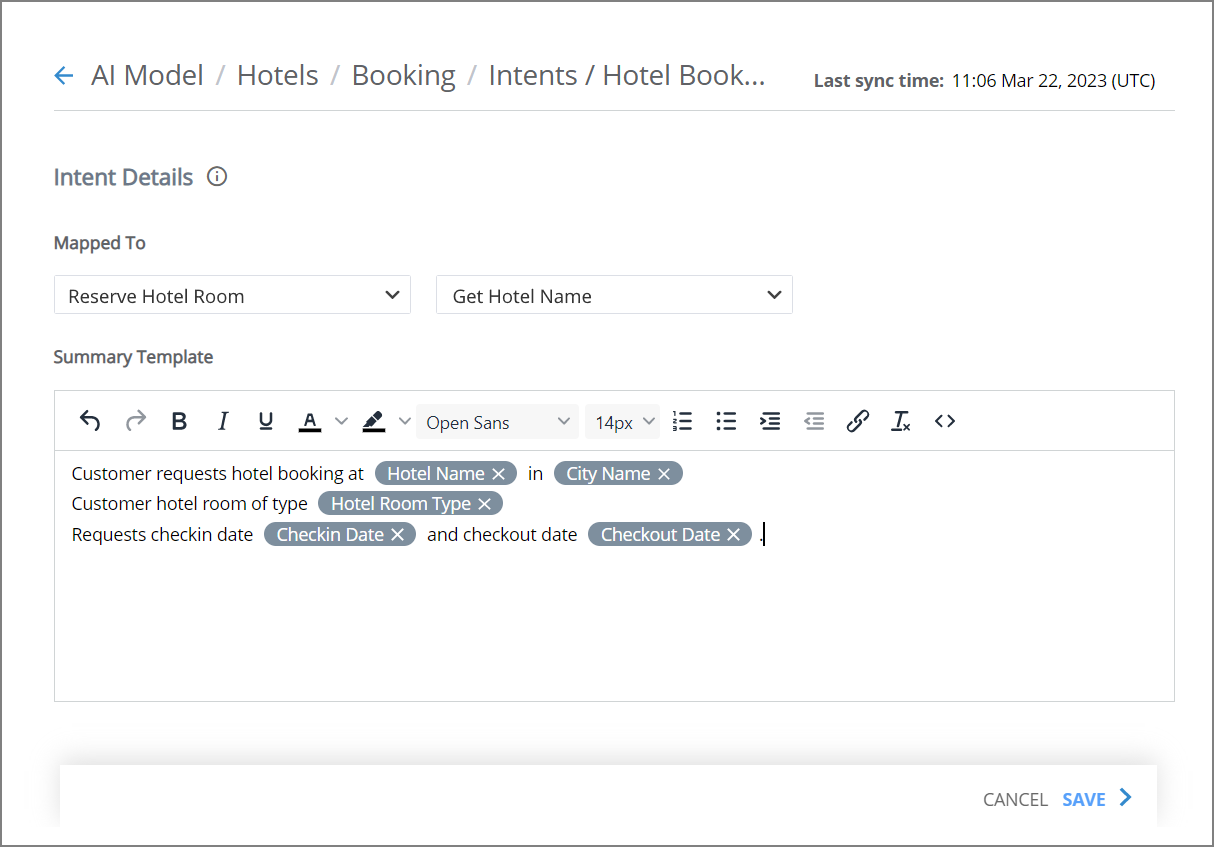
In the Mapped To section, from the dropdown menus, select the the X‑Designer Flow and then (optionally) the specific Flow Step that will be triggered when the Intent is identified by U-Assist. You must select the Flow before you can select any of its Steps.
Note that mapping selections will be saved immediately.
Note
The Intent Summary Template can also be created without this mapping action.
In the Summary Template section, provide template content by entering free text and adding other elements. Use the rich text editor to customize the formatting, add hyperlinks, and more. For complete details about using the rich text editor, click here.
To add one or more Session Variables or Slots, enter the '@' symbol at the cursor. An autocomplete dropdown list will appear with all Session Variables, Slots, and U-Assist ACW Entities that are available to the current Business Process:
The dropdown list includes all available variables that point to X‑Platform AI, NLP and Rule values, as well as to X‑Designer Flow element values. However, only those U-Assist ACW Entities and Slots that are available for the current Business Process will be displayed.
Locate and select the item that you want to insert. When needed, you can insert multiple instances of the same Variable or Slot in the template.
When the autocomplete list is long, you can locate a specific Variable, Slot or U-Assist ACW Entity by entering a few letters from its name in the Search field, located at the top of the list.
Click the selected item. A variable field representing your selection will be inserted at the cursor in the editor.
You can remove an inserted Variable or Slot by clicking the X on the right side of the field. Alternatively, you can use the delete or backspace keys in the editor.
When you finish adding content to the Intent Summary template, click Save at the lower right corner of the page. A confirmation message appears, and changes are saved. To exit at anytime without saving changes, click Cancel.
Tip
When there are multiple Intents in a Business Process, at the bottom of the Intent Details page, left and right arrow  icons will appear, enabling you to move to the next (or previous) Intent Summary as you work.
If you make changes to a saved Intent Summary and then click on an arrow icon, a popup dialog will be displayed asking you whether to Save Changes before proceeding to the next Intent Summary. To cancel any changes made to the current Intent Summary, click Leave Without Saving.
After creation, on its parent Business Process page, a preview of the Intent Template is displayed alongside its respective Intent.
Updating an Intent Summary Template
From the U-Assist AI Model page for your account, locate and click Details on the right side of the specific Line of Business (LOB) where you want to edit an Intent Summary template. The Line of Business Details page is displayed.
Click the name of the specific Business Process where you want to edit an Intent Summary template. The Business Process details page is displayed, showing all of its current Intents.
In the Intents panel, click the name of the Intent where you want to edit the Intent Summary. The Intent Details page appears.
In the Intents panel, click the name of the Intent where you want to edit the Intent Summary. The Intent Details page appears.
Change the Intent Details template content as required using the rich text editor and other functions described above.
Click Save at the lower right corner of the page. A confirmation message appears, and changes are saved.