Working with Alerts (Legacy)
Note
Starting with Release 24.4, you can create and manage Agent Alerts directly from the X-Console. For complete details, click here.
Alerts Overview
A U-Assist Alert is a predefined notification that is displayed to an Agent or Supervisor while a call is in progress.
Alerts function intelligently in U-Assist, with the ability to simultaneously analyze customer and Agent emotions, call transcripts and selected conversation attributes to help an Agent deliver more personalized service. Alerts can also provide valuable insights for sales recommendations, respond to customer service queries, or suggest soft skills improvement for an Agent.
For example: If a customer appears angry and has uttered a keyphrase like 'I want to discontinue this service', an Alert can be displayed to the Agent that says, 'Provide a discount on the existing plan'.
Alerts also can be used to heighten Supervisor awareness about events that require immediate attention during the call. For example:
If an Agent puts a call on hold more than 3 times, the Supervisor can be alerted.
If keywords like 'speak to supervisor' or 'talk to a manager' are identified in the customer channel, then the Supervisor can be instantly notified.
When a customer expresses a high level of frustration, should the Agent be unable to provide the needed assurance to the customer the Supervisor can be alerted in order to intervene.
The Business Analyst creates and configures Alerts as part of a relevant Experience. U-Assist currently supports three types of Alerts: Information Alerts, Coaching Alerts and Critical Alerts.
For details on how to create and configure Alerts, click here.
For details on viewing Alerts in the AI Agent Application, click here.
For details on viewing Alerts in the Supervisor Application, click here.
View Alerts Dashboard
In the Alerts Landing page, Analyst can view the alert configuration details such as number of alerts drafted, submitted and configured within a corresponding business process for an Organization. If you are creating an Alert for a first time, the value '0' will be displayed in the alert configuration section.
Click on Alerts under Application to navigate to Alerts Dashboard screen.

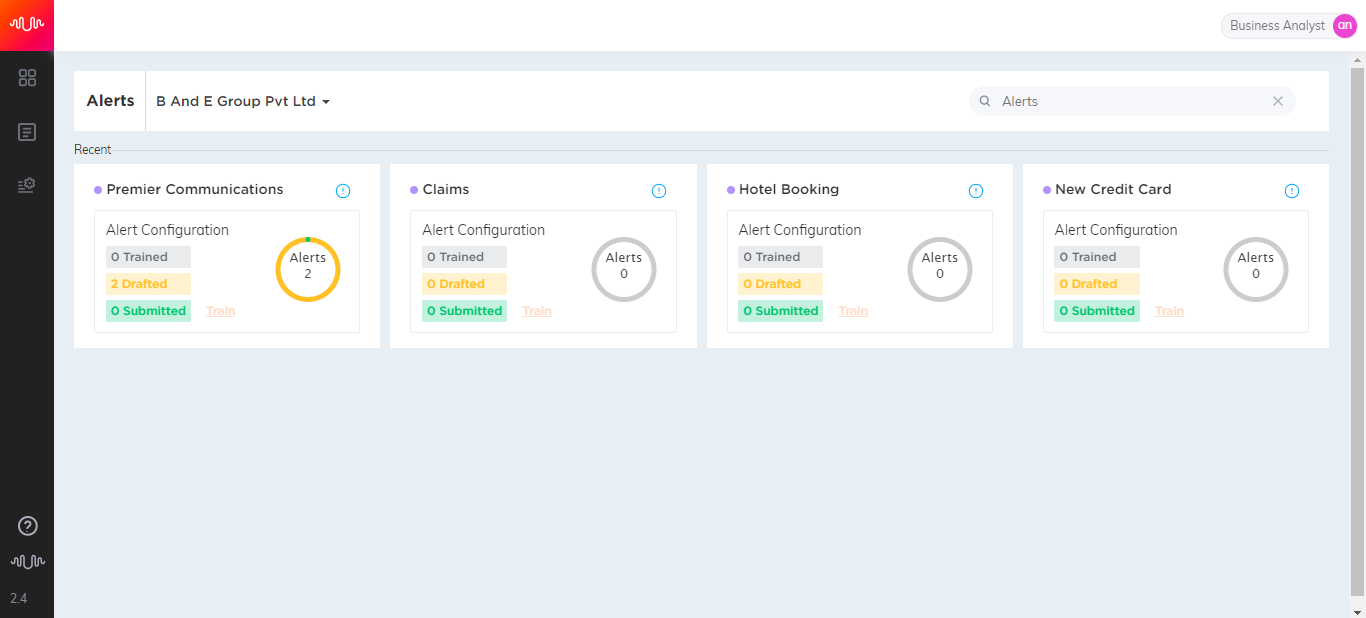 |
In the Search field, enter a minimum 3 alphabets to search by business process or alerts.
Click on the Alert Configuration section under each business process to navigate to Define Alerts page. It will navigate to the Alerts list page if the business process already has alerts created.
Quick Navigation
Analyst can navigate to the following modules from the left pane.
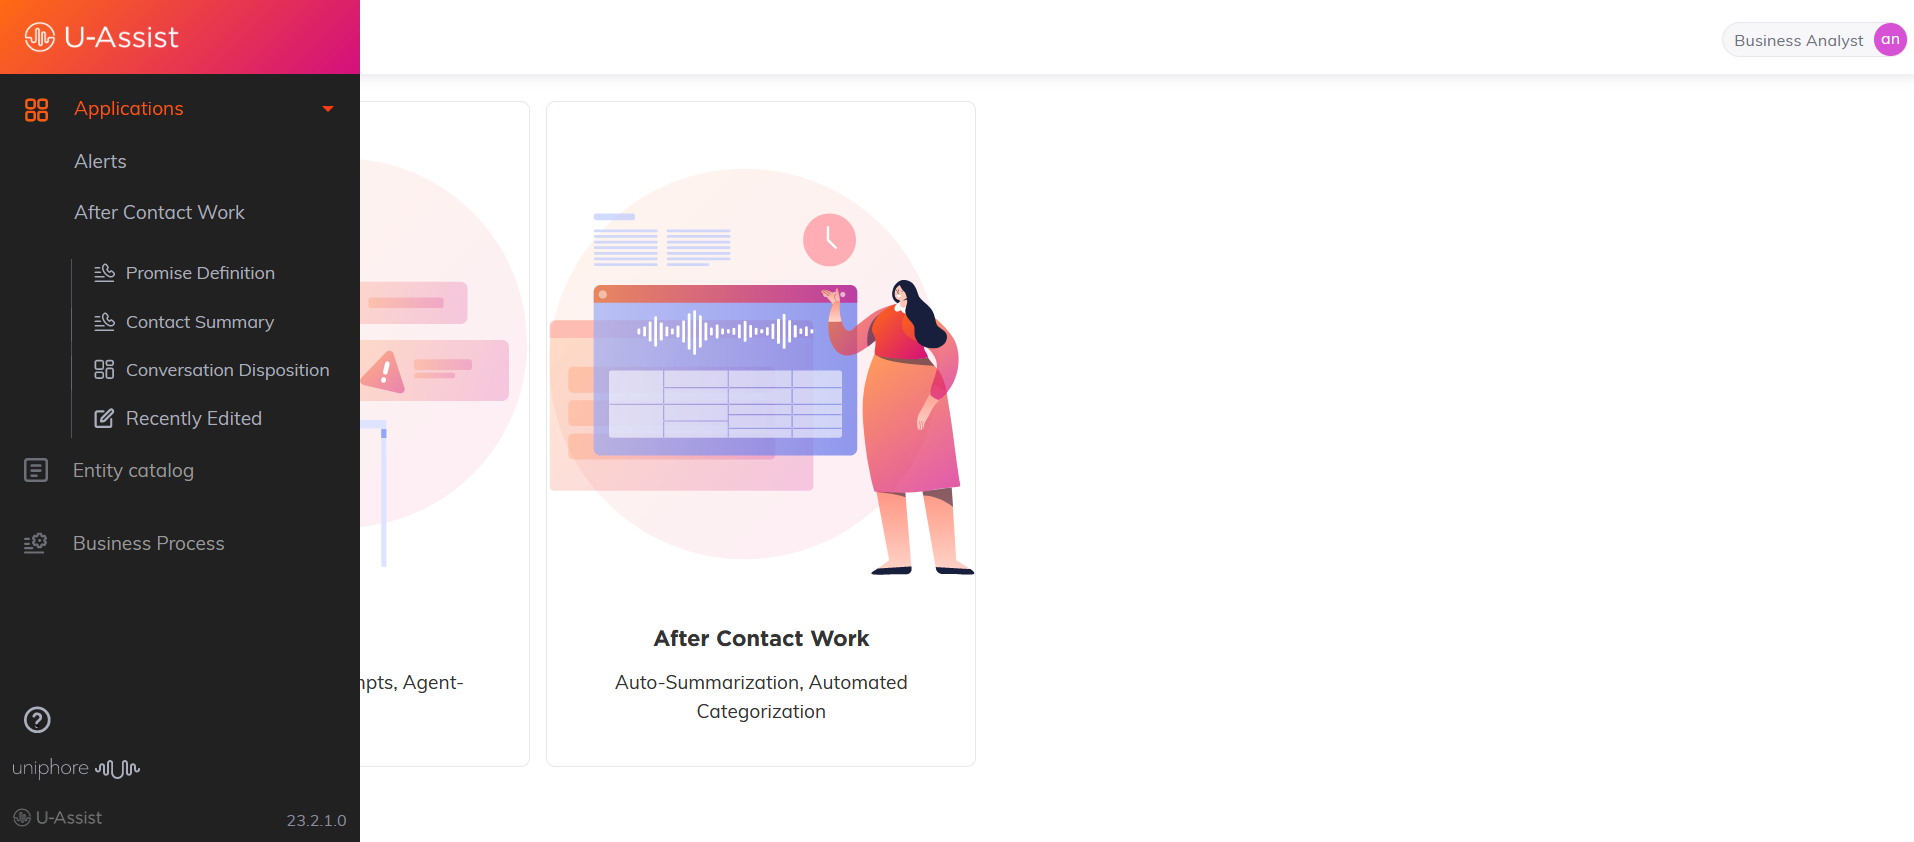
 Applications
Click to create/configure Alerts, ACW Contact Summary and ACW Conversation Disposition
Alerts
After Contact Work
Promise Definition
Contact summary
Conversation Disposition
Recently Edited
 Entity Catalog
Click to display the list of entity catalogs with AI entities. The catalog reference list is at the Tenant level. Multiple entity catalog lists at organization/business process level are not allowed. Analysts cannot edit/add entities in the entity catalog reference.
 Business Process
Click to setup a business process for an Organization
 Question Mark
Click to navigate to the Help file.
 Uniphore Logo
Click to navigate to the Home page.
At the bottom of left pane, Analyst can view the version of application.
Define Alert
In the Alerts Dashboard page, click on the Alert Configuration section under each business process to navigate to Define Alerts page. if the business process already has alerts created it will navigate to the Alerts list page.
In the Alert Name field, enter the name of the alert (for example: Repeat Caller). Alert Name should not exceed a maximum of 50 characters. The following special characters /[`!@#$%^&*~,.<>;':"/[\]|{}()=+]/ are not allowed in the “Alert Name” field.
Click Create New button to navigate to Define Alerts page.
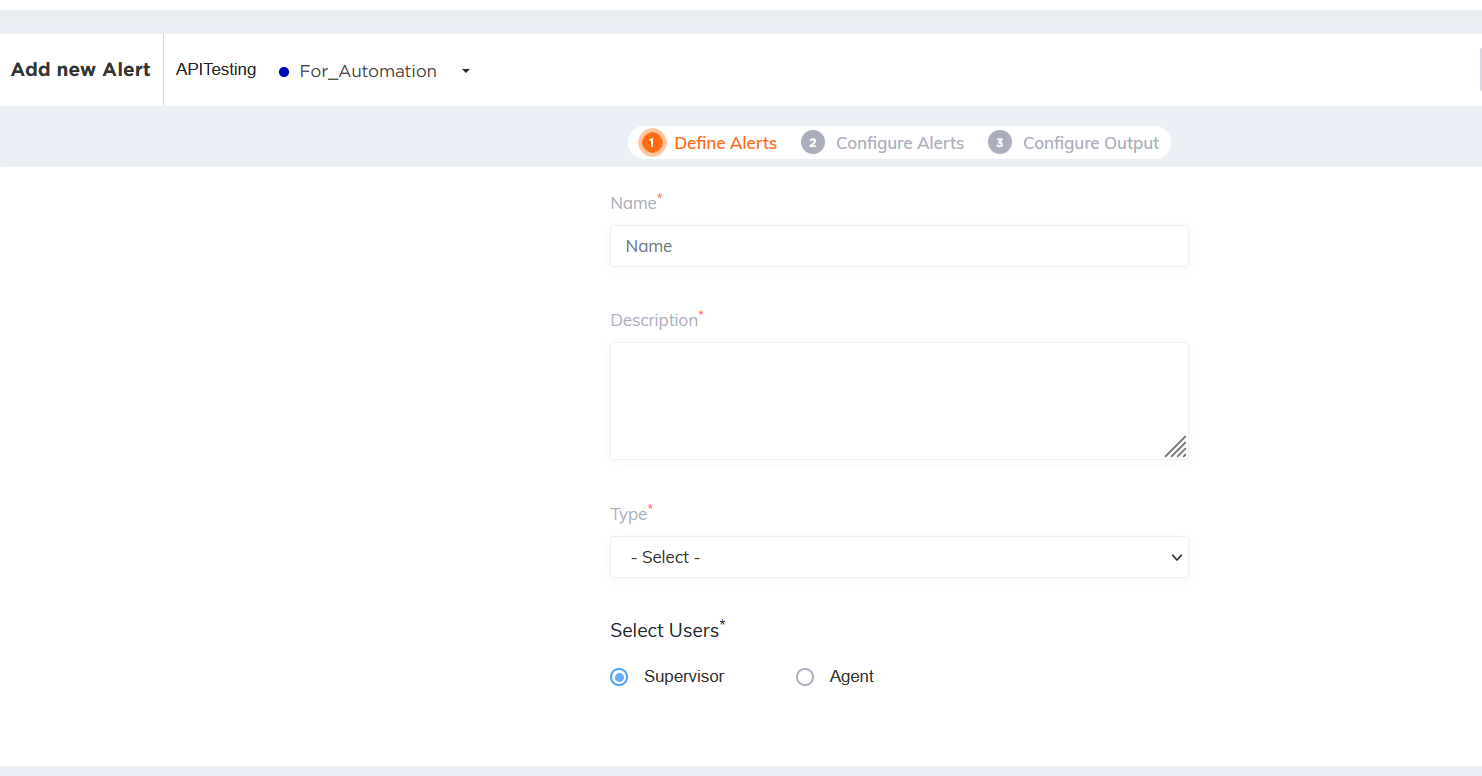
In the Alert Description field, enter the description of the alert. Description should not exceed a maximum of 300 characters. The following special characters /[`!@#$%^&*~<>;':"/[\]|{}=+]/ are not allowed in the “Description” field.
Select any one of the values from Alert Type drop-down list. It will be displayed in Alerts section of Agent Desktop.
Information Alert - Shows an alert message on the Agent Desktop in Blue color with an icon (
 )
) Coaching Alert - Shows an alert message on the Agent Desktop in Orange color with an icon (
 )
)Critical Alert - Shows an alert message on the Agent Desktop in Red color with an icon (
 )
)
Select a user to whom alert notification to be sent.
Supervisor - This alert will only be sent to the Supervisor
Agent - This alert will be sent to the Agent and the Supervisor.
Click Next button to configure alerts.
Click Save as draft button on the top right side of the page to save the alert details as draft.
Configure Alerts
Business Analyst can create various alerts based on various conditions or combinations of conditions created by combining various attributes (keyphrase, call attribute, speech attribute) and then add key phrases. Alerts can be used as a sophisticated coaching service, which consumes emotions, transcripts, and call attributes for analyzing to derive the context and provide effective agent guidance/assistance.
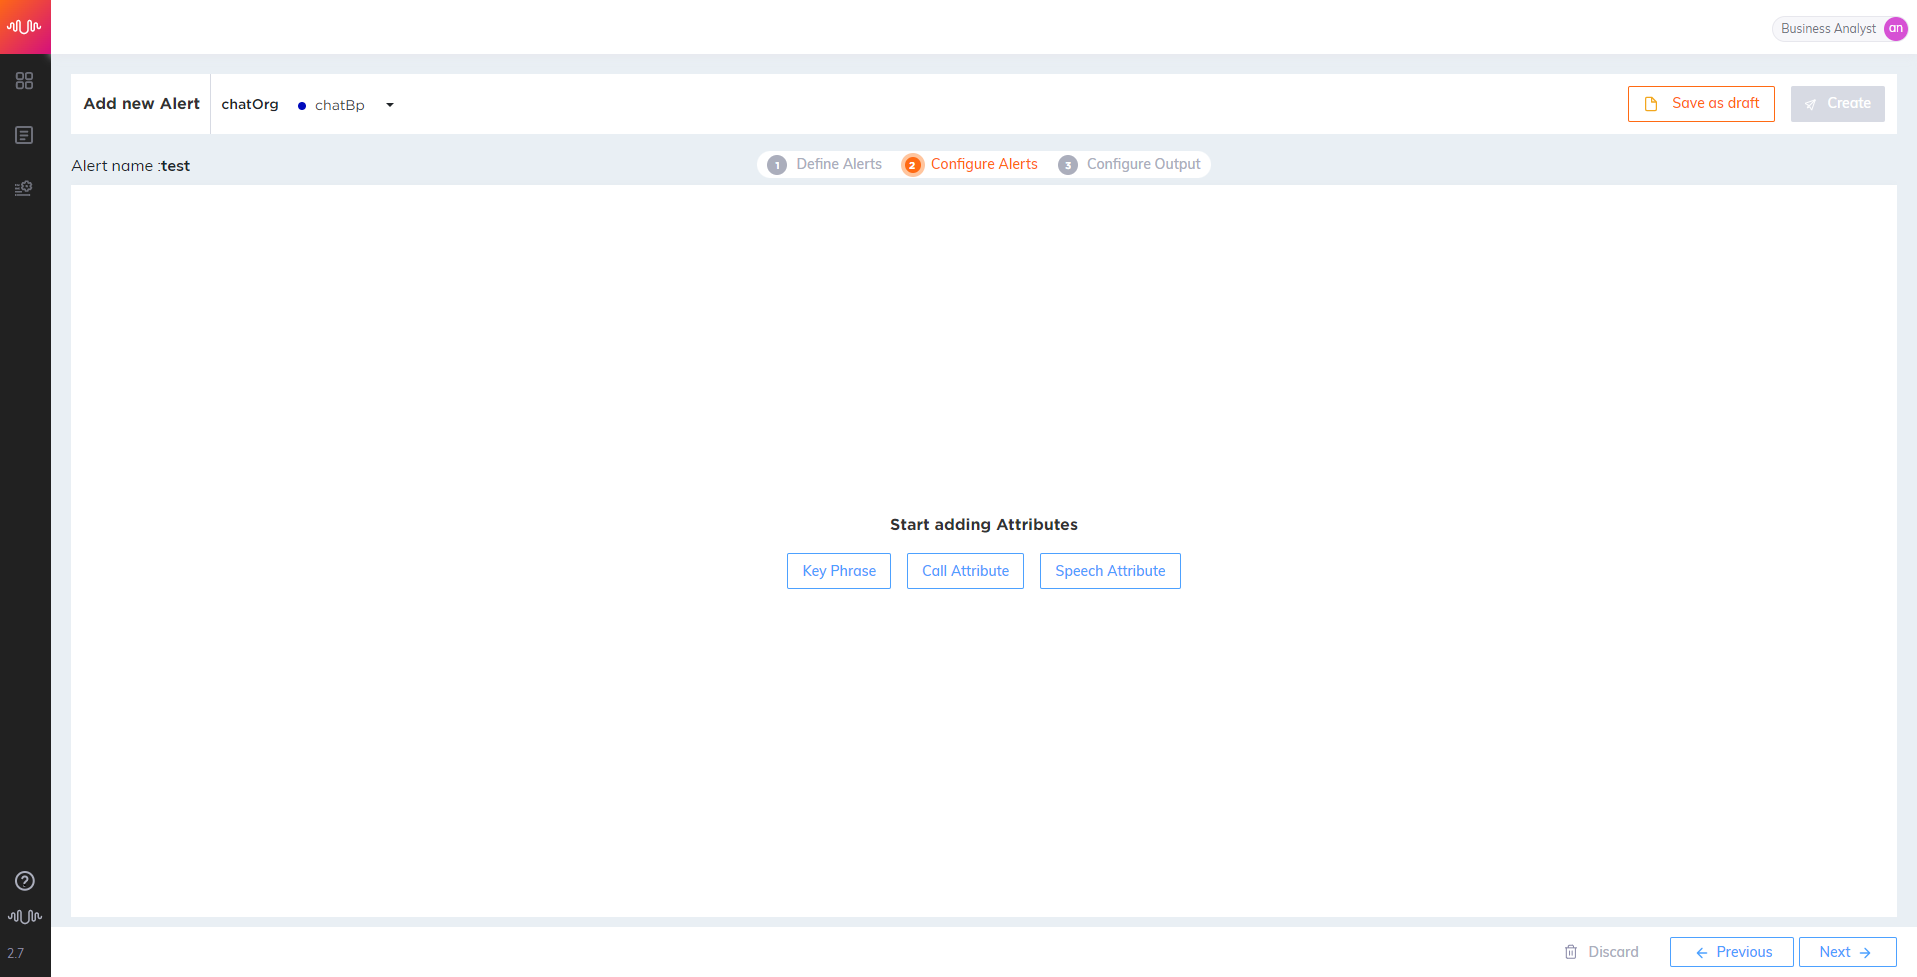
Attribute - Keyphrase
Select Keyphrase as an attribute from the drop-down list.
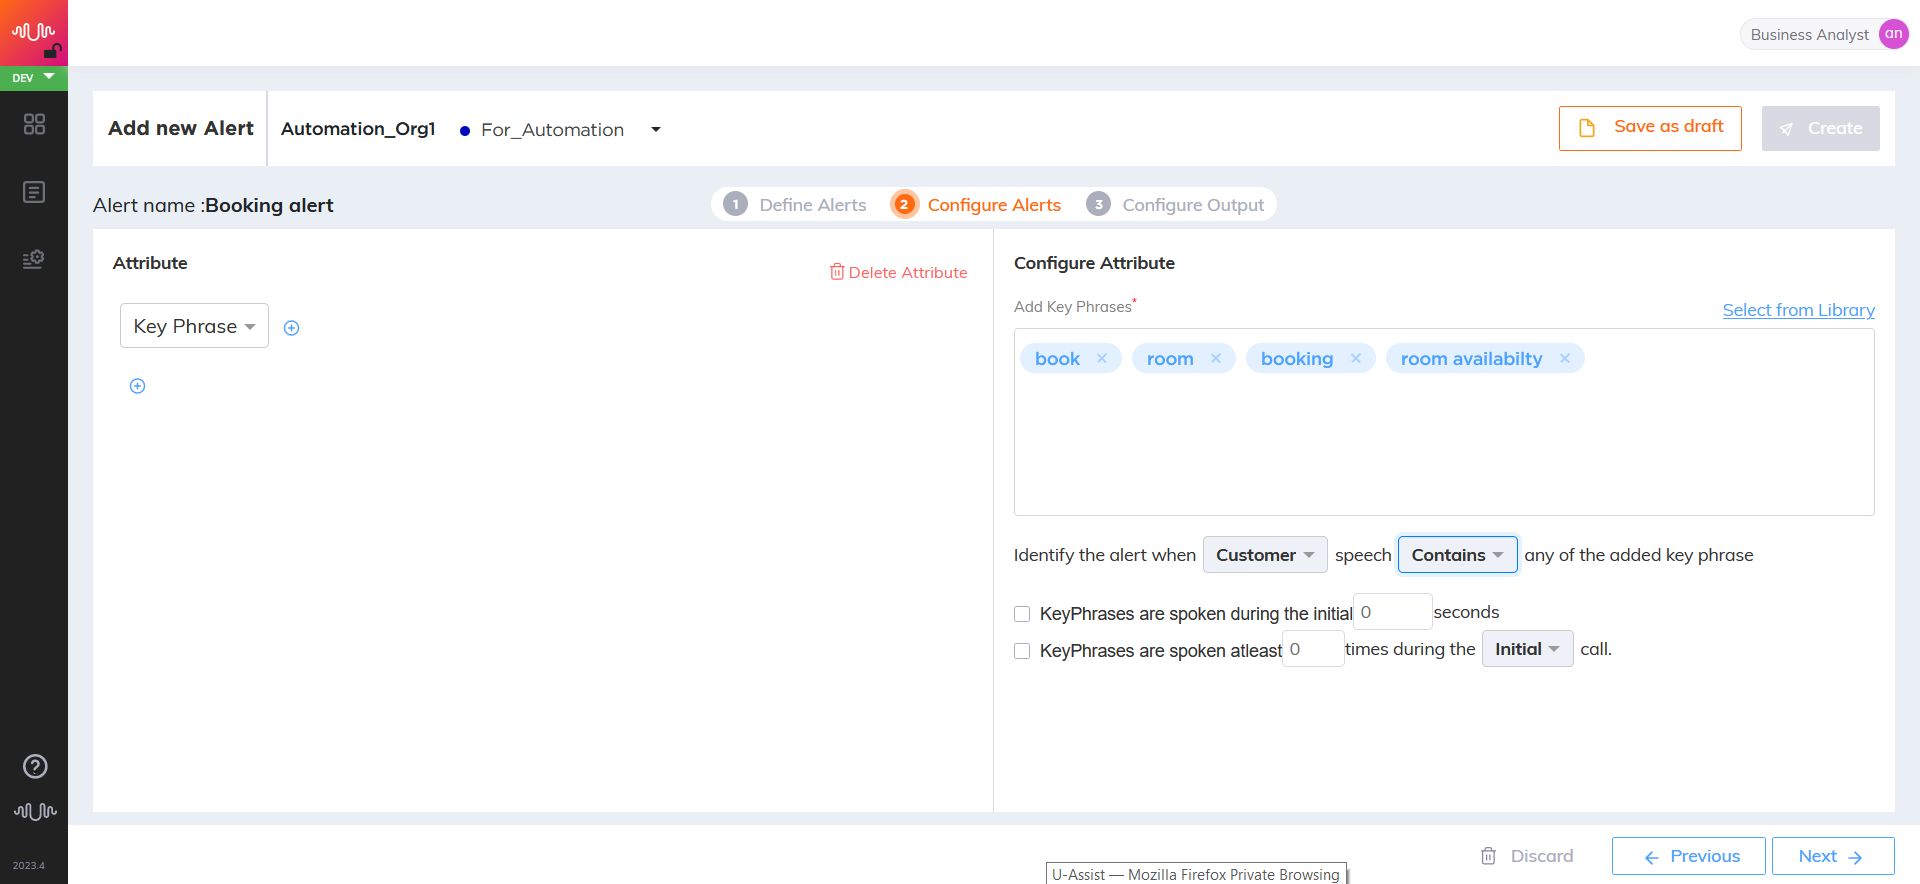
In Add Keyphrases section, enter a new keyword.
Click on Select from Library link to copy the keyphrase from other alerts.
While entering the keyphrase, an auto scroll list of keyphrases appears.
Select the keyphrase from the list. The selected keyphrase is listed at the bottom of the pop-up window.
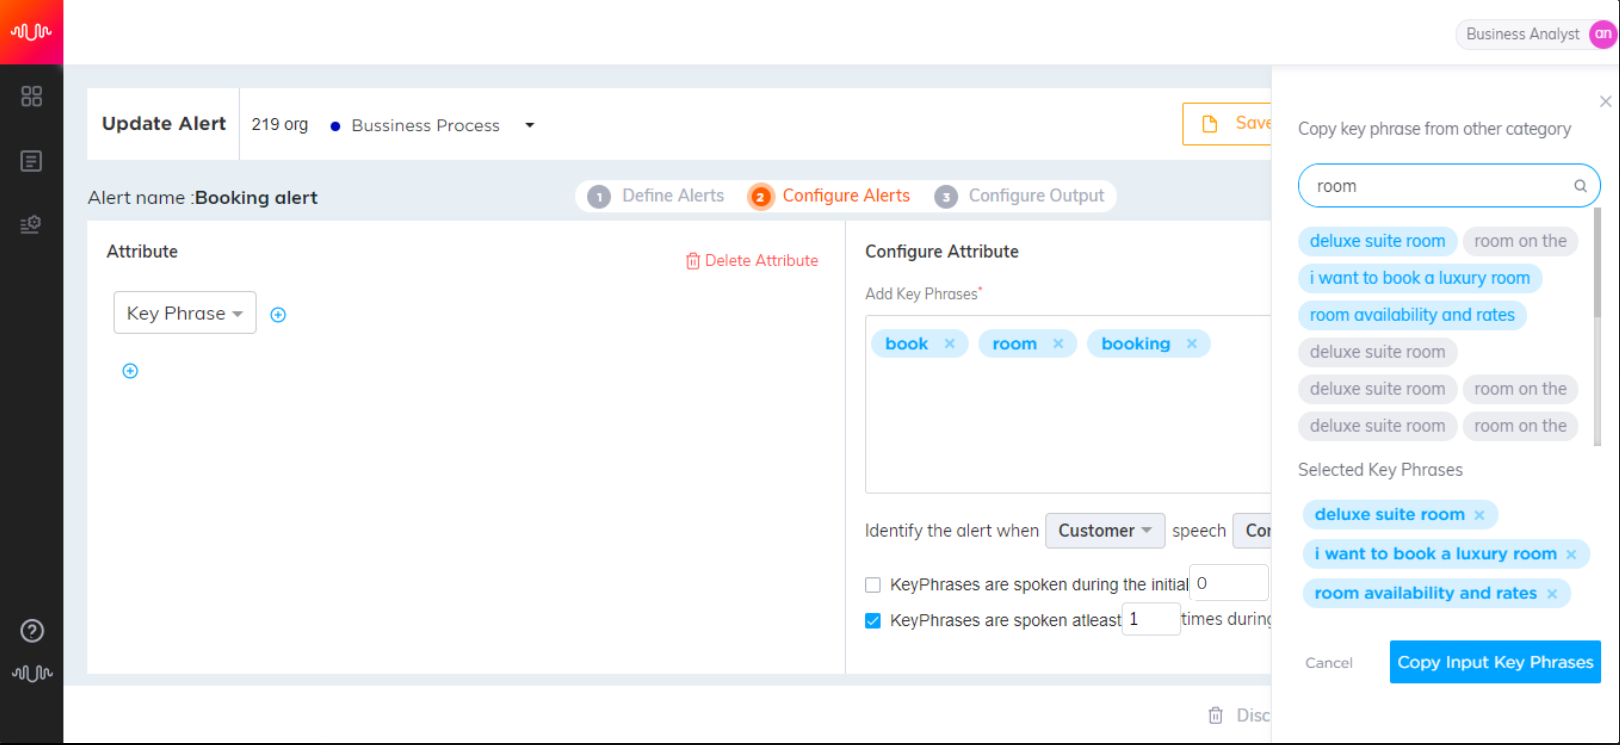
Click Copy Input Keyphrases button to copy the keyphrases and display them in Add Keyphrase section.

Select speaker channel as Agent or Customer.
Agent – If Configured keyphrase is to be matched from Agent Channel.
Customer – If Configured keyphrase is to be matched from Customer Channel.
Select any of the below values to identify the alert.
Contains - If selected channel (Agent or Customer) should contain the added keyphrases.
Does not contain - If selected channel (Agent or Customer) does not contain the added keyphrases.
Mention the time period (seconds) in which the keyphrases should be detected.
Mention the minimum number of occurrences of the keyphrases in the call which triggers the alert.
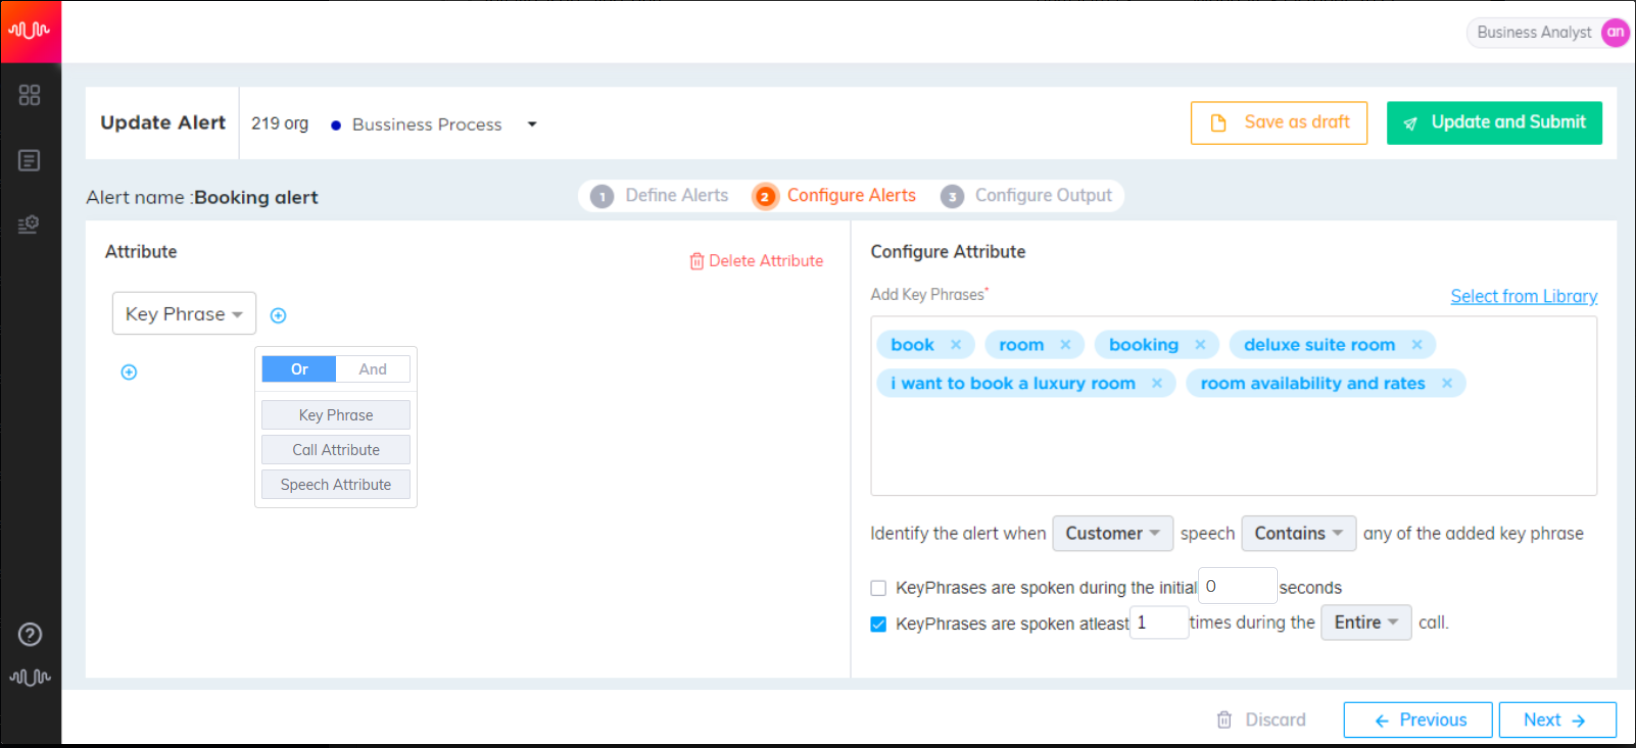
The checkbox “Keyphrases are spoken during the initial “_” seconds” is unchecked by default and the value is shown as '0'. If you select the checkbox, the default value is shown as '1' second. Mention the number of seconds manually to trigger the alert when the keyphrases are detected within the initial configured period of the call.
If the checkbox is not selected, the alert will not be triggered when the keyphrases are spoken during the entire call.
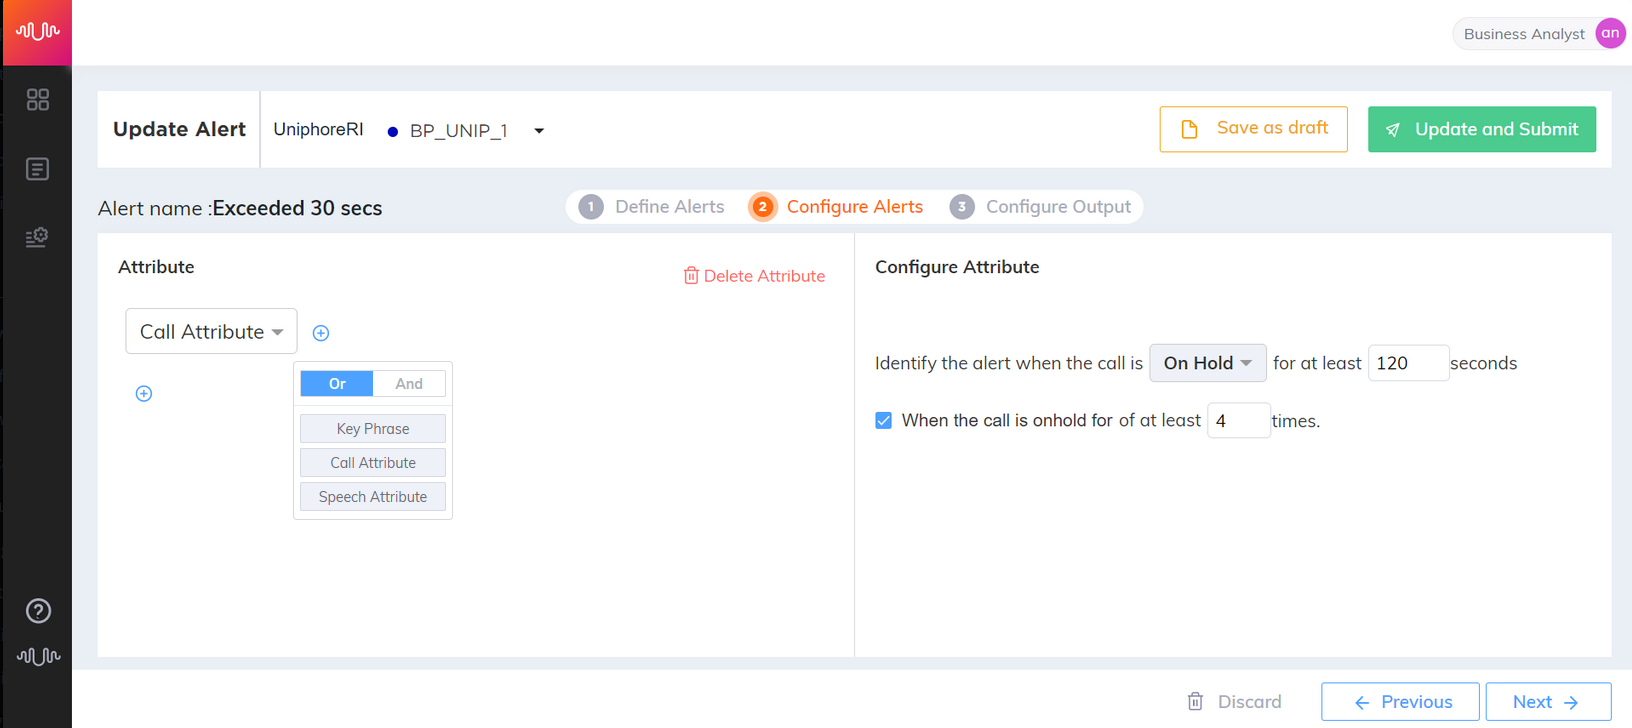
Click Plus icon in left pane to select the operator OR or AND, then proceed with configuration.
Tip
If you want to delete a particular attribute, select the Attribute from left pane and click Delete Attribute button to delete this attribute. A confirmation message is displayed asking you whether to delete this attribute. Click Yes to delete this attribute. To cancel the delete operation click Cancel button.
Click Next button to navigate to the Configure Output page.
Tip
If you want to view or make changes to the alert details, click Previous button to navigate to the Define Alerts page.
If you want to save the configured alert details as a 'draft', click Save as draft button in top right side of the page
Attribute - Call Attribute
Click on the Call Attribute from the left pane.
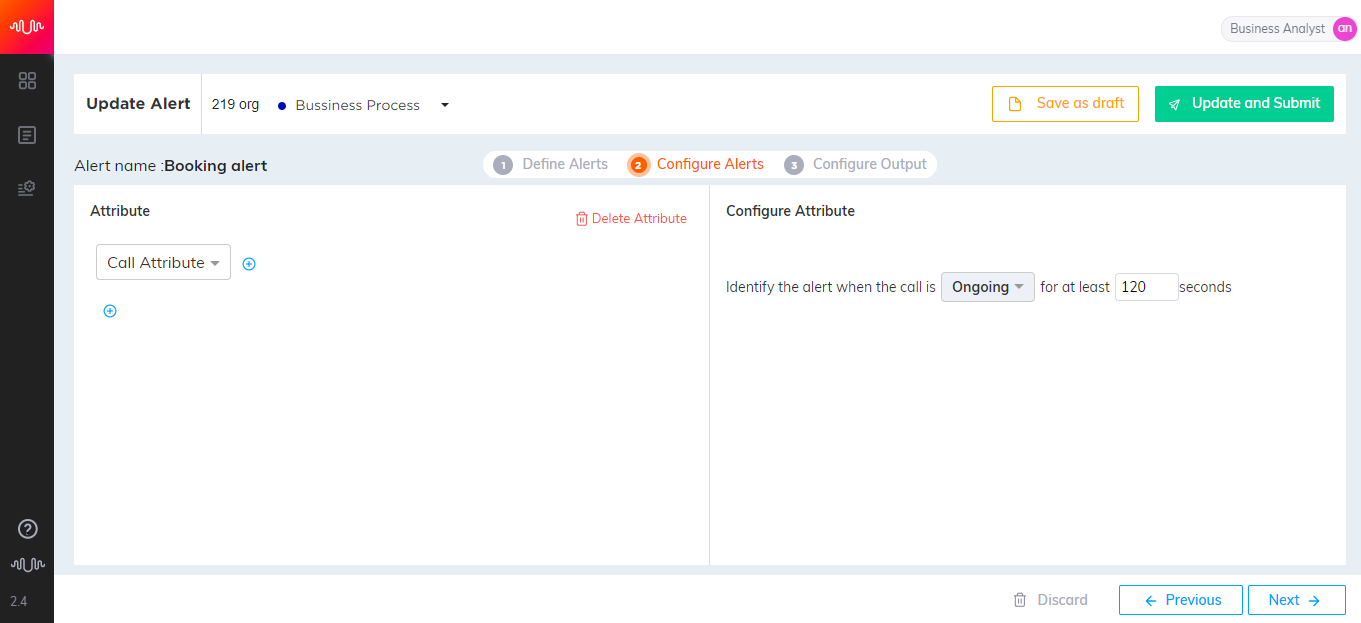
Select a value from the drop-down list.
Ongoing - To trigger the alert when the call is in progress for a certain configured amount of time (in seconds).
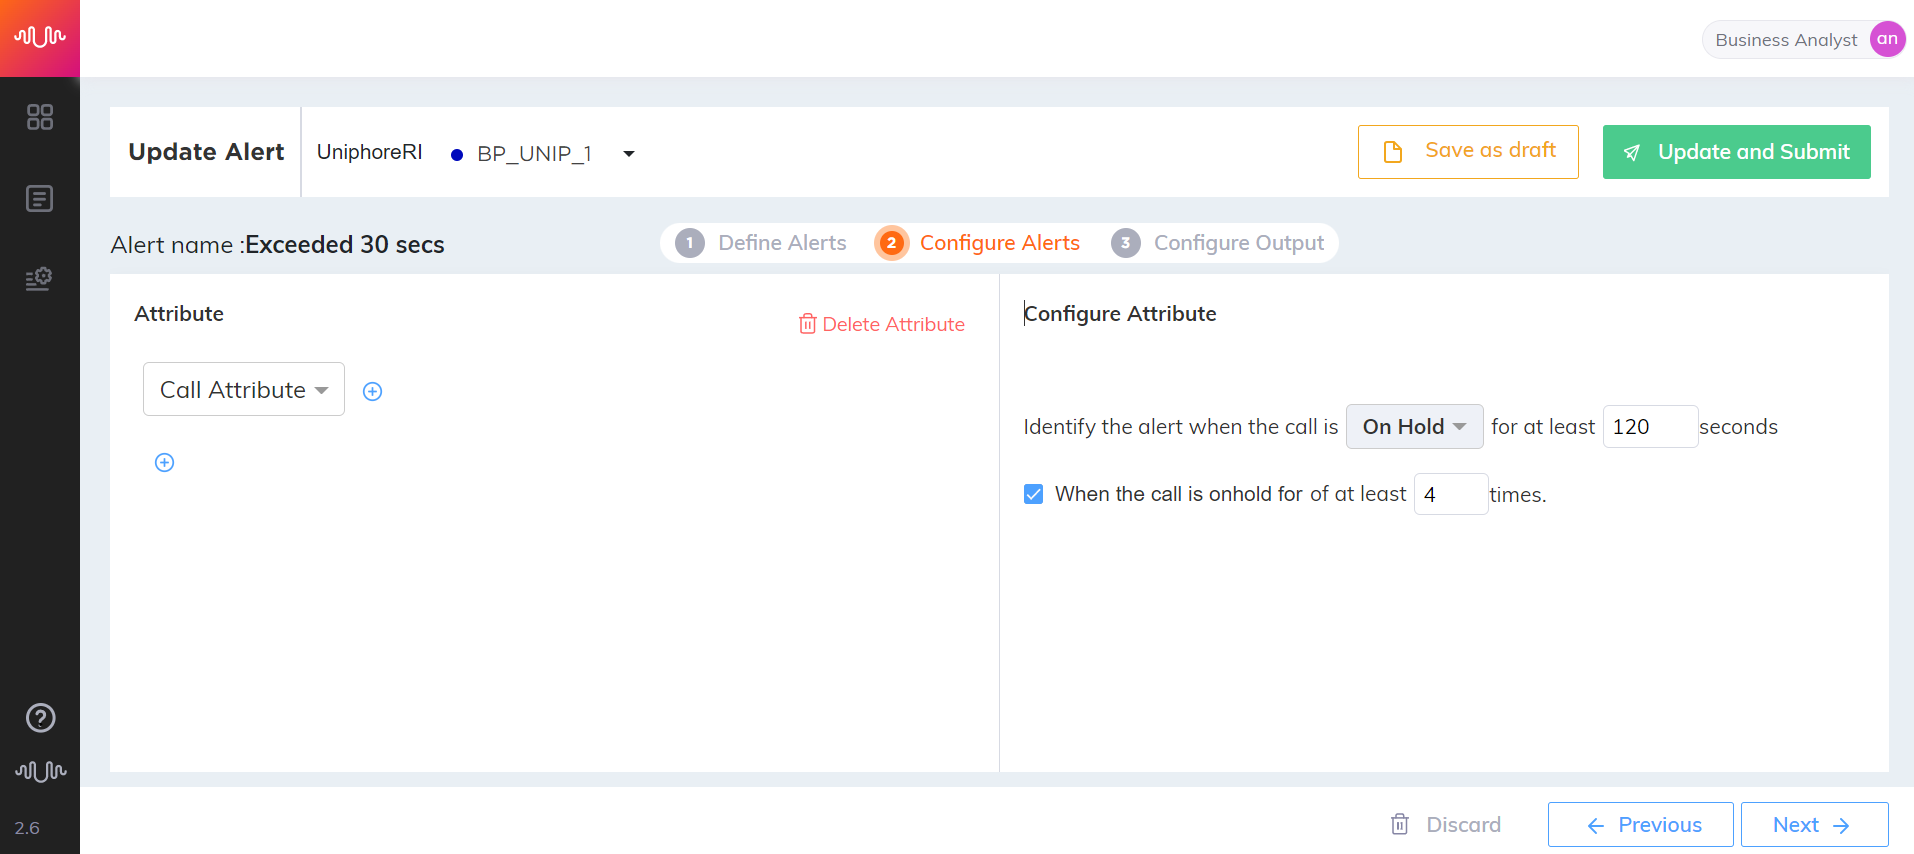
On Hold - To trigger the alert when the call has been found to be on hold either more than a certain period of time Additionally you can even select a checkbox for when the number of times a call is on hold is more than a certain count.
For example, you trigger an alert when the call is on hold at least 4 times.
Click Plus icon in left pane to select the operator OR or AND, if you want to combine two or more attributes.
Click Next to proceed with the configuration of the output.
Attribute - Speech-based and Tonal Attribute
The Analyst can configure tonal alerts based on tone of the speaker (Agent or Customer). Real-time tonal alerts are generated in the Agent or Supervisor applications based on the configured emotional attributes. This feature enables Agents to receive in-call coaching for various scenarios, and also provide cross-sell/up-sell opportunities, and knowledge-base article links to quickly refer and provide required information to the customers.
Given below are some examples when the agent / supervisor can get alerted:
When the customer is unhappy and frustrated, the Agent/Supervisor receives alerts regarding some coaching tips during the call to empathize with the customer and offer apologies.
When the customer is pleased, the Agent/Supervisor receives a positive alert to commend them on their performance.
When the Agent is not sufficiently engaged with the customer, the Agent/Supervisor receives alerts to motivate them to increase their enthusiasm and establish a better rapport with the consumer.
When a customer expresses a high level of frustration, the Supervisor gets alerted in order to intervene during the call and handle the customer.
The following system-level tonal attribute parameters "ALERTS_TONAL_CONFIDENCE_VALUES" and "ALERTS_TONAL_SCORE_FOR_EMOTION_HIGH" need to be set in the Alert Service in order to generate tonal alerts. Typically, these parameter values are set by the users who deploy the application.
Important
The parameter "ALERTS_TONAL_CONFIDENCE_VALUES" should always be set to High.
ALERTS_TONAL_SCORE_FOR_EMOTION_HIGH:
Allows you to define the value of emotion. In real time, when the emotion value is more than this defined value, the tonal alerts are generated. The value is set to 0.2 by default. The user can set a maximum value of 1.
Important
It is recommended to use the default value for the parameter 'ALERTS_TONAL_SCORE_FOR_EMOTION_HIGH'.
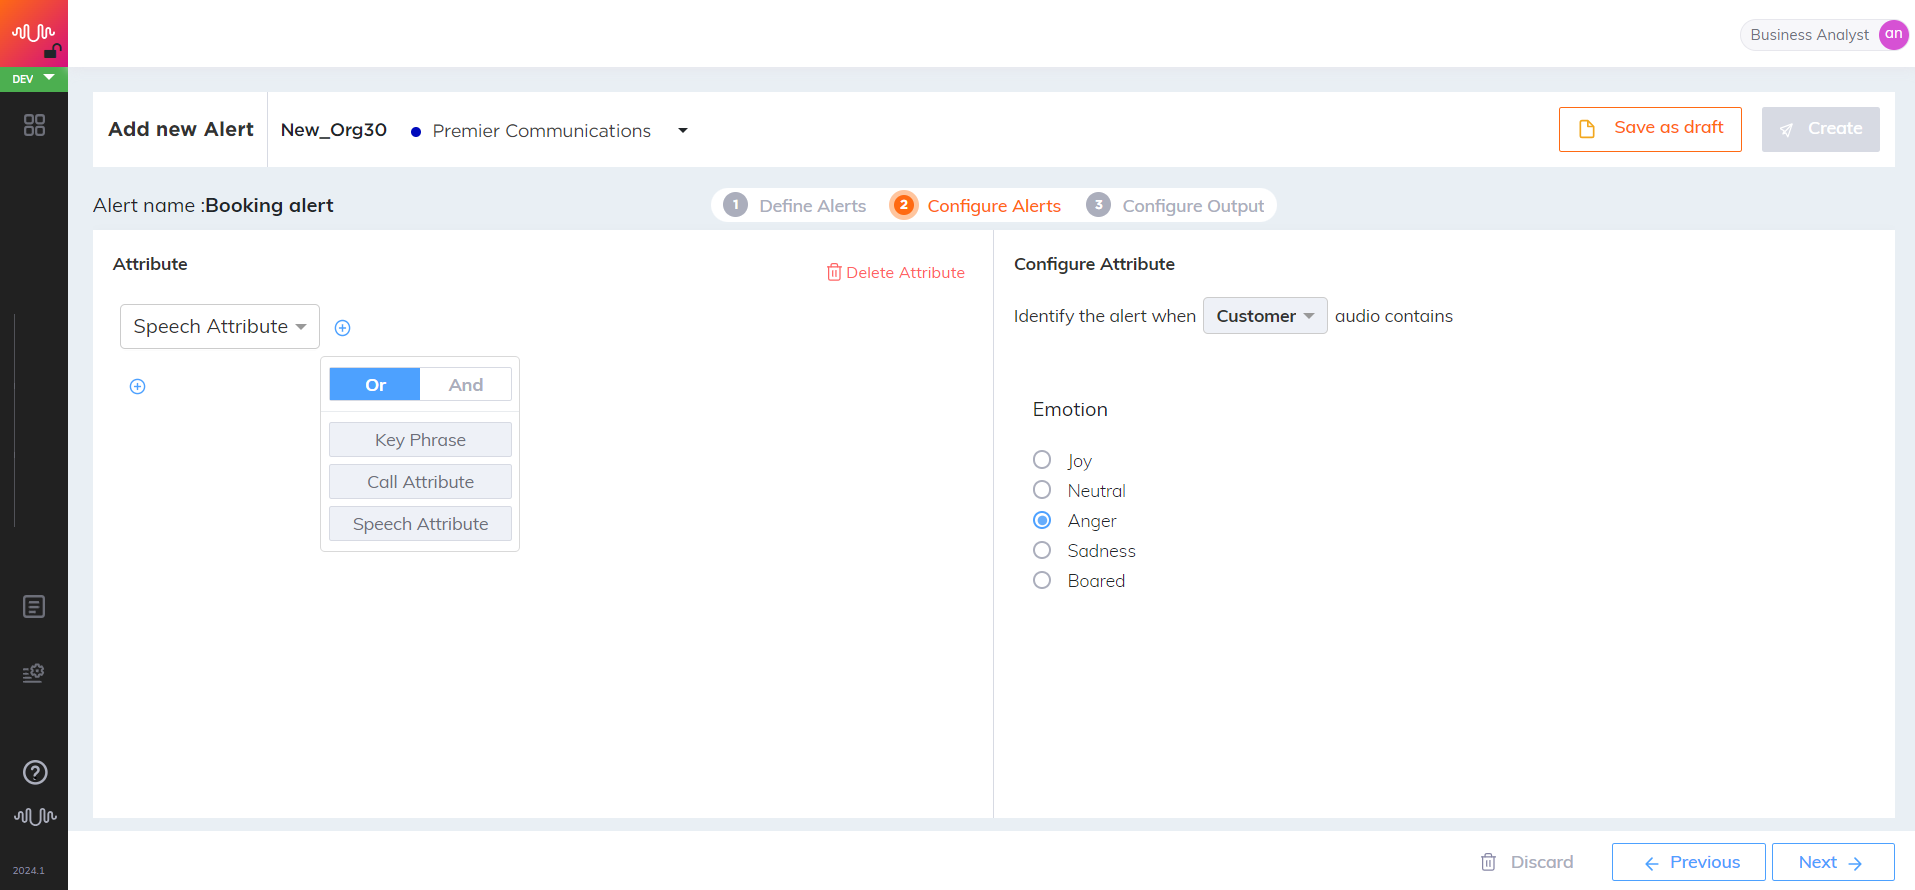
Follow the below steps to configure speech-based/tonal attribute:
Select Speech attribute as an attribute from the drop-down list.
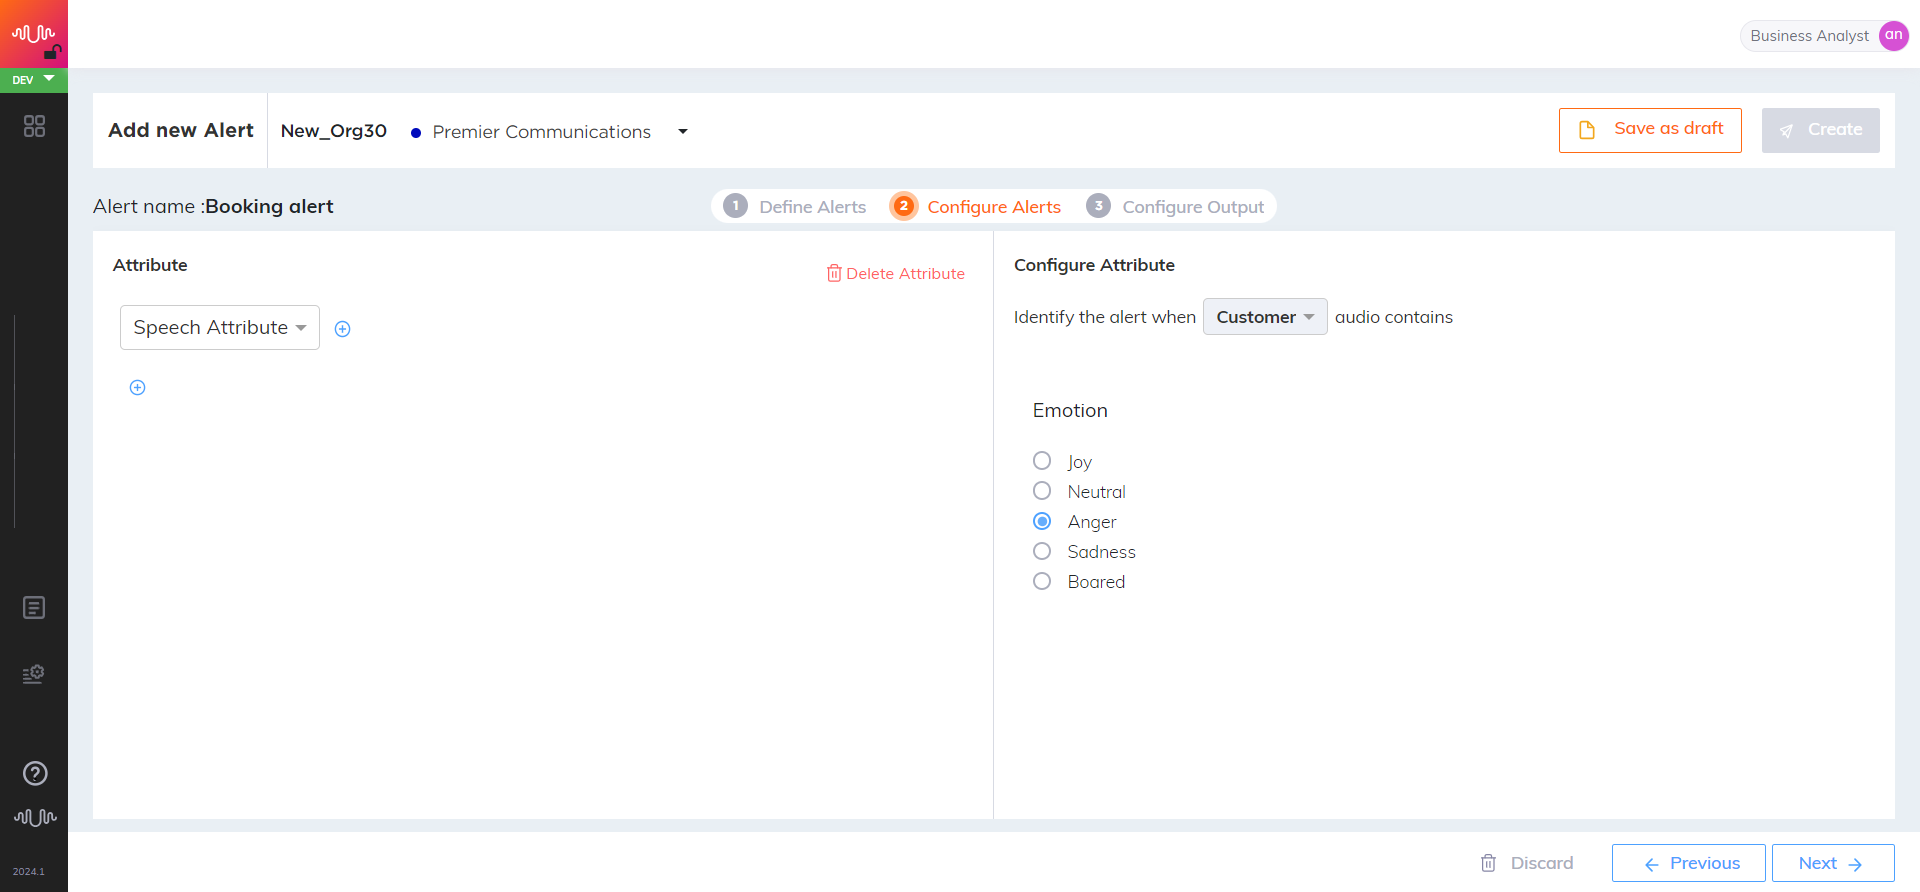
In the Configure Attribute section, select a value (Agent or Customer) from the drop-down list.
Agent - To trigger the alert when the agent channel contains any of the configured speech-based/tonal attributes during the call.
Customer - To trigger the alert when the customer channel contains any of the configured speech-based/tonal attributes during the call.
Select any one of the speech-based/tonal attributes (emotion attributes) to be detected in the call. Only one emotion attribute can be selected at a time.
Click Plus icon in left pane to select the operator OR or AND, if you want to combine two or more attributes.
Click Next to proceed with the configuration of the output.
Remove Attribute Configuration
To delete a particular attribute configuration, select the Attribute from left pane and click Delete Attribute button.
A confirmation message appears. Click Yes to delete the attribute configuration or Cancel to cancel deleting the attribute configuration.
Configure Output
Here, the Business Analyst can configure the alert message to be displayed in the Alerts section of Agent Desktop.
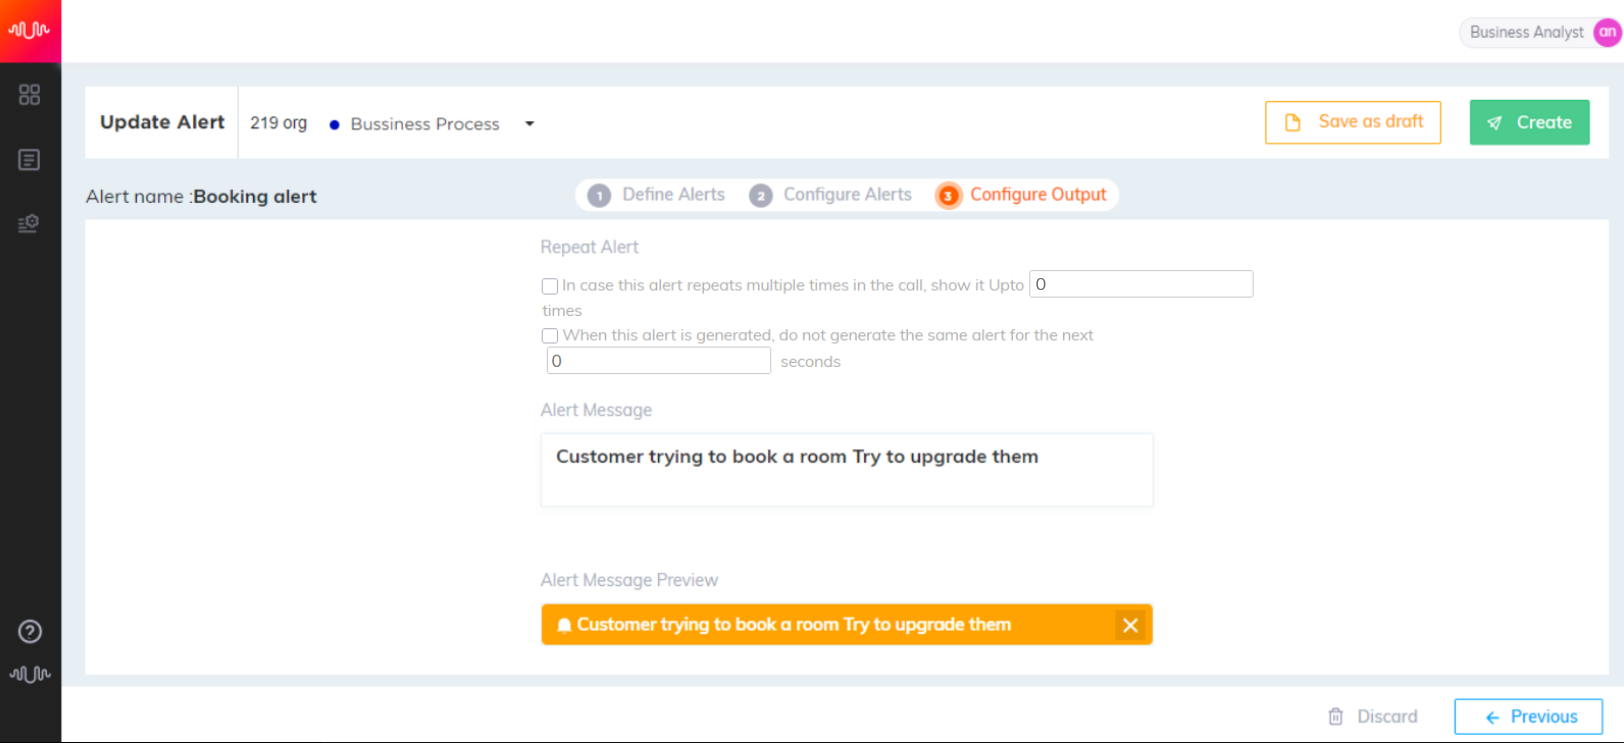
Select the Repeat checkbox to set the maximum number of times the alert can be shown in the Agent Desktop, if it repeats multiple times in the call. This checkbox is unchecked by default and the value is shown as '0'. If you select the checkbox, the default value is shown as '1' time.
Select the Back-off period checkbox to set the time period for which the same alert should not be repeated once it is already shown (useful for alerts which are likely to be repeated very frequently within short time intervals). If you select the checkbox, the default value is shown as '1' second.
Enter the Alert Message to be displayed in the Alerts section on the Agent Desktop. From the version 23.2.1.0, this field accepts all special characters. If you want to restrict some special characters in this field, these characters are to be configured in the u-assist.env file.
Administrator can configure the regex pattern of special characters which are to be restricted in the property "ALERTS_MESSAGE_REGEX_PATTERN" of u-assist.env file. By default, this property is empty. Configure the special characters based on the customer requirement. For example, if you want to restrict these characters '$' and '&', mention the regex pattern as "ALERTS_MESSAGE_REGEX_PATTERN=[$&]".
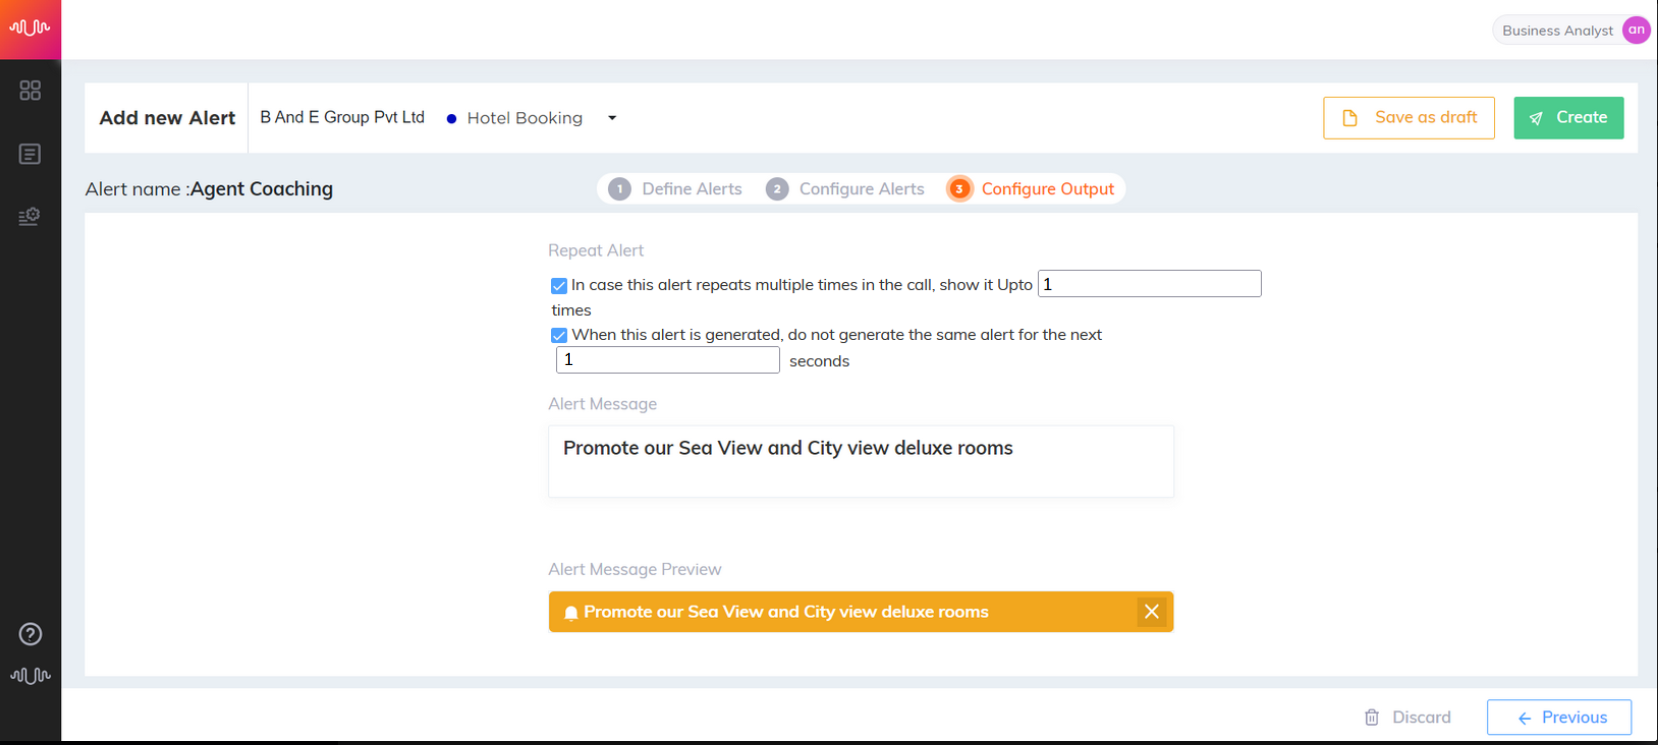
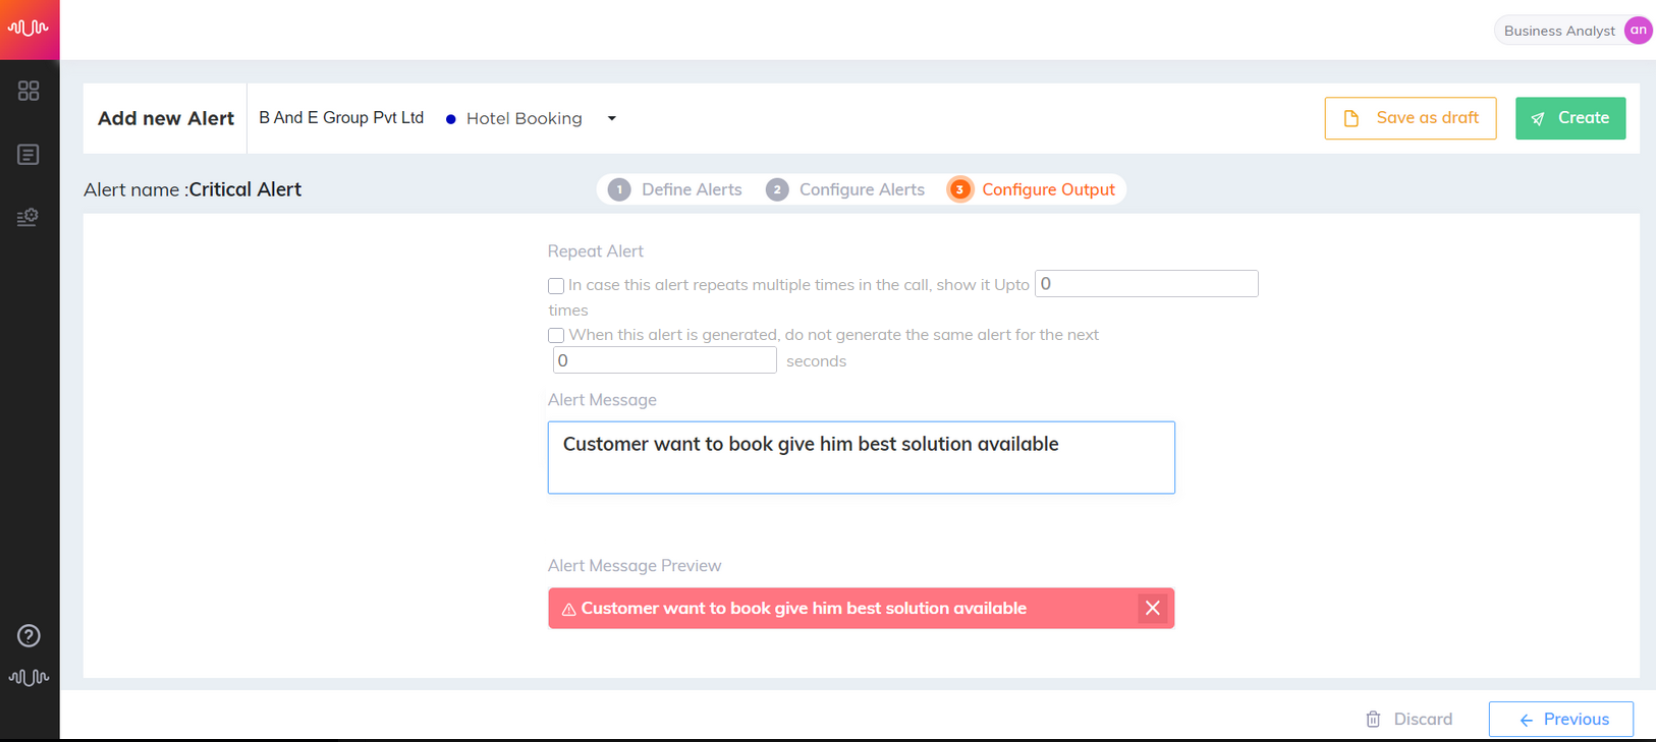
In the Alert Message Preview section, Analyst can preview how the alert message will be shown in Agent Desktop with the Alert Type. The different types of alerts are differentiated by their icons and highlighted colours. Please see the below screenshots for examples:
Information Alert

Coaching Alert
Critical Alert
Click Create button. The newly created alert is displayed in the Alerts List page.
Tip
If you want to view or make changes to the configured attributes, click Previous button to navigate to the Configure Alerts page.
If you want to save the configured alert details as a 'draft', click Save as draft button in top right side of the page
Map Alerts to Business Processes
Mapping an Alert to a Business Process (BP) makes it available to the AI Agent application at runtime, enabling instant notification to an Agent during a call. Alert mapping is performed in the Interact Admin Console, as part of the configuration process for a BP component in the AI Model.
Important
Only Alerts which have been predefined and trained in U-Assist will be available for mapping to a BP in Interact.
Each trained Alert can be mapped to a specific Interact Service Flow, invoking the Flow whenever the Alert occurs:

For complete details about mapping Alerts for the AI Agent application, click here.
Even if an Alert has not been not been mapped to a specific Service Flow, it will still be sent to the AI Agent application, in accordance with its settings in U-Assist.
Export and Import of Alerts
Analyst can export a set of alerts or all alerts from one business process and import this exported file into another business process, which simplifies and reduces the time to configure alerts for the business process. This operation can be performed across different environments as well. While importing, the language of the file to be imported should be same as the language of the business process in the target environment.
Note
The export and import of alerts will not be allowed across any two different languages.
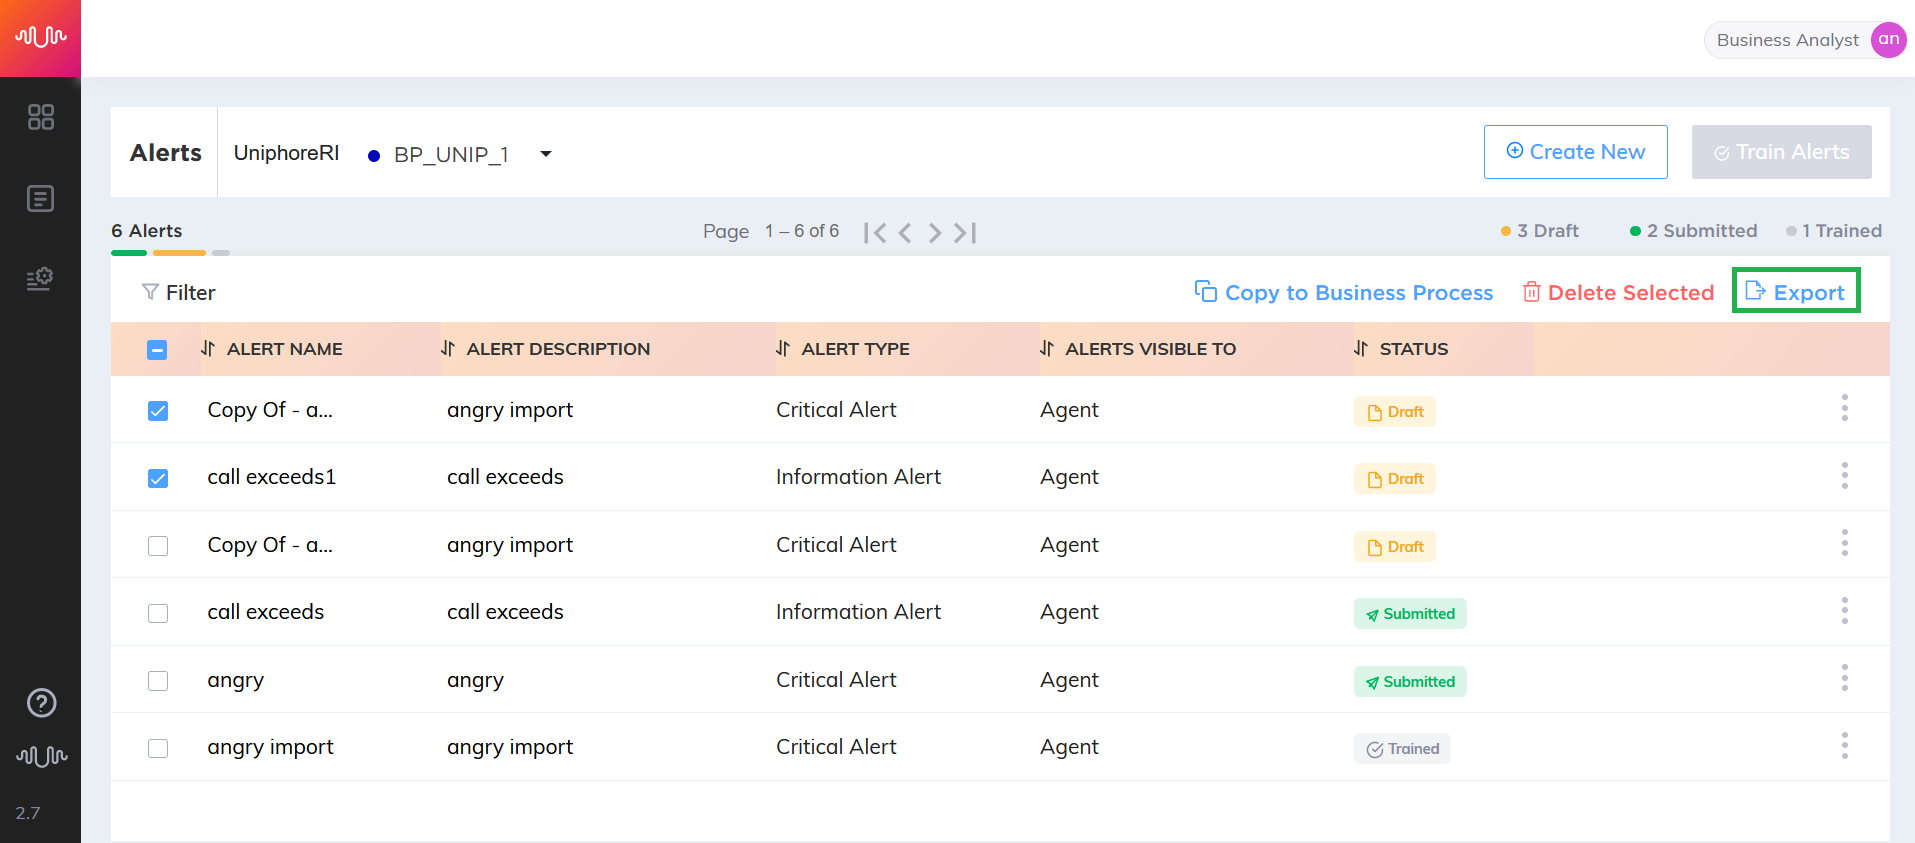
Export Alerts:
Select the alerts to be exported from the Alert List page.
Click Export button.The selected alerts will be downloaded in JSON format. This JSON file includes language code, ISO language code, alert name, description and alert configuration details.

{"languageCode":"EUU","isoLanguage":"en-us","data":[{"referenceName":"call exceeds1","name":"call exceeds1","description":"call exceeds","alertAttributes":[{"inclusionContains":false,"keyPhrases":[],"occurrenceOperator":"GE","occurrenceCount":2,"attributeOperator":"","attributeOrder":0,"alertAttributeGroupOrder":0,"alertAttributeGroupOperator":"","attributeSpeaker":"","attributeDurationSecs":20,"attributeDurationType":"ongoing","attributeType":"call_attribute","emotions":null},{"inclusionContains":false,"keyPhrases":[],"occurrenceOperator":null,"occurrenceCount":0,"attributeOperator":"","attributeOrder":0,"alertAttributeGroupOrder":0,"alertAttributeGroupOperator":"","attributeSpeaker":"Customer","attributeDurationSecs":50,"attributeDurationType":"last","attributeType":"emotion","emotions":{"emotion":["angry"]}}],"icon":"string","message":"call exceeds 10 secs","type":"Information Alert","isDraft":true,"isTrained":false,"displayCount":5,"backoffPeriod":0,"recipient":"agent"},{"referenceName":"Copy Of - angry import_1","name":"Copy Of - angry import_1","description":"angry import","alertAttributes":[{"inclusionContains":false,"keyPhrases":[],"occurrenceOperator":"GE","occurrenceCount":2,"attributeOperator":"","attributeOrder":0,"alertAttributeGroupOrder":0,"alertAttributeGroupOperator":"","attributeSpeaker":"","attributeDurationSecs":20,"attributeDurationType":"ongoing","attributeType":"call_attribute","emotions":null},{"inclusionContains":false,"keyPhrases":[],"occurrenceOperator":null,"occurrenceCount":0,"attributeOperator":"","attributeOrder":0,"alertAttributeGroupOrder":0,"alertAttributeGroupOperator":"","attributeSpeaker":"Customer","attributeDurationSecs":50,"attributeDurationType":"last","attributeType":"emotion","emotions":{"emotion":["angry"]}}],"icon":"string","message":"Customer is angry","type":"Critical Alert","isDraft":true,"isTrained":false,"displayCount":10,"backoffPeriod":30,"recipient":"agent"}]}
Import Alerts:
Click Import button in the Alerts list page or Import from . The window to select file will open.
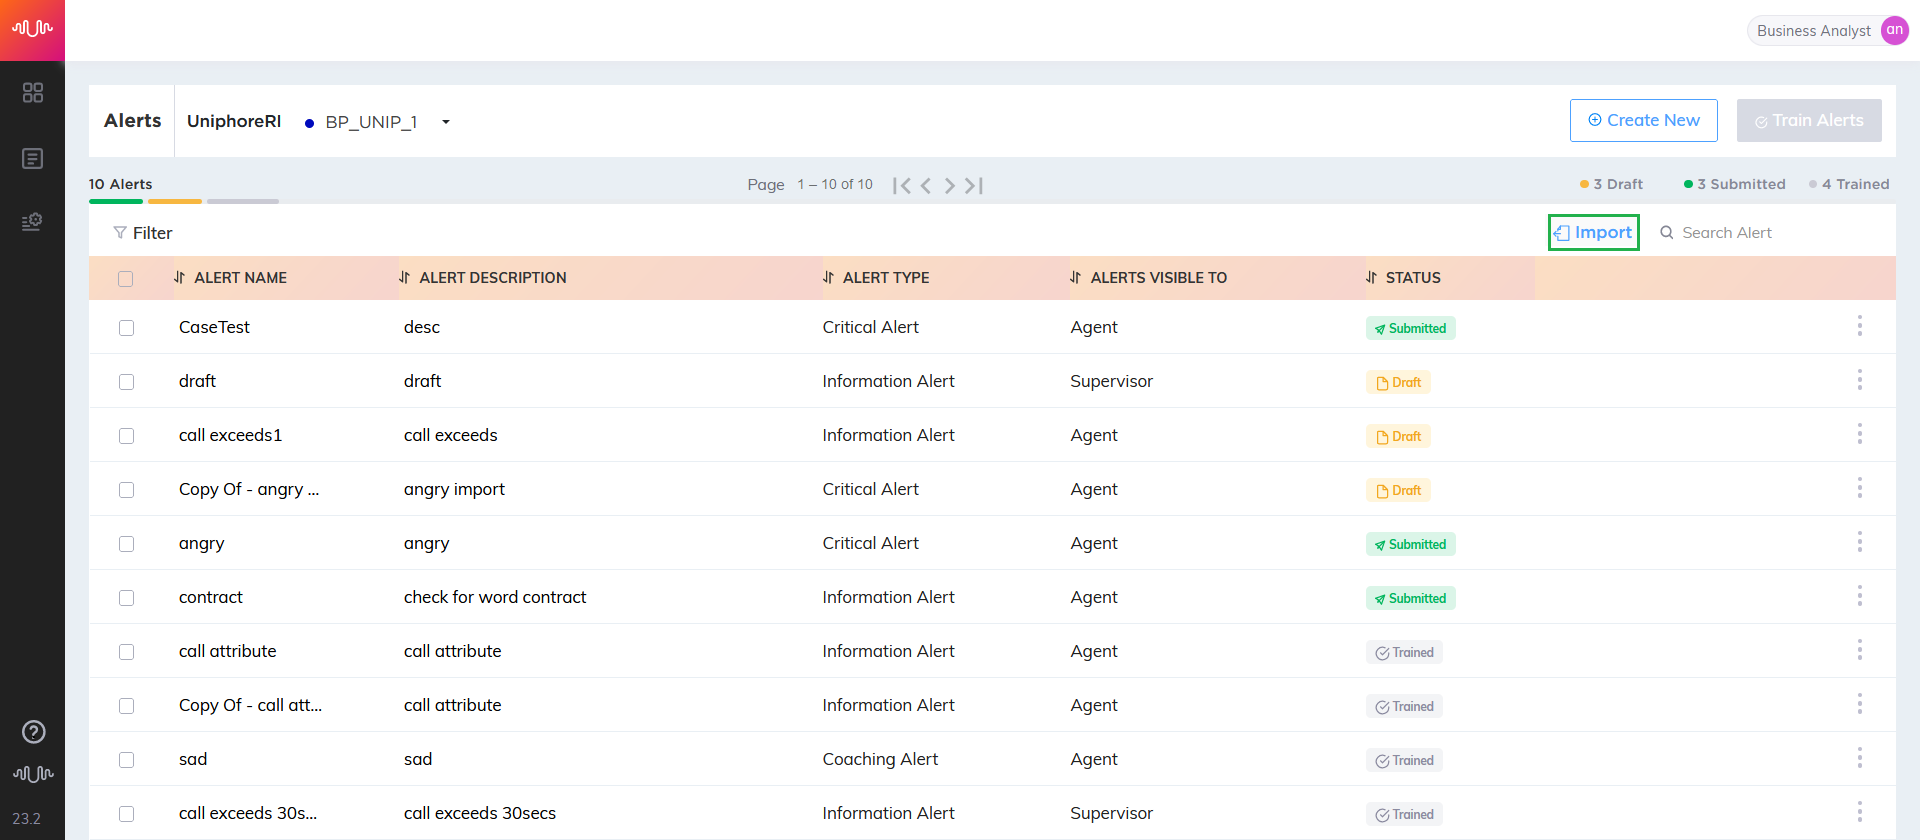
Select the alert file and click OK. The imported alerts will be listed in the Alert List page.
Import conditions:
While importing, duplicate alerts should not exist in the source. After importing alerts, a confirmation message showing the number of alerts successfully imported and the number of duplicate alerts failed to be imported will be displayed.
Language of the import file should be same as language of the target environment.
Only valid JSON file should be imported.
Warning
Please do not edit an exported JSON file unless you have to modify the contents for a cross-version import. Errors in the JSON structure or contents will cause imports to fail.
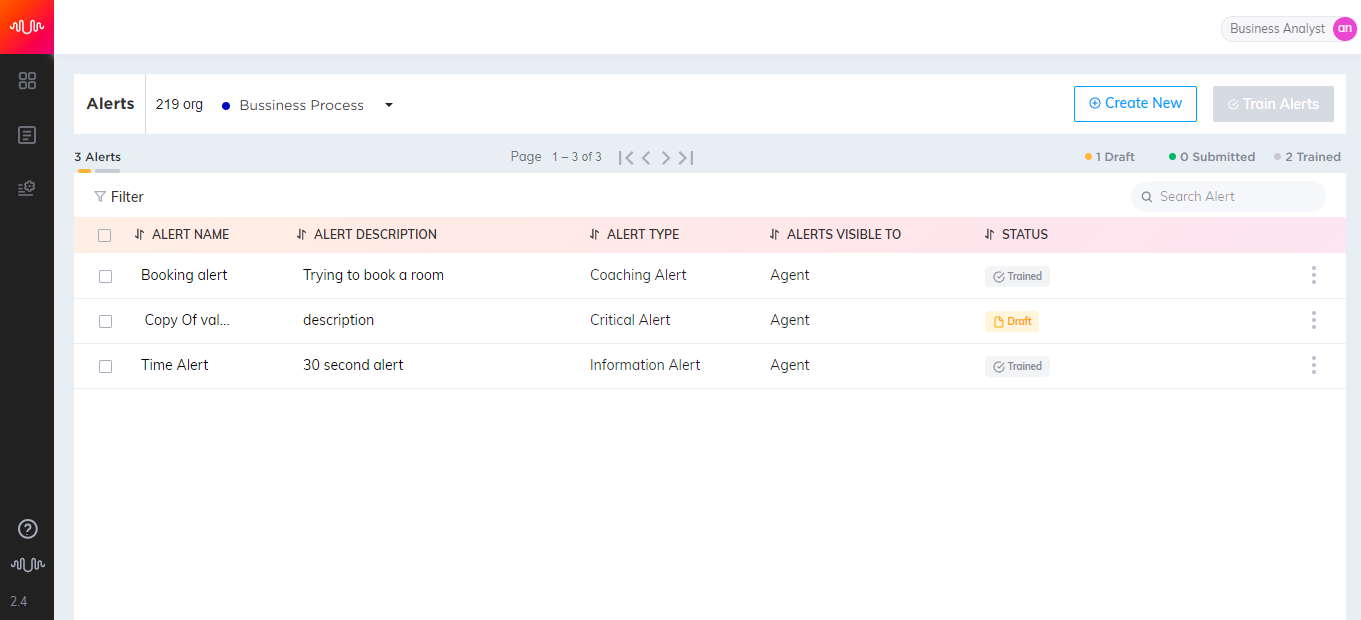
View Alert Details
In this page, Analyst can view the list of alerts along with description, alert type, user to whom alerts to be sent and status for the business process. In the status column, Analyst can view the following values:
Draft - Alerts which are saved as draft while defining or configuring alerts or configuring output
Submitted - Alerts which have been successfully created and submitted
Trained - Alerts which are trained
On the top right side of the page, the number of alerts drafted, submitted and trained for the business process will be displayed.
 |
Search Alert
Analyst can search for an alert from the list within a business process.
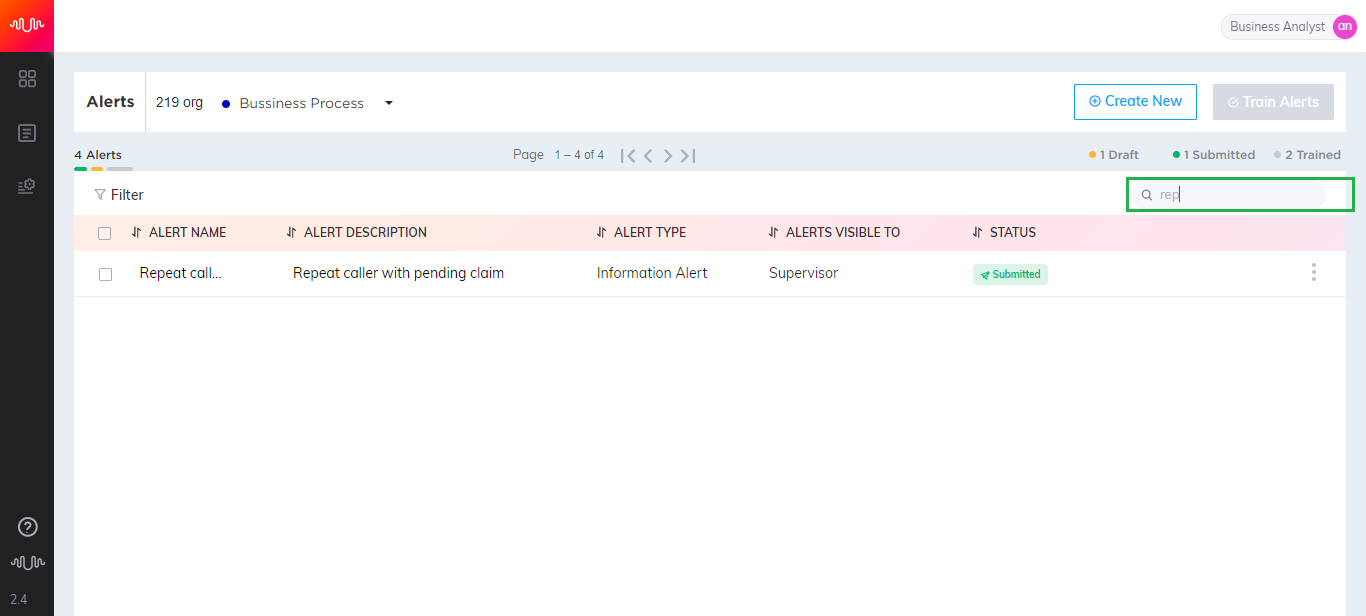 |
In the Search field, enter a minimum of 3 characters to search by Alert Name and Description from the list.