Agent Application Launchpad
The Launchpad is a special view of the Agent Application that is presented to non-Agent users. This view has several extra features that enable new users to quickly become familiar with Interactions and how they are run in the Agent Application.
In addition, the Launchpad allows users to easily practice basic operations that are important for effectively working with Uniphore Agent Scripting (JAS), such as designing and publishing an Interaction, accessing the X-Console, sharing the application with colleagues, and so on.
Note
The Launchpad display is determined according to the Show LaunchPad View setting in the X-Console. When the setting is Yes, the Launchpad will be displayed to all users with a role other than Agent.
Launchpad Basics
Although you may select and navigate through an Interaction without being logged in to the Agent Application, most Launchpad features require login, since server communication is involved.
To log in, from the upper right corner of the page click the arrow next to the Guest user. Then, enter your credentials in the popup that appears, and click Login:
 |
The main features of the Agent Application Launchpad are detailed below.
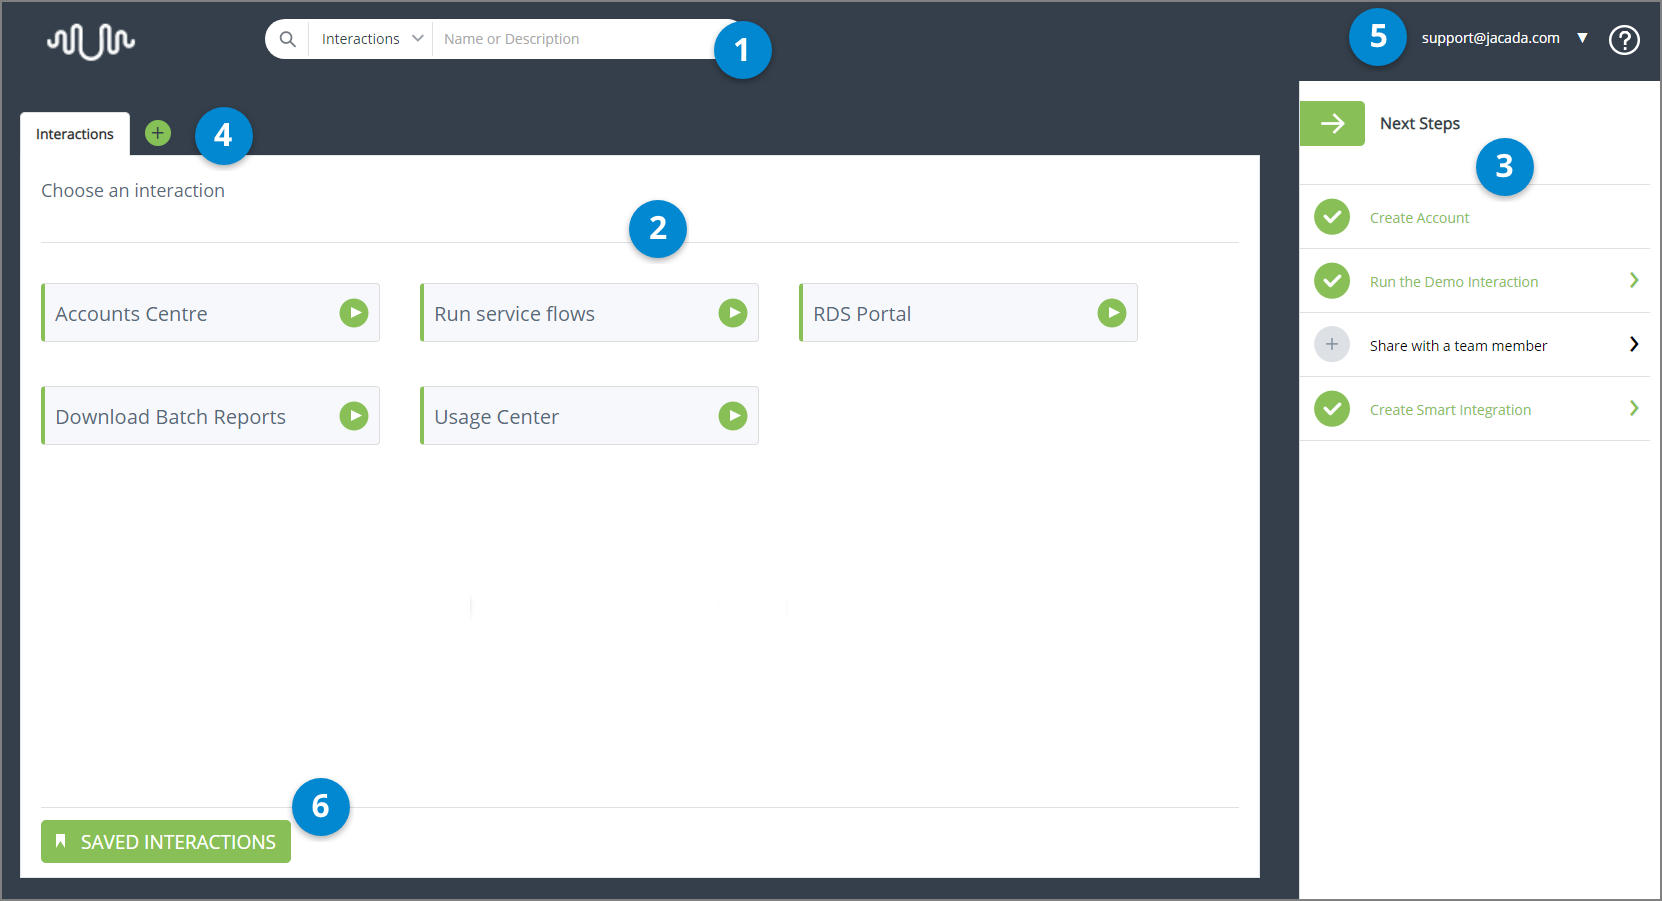 |
Item | Feature | Description |
|---|---|---|
1 | Search Tool | Enables you to search the Interactions list. For details, click here. NoteUsers may not search according to History from the Launchpad view. |
2 | Interactions list | Provides a list of available Interactions. Selecting an Interaction from this list opens a new instance of the Interaction. For details, refer to Run the Demo Interaction (below). |
3 | Next Steps pane | A step-by-step list of recommended actions to take and operations to perform to help you become a proficient Launchpad user. For more information, refer to Using the Launchpad to Become a More Proficient User (below). |
4 | Add Tab icon | Clicking this icon opens another Interactions tab to display additional Flows. |
5 | Login and Actions Menu | Enables you to log in to the Launchpad. When you are already logged in, provides the following menu of actions:
|
6 | Saved Interactions | Accesses a list of any Interactions you have saved. |
Using the Launchpad to Become a More Proficient User
The collapsible Next Steps pane lists recommended operations to perform to help you learn to use the Launchpad effectively and efficiently. The operations are launched by clicking the relevant row in the pane.
Although the steps may be done in any order, the sequence in which they are presented provide a logical progression for increasing your proficiency. If you are logged in, as each step is completed, its font turns green, and a checkmark icon appears to its left.
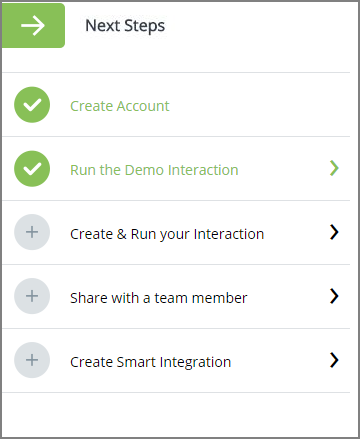 |
Various Next Steps operations are described in detail below.
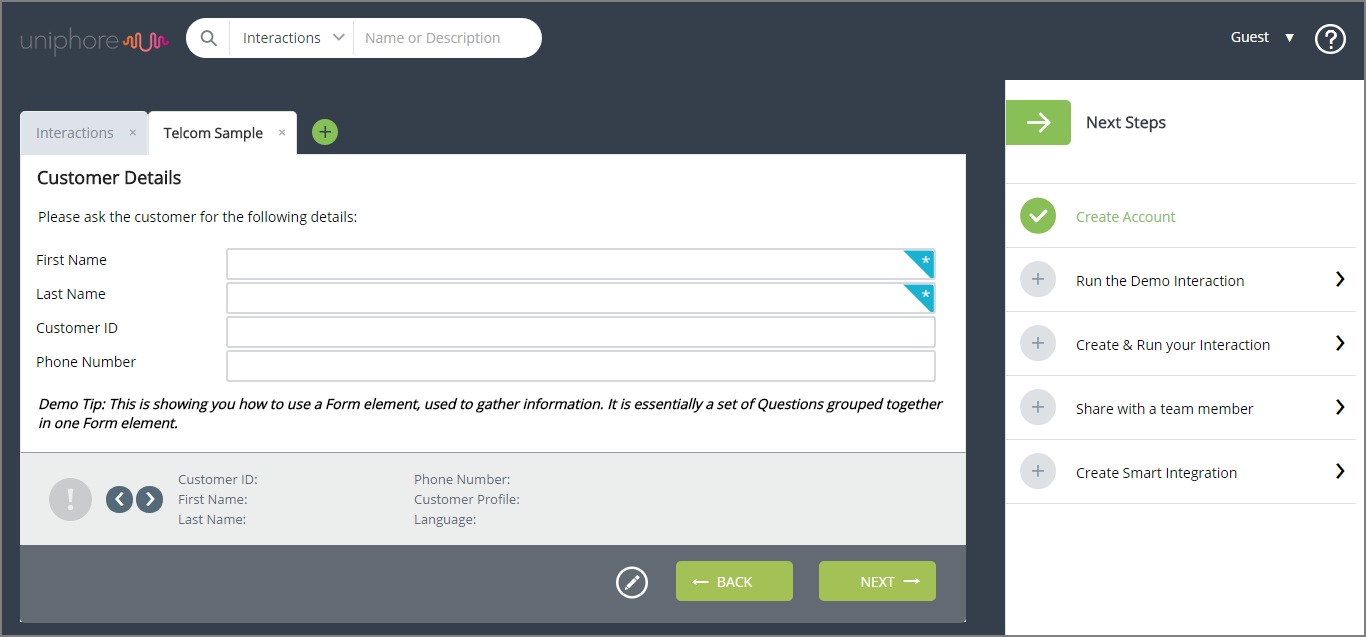
An Interaction is a step-by-step visual representation of a workflow. The Launchpad features two sample Interactions (Utilities and Telcom Sample) that were designed to demonstrate the capabilities of the Launchpad and familiarize you with the feel of navigating through an Interaction. Use the Next and Back buttons at the bottom of the page to progress forward and backward in the flow. If you want more room for the Interaction list display, you can hide the Next Steps pane by clicking the green arrow at the top.
 |
When you finish running the Interaction (by clicking Done), the Interaction History is displayed automatically. For more information, refer to Viewing Interaction History.
This operation launches the X-Designer, that enables Flow Designers to create, publish and test Interactions. The X-Designer does not require any advanced programming skills, and is intended for use by business analysts, system integrators and other non-developers.
For detailed information about using the X-Designer, click here. The Launchpad operation is considered complete once you publish one Interaction.
This operation enables you to invite additional users to join your Launchpad account. Inviting new users allows your colleagues and associates to test your Interactions and provide feedback for meeting your customers' business needs.
When you invite a new user, an email containing the username and a link is sent to the user. The user then needs to click the link and select a password. Once a password is selected, the user obtains access to all components (X-Console, Agent Application, etc.).
Note
The Share operation is available to users with roles of Interaction Admin or Account Admin only. For detailed information about account users, click here.
To invite a user to your Launchpad account:
From the Next Steps pane, select Share with a team member. Alternatively, click the Actions icon to the right of your username, and then select Invite.
The Invite A New User popup opens.

In the Email field, enter the email address of the person you want to invite.
Select the checkbox matching the role to be assigned to the new user. You may assign any role that has the same or fewer permissions than your own role. For example, if your role is Flow Admin, you may assign a role of Flow Admin, Flow Designer, or Agent (but not Account Administrator).
For detailed information about roles, click the link below the checkboxes.
Click Invite.
The popup closes, and a confirmation message is displayed. An email is sent to the invited person, and a user account is created in the X-Console.
This operation provides information about Integration Points. Integration Points are Interaction elements that allow you to use web services to retrieve information from external data sources. Some use cases for utilizing Integration Points in Interactions are:
Retrieving customer information from a CRM
Validating input (e.g., an identification number) that is entered by the customer
Sending a request to a CTI service to add a customer to the CTI's callback mechanism