Working with Tables
When using RPA, a X-Designer Flow can capture and parse specified columns or values from HTML-formatted tables in a Covered Application. This enables you to easily use or change selected table-based data at runtime.
Note
Currently, X-Designer supports table capture for web-based platforms only.
X-Designer provides an intuitive, interactive method for capturing a table in your Covered Application, and stores its runtime data in the dedicated RPA_Table variable type. This variable is available for use by any relevant Flow element or function, like other X-Designer variables.
Basic Workflow
You use the following high-level stages to capture and use table data. Step-by-step details for each stage can be found in the sections that follow.
From the relevant Flow, open or create the RPA Sequence where the table data will be used, and click the RPA Capture button.
From your Covered Application, locate and click on the desired table.
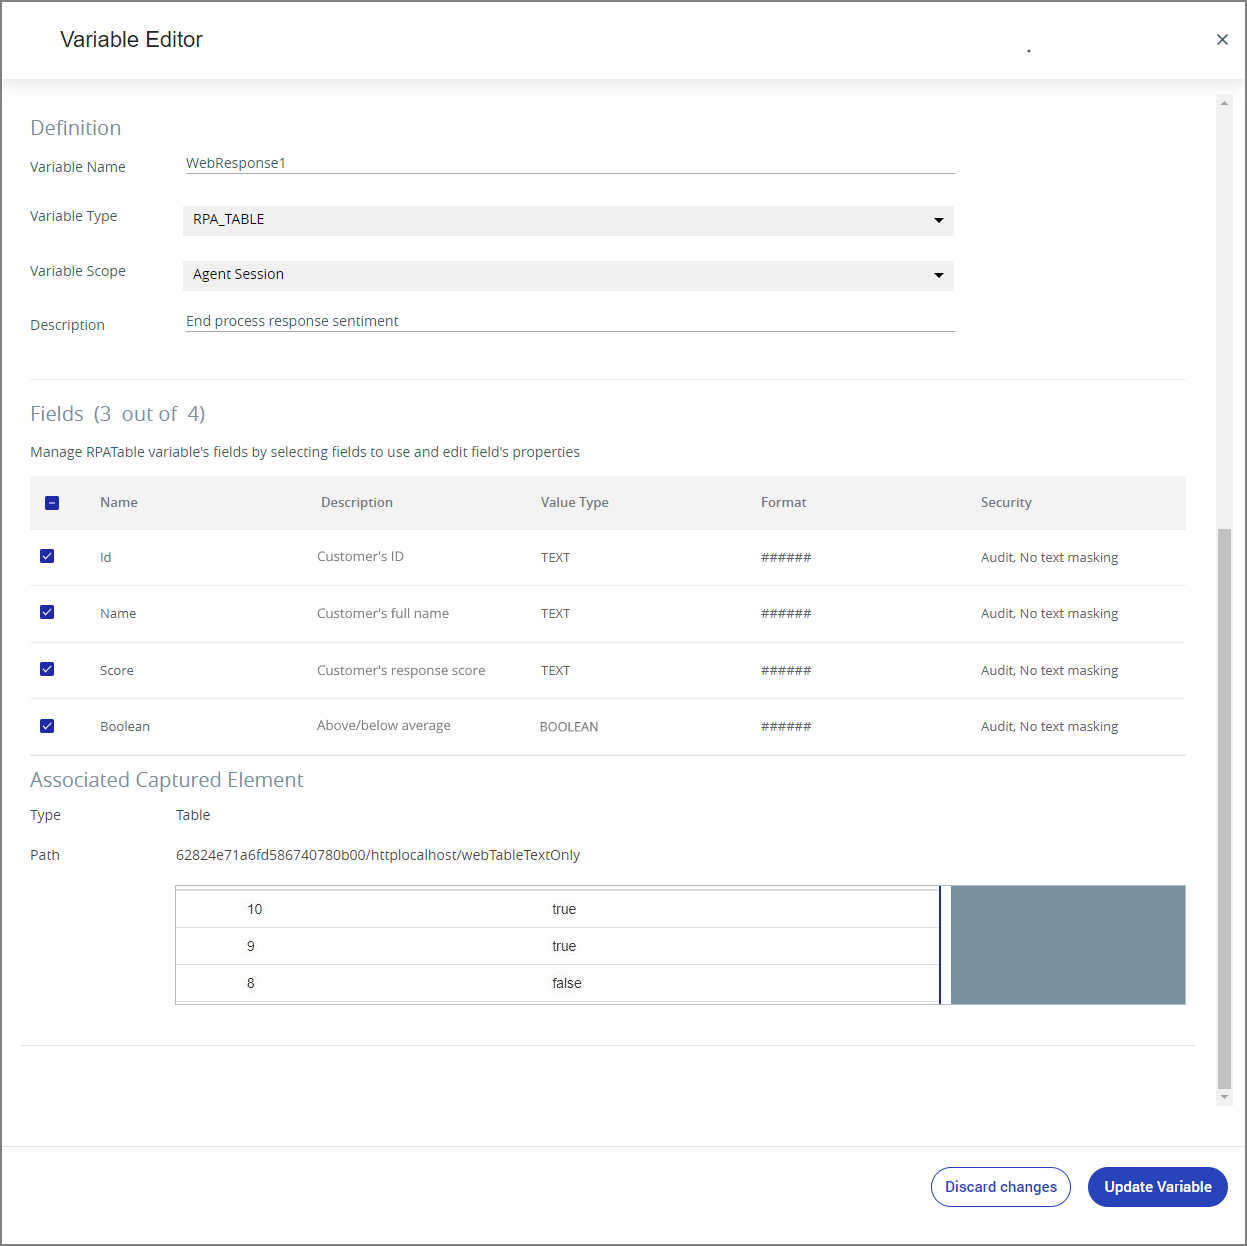
A new RPA_Table variable definition will be created from the captured table and opened in the Variable Editor. Review and change this variable as needed.
From the RPA Sequence, choose the action to perform on the captured table data at runtime, and optionally search for or refine the data for specific table records.
Returning to your Flow, create the additional Steps that use, change or process the selected RPA_Table variable data at runtime. Captured data is available to any relevant X‑Platform function. For example, you can add an Allocator element to change selected table data, or a Decision Point to execute some predefined logic according to a variable parsed from the table. You can also display a selected table data directly to a user and enable them to interact with it.
Capturing a Table
Create or open the Flow that will access the desired table in your Covered Application.
Add or edit an RPA Sequence in the Flow. For complete details, click here.
From the open RPA Sequence Editor, at the top of the Resources panel, click the RPA Capture
 icon to invoke the live UI element capture mechanism. The RPA Capture progress dialog will be displayed, and the X-Designer window will be minimized. (For more details on using Capture, click here.)
With live Capture running, activate a Covered Application window and hover over the desired table. The table will be highlighted with a blue rectangle. For example:

Click the desired table. The table will be captured as a Resource.
The X-Designer browser window will be restored with the Variable Editor dialog open, showing a new RPA_Table variable for the captured table:
Note
In the current RPA version, some settings are read-only.
In the Variable Name field, enter a unique name for this RPA_Table variable
In the Variable Scope field, choose the usage scope for this RPA_Table variable:
Customer Session - The RPA_Table variable will be available in all Flows.
Agent Session - The RPA_Table variable will be available only when an Agent is running an Agent application.
For complete details about variable scopes, click here.
In the Description field, enter helpful text that identifies this RPA_Table variable.
In the Fields area, activate the checkbox for each data item that you want to include during runtime. Each row in the RPA_Table variable corresponds to a column in your captured table.
An included field will be available to X‑Platform for your RPA Sequence. In the next stage, you can further refine the data collected by selecting or filtering it in the RPA Sequence.
Click Save. Your RPA_Table variable changes will be stored and the current RPA Sequence will be displayed once again.
You can now choose the action settings for the captured table data at runtime, and optionally search for or refine the data for specific table records.
To capture an object that is embedded in a table (e.g., a control button or dropdown list), first capture the entire table:

From among the captured table's RPA_Table variable fields or the Resources listed in the RPA Sequence Editor, identify the object from which you want to get data.
In the RPA Sequence Editor, drag the object from the Resources list onto the canvas at the center of the page:
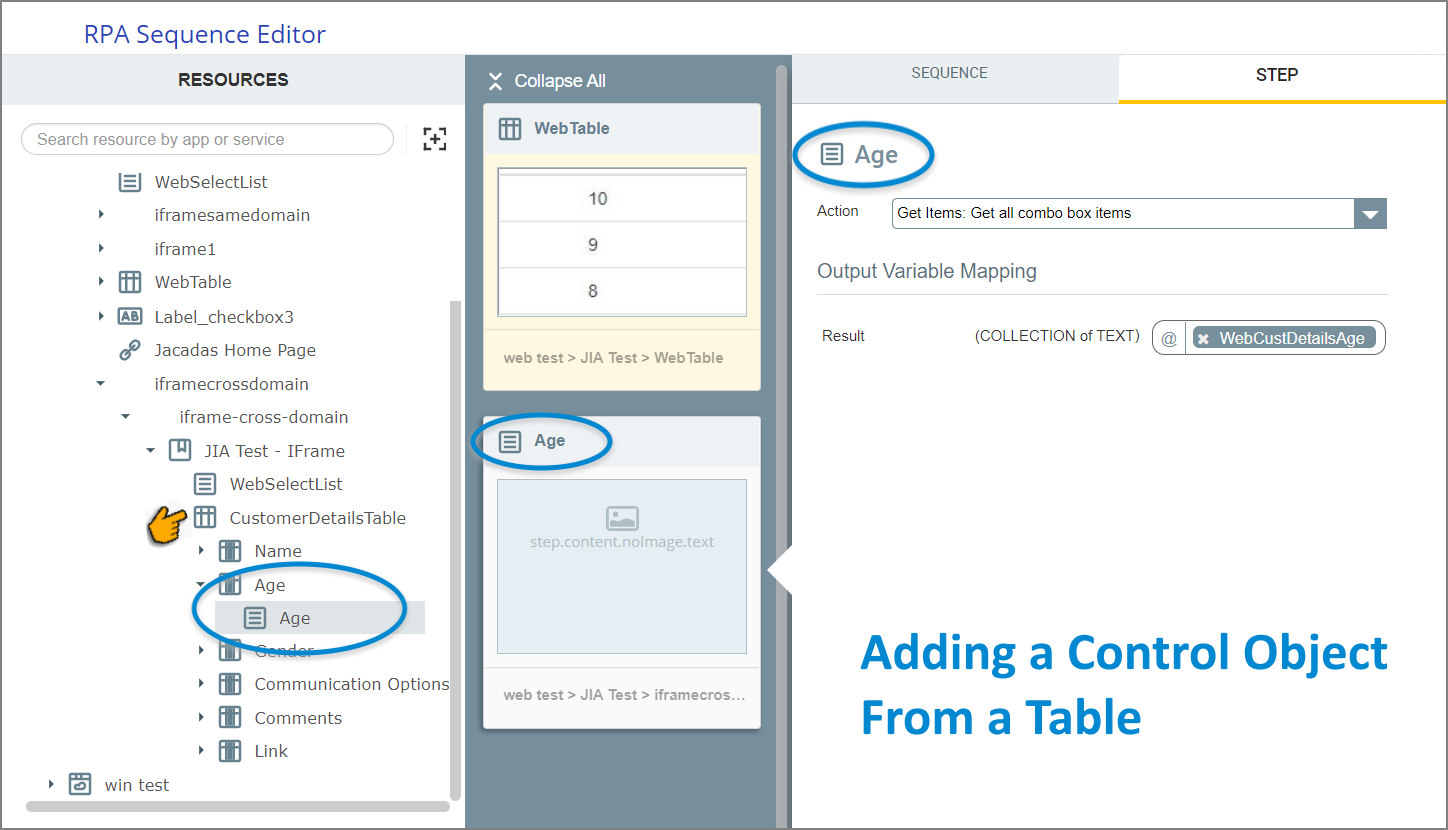
With the object currently active in the editor, edit its RPA Step settings as needed.
Note
Objects that are embedded in tables but are added to an RPA Sequence separately (i.e., outside of their parent table) are handled as standard RPA elements.
Edit RPA Table Settings
You can edit the RPA Settings for a captured table at anytime, using the RPA Sequence Editor. You can assign or change the action taken for the table at runtime, as well as refine its data when needed.
From the open RPA Sequence Editor, ensure that the relevant captured table is active on the canvas:
In the Step panel, select the Action you want to occur whenever the table is displayed during runtime. The panel setting options will change according to your Action selection.
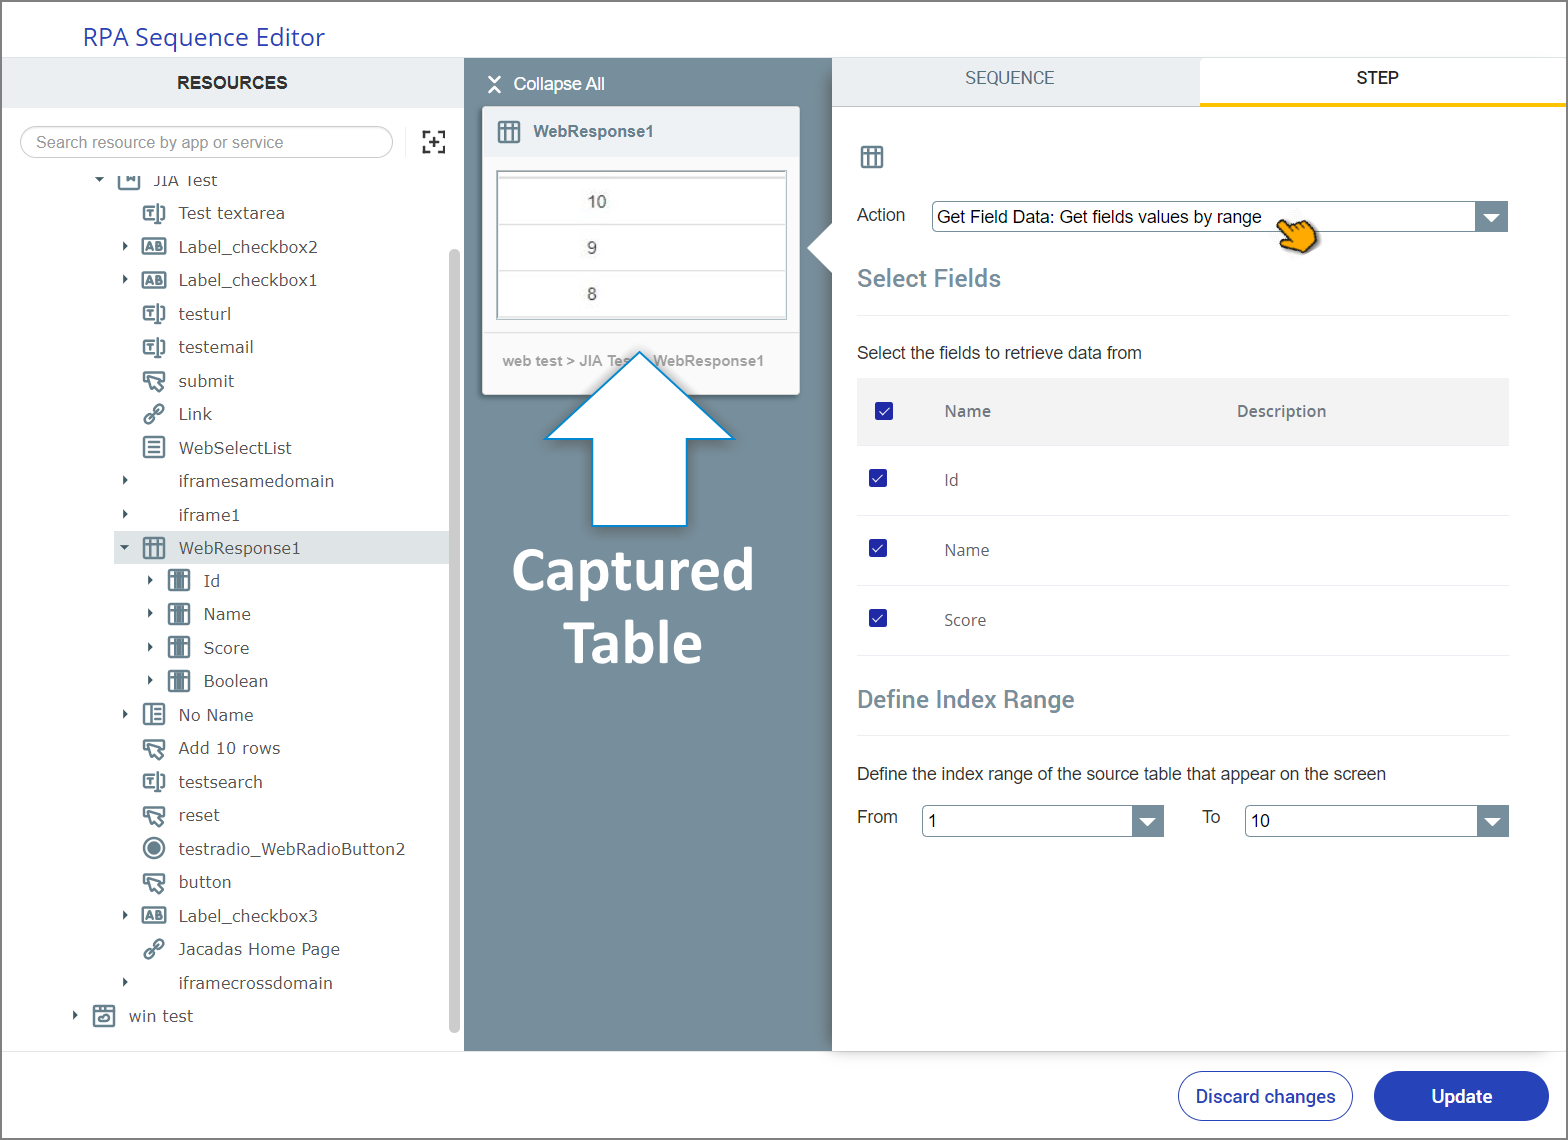
Get Field Data
Retrieve the runtime values of selected fields that are included in the Index Range you have defined.
After selecting this action:
Activate the checkbox next to any Fields you want to collect data from.
Set the Index Range of table records you want to collect data from, using the From and To counter dropdown lists. (See the example image above.)
Simple Search
Retrieve only those runtime table records where the selected field matches the search string or value that you have provided.
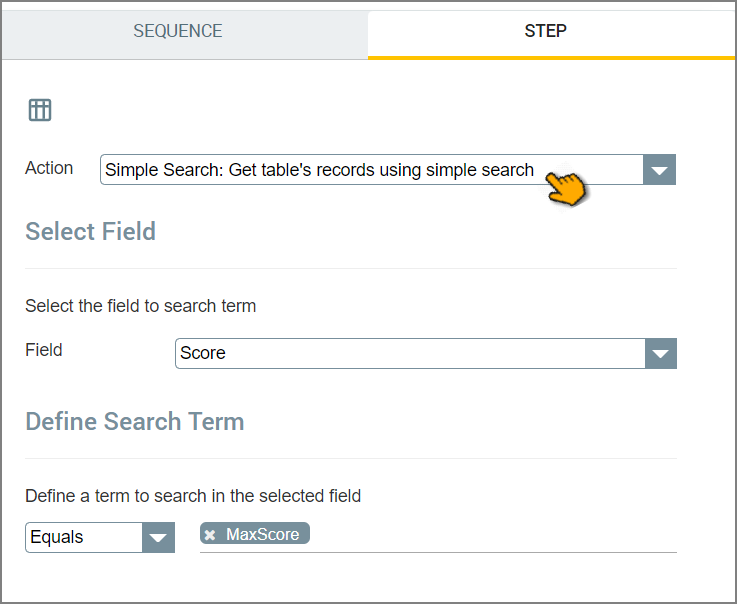
After selecting this action:
Select the Field you want to search on.
In the Define a Search Term area, select the comparison operator to use, and then enter the value(s) to search for in the Field being searched. You can also specify a Variable that will hold the desired value at runtime.
Set Current Row for Action
Assign a specific table row as the record that will be handled in the action that follows.
After selecting this action:
In the Row Number field, enter the table row on which to perform the next action in the Flow. You can also assign a variable which returns the number of the desired table row at runtime.
Get Exists
Returns a Boolean value that indicates whether or not the captured table is currently being displayed on the screen.
Click Save or Update to store your settings. The RPA Sequence Editor will close and the current Flow Map will be redisplayed.
Using RPA Table Data
An RPA_Table variable can be used like any X-Designer variable. At runtime, X‑Platform will retrieve the current values of each record that has been specified in your RPA Sequence, and make them available to any relevant Flow element or function.
You can access and change the value of a specified table record at runtime using an Allocator. In the following example, we use this capability to update the name of a customer using RPA.
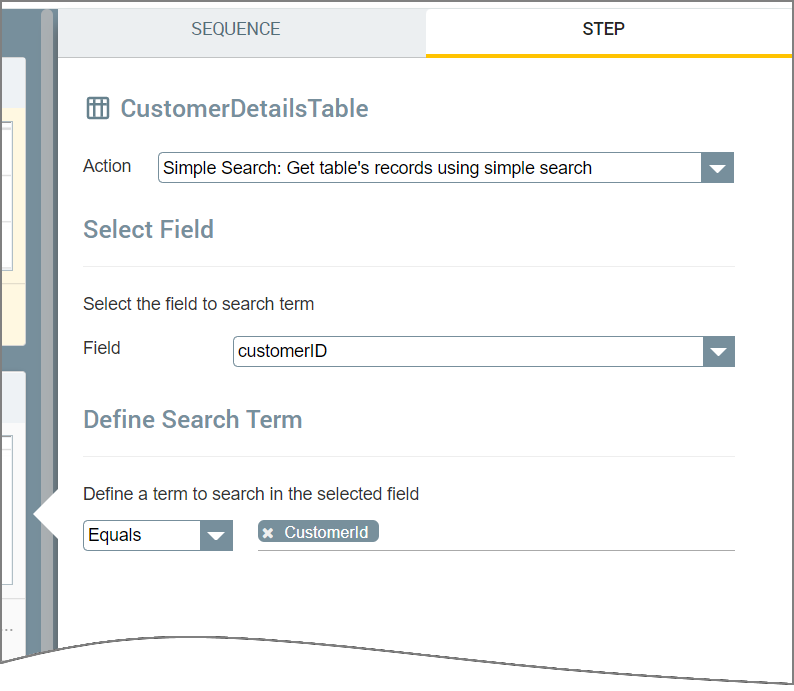
In our Covered Application, we've captured a HTML-based table that will contain the name and other details of the current customer at runtime, and saved it as an RPA_Table variable named CustomerDetailsTable.
To perform an automatic name change when required, we added the following elements to our Flow:
We created a dedicated RPA Sequence that retrieves data from the CustomerDetailsTable RPA_Table.
The main Step performs a Simple Search action on captured table data, retrieving the desired details using a Session Variable which holds the current customer ID, customerID:
Following the RPA Sequence, we add an Allocator which updates the selected table record using dedicated Session Variables, which hold the new data for customer first and last names:

The variables UpdateFirstName and UpdateLastName need to be populated with the new name data beforehand, perhaps using a different Flow.
You can display selected runtime values for a specified table record in any Page using the Table Display element. In the following example, we display values from our CustomerDetailsTable RPA_Table.
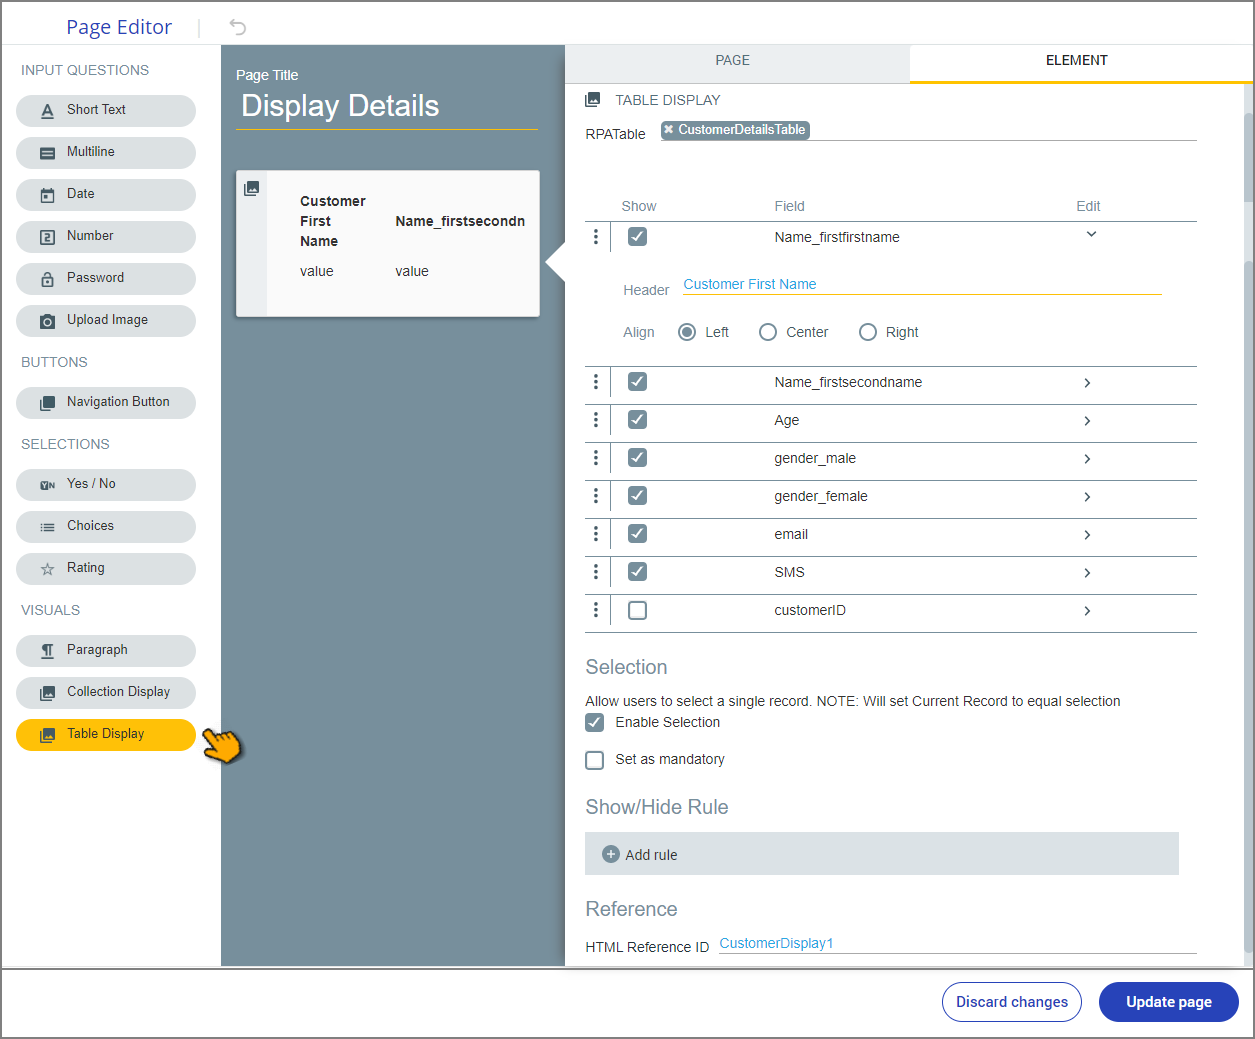 |
As shown above, the Table Display element enables you to select which fields will be displayed in the table, as well as assign custom display Headers text alignment settings for any field.
In addition, in the Selection area settings, you can:
Activate the Enable Selection checkbox to allow a customer to select a single table record in the displayed table.
Activate the Set as Mandatory checkbox to required that a customer select one of the records in the displayed table.
The following standard Page element options are also supported:
The Show/Hide Rule field enables you to show or hide the RPA Table during runtime if a specified Rule condition is met. (The table is always displayed by default.) To add a Show/Hide rule, click on the Plus icon

and enter the condition to meet using the Rule Editor that appears:
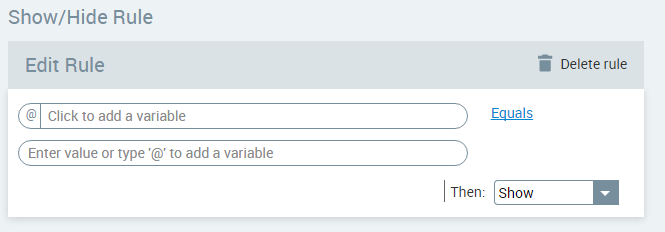
After adding the condition, select Show or Hide from the dropdown menu at the lower right to set the table's display status. To delete a Rule, click on Delete rule at the top right corner of the Rule Editor.
For more details and an example, click here.
The HTML Reference ID field stores the user response in order to make it available for use outside of X‑Platform, for example in CSS or application extensions. A unique name is automatically assigned to this field by default, but you can assign a more descriptive name to make it easier to identify.