Working with Flow Steps
Steps are the basic building blocks for your Flows. A step can be a visual element or non-visual element. The elements available to you will vary, depending on the type of Flow being used.
Visual Elements | Some examples of visual element steps include:
The UI Elements group in the Add Steps Toolbox consists entirely of visual elements. Visual elements are only available when using Interaction Flows and Intent Flows. |
Non-Visual Elements | Non-visual elements direct workflow based on predefined logic, conversations, background processing, user input, or other data. Some examples of navigation logic steps include:
The Logic Elements group in the Add Steps Toolbox consists entirely of non-visual elements. Non-visual elements are available when using any Flow type. |
Adding a Flow Step
You add steps to an open Flow using Add Steps Toolbox.
At the top left of the Flow Map, click the round Add Steps icon. The Add Steps Toolbox opens.
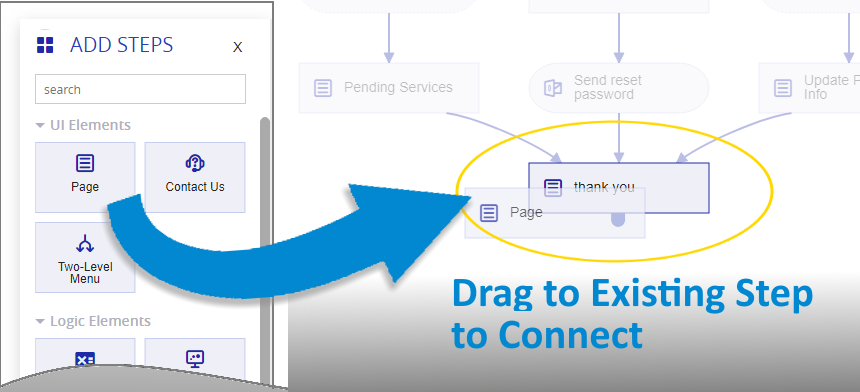
Select an element from one of the element groups displayed and drag it to the Flow Map. You can:
drag and drop it to an empty location on the Flow Map, or
drag and drop it over an existing Flow step to create a connection between the two elements.
Tip
As you drag, Flow Map elements that cannot receive the new step will be grayed out, indicating that they are unavailable.
The editor for the new element opens.
Use the element editor to configure all properties for the new step, and then save it.
If you didn't connect the new step to an existing Flow element, add a connector to tie the new step to the desired element in your Flow.
Editing a Flow Step
You can edit a step at any time. However, keep in mind that conflicts may arise if you edit or delete step parameters which provide information for variables used elsewhere in your Flow.
From the Flow Map, either:
double-click the step, or
right-click the step and click the Edit
 icon from the menu.
The appropriate editor or page opens for your selection.
Make your changes and click Create or Update, as appropriate.
The step will be updated and closed, and the Flow Map will be displayed once again.
Note
Following a step edit, it is sometimes necessary to manually refresh the active Flow's Session Variables, Custom Types, Rules or other server resources. To do this, click the Refresh button in the Flow Toolbar. The Flow Map will also be redrawn, if needed.
Deleting a Flow Step
You can remove one or more steps at any time. Keep in mind that conflicts may arise if you delete steps or elements that provide information to variables used elsewhere in your Flow.
When you delete a step that has exit points (for example, a Decision Point), all of the connected exit points will be deleted, since they are dependent on the step you are deleting.
From the Flow Map, select or hover over one step or multiple steps and then right-click.
Click the Delete
 icon from the menu that appears. A warning message will be displayed asking you to confirm the deletion.
Click Yes to confirm step deletion.
Note
You cannot delete a step which serves as a reference for another step (for example, providing information to a variable). If you try to delete a referenced step, a warning message will be displayed.
Copying and Pasting a Flow Step
You can copy and paste one or more steps at any time.
When you copy a step that has exit points (for example, a Decision Point), all of the connected exit points will be copied, since they are created from the step you are copying.
From the Flow Map, select or hover over one step or multiple steps and then right-click.
Click the Copy
 icon from the menu that appears.
Paste the step or steps:
Paste to Current Flow. To paste the copied steps into the current Flow, right-click the mouse at the desired location on the Flow Map and click Paste. The copied steps will be pasted onto the current Flow Map.
Paste to Different Flow. To paste the copied steps into another Flow, go to the target Flow by opening and activating its navigation tab. Right-click the mouse and click Paste. The copied steps will be pasted onto the active Flow Map.
Caution
Steps that make reference to User Variables in a Flow cannot be pasted into a different Flow, since the referenced information does not exist there. When you attempt to paste a step that contains a User Variable into a different Flow, a warning message will be displayed. If you have selected multiple steps and any of these contains a reference to a User Variable, no steps will be pasted.
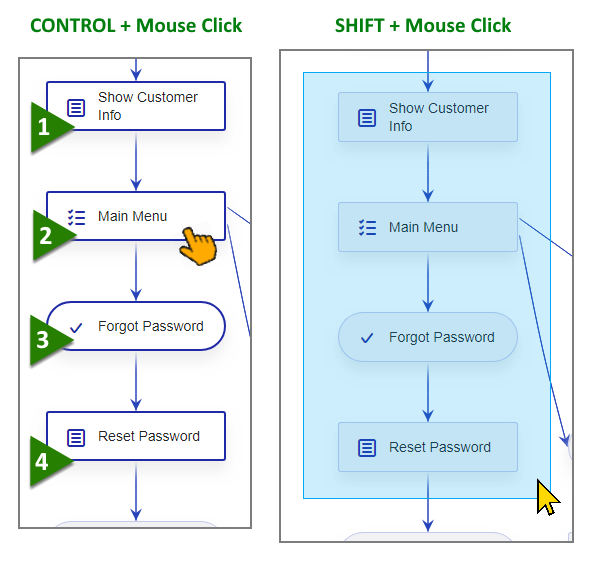
Selecting Multiple Steps
Some actions, like Delete, Copy and dragging, can be performed on multiple steps simultaneously. To select multiple steps:
From the Flow Map, while pressing the Control key, click on each step you wish to include in your selection.
Alternatively, you can also press the Shift key and use the mouse to drag a rectangle over the steps that you wish to copy.
The selected steps will be highlighted with a blue rectangle:
With your multiple step selection active, perform the desired action.
Exploring Step Components and Variables
You can quickly view all the components and variables associated with a step or element at any time.
From the Flow Map, select or hover over the step and then right-click.
Click the View in Explorer
 icon from the menu that appears.
The Elements tab of the Solution Explorer will open with the selected step or element displayed. For more details on using the Elements tab, click here.