Resources Deployment Facility
The X-Console Resources Deployment page provides a powerful facility to manage key account resources.
From this page a user with Flow Admin Role or higher can:
export or import selected resources to or from a portable .zip file;
perform a comprehensive Deployment to migrate a complete account configuration between environments;
perform a rollback from the current account configuration to a previous configuration, maintained in a previously-saved Snapshot.
Important
When using X‑Platform Release 2023.3 or earlier, deployment between complete environments is possible only with the legacy Deployment facility. For complete details, click here.
 |
Exporting and Importing Selected Resources
The export and import tools are ideal for quickly sharing one or more selected X-Designer Flows with another designer, or for moving some data from one environment or account to another.
When you export or import a resource, X‑Platform automatically includes all of its associated resources (e.g., related sub-Flows, Images, Session Variables, Entities, Integration Points and more) to ensure that it will perform as expected.
By default, before an import to the PROD environment is executed, X‑Platform automatically creates a snapshot of existing environment resources, in case a rollback should be needed. As this might add considerable time to the deployment, you can optionally request that automatic snapshots be disabled. Contact your Uniphore Account Admin for more information.
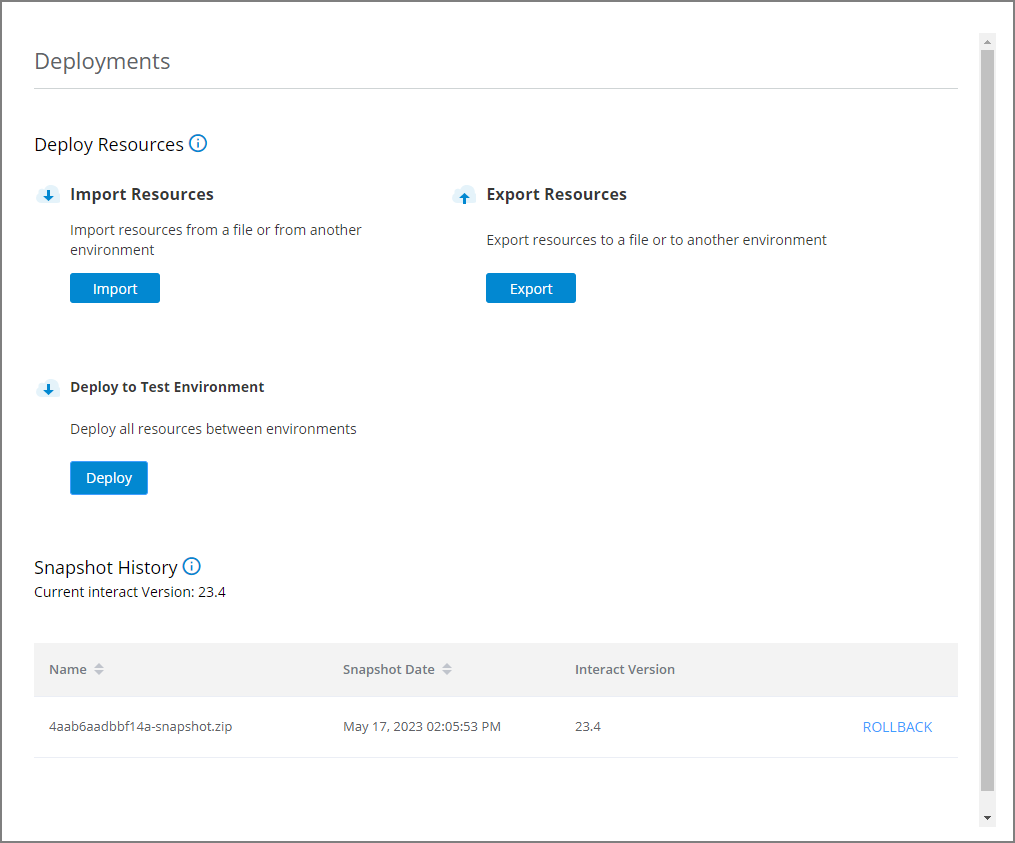
From the X-Console Account menu, select Resources Deployment. The Resources Deployment page is displayed.
Ensure that you are currently in the environment whose resources you want to export. For example, if you are working in the TEST environment, only resources for TEST will be included in the export.
Click Export. The Export Environment Resources page is displayed:
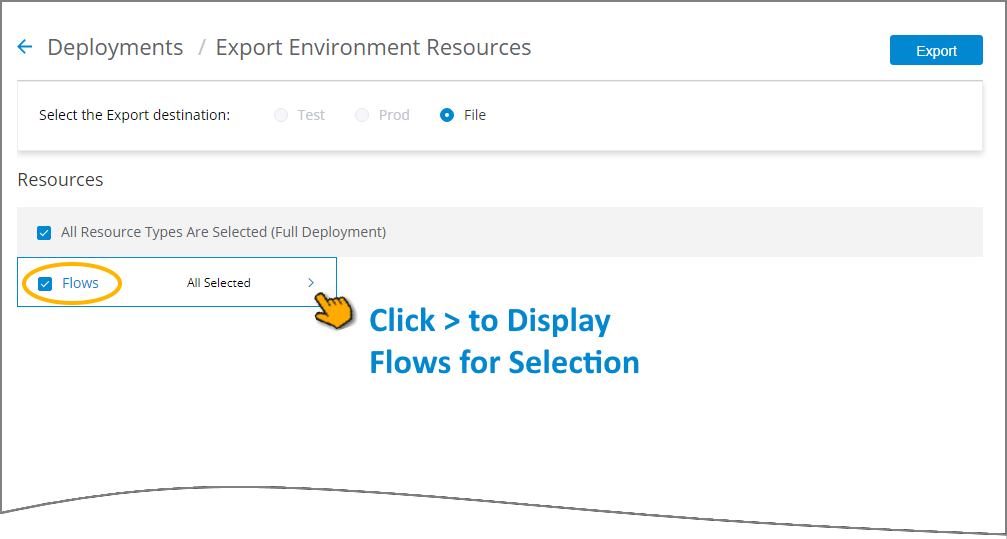
To the right of the Select the Export destination field, click the File radio button.
Note
In the current release, only the File radio button can be selected.
By default, Flow resources are displayed, with all Flows selected for export, as indicated by the checkbox activated next to Flows (circled above).
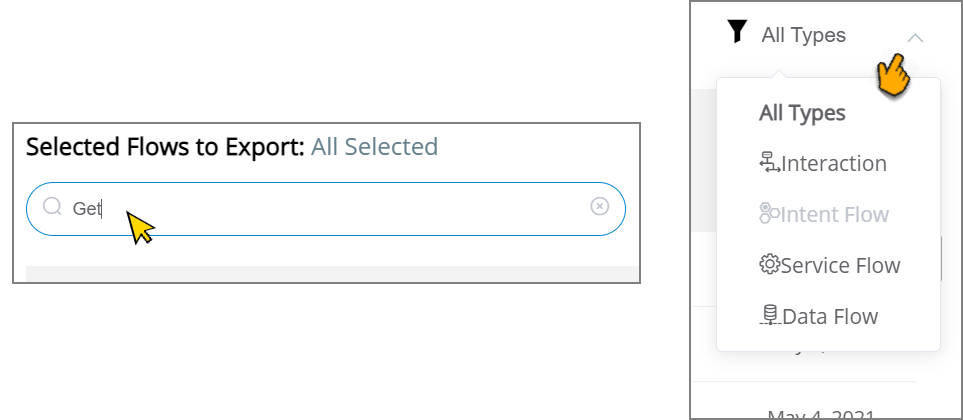
To export only selected Flows, hover over the words All Selected and click the > that appears to the right. The Flows page will be displayed, listing all Flows in your account:
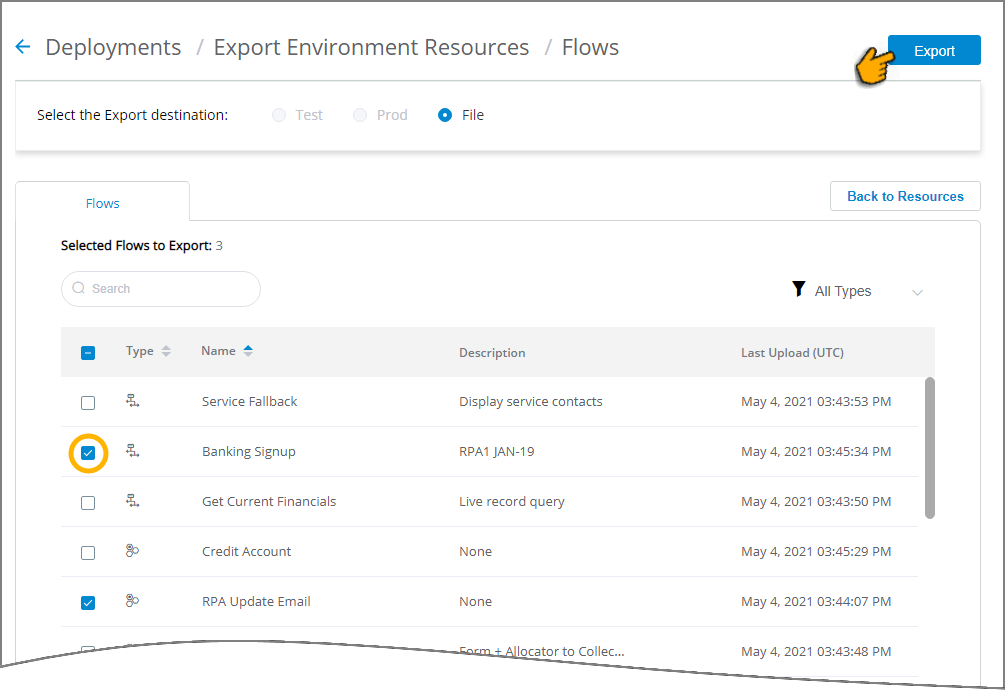
Click the checkbox next to each of Flows from the list that you wish to export.
When the list is long, you can locate a specific Flow to export by entering a few letters from its name in the Search box near the top of the page. Alternatively, you can list only specific Flow types using the Filter dropdown at the right of the page:
At any time during the selection process, clicking Back to Resources at the upper right of the list returns to the main Export Environment Resources page .
After you have selected the Flow(s) you want, click Export. A notification is displayed indicating that the export process has begun.
As the export may take a few minutes, X‑Platform enables you to continue working as needed while the process is run. When it is complete and the export file is ready for download, a popup notification will be displayed.
Click Click here to download. The exported .zip file will be saved to your Downloads folder. You can use this file for backup purposes, or share it as needed.
Caution
Ensure that you publish a Test VA to Live VA prior to performing Resource Deployment. Navigate directly to NLU Version History page to confirm that the relevant VA has been published successfully.
Do not use the Deploy Resources facility while Live VA publishing is in progress on the NLU Version History page.
From the X-Console Account menu, select Resources Deployment. The Resources Deployment page is displayed.
Ensure that you are currently in the environment where you want to import the resources. For example, if you are working in the TEST environment, the resources will be imported only to the TEST environment.
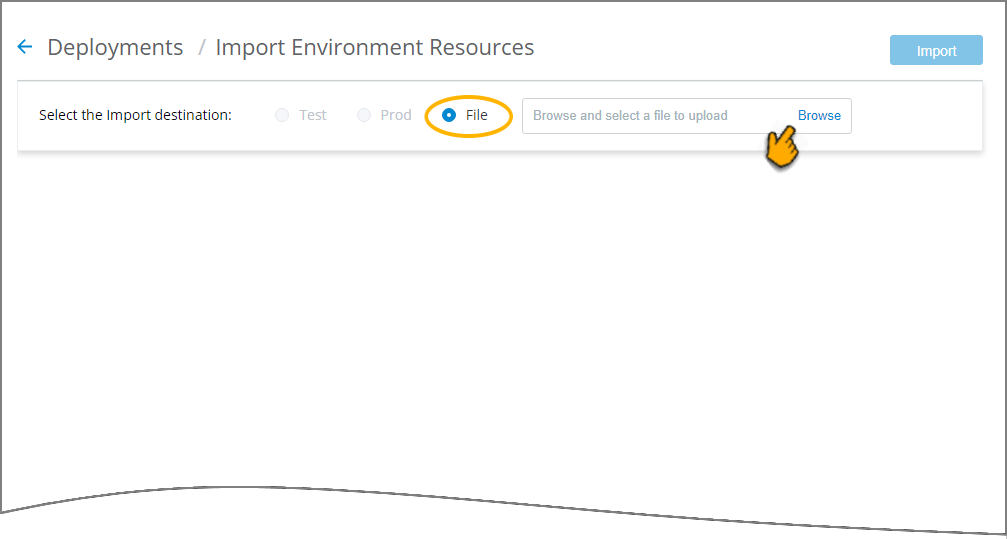
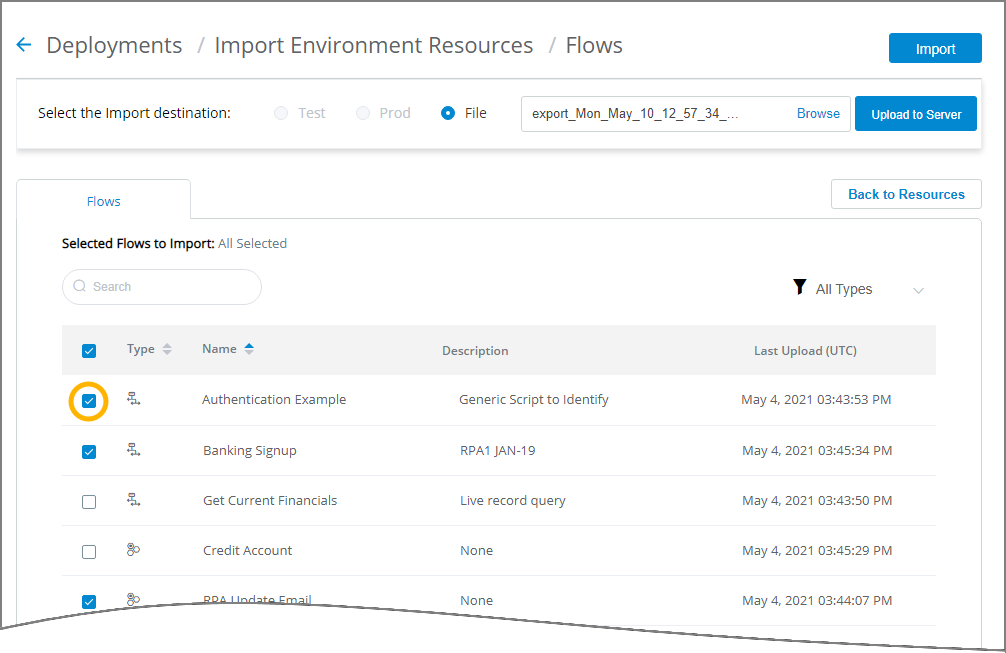
Click Import. The Import Environment Resources page is displayed.
To the right of the Select the Import destination field, click the File radio button:
Note
In the current release, only the File radio button can be selected.
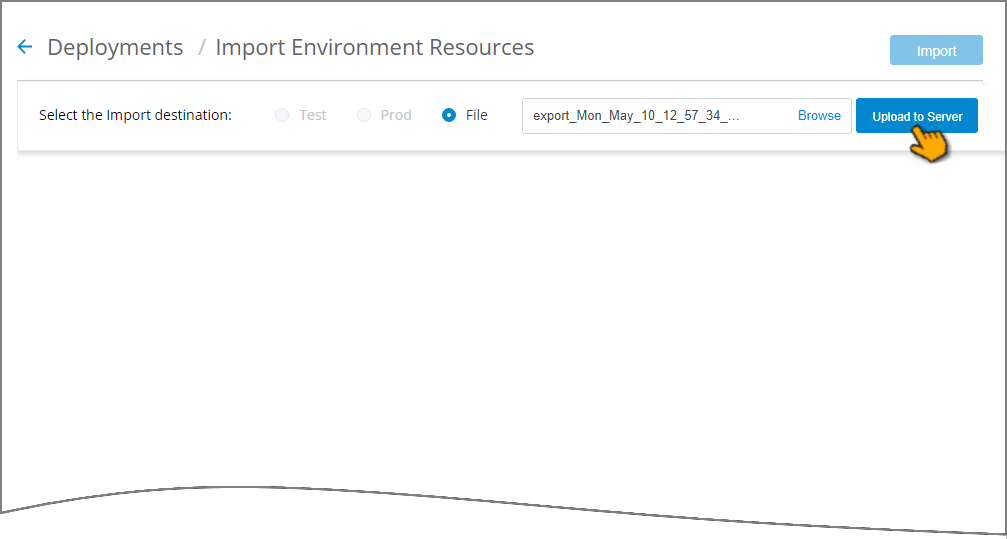
In the file selector field to the right, click Browse to locate the .zip file that you wish to import to the account. The from the file browser, click Open to select that file.
Click Upload to Server to load the selected file:
The file will be parsed to ensure that it is valid, and the Resources page will be displayed:
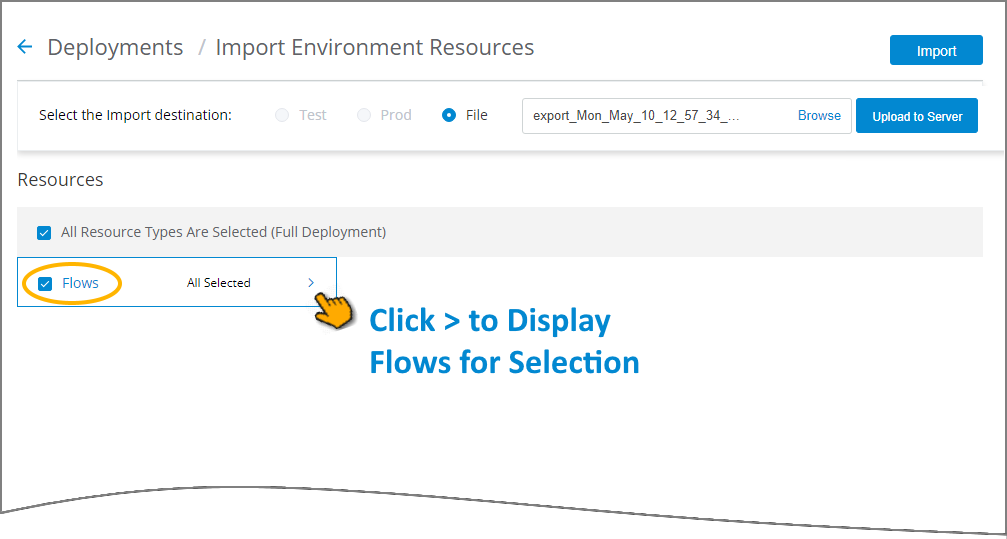
By default, all Flows are selected for import, as indicated by the checkbox activated next to Flows (circled above).
To import only selected Flows, hover over the words All Selected and click the > that appears to the right. The Flows page will be displayed, listing all Flows in your account:
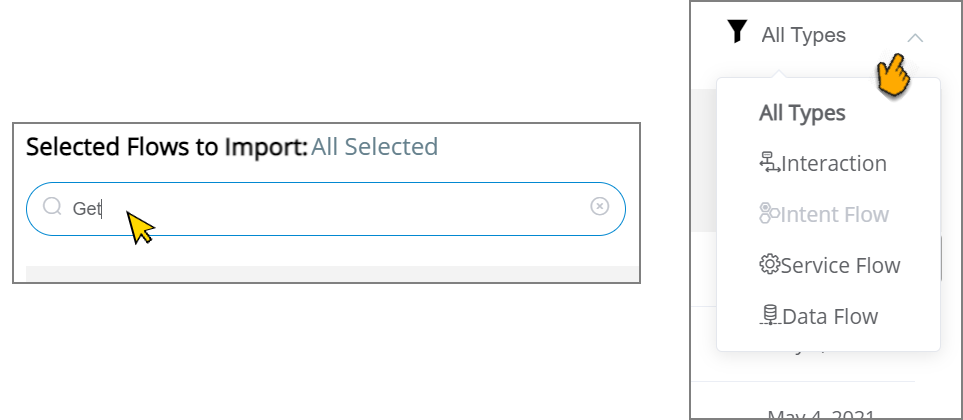
Click the checkbox next to each of Flows from the list that you wish to import.
When the list is long, you can locate a specific Flow to import by entering a few letters from its name in the Search box near the top of the page. Alternatively, you can list only specific Flow types using the Filter dropdown at the right of the page:
At any time during the selection process, clicking Back to Resources at the upper right of the list returns to the main Import Environment Resources page .
After you have selected the Flow(s) you want, click Import. A notification is displayed indicating that the import process has begun.
Note
In the current release, the Import process will also include all Applications. Newly-imported Applications will be merged with Applications that already exist in the account. For details, contact your Uniphore support representative.
As the import may take a few minutes, X‑Platform enables you to continue working as needed while the process is run. When it is complete, a success notification popup will be displayed.
If the Automatic Snapshot option is activated for the account, X‑Platform will automatically create a Snapshot of existing environment resources before performing the Import, supporting rollback to a previously-saved account configuration.
The new Snapshot will be listed in the Snapshot History section on the Resources Deployment page of any environment that was configured in the account's General Settings.
Note
By default, Automatic Snapshots are listed in the Prod environment for the account.
For complete details about rollbacks and Snapshots, click here.
Performing a Full Deployment
A full deployment operation migrates the complete X‑Platform configuration for an account from a source environment to a destination environment. Because this operation potentially can require a long time to complete, the deployment process will run asynchronously in the background, without interfering with other processes or activities being performed in the X-Console. When the deployment is finished, you are notified with a message that includes a success/fail status indicator for the various components deployed.
The following rules are used for deploying between environments:
Only one deployment operation can be actively running on the account at any time.
Deployment from the DEV environment will always be to the TEST environment.
Deployment from the TEST environment will always be to the PROD environment.
Deployment from the PROD environment will always be to the TEST environment.
When performing deployments from TEST to PROD or from PROD to TEST environments, prior to deployment, all existing resources are deleted from the destination environment.
If the Automatic Snapshot option is activated for the account, X‑Platform will automatically create a Snapshot of the current environment configuration before performing a deployment, supporting rollback.
From the X-Console Account menu, select Resources Deployment. The Resources Deployment page is displayed.
Ensure that you are currently in the source environment, that is, the environment which contains the configuration that you want to deploy. For example, if you are working in the DEV environment, the deployment will be performed from the DEV environment.
Click Deploy. A confirmation popup message is displayed indicating both source and destination environments, together with the list of all X‑Platform components that will be deployed.
Caution
Once it is started, a deployment operation cannot be cancelled.
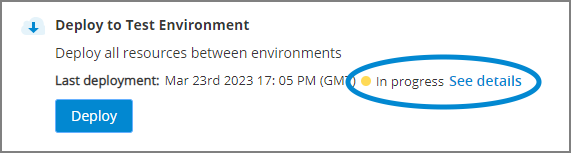
In the confirmation message, click Deploy again. A message is displayed indicating whether the deployment process has started successfully. In addition, the new deployment status also will be updated in the Last Deployment indicator line, located just above the Deploy button:
In the event that the deployment operation is unable to start, a failure message will be displayed indicating the reason, if possible.
While the deployment operation is running, you can view its general progress by clicking the See details link in the Last Deployment indicator line.
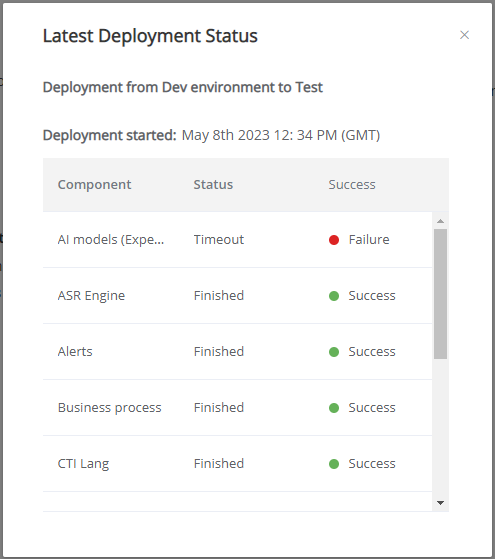
Upon completion of the deployment process, a message is displayed indicating whether the deployment process finished successfully. In addition, the final status of the last deployment operation will be displayed in the Last Deployment indicator line.
Final deployment operation status will indicate Success only when all components were successfully deployed.
To view more details about the completed process, click the See details link in the Last Deployment indicator line. A detailed popup message will be displayed showing which components deployed successfully, and which components failed to deploy, similar to the example below: