Creating Account Rules
A Rule is one or more logical conditions that can be used by any Flow in your account.
Once defined, a Rule can be used in elements like Menus, Choices and Decision Points to add intelligence and flexibility to your Flows. For some examples, click here.
When you create an Account Rule, it becomes available for use globally as a Session Variable.
Note
You can also create local Rules. A local Rule can be used in a single Decision Point and to Show/Hide specific elements from a user based on current logic.
The Rules page is available from the Main Toolbar to make it easy for you to create and maintain Rules from any activity.
Create a New Rule
From the Main Toolbar, click on Rules:

The Account Rules page is displayed.
On the upper right side, click Add New Rule. The Rules Editor opens:
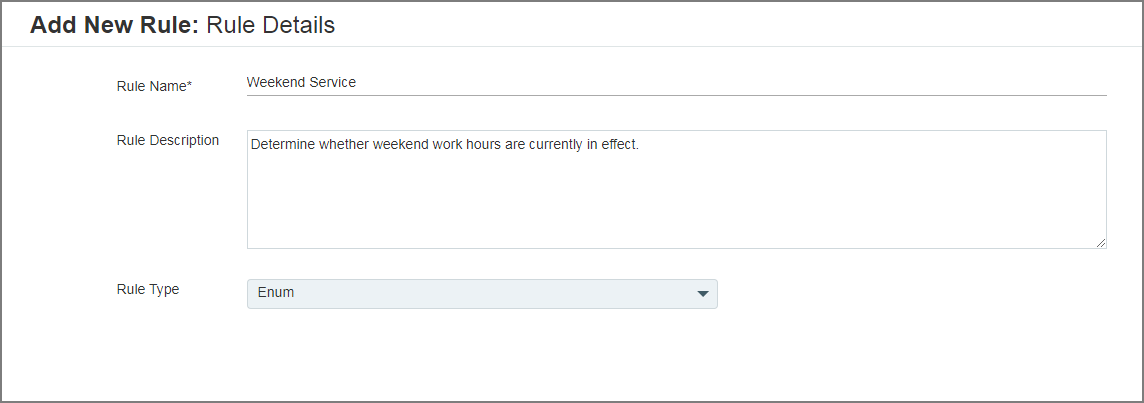
In the Rule name field, enter a unique name for the new Rule. This is a required field.
If you wish, enter a comment or helpful note in the Rule Description field.
From the Rule Type drop-down menu, select the type of Rule you wish to create. By default, the Rule TypeEnum is displayed for a new Rule.
On the lower right side, click Next. The Rules Editor displays output condition fields according to the selection:
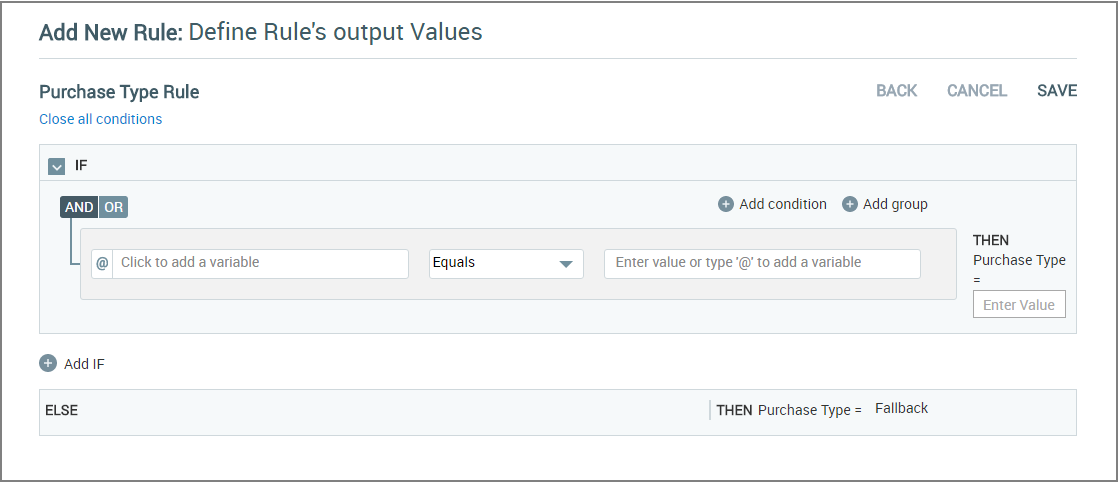
Enum rules enable you to build a set of multiple conditions to evaluate user input and determine one or more logical outcomes. As you build the Rule you can specify AND/OR logic for how each individual condition is applied, and specify the values to use when one or more conditions evaluate to True. You can also create groups of conditions that are evaluated independently to determine an outcome.
For guidance on adding and editing Rule conditions, see About the Rules Editor, below.
Define the Enum Rule conditions. Click in the left-side variable field and provide one of the following variables to examine from the Variables List:
Enter '@' then select a variable or formula from the Variables list,
Choose the
.elementAtvariable from a Collection variable and enter the index location of the item you want to access, orChoose a Dynamic Variable or enter a specific Dynamic Variable path for comparison.
Important
Global Rules can use only existing Session Variables. You should define all required Session Variables before creating the Rule. For details, see Adding Session Variables.
Select the required comparison logic (equals, less than, etc.) to be used in evaluating the condition. The comparison logic options depend on the selected variable type as detailed here.
Click in the right-side field and provide one of the following to compare against:
Enter a set value,
Enter '@" then select a variable from the Variables list,
Choose the
.elementAtvariable from a Collection variable and enter the index location of the item you want to access, orChoose a Dynamic Variable or enter a specific Dynamic Variable path for comparison.
Caution
If you have entered a value to compare that results in an error (for example, a text value when a number is expected for the variable), the X-Designer will issue a warning to correct the error. If an error persists in a condition, an execution error will be occur when the Flow is published and run.
To add another logical test statement to the current Rule condition, click on Add condition next to the Plus
 icon. When adding the new statement, be sure to select how it will be applied using the AND/OR button at the upper left of the Rule condition.
Repeat Step 8 through Step 11 for each statement you add to the current condition.
You can also create a new groups of condition statements that will be evaluated together by clicking Add group. For more information about creating groups of conditions, see About the Rules Editor.
After you specify left and right comparators for the condition, enter the desired value that will be passed if the current condition evaluates to True. This value will be used by the element you have designated to execute the Rule.
If needed, move to the next condition of the Rule. Add a new IF statement by clicking on Add IF next to the Plus
icon at the lower left of the dialog.Repeat Step 8 through Step 12 above for each condition, group of conditions or IF statement you need for the Rule.
When you have defined all Rule conditions, click Save at the lower right corner of the dialog. The new Rule will be added to the Rules listing. Note: When you add or make changes to a Rule, you must Refresh any currently open Flows in order to update them with the new information. (Saved drafts and published Flows will be updated automatically.) Use the Refresh button in the Flow Toolbar of the X-Designer.
Change an Existing Rule
From the Main Toolbar, click on Rules. The Account Rules page is displayed.
In the Rules list, click on the Rule you want to edit. The existing Rule definition will be displayed.
Make the changes to the Rule. Refer to instructions in the previous section, if needed.
When you have defined all Rule conditions, click Save at the lower right corner of the dialog. The new Rule will be added to the Rules listing. Note: When you add or make changes to a Rule, you must Refresh any currently open Flows in order to update them with the new information. (Saved drafts and published Flows will be updated automatically.) Use the Refresh button in the Flow Toolbar of the X-Designer.
About the Rules Editor
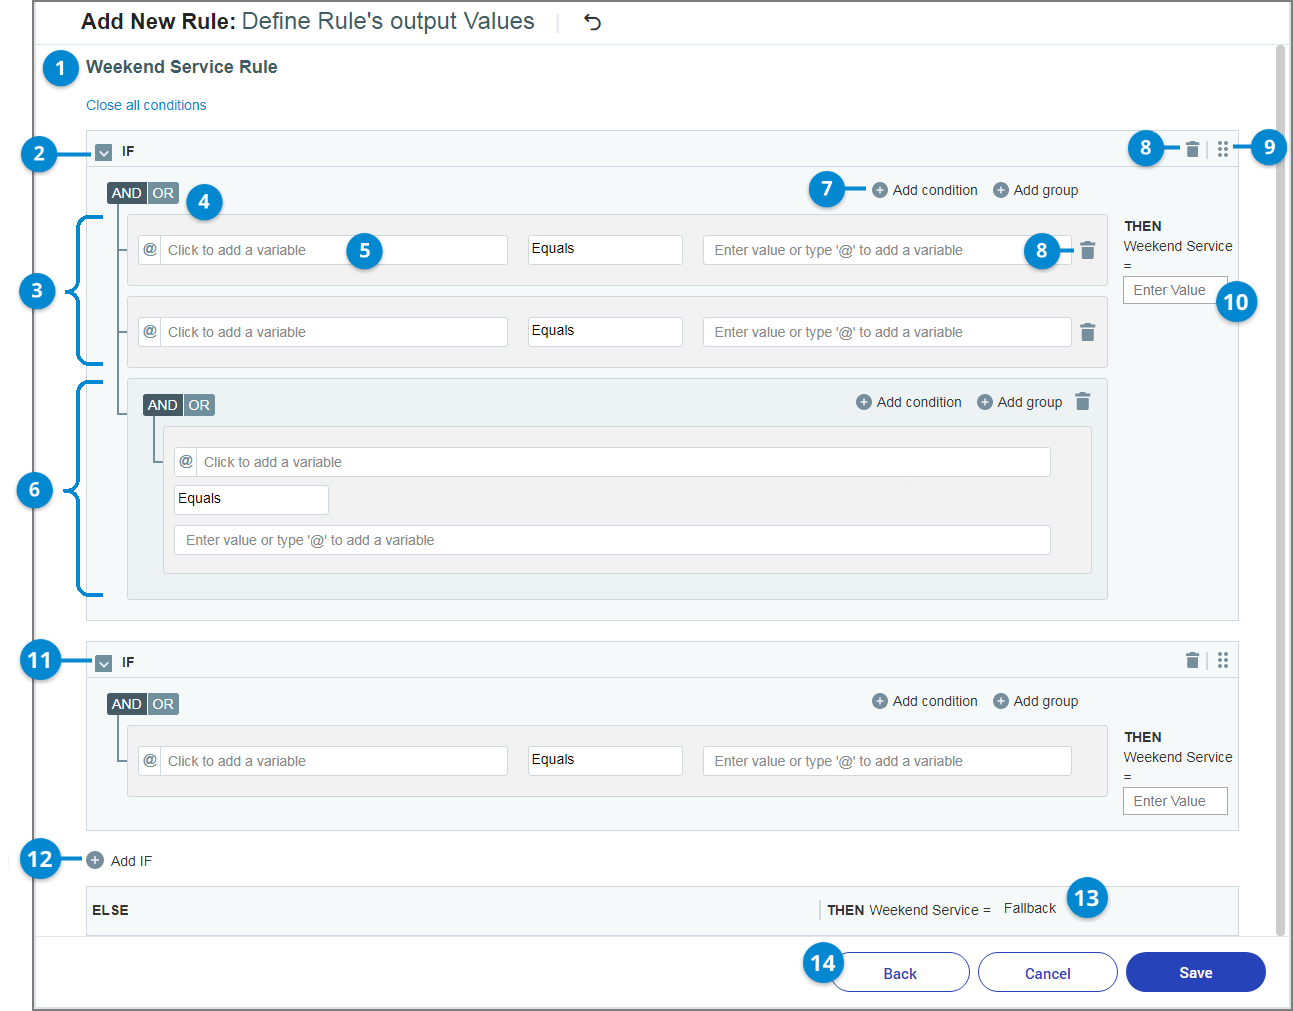
The Rules Editor is used to add condition statements to the selected Rule. It's designed to enable creation of highly complex, multiple condition rules as well as simple, single condition rules. The following diagram and table provide a quick guide to working elements of the Rules Editor.
 |
Item | Element | Description |
|---|---|---|
1 | Rule Name | The unique name for the global Rule. |
2 | Primary Condition | The first IF statement of the Rule, consisting of one or more condition statements. |
3 | Primary Condition Group | The first group of logical comparators in the Rule. Each rule must have a minimum of one group containing a minimum of one statement. |
4 | AND/OR Operator | Toggles between AND/OR to determine how the associated Condition Group will be applied to the logic:
|
5 | Conditional Statement | A variable-based statement that compares the values on left and right sides via an operator. The operator varies according to variable type. One or more statements can be used in a Condition Group. |
6 | Additional Condition Group | When needed, additional groups of statements can be added to a parent Condition Group to create more complex logical tests. Each Group is evaluated independently, and the result is applied according to the AND/OR toggle mode of its parent group. |
7 | Add Condition Add Group | Add a conditional statement or group of conditional statements to the current Condition Group. |
8 | Delete | Delete the current statement or condition. |
9 | Reorder | Move the current statement or condition to change when it will be evaluated when the Rule is run. Click on the icon and drag it to the desired location in the Rule. |
10 | THEN (Condition Output) | The output of a Condition Group when its logical test evaluates to True. This value is passed to the element that is using the Rule. |
11 | Secondary Condition | A separate Conditional Group that results in a new output value for the Rule. |
12 | Add IF Statement | Add an new, separate conditional IF to the Rule. |
13 | ELSE Fallback | The output of the Rule when none of its Conditions evaluates to True. The Fallback statement is created automatically and will always appear with the Rule on the Flow Map. |
14 | Back, Cancel and Save Buttons | Basic Rule Editor activities. Back returns to the previous entry stage when first defining the Rule, Cancel exits the Rule Editor (you will be prompted before any changes are discarded), Save saves the Rule. |