Writing Code for a Custom Integration Point
When a Custom Integration Point is called, a Custom Service is used to create a self-executing anonymous function.
This function passes a context argument that contains all the sub-functions and data that will be required to process the request. Using this method ensures that the Custom Service request is completely segregated from any other running code.
You enter your Custom Service code on the Compose panel of the Custom Integration Point wizard. To help you get started, this panel provides a simple template containing a sample function, with its input argument and response as a JSON object or string. The input parameters displayed (in this case, arg 1) are copied automatically from the parameters which are defined on the Request panel of the wizard.
(function(context) {
    context.complete(200, {echo:context.params.arg1});
})(context);
General Principles of Code Construction
Custom Services support most JavaScript functions and features using Node.js code, along with many other Node.js modules.
As you write your code, keep the following important guidelines in mind:
In order for your code to run, all the code added to the template needs to be written inside the enclosed brackets within the context function. Pre-written portions of the code outside this enclosure should not be modified.
(function(context) {
    context.complete(200, {echo:context.params.arg1});
})(context);
When you are ready to define the response, you need to call the complete function on the context. If no complete function is called in any of the code branches, the request will reach a timeout.
(function(context) {
    context.complete(200, {echo:context.params.arg1});
})(context);
Your code needs to run quickly - generally in 10 seconds or less.
The context argument that is passed to the Self-Executing function represents this particular request. The argument includes all the functions and data necessary to process the Integration Point request and respond with a result. It also can include a utility function called trace that helps debug the Integration Point while developing it.
Member | Description | Example |
|---|---|---|
| Allows you to write messages that will be placed in the console area of the Test window. The timestamp will be included. |
|
| Ends the request by returning status and data to the caller. This function is mandatory. |
|
params | Parameters that are passed to the Integration Point. These parameters are defined on the Request panel of the New Custom Integration Point wizard. |
|
Permitted Node.js Modules
Note
Currently, X‑Platform Custom Integration Points support nodeJS version 12.
When creating a Custom Service, any required Node.js modules must be invoked by calling the require function.
For example, the following code invokes an asynchronous function that waits for two seconds before returning the result to the caller. (The timers function is native to the nodejs module.) Note the syntax used for the required function, and also the use of the complete function.
(function(context) {
    var timers = require('timers');
    timers.setTimeout(function(){
    context.complete(200, {echo:context.params.arg1});
      }, 2000);
})(context);
The Node.js modules that can be included and run in your code are listed in the following table. If you include a module that does not appear below, or if you use one of the permitted modules without calling the require function, your code will not run.
Module | Description | Link for More Information |
|---|---|---|
@aws-sdk/client-s3 | AWS SDK for JavaScript S3 Client. | |
@azure/communication-email | Azure JS client SDK for email | |
axios | Promise-based HTTP client for the browser and Node.js. | |
basic-FTP | FTP client | |
csv | CSV generation, parsing, transformation and serialization | |
debug | Tiny node.js and browser debugging utility | |
email-validator | Email validator to check form level | |
googleapis | Client library for using Google APIs | |
jszip | Client API for creating, reading and editing .zip files | |
mailgun | Provides simple access to Mailgun's API | |
moment | Library for parsing, validating, manipulating, and formatting dates | |
mongodb | Official MongoDb driver API | |
ms | Tiny ms conversion utility | |
mssql | MSSQL database connector for Node.js | |
mysql | A Node.js driver for mysql | |
node-xlsx | Excel file parser/builder | |
opentok | Generate sessions and tokens for OpenTok applications | |
pusher | A Node.js client to interact with the Pusher REST API | |
soap | Allows you to connect to web services that use the SOAP protocol. | |
ssh2-sftp-client | An SFTP client that wraps around SSH2. | |
twilio | Allows you to connect to voice and data services via Twilio. | |
underscore | Underscore.js is a utility-belt library for JavaScript that provides support for common functional programming helpers (each, map, reduce, filter, etc.) without extending any core JavaScript objects. | |
xml2js | A simple XML to JavaScript object converter |
Checking Syntax and Debugging
The following tools are provided with the New Custom Integration Point wizard to help you check and test your code.
We recommend that you use your own preferred syntax checking tool to validate code before pasting it into the code editor of your Custom Integration Point.
Note that syntax errors do not prevent your code from running. Errors will be listed in the Console Output upon execution.
Built-in Syntax Checker
A simple syntax checking tool is provided with the code editor. Lines containing syntax errors are indicated by a red Error icon, and a description of the error is displayed in a tooltip when you hover the mouse over the icon:
 |
Important
The built-in syntax checker may not be as reliable as your external syntax checking tool. In some cases, it might indicate a syntax error because a function is not recognized by the checker, even when the function is valid.
To test your Custom Integration Point, click the Test button that appears at the top right corner of either the Compose or Response panels in the wizard:
 |
The Test panel is displayed.
Enter the sample value(s) that will be used for your test input parameter(s).
Click Run Test. The test will be performed:
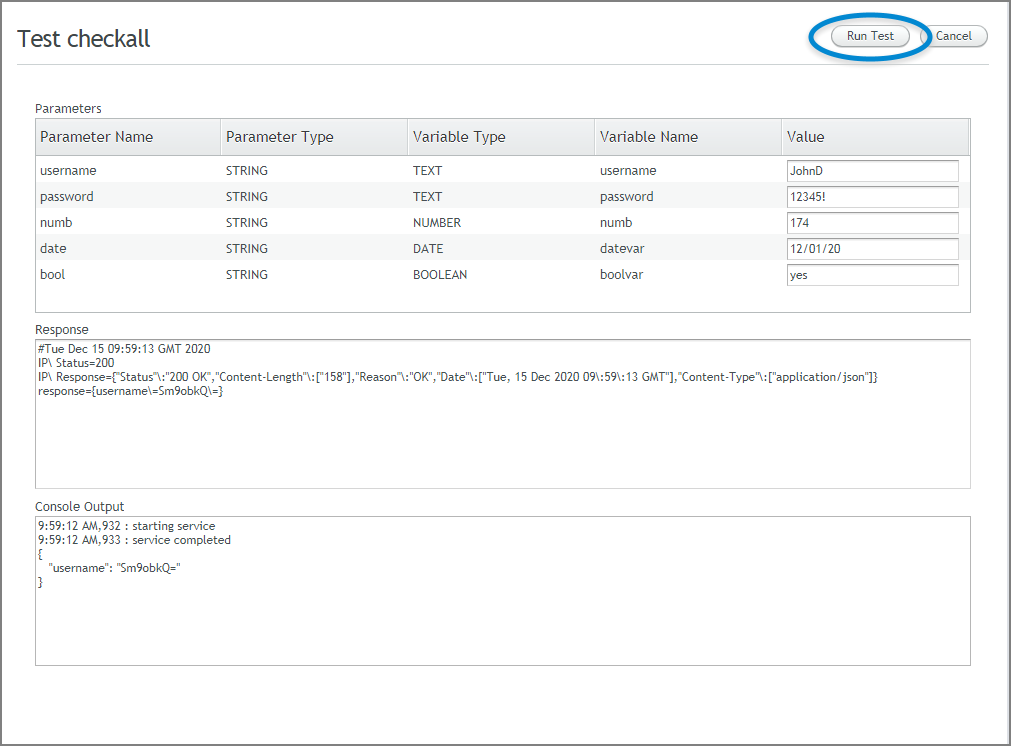
A successful test will show the expected results in the Response and Console Output panes. Usually the Response will include an HTTP Status Code of 200, also indicating success.
A test may fail for a variety of reasons, including:
An HTTP or server error. Test results may display a related error message in red at the top of the panel. The actual code may not have been executed.
A specific input or execution error. Test results may display a general error message in red at the top of the panel, with additional error details provided in the Response and/or Console Output panes.
As with all IP activities, test results are maintained in the IP Log, enabling you to review or compare previously run tests at any time.