Viewing and Managing DNIS Phone Numbers
You can view and manage the list of phone numbers used by the DNIS Application
Note
The DNIS Application availability is determined by your license settings.
Viewing the DNIS Phone Number List
From the Settings menu in the X-Console, click Connectivity. The Connectivity page is displayed.
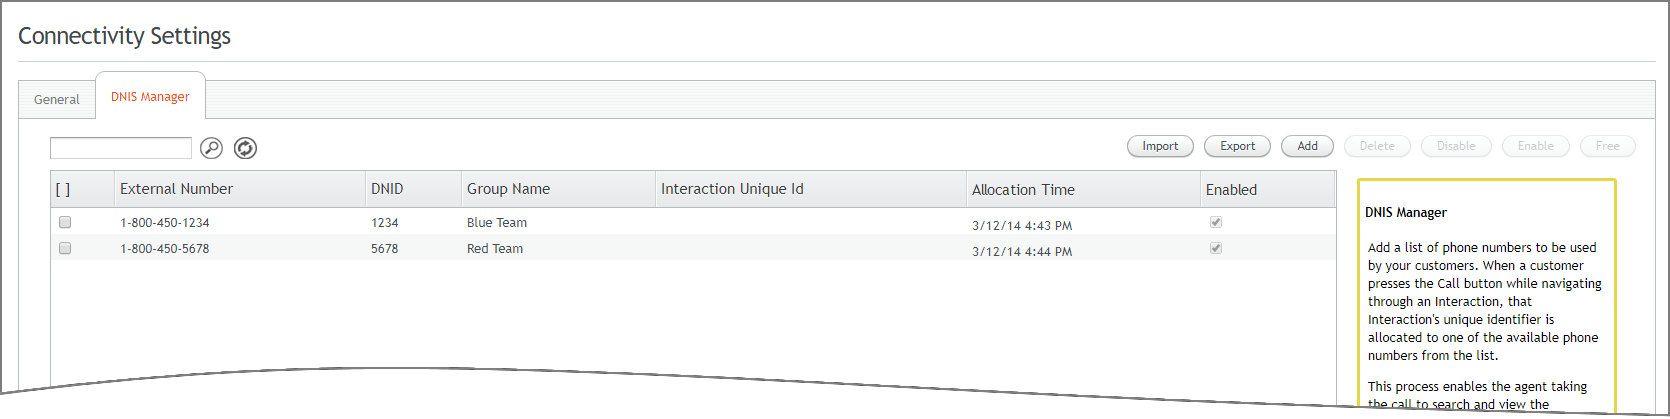
Click the DNIS Manager tab. The DNIS Manager panel is displayed, showing the current list of DNIS phone numbers:
To add or remove phone numbers to or from the DNIS Manager, see Managing DNIS Phone Numbers, below.
When the list is long, you can filter for specific phone number(s) by entering a number portion into the Search box at the upper left corner of the panel and then clicking the Search icon. To remove the search filter and refresh the list, click the Refresh icon.
For each phone number in the list, the following information is displayed:
Column | Description | Relevant to DNIS Service Application? |
|---|---|---|
Select All checkbox | Selects or clears all numbers on the phone list. | Yes |
External Number | The complete number, including all prefixes (area code, etc.). | Yes |
DNID | A unique identifier for the number, generally the last 4 or 6 digits of the phone number. | No |
Group Name | A user-defined logical group association for the number. | No |
Interaction Unique Id | The unique identifier of the Flow that is currently allocated to the phone number (if relevant). | Yes |
Allocation Time | The date and time when the phone number was last allocated. | Yes |
Enabled | Indicates whether the phone number is currently able to receive calls. | No |
Managing DNIS Phone Numbers
The action buttons at the upper right corner of the panel enable you to perform various functions on phone numbers, as listed below. Select the checkbox at the left of a phone number to perform an action on it:

Button | Description |
|---|---|
Import | Imports a list of phone numbers from an Excel file. For details, refer to Adding DNIS Phone Numbers. |
Export | Exports the current list of phone numbers to an Excel file. This button is available only when at least one number is on the list. |
Add | Enables you to manually add a phone number to the list. For details, refer to Adding DNIS Phone Numbers. |
Delete | Deletes one or more numbers from the list. This button is available only when at least one number on the list is selected. |
Disable | Inactivates one or more numbers on the list. This button is available only when at least one number on the list is selected. To reactivate a disabled number, select the number and click Enable. |
Enable | Activates one or more numbers on the list. This button is available only when at least one number on the list is selected. |
Free | Manually releases a number to which a unique ID has been allocated. When the DNIS Manager page is refreshed, the identifier no longer appears in the Interaction Unique Id column. Free is relevant to both the DNIS Application and the DNIS Service Application. |
Adding DNIS Phone Numbers
You can either Import phone numbers from a prepared file or Add phone numbers individually.
To Import phone numbers to the list, from the DNIS Manager panel, click the Import action button. A file browser is displayed enabling you to navigate to a prepared Excel file (.xls or .xlsx) and importing its data into the phone list. To be valid, the phone data must be placed into the following columns (a column header is not required):
External Number
DNID
Group Name (if relevant)
Select and Open the prepared file. The phone numbers will be imported into the phone list. A message will be displayed with the results of processing.
Note
Duplicate (existing) phone numbers are not imported.
To Add phone numbers to the list, from the DNIS Manager panel, click the Add action button. A New Phone popup is displayed enabling you to add numbers one at a time:
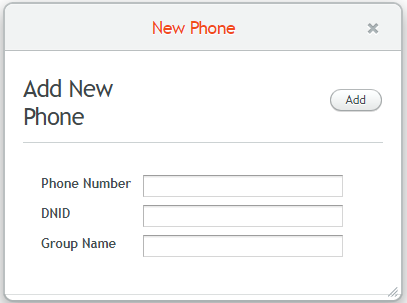
Enter the following values:
Phone Number: The complete number, including all prefixes (area code, etc.).
DNID: An identifier for the number, generally the last 4 or 6 digits of the phone number.
Group Name: A user defined logical association for the number. This setting is not mandatory.
When you are finished with each phone number, click Add at the top of the popup. The popup closes, and the number is added to the phone list.