System Properties
The admin user can configure the System Properties that follow:
Job Manager Related Properties
Transcription Related Properties]
Audio Preprocessing Related Properties
License Related Properties
Report Aggregation Properties
Recognizer NSS Related Properties
Encryption Related Properties
Speech Amplitude Properties
Job Scheduler Properties
Non-Speech BR Related Properties
Tuning Tool Related Properties
AWS Properties
Uniphore SD Properties
SIEMLOG Properties
Contact Summarization Properties
Platform Services Properties
Report Properties
Uassist Processing Properties
Date Filter Properties
Contact Reprocess and Custom Report Properties
QSense Chart Properties
UNIPHORE ASR Properties
Non-Speech Meta Properties
NLP Services properties
FANO ASR Properties
Call List View for Agents Properties]
Data Redaction Properties
Key Moment Analytics Properties
VAD Processing Properties
Contact List View for Agents
Agent Property
Business Rule Configuration Properties (Available from Version 2024.1 onwards)
Enable Reports (Available from Version 2024.1 onwards)
Job Manager Properties
In the System Properties page, click the Edit button in the Job Manager Related Properties section to update the job manager related properties.
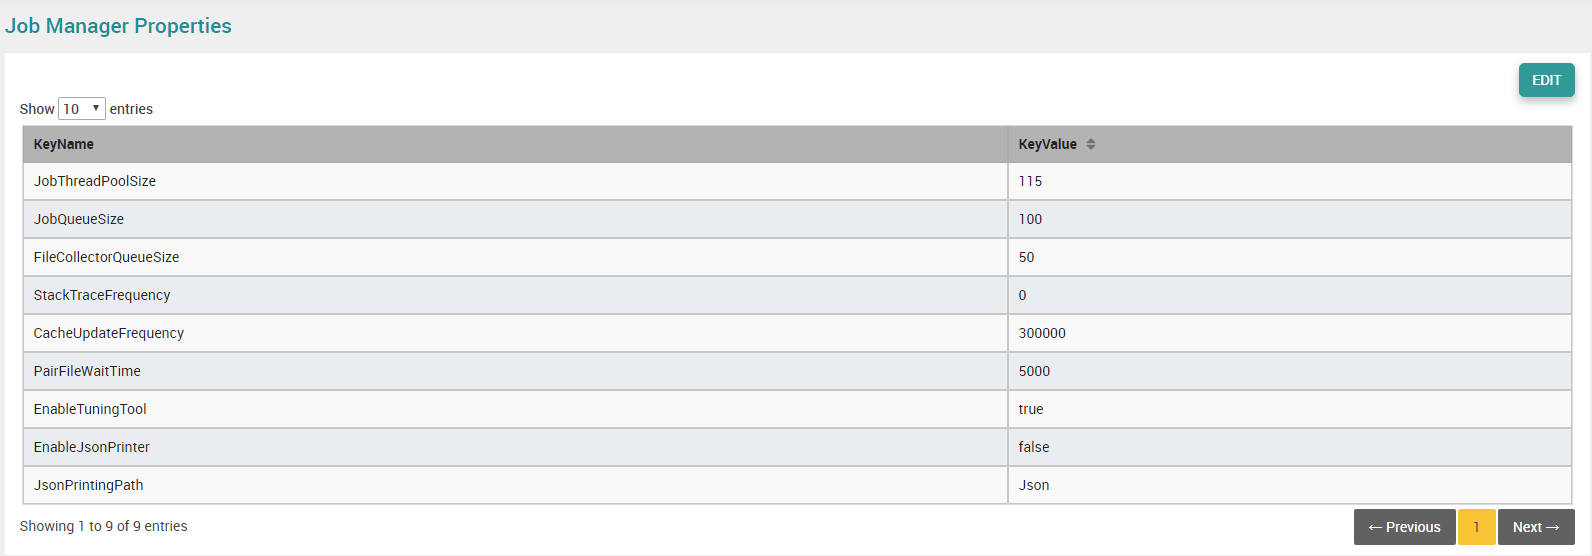
In the Job Thread Pool Size field, enter the value representing the number of audio files to be processed in parallel. It cannot be less than nuance license port size and system core size.
In the Job Queue Size field, enter the value representing the number of audio files received from database and processed the same.
In the File Collector Queue Size field, enter the value representing the number of audio files received from the File Collector folder.
In the Stack Trace Frequency field, enter the value representing the machine’s memory dumb logging frequency.
In the Cache Update Frequency field, set the value to update the Business Rules, License, Grammar, and Confidence Threshold. If you made some changes in these items, it is automatically updated based on the set value.
In the Pair File Wait Time field, mention the waiting time period to move the agent or customer file in the desired folder, while moving the pair file.
In the Enable Tuning Tool field, enter the value as ‘True’ or ‘False’ whether to update the batch file status as completed in the Tuning Tool or not.
In the Enable Json Printer field, enter the value as ‘True’ or ‘False’ to export the Business Rule result and Score result in JSON format for every call.
In the Json Printing Path field, mention the path where the JSON files to be exported.
Click the Update button to update the changes made in the job manager related properties.
Recognizer NSS Properties
In the System Properties page, click the Edit button in the Recognizer NSS related properties section.
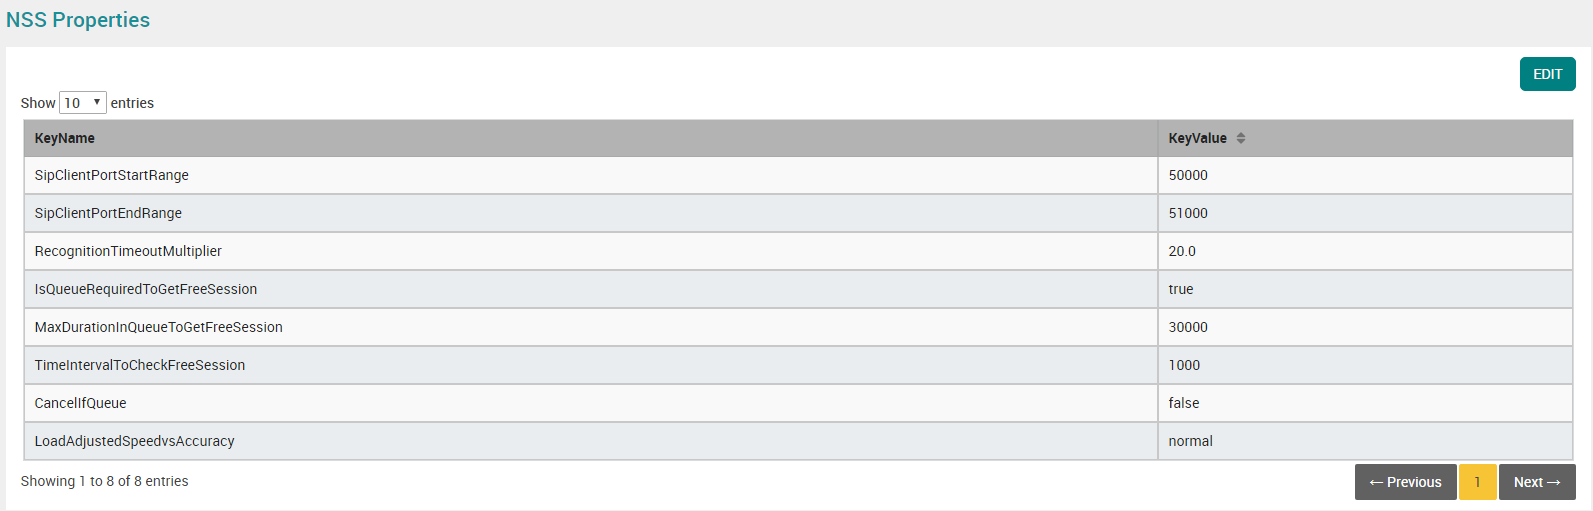 |
By default, the available port start range and port end range are displayed in the Sip Client Port Start Range and Sip Client Port End Range fields. Else, enter the available port start range and port end range which are in the job manager running system in the respective fields.
Note: The numbers between the start range and end range should be more than
10 times of nuance license count.
By default, the value is displayed in the Recognition Timeout Multiplier field.
Select the checkbox Is Queue Required To Get Free Session to indicate whether the queue waiting period is required to get a free session or not.
In the Max Duration In Queue To Get Free Session field, mention the time period (in milliseconds) need to be wait to get a free session.
In the Time Interval To Check Free Session field, mention the time interval (in milliseconds) need to be check to get a free session.
Select the checkbox Cancel If Queue to specify what happens if the client invokes another RECOGNIZE method, while this RECOGNIZE request is in progress.
In the Load Adjusted Speed vs Accuracy field, define ranges of system activity ‘idle’, ‘normal’ or ‘busy’ based on CPU capacity.
Click the Update button to update the changes made in the recognizer NSS related properties.
Transcription Properties
In the System Properties page, click the Edit button in the Transcription Properties section to update the transcriber related properties.
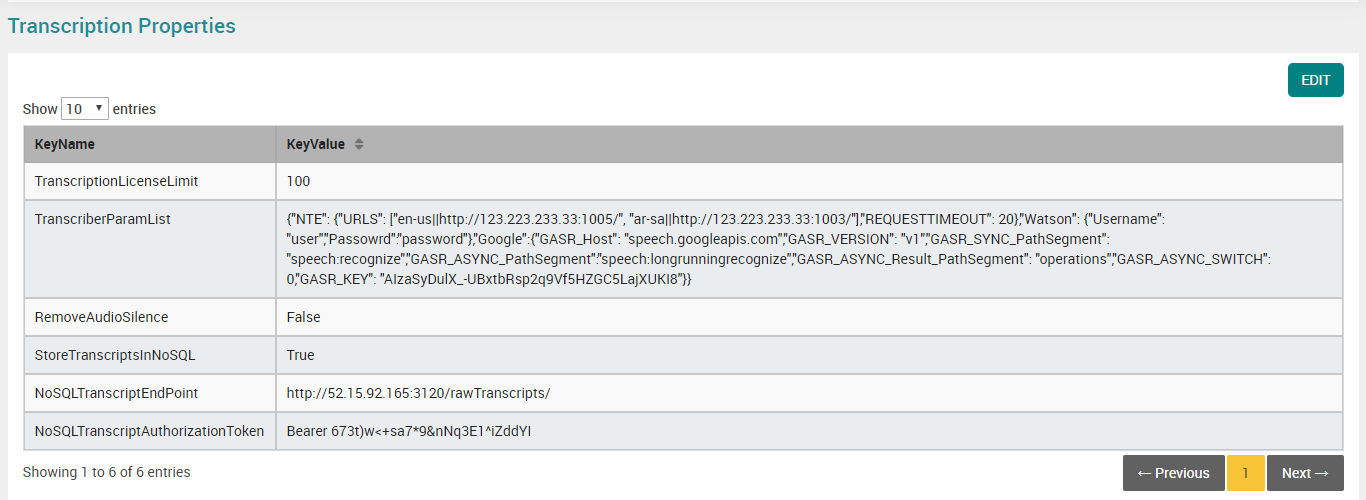
In the TranscriptionLicenseLimit field, mention the license limit of Transcriber.
In the TranscriberParamList field, mention the service URL (IP & Port number) in JSON format.
In the RemoveAudioSilence field, set the value as False.
In the StoreTranscriptsInNoSQL field, set the value as ‘True’ to store the transcripts in MongoDB.
In the NoSQLTranscriptEndPoint field, mention IP address and port of the transcript service.
In the NoSQLTranscriptAuthorizationToken field, mention authorization token to access transcript service.
Engine Properties
Go to EngineMaster table in auMina DB.
By default, the operating mode of transcription is as “Accurate” in EngineProperties column in EngineMaster table for the corresponding description column NTE.
{"SystemProperties": {"DesirableSplitLength": 7200,"EnableAddSilence": false,"AddSilence": 0, "SamplesForMinSpeechBetweenSilences": 0,"isSpeakerDiarization": false,"Operating_Mode": "accurate"}}Change the operating mode of transcription to Fast or Warp, if required.
Note
The recommended operating mode of transcription is as “Accurate”.
Audio Preprocessing Properties
In the System Properties page, click the Edit button in the Audio Preprocessing Related Properties section to update the audio preprocessing related properties.
In the Desirable Split Length field, set the value to split the audio file.
In the Samples For Silence Detection field, set the value representing the limit to consider as the silence in the samples.
In the Samples For Min Speech Between Silences field, enter the value representing the minimum silence period in the speech.
In the Speech Overlap Threshold field, mention the time limit in milliseconds to detect Speech Overlap in the call. If the time period exceeds the mentioned limit, it is considered as Speech Overlap.
Click the Update button to update the changes made in the audio preprocessing related properties.

License Properties
In the System Properties page, click the Edit button in the License section.

In the System Warning field, enter the value representing the number of days to display the system warning message before the license period expired.
Click the Update button to update the changes made in the license related properties.
Report Aggregation Properties
In the System Properties page, click the Edit button in the Report Aggregation Properties section.
In the
FirstAggregationJobStartDatefield, enter the date and time on which the report aggregation must start.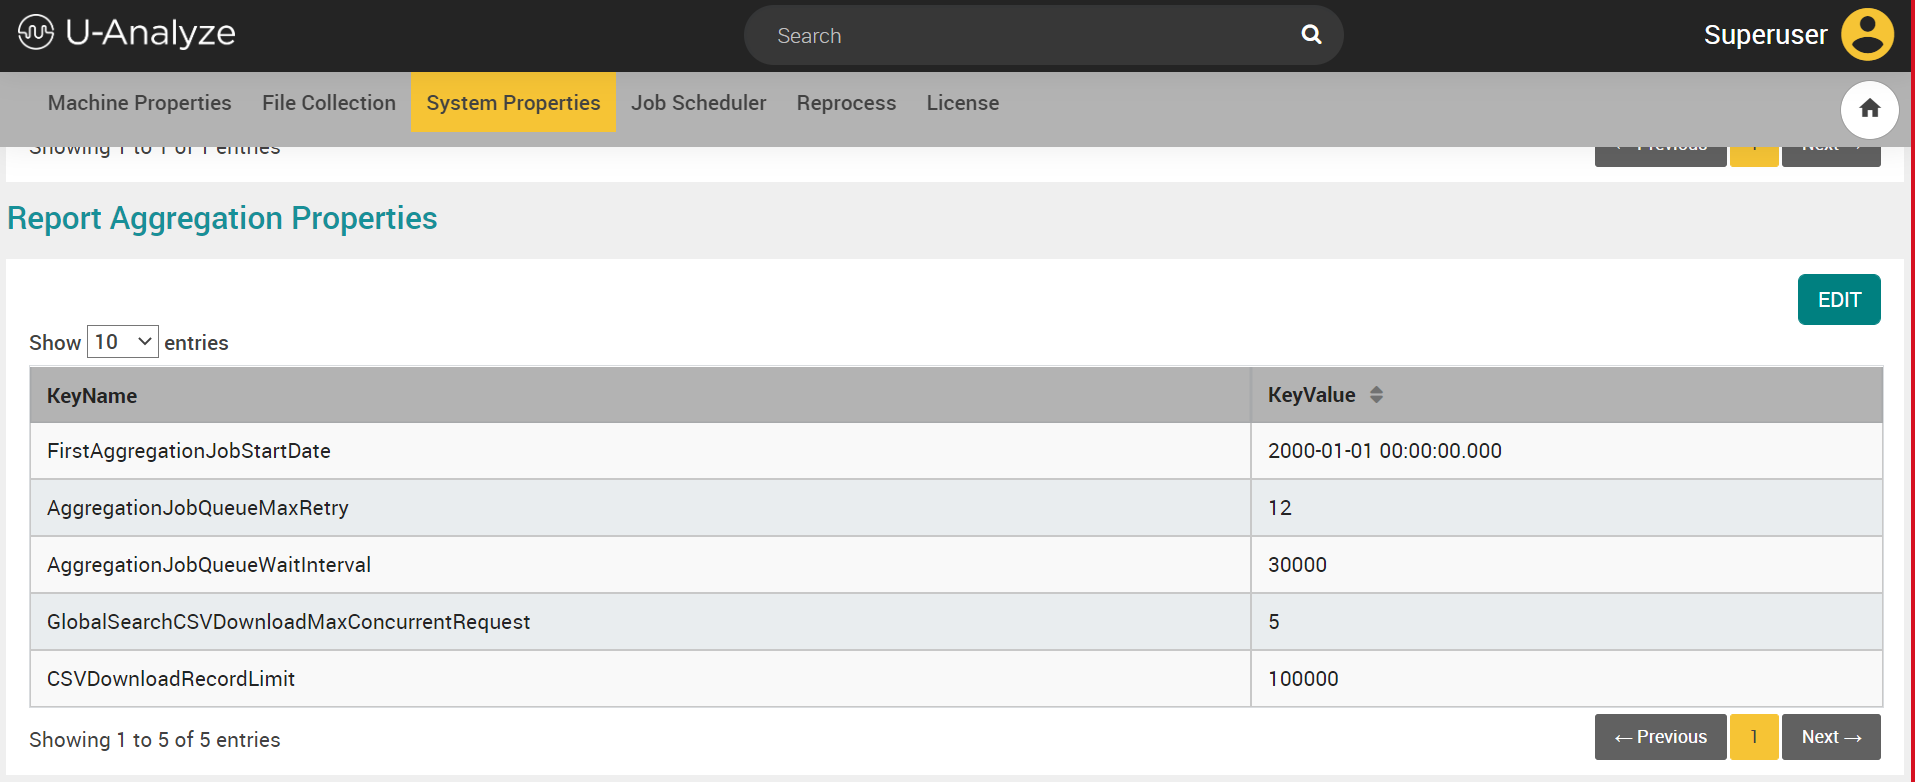
In the
AggregationJobQueueMaxRetryfield, enter the value of the number of times to check the completion of report data aggregation.In the
AggregationJobQueueWaitIntervalfield, mention the time interval to check the completion of report data aggregation.The
GlobalSearchCSVDownloadMaxConcurrentRequestshows the maximum concurrent requests that can be processed to download the CSV file. Currently, it can be configured to a maximum value of five (5).In the
CSVDownloadRecordLimitset the maximum number of records that can be downloaded in the CSV file. By default, it is set to 100000.Click the Update button to update the changes made in the report aggregation properties.
Recognizer Properties
In the System Properties page, click the Edit button in the Recognizer Related Properties section to update the recognizer related properties.

In the Confidence Threshold field, set the threshold value for reading keywords from .xml file.
In the RecogLicenseLimit field, mention the license limit of Recognizer.
Click the Update button to update the changes made in the job manager related properties.
Encryption Properties
In the System Properties page, click the Edit button in the Encryption Properties section.

In the Session TimeOut field, enter the time-out period in milliseconds.
Click the Update button to update the changes made in the encrypted related properties.
Speech Amplitude Properties
In the System Properties page, click the Edit button in the Speech Amplitude Properties section.
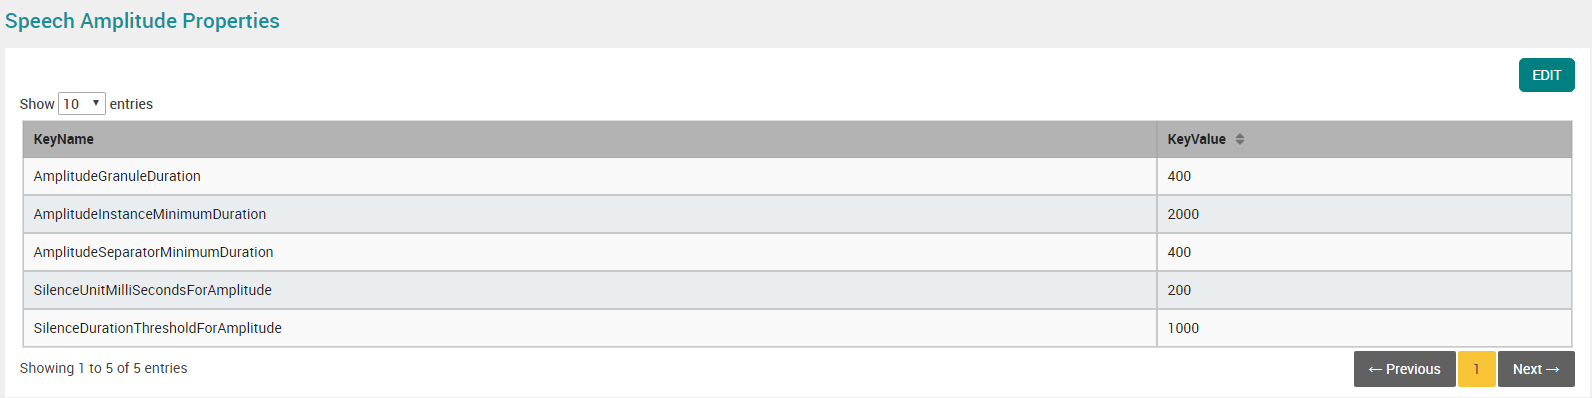
In the Amplitude Granule Duration field, mention the time period in seconds to split the audio file. This field accepts 0.25, 0.5 and 1 values.
In the Amplitude Instance Minimum Duration field, mention the continuous time period in seconds to consider as Low, High amplitude.
Note
Ensure the value is greater than Amplitude Granule Duration.
Ensure the value is a multiple of Amplitude Granule Duration.
In the Amplitude Separator Minimum Duration field, mention the time period in between Low or High amplitude to consider as Low or High.
Note
Ensure the value is greater than or equal to Amplitude Granule Duration.
Ensure the value is less than Amplitude Instance Minimum Duration.
Ensure the value is a multiple of Amplitude Granule Duration.
In the Silence Duration Threshold for Amplitude field, mention the time limit to detect Silence in the call. If the time period exceeds the mentioned limit, it is considered as Silence.
Click the Update button to update the changes made in the Loudness related properties.
Job Scheduler Properties
In the System Properties page, click the Edit button in the Job Scheduler Properties section.

In the Scheduled Job Misfire Threshold field, mention the time period in milliseconds to restart the job. If the job is not run automatically for any reason in the time period set in Job Scheduler screen, system automatically starts the job based on the mentioned time period.
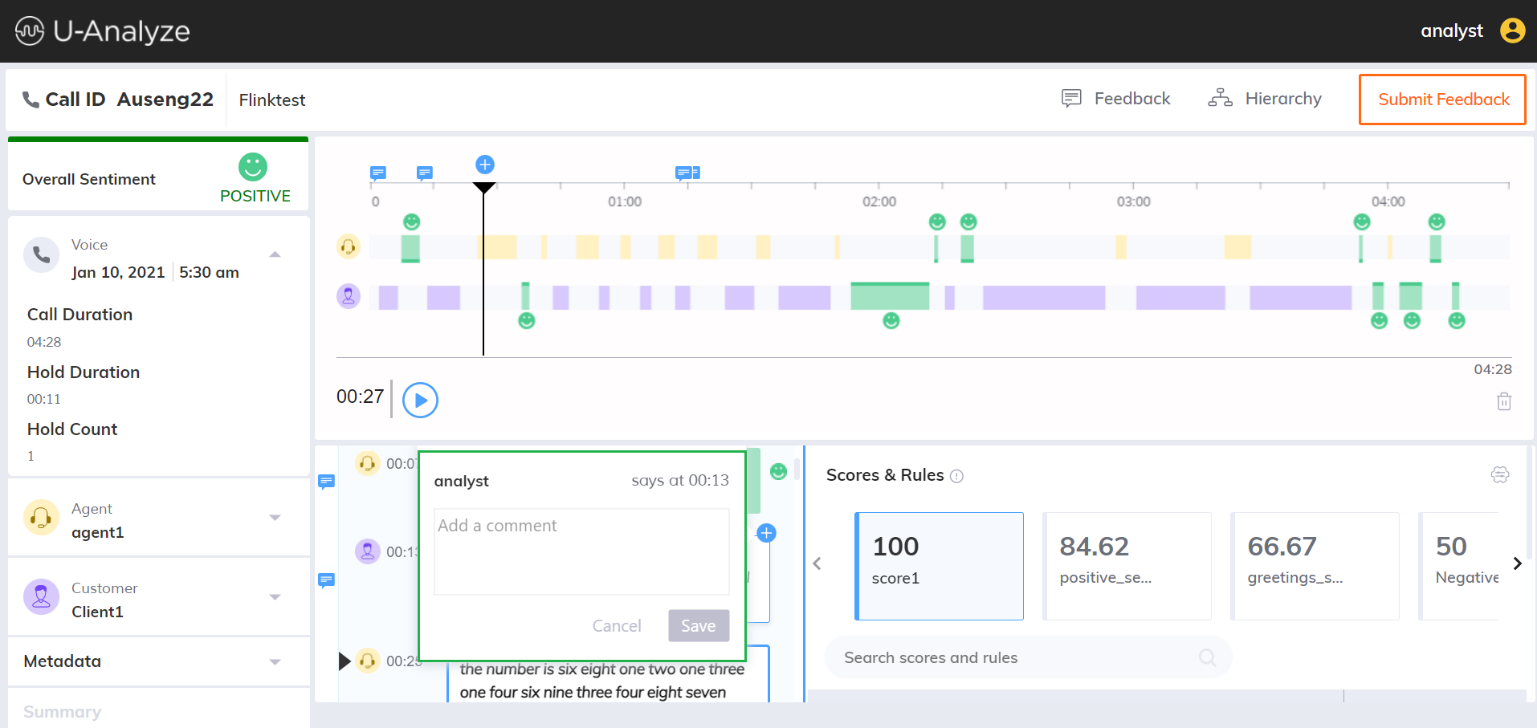
Add Comment in Voice Transcript
User can also provide call comments from Transcript section. Click plus icon ( ) to provide a comment in the specific time period. Analyst name and time period will be shown in the top of comment box. After providing the comment, click Save button.
 |
Non-Speech BR Properties
In the System Properties page, click the Edit button in the Non-Speech BR related Properties section.
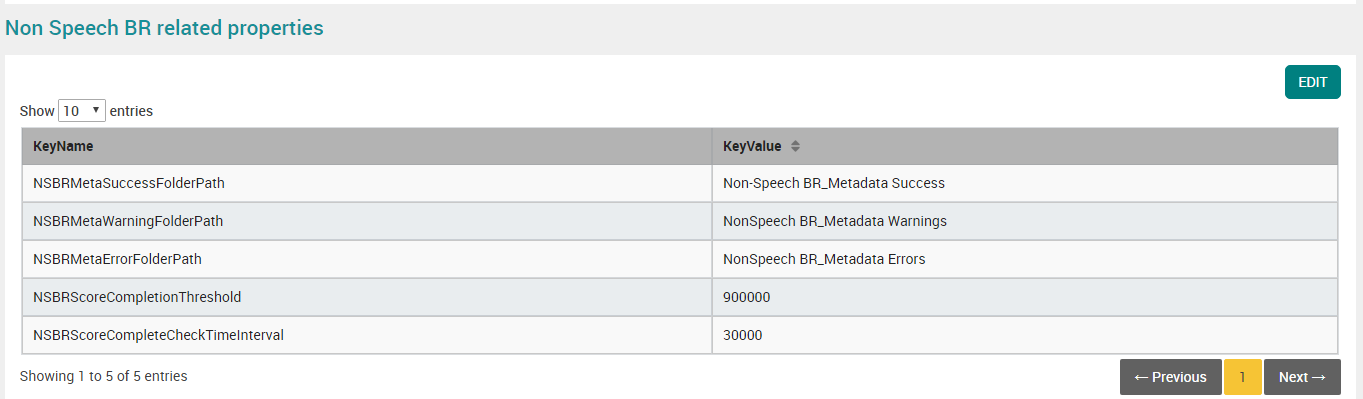
In the NSBRMetaSuccessFolderPath field, mention the folder name to be created in the U-Analyze Home Path to automatically move the successful non-speech meta .csv file.
In the NSBRMetaWarningFolderPath field, mention the folder name to be created in the U-Analyze Home Path to automatically move the warned non-speech meta .csv file.
In the NSBRMetaErrorFolderPath field, mention the folder name to be created in the U-Analyze Home Path to automatically move the error non-speech meta .csv file.
In the NSBRScoreCompletionThreshold field, set the maximum time range to process non-speech business rule.
In the NSBRScoreCompleteCheckTimeInterval field, set the time interval to check whether the non-speech business rule processing is completed or not and also check that the maximum time range set in the NSBRScoreCompletionThreshold field is reached.
Tuning Tool Properties
In the System Properties page, click the Edit button in the Tuning Tool Related Properties section.

Select the checkbox “Enable Tuning Tool”.
Provide the Tuning Tool url.
AWS Properties
In System Properties page, click Edit button in AWS Properties section.
In the AwsBucketName field, enter the bucket name created in AWS Console.
In AwsSwitch field, enter the value ‘ON’. By default, the value is displayed as ‘OFF’.

Click Update button.
Uniphore SD Properties
In System Properties page, click Edit button in Uniphore SD Properties section.
In UniphoreSpeakerDiarizationEndpoint, enter the path where Uniphore SD service is running to use this service for evaluation.
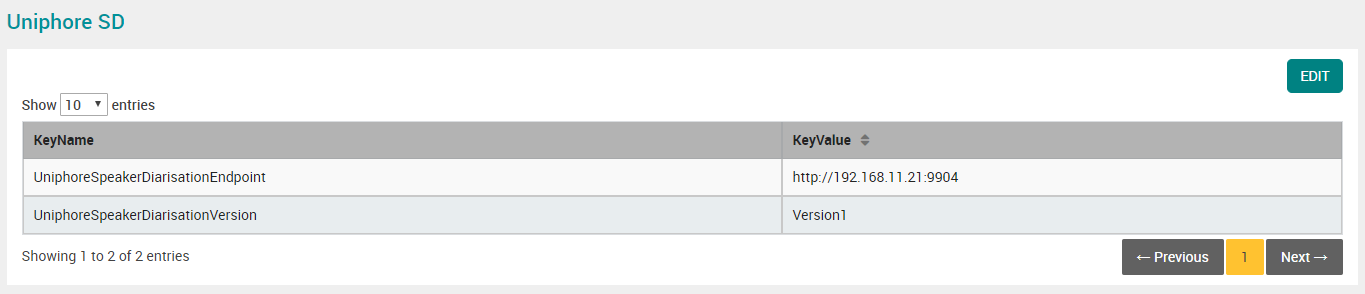
By default, Version1 is shown in UniphoreSpeakerDiarizationVersion field. In Version1, Non-Speech includes Beep, Music, Ringtone and Silence. Mention Version2, if required. In Version2, Non-Speech includes Silence only. Beep, Music, Ringtone are part of Speech.
Click Update button.
SIEMLOG Properties
In System Properties page, click Edit button in SIEMLOG Properties section.
Mention the keyvalue as ‘ON’ in EnableSIEMLOG field to enable SIEMlog.
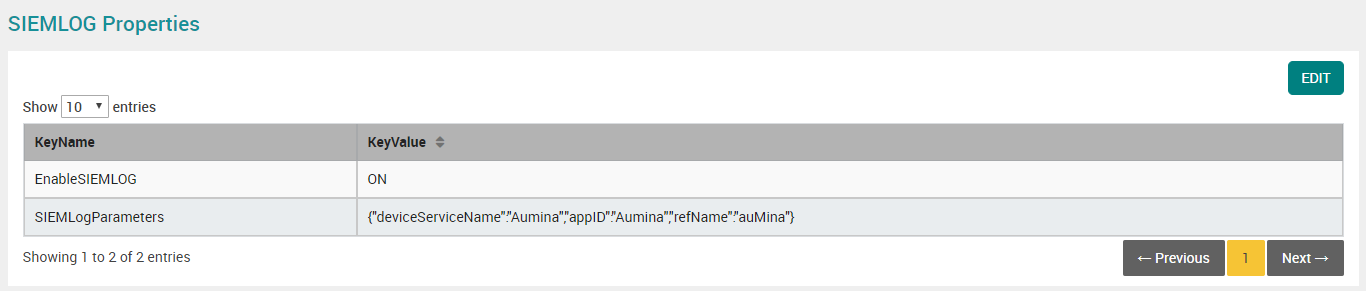
Mention deviceServiceName, appID and refName in SIEMLogParameters field without changing the structure. This value is provided in JSON format and case sensitive.
Contact Summarization Properties
In System Properties page, click Edit button in Contact Summarization Properties section.

In the EnableSummarization field, mention the value as ‘True’ to view the contact summary in Contact Details screen.
In the SummarizatioEndpoint field, mention the IP address of the system where all real intent services (Ridc.exe, transcription.exe, Mongo DB, kakfa, redis) are running.
In the SummarizationAuthorizationToken field, mention the Summarization Authorization Token.
Click Update button.
Platform Services Properties
In System Properties page, click Edit button in Platform Services properties section.
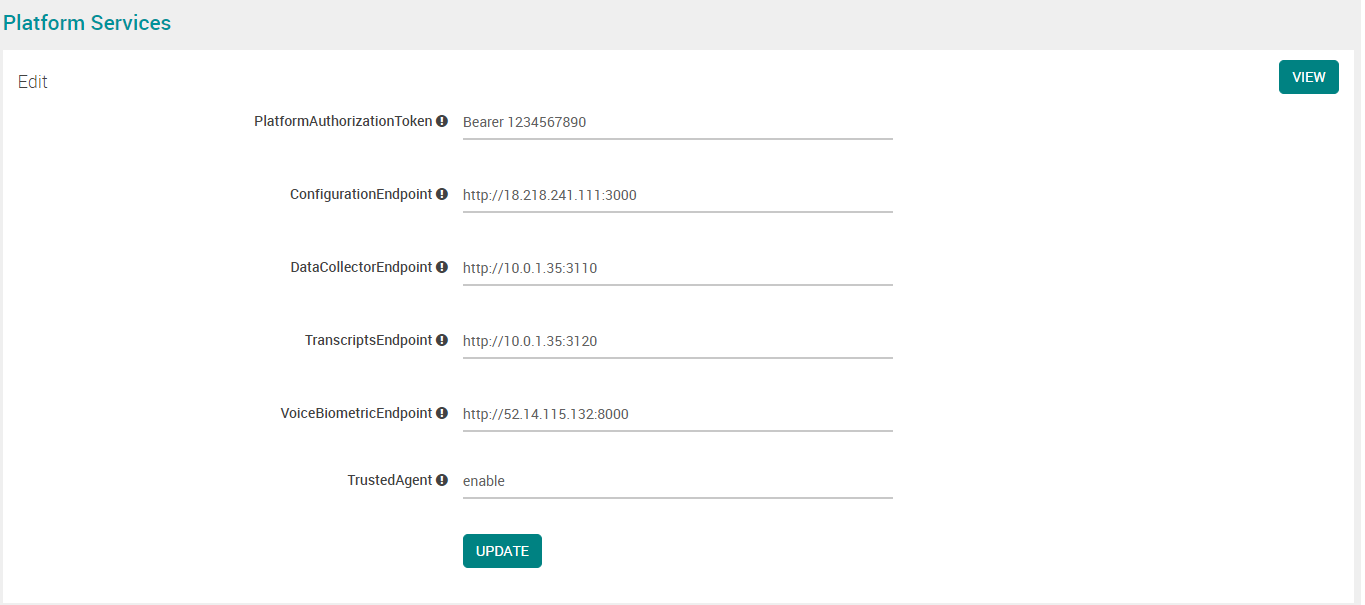
Mention the Platform Authorization Token.
Mention the Configuration Manager Service (CMS) IP address.
Mention the data collector service IP address. Contact summary properties are configured in the data collector service.
Mention the transcript service IP address.
Mention the Voice Biometric IP address. (Applicable only U-Assist only)
Mention the value as “enable” or “disable” in Trusted Agent field. (Applicable only U-Assist only)
Click Update button.
Report Properties
In System Properties page, click Edit button in Report Properties section.

Set ‘True’ or ‘False’ in Persist Screen Filter option thus allow system to remember the filter value applied for the session across U-Analyze-Quality when Quality Analyst is logged in.
Click Update button.
U-Assist Processing Properties
In System Properties page, click Edit button in Uassist Processing Properties section.
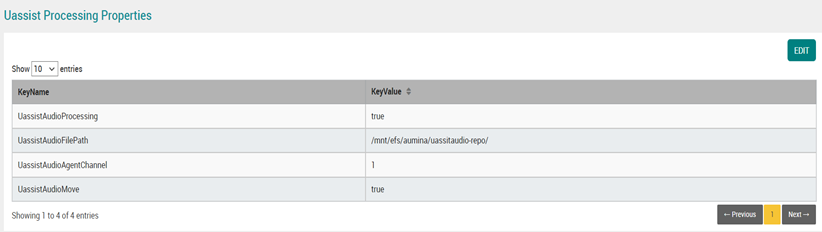
Set the UassistAudioProcessing as true or false based on audio availability.
Set the UassistAudioFilePath based on U-Assist configuration.
Set the UassistAudioAgentChannel as I or 2 based on U-Assist configuration.
Set the UassistAudioMove as true or false based on whether the audio file must be moved or copied.
Date Filter Properties
In System Properties page, click Edit button in Report Properties section.

Set the custom date value in between 90 days to 365 days. Based on this value, system allow Analyst to select the maximum custom date range across the application.
Click Update button.
Contact Reprocess and Custom Report Properties
In System Properties page, click Edit button in Contact Reprocess and Custom Report Properties section.

Set the
ReprocessMaximumDateWindowas required. (Value must be between 30 and 180 days.). Default value is 30 days.
Set the
ReprocessMaximumDaysLimitas required. (Value must be between 1 day and 90 days.). Default value is 7 days.Set the
EnableCustomReportsto true. By default, it is false.Set the
EnableScoreComponentReportsto true. By default, it is false.Click Update button.
QSense Chart Properties
In System Properties page, click Edit button in QSense Chart Properties section.
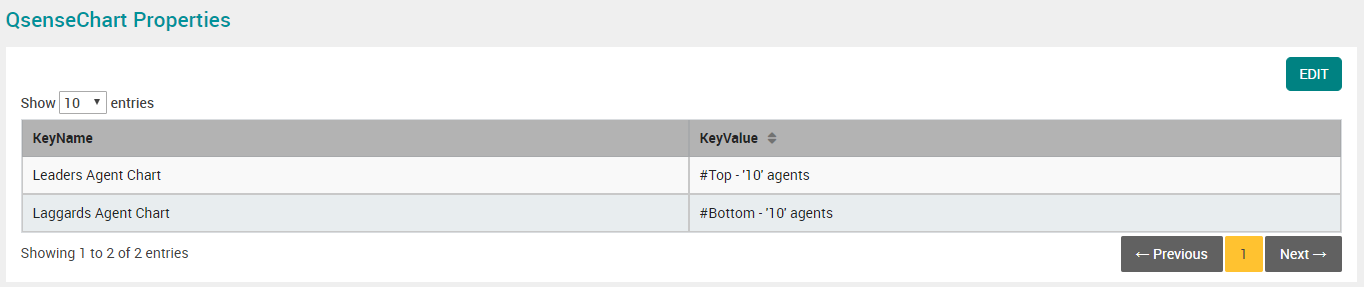
Mention the leaders and laggards Agent chart names to be displayed on the QSense Dashboard.
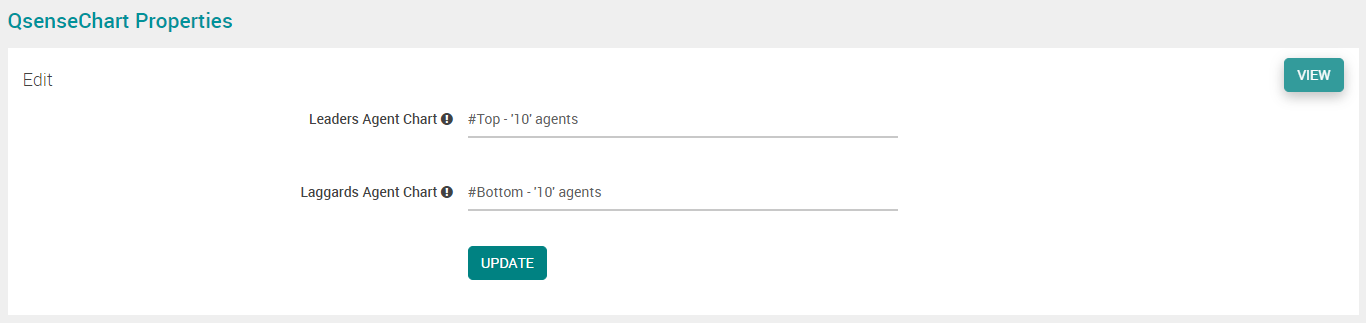
Click Update button.
UNIPHORE ASR Properties
In System Properties page, click Edit button in Uniphore ASR properties section.
In the EngineEndpointURL field, enter the path where Uniphore ASR service is running to use this service for evaluation.
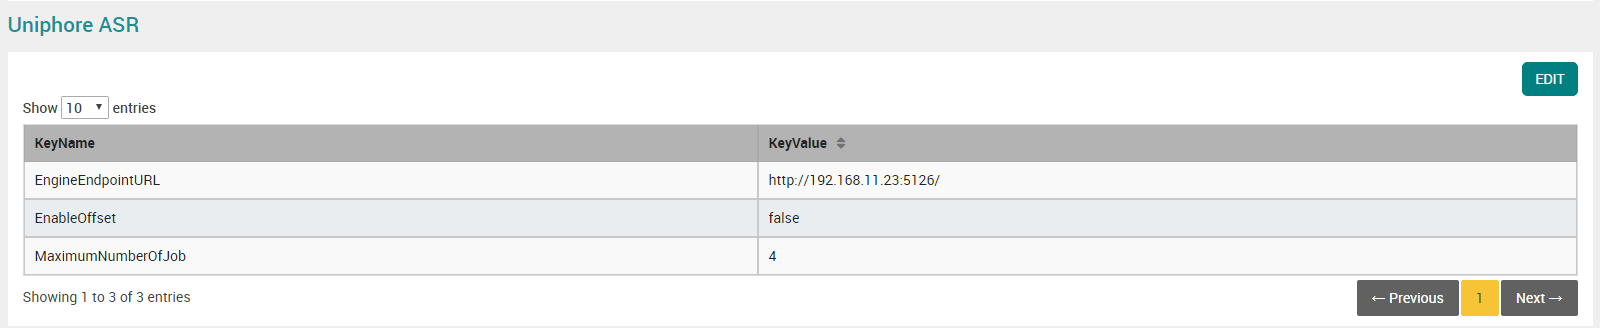
By default, the value ‘false’ is displayed in EnableOffset field.
Mention the number of audio files to be processed in parallel in MaximumNumberOfJob field.
Non-Speech Meta Properties
In System Properties page, click Edit button in Non-Speech Meta Properties section.
In the JourneyIdColumnNameInCSV field, mention the name of Journey ID column which is to be included as column header in Non-Speech Metadata CSV file.

NLP Services Properties
In System Properties page, click Edit button in Non-Speech Meta Properties section.
Mention the following NLP services endpoint in the respective fields:
Data Redaction
Sentiment Analysis
Kaldi Transcription
Language Detection
Kaldi Speaker Diarization
Hybrid Speaker Diarization
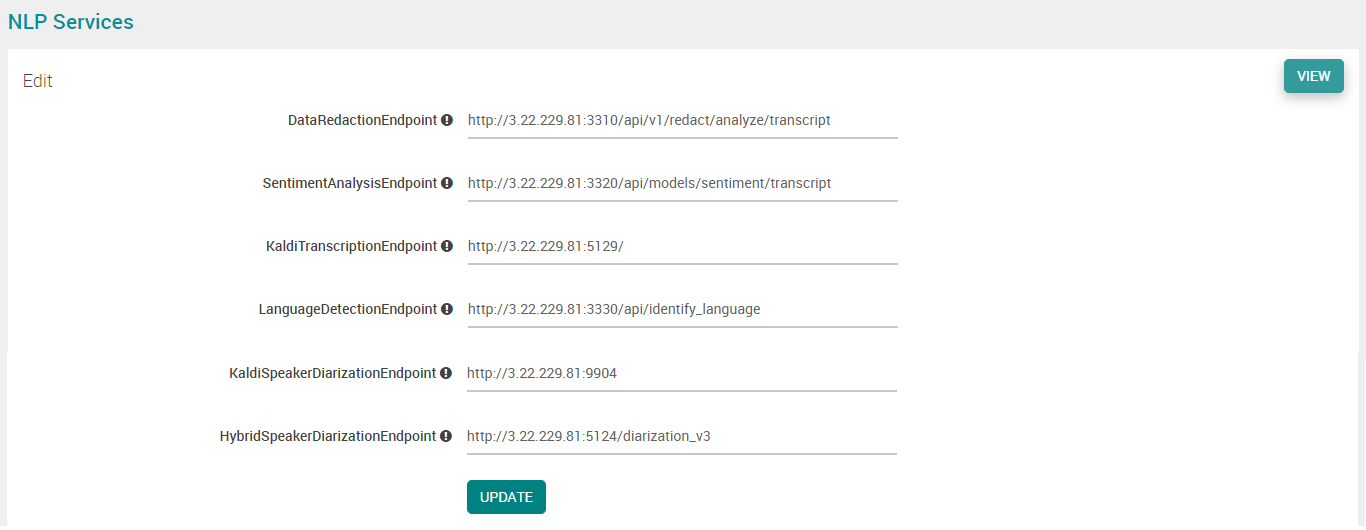
Click Update button.
Vernacular ASR Properties
In System Properties page, click Edit button in Vernacular ASR Properties section.

Mention the host name where Vernacular ASR service is to be running.
Mention the Vernacular ASR service port number.
Mention the authorization token provided by the Vernacular.
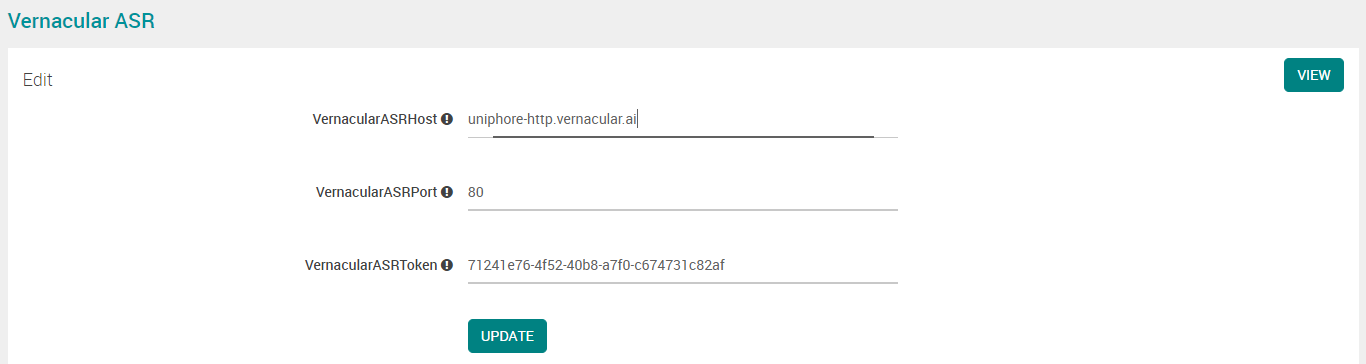
Click Update button.
FANO ASR Properties
In System Properties page, click Edit button in FANO ASR Properties section.

Mention the host name where FANO ASR service is to be running.

Click Update button.
Call List View for Agents Properties
In System Properties page, click Edit button in Call List View for Agents Properties section.

By default, this option “Is Call List Required for Agents” is disabled. Select this option to enable agents to view the call list attended by them.

Click Update button.
Data Redaction Properties
In System Properties page, click Edit button in Data Redaction Properties section.
By default, the checkbox “RedactPII” is unchecked (False), and the PII fields are neither redacted at audio nor at DB, but only masked at UI layer based on the user privilege. Select this checkbox to redact the PII fields in the audio, transcript and DB. The PII fields are represented with field names in UI as well as DB (Data at REST).
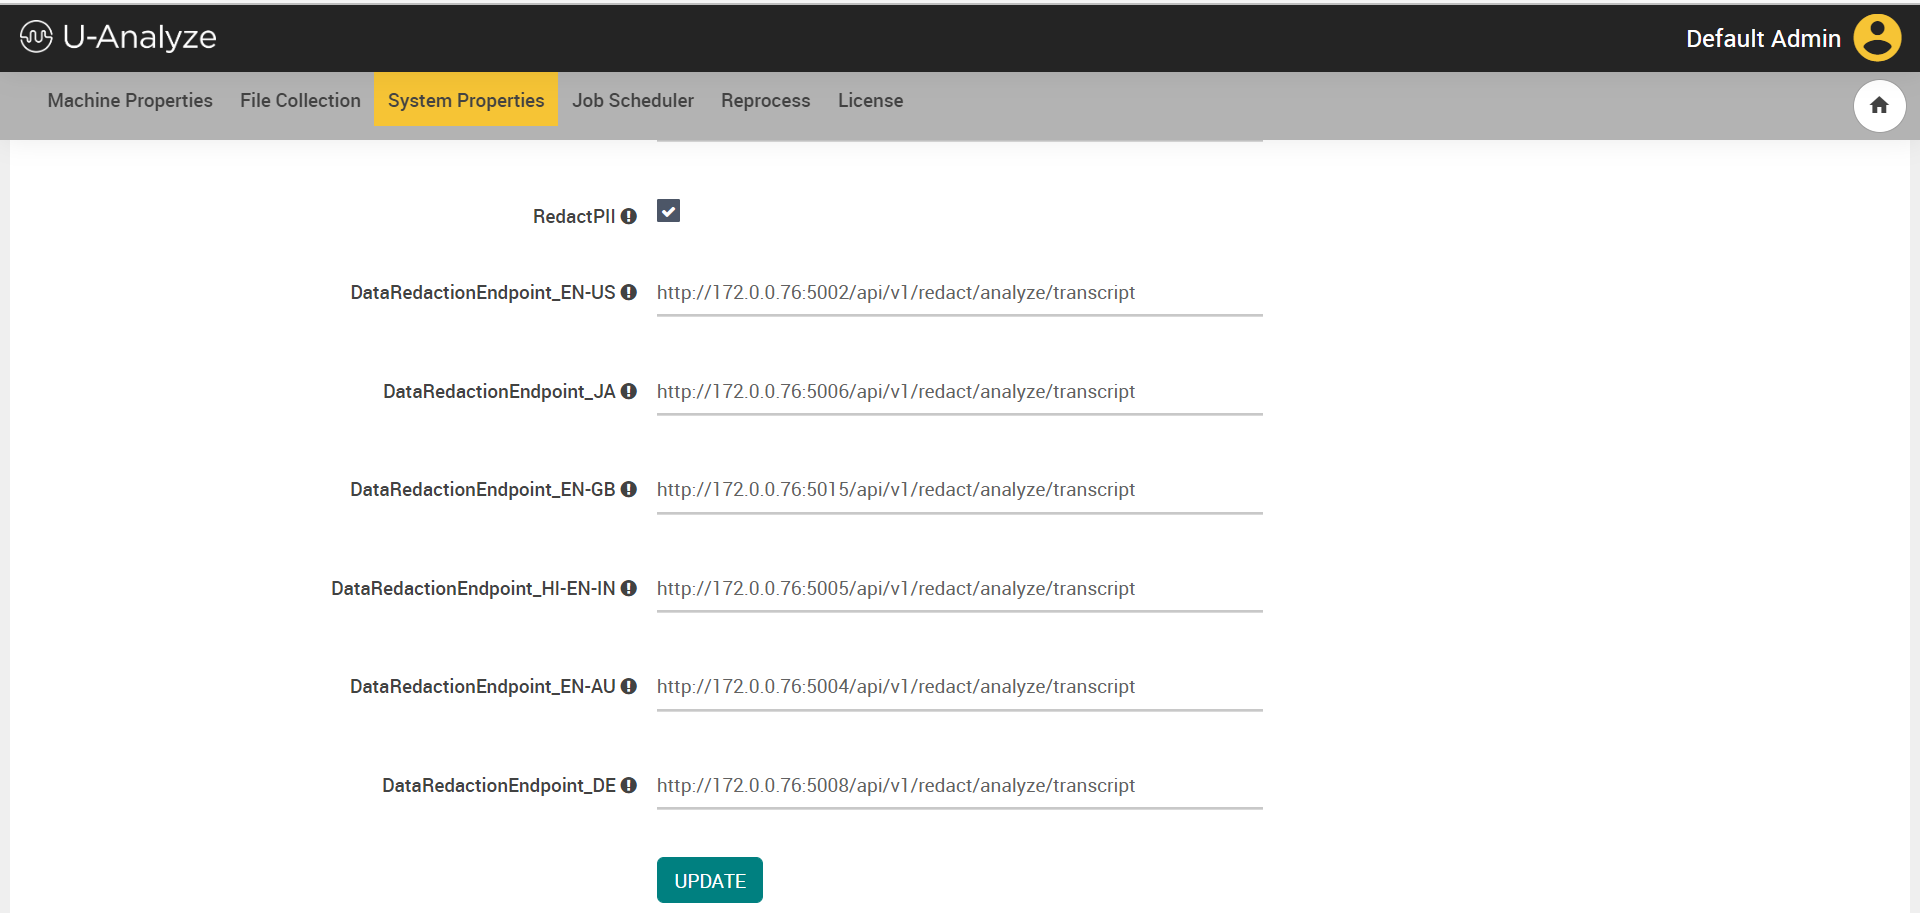
According to the language preference, mention the corresponding IP address and port where the data redaction service is running in the respective fields. (DataRedactionEndpoint_EN-US, DataRedactionEndpoint_EN-GB, DataRedactionEndpoint_HI-EN-IN, DataRedactionEndpoint_EN-AU, DataRedactionEndpoint_AR, DataRedactionEndpoint_DE, DataRedactionEndpoint_TA, DataRedactionEndpoint_TL, DataRedactionEndpoint_ES-NA, DataRedactionEndpoint_ML, DataRedactionEndpoint_FR-CA, DataRedactionEndpoint_ES-EU, DataRedactionEndpoint_MR and DataRedactionEndpoint_GU.
Note
If no language is selected or identified, the system picks default IP address and port (DataRedactionEndpoint).
Enable the RedactExceptionDeleteFileEnabled field. This immediately purges the audio file that have an audio redaction exception.
Note
By default, this option is not selected. If this option remains not selected, the audio file is deleted based on the configured audio retention period.
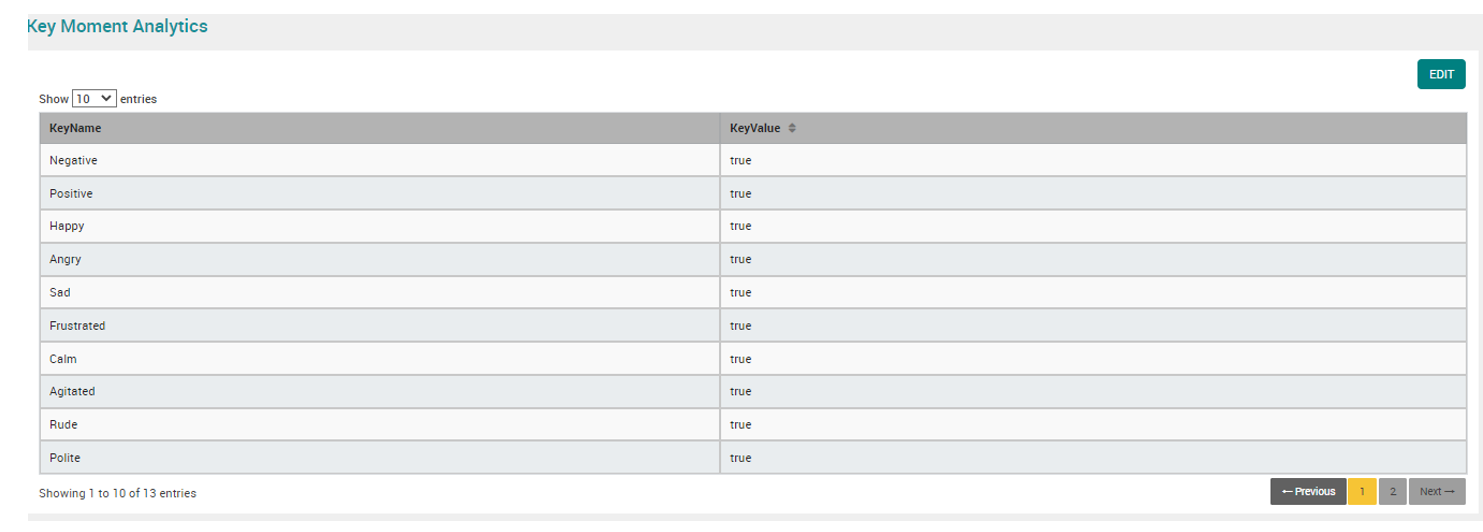
Key Moment Analytics Properties
The Key Moment Analytics properties captures the tonal emotion and behavior of agent and customer. The Key Moment Analytics (Tonal Analytics) is applicable for stereo, US English calls only. This property field is made available for configuration only when the IS_TONAL_ENABLED property is set to true in the install/upgrade environment file during installation/upgradation of the U-Analyze application.
In System Properties page, click Edit button in the Key Moment Analytics Properties section.
Set the key value as “true” for the key name associated with the tonal behavior and emotion which needs to be captured in the Contact Details page.
The key names and their default key values are shown in the table below:
Key Name
Default Key Value
Negative
false
Positive
false
Happy
false
Angry
true
Sad
false
Frustrated
true
Calm
true
Agitated
true
Rude
true
Polite
true
Withdrawn
false
Engaged
false
Hesitation
false
VAD Processing Properties

Hold music can now be detected in audio calls with the new Voice Activity Detector (VAD). To use new VAD, the NlpVadServiceFlag must be set to true. By default, it is set at false.
Agent Property

The Agent Acknowledge Feedback flag is introduced in version 2023.4.
By default, this flag is set to false. In this configuration the Agree or Decline buttons in Agent Feedback Log is available for selection by agents.
When the Agent Acknowledge Feedback flag is set to true the Agree or Decline buttons are replaced by Acknowledge button in Agent Feedback Log.
Contact List View for Agents Properties

This system property has been renamed in version 2023.4 and was previously called "Call List View for Agents Properties". Additionally, a new Key Name flag "Access to Contact Details" is introduced.
The setting combinations that are allowed for the two key combinations are:
Access to Contact Details - Unselected. Key value is "false":
The audio player is available in the agent feedback log screen and there is no access to contact details page by clicking the Contact Id in the agent Feedback Log screen.
Is Contact List Required for Agents - Unselected. Key value is "false":
The Contact List tab is not available for the agents to click and view the calls attended by them.
Access to Contact Details - Selected. Key value is "true":
The audio player is not available in the agent Feedback Log screen and clicking the Contact Id gives access to the contact details page in the agent Feedback Log screen.
Is Contact List Required for Agents - Selected. Key value is "true":
The Contact List tab is available for the agents to click and view the calls attended by them.
Note
Do not use this setting combination:
Access to Contact Details - Unselected. Key value is "false" and
Is Contact List Required for Agents - Selected. Key value is "true".
By default, this option is unselected i.e., the checkbox is unticked (Key value "false"). In this option the audio player is available in the agent Feedback Log screen and there is no access to contact details page by clicking the Contact Id in the agent Feedback Log screen.
When this option is selected i.e. the checkbox is ticked (Key value "true") the audio player is no longer available in the agent feedback log screen and clicking the Contact Id gives access to the contact details page in the agent Feedback Log screen.

Click the Edit button.
By default, this option is unselected (Key value "false"). Click the checkbox to select this option (Key value "true").
Click Update button.
Click the Edit button.
By default, this option is unselected (Key value "false"). Click the checkbox to select this option (Key value "true"). The Contact List tab is now available for the agents to click and view the calls attended by them.
Click Update button.
Business Rule Configuration Properties
The Business Rule configuration property allows you to configure the maximum number of keywords for bulk import using a CSV file. This configuration property is introduced from version 2024.1 onwards.
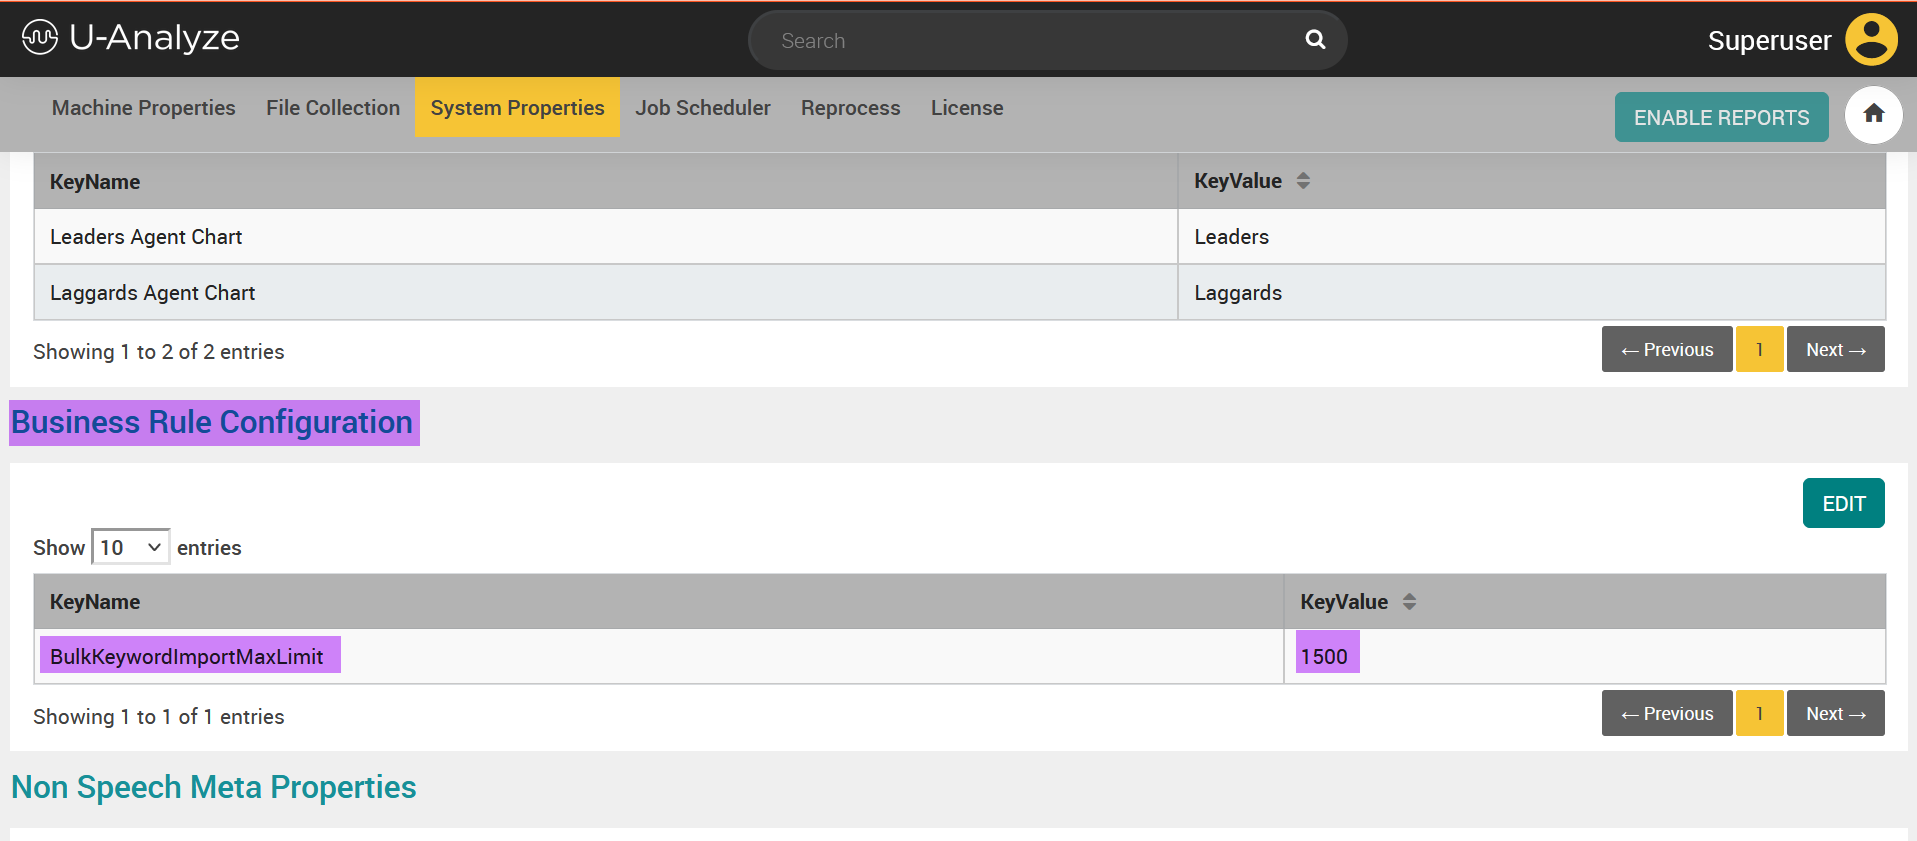
By default, this Key Value is set to 1500 which is the maximum permissible limit.
To change the Key Value follow the steps below:
Click EDIT. The edit screen is displayed.

In the Bulk Keyword Import Max Limit edit field enter the desired value.
Click UPDATE. A success message is displayed.
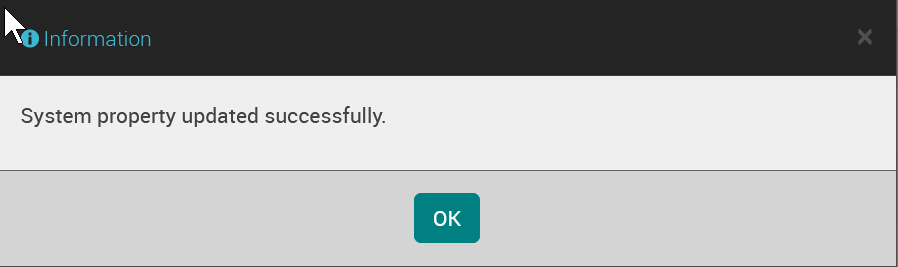
Click OK.
Enable Reports
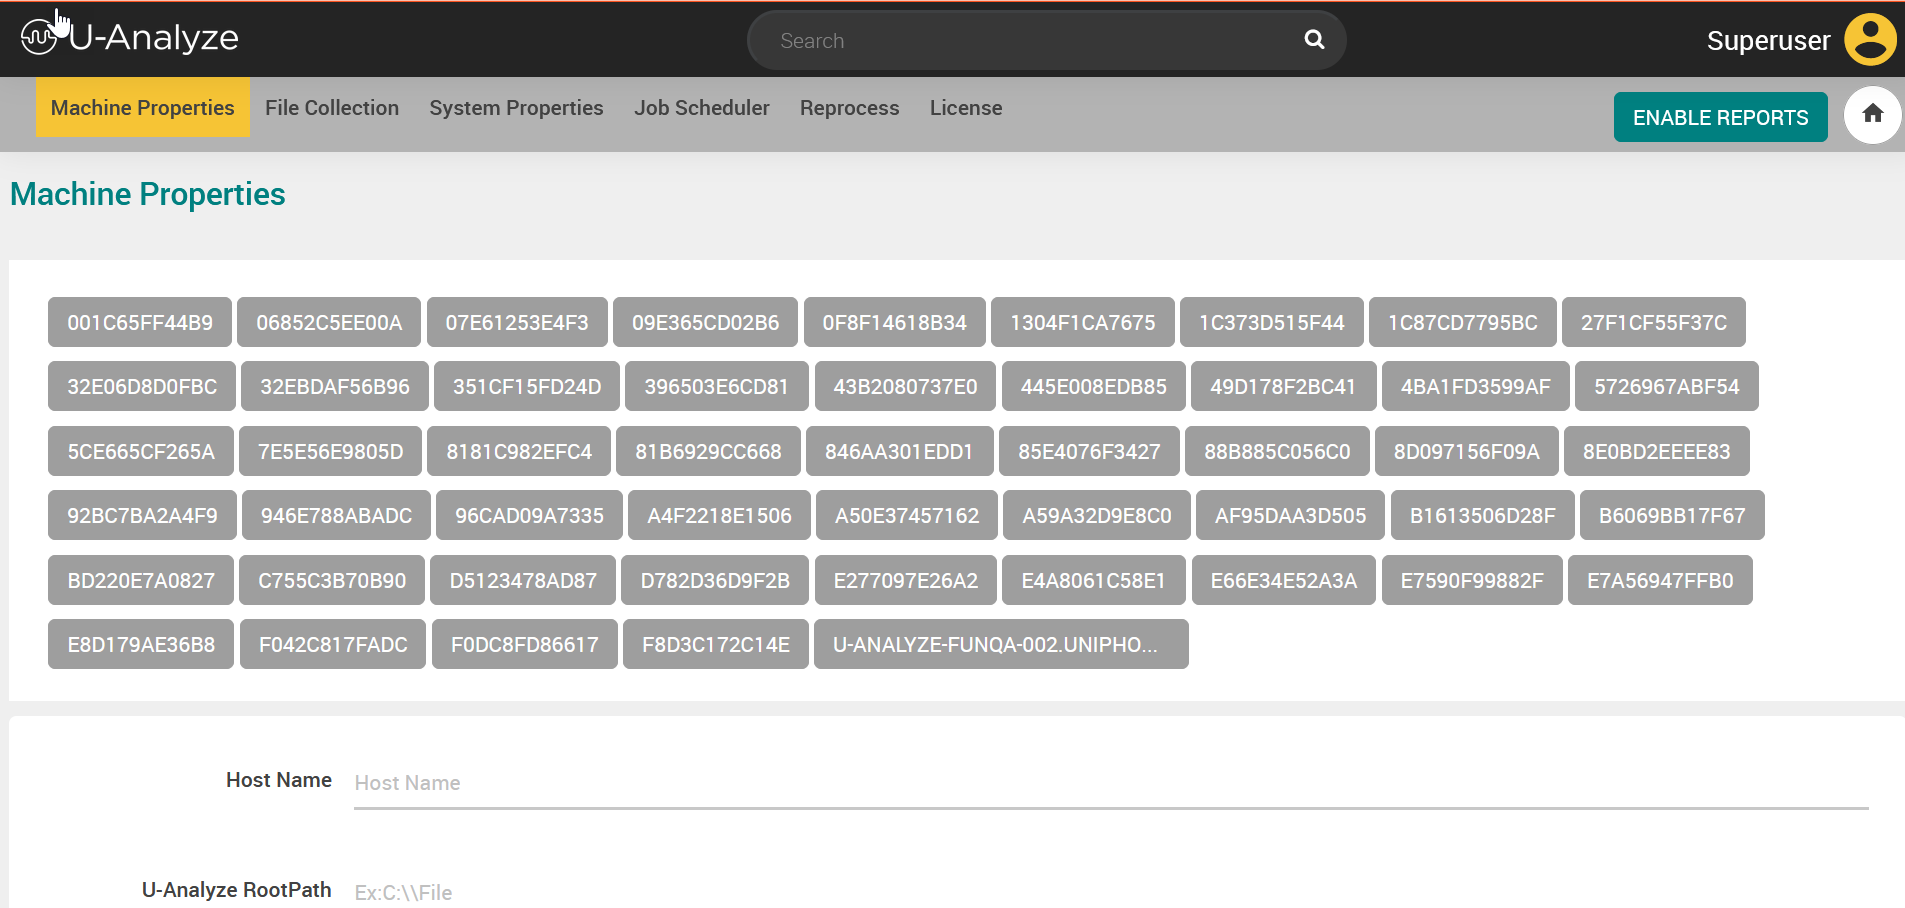
The Enable Reports feature is introduced in version 2024.1 by providing the ENABLE REPORTS button in the System Properties page. It is available across all the system property tabs.
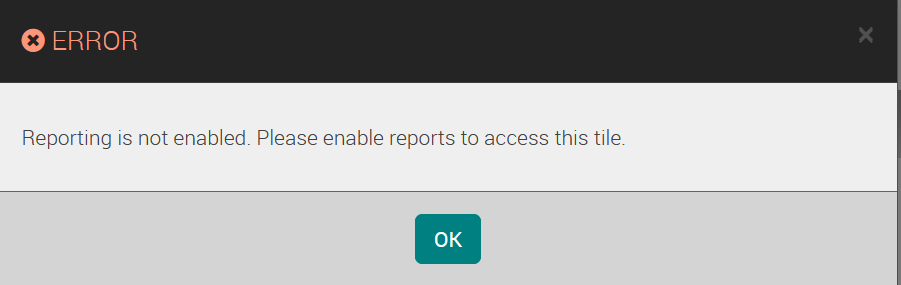
In earlier versions of the application without Tableau being installed the Business Analysts/Reporting Analysts couldn't login to the application and the admin could not create a new category. Now, by introducing this feature all the users can log in to the application and create category and configure business rules and scores. However, the Business Analysts can't access the DATA VISUALIZATION & ANALYTICS tile without Tableau being installed and the enable reports procedure completed. If Business Analysts/Reporting Analysts click DATA VISUALIZATION & ANALYTICS tile without completing the enable reports procedure the message that follows is displayed.
For users upgrading from previous versions the ENABLE REPORTS button is disabled since they already have Tableau installed and report migration would be completed for them.
For users who have procured and deployed the U-Analyze application for the first time, the ENABLE REPORTS button is enabled for selection.
To enable the reports, follow the procedure below.
Click ENABLE REPORTS button. A confirmation message is displayed.
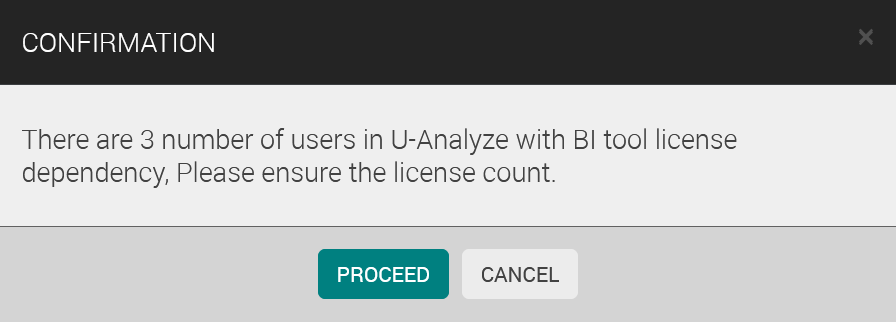
This message is related to the number of Tableau (BI tool) licenses in usage. If the user exceeds the license limit, reports will not be enabled, and an error message is displayed. The reason for the failure can be seen in the UI logs.
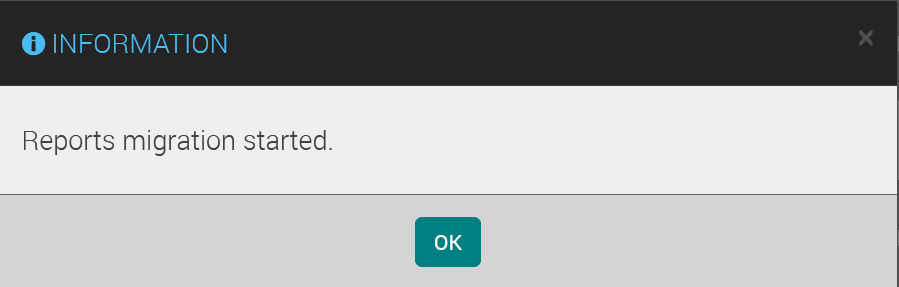
Click PROCEED to proceed with the reports migration, else click CANCEL. An information message is displayed.
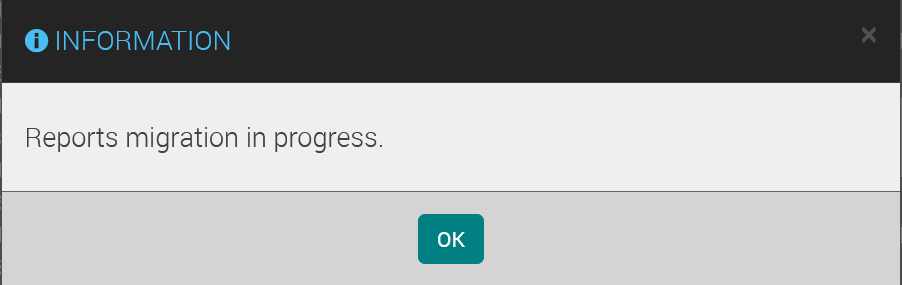
If the ENABLE REPORTS button is clicked again an information message is displayed.
Click OK.
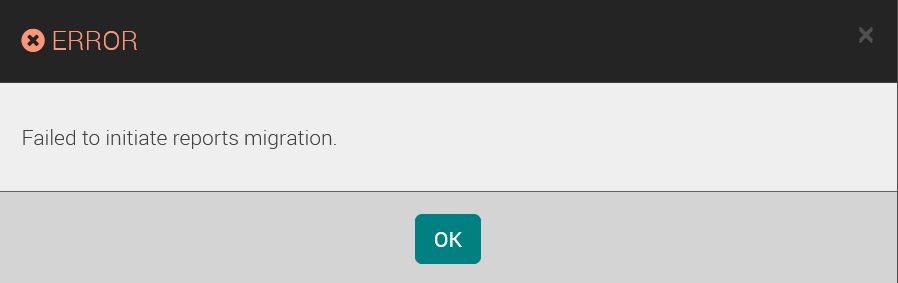
Once report migration is completed a success message is displayed and the ENABLE REPORTS button is disabled. The Business Analysts/Reporting Analysts can now access the advanced reports from DATA VISUALIZATION & ANALYTICS tile. If report migration fails, contact the Uniphore delivery manager assigned to your organization.
After you receive confirmation that the issue is resolved redo the steps given in the Enable Reports procedure.
If the Business Analyst/Reporting Analys is not able to access reports after successful completion of report migration and a message is displayed that states "Report migration is not completed" then follow the steps given below:
Logout and request your organization's system admin to do a fresh login.
The Business Analyst/Reporting Analyst must login after the admin has logged in.
The reports must now be accessible. If not, contact Uniphore customer support.