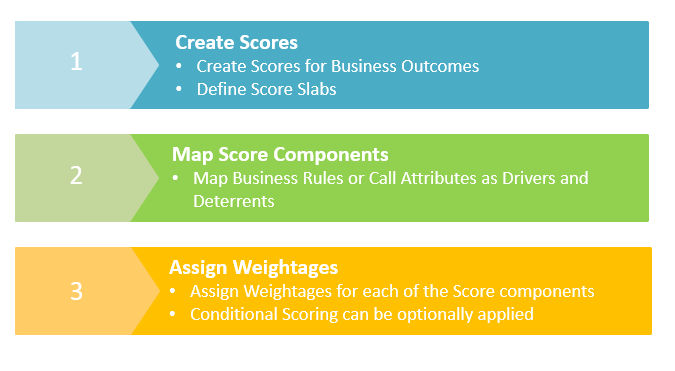
Business Evaluators: Create
Business Evaluators
The business analyst home page is shown below:

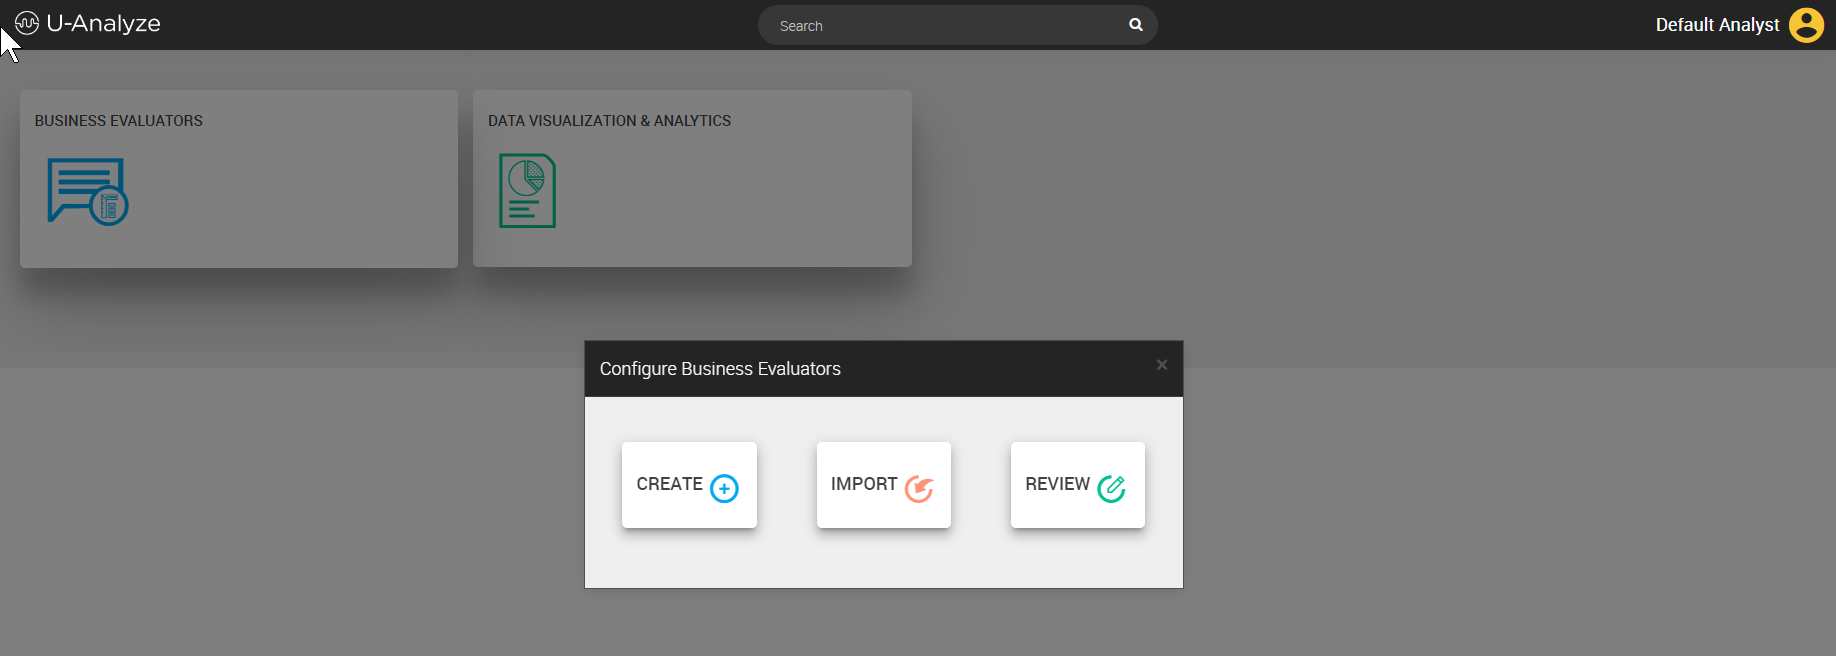
In the Home page, when you click on BUSINESS EVALUATORS., the Configure Business Evaluators pop-up window appears as shown below:
Note
When the analyst clicks on Home ( ) icon from any of the pages, the application navigates back to the home page.
 |
Business Evaluators: Create
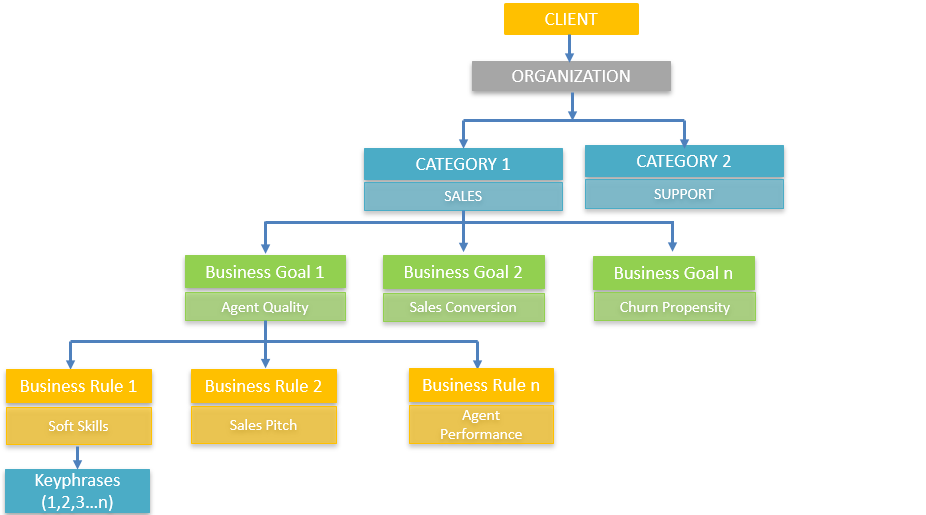
In Create flow, Analyst can create Business Goals, Rules and Scores. Analyst must follow step by step navigation and cannot directly navigate to any other screen through the click of breadcrumb. Breadcrumbs are non-clickable.
Click Create button on the Configure Business Evaluators pop-up window. The Define Business Goal page appears as shown below.
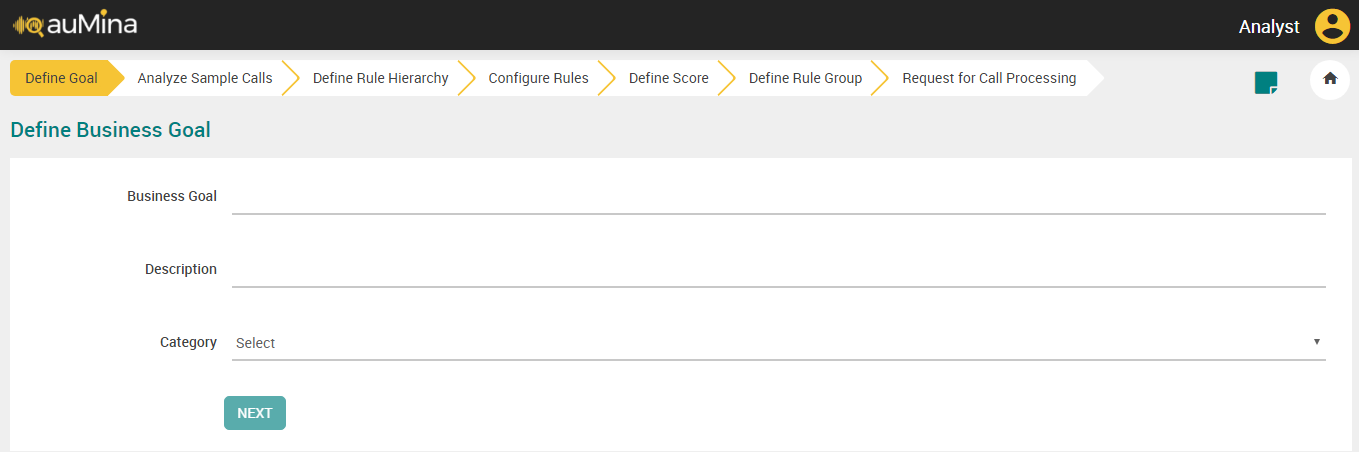 |
Define Business Goal
In Define Business Goal, Analyst will create a list of Business Goals for each of the Category.
In the Business Goal field, enter the name of the Business Goal.
In the Description field, enter the goal description.
Select Category from the drop-down list.
Click Next button. A warning message will be displayed.
Click Save Changes button to navigate to Analyze Sample Calls page.
Note
All fields are required. If any of the fields are not filled and next button is clicked, then required alert will be displayed at each non-filled text field.
When Analyst clicks on Home icon and if data has been entered, a warning message is displayed to check if the user wants to save and continue to Home page or cancel and continue to Home page.
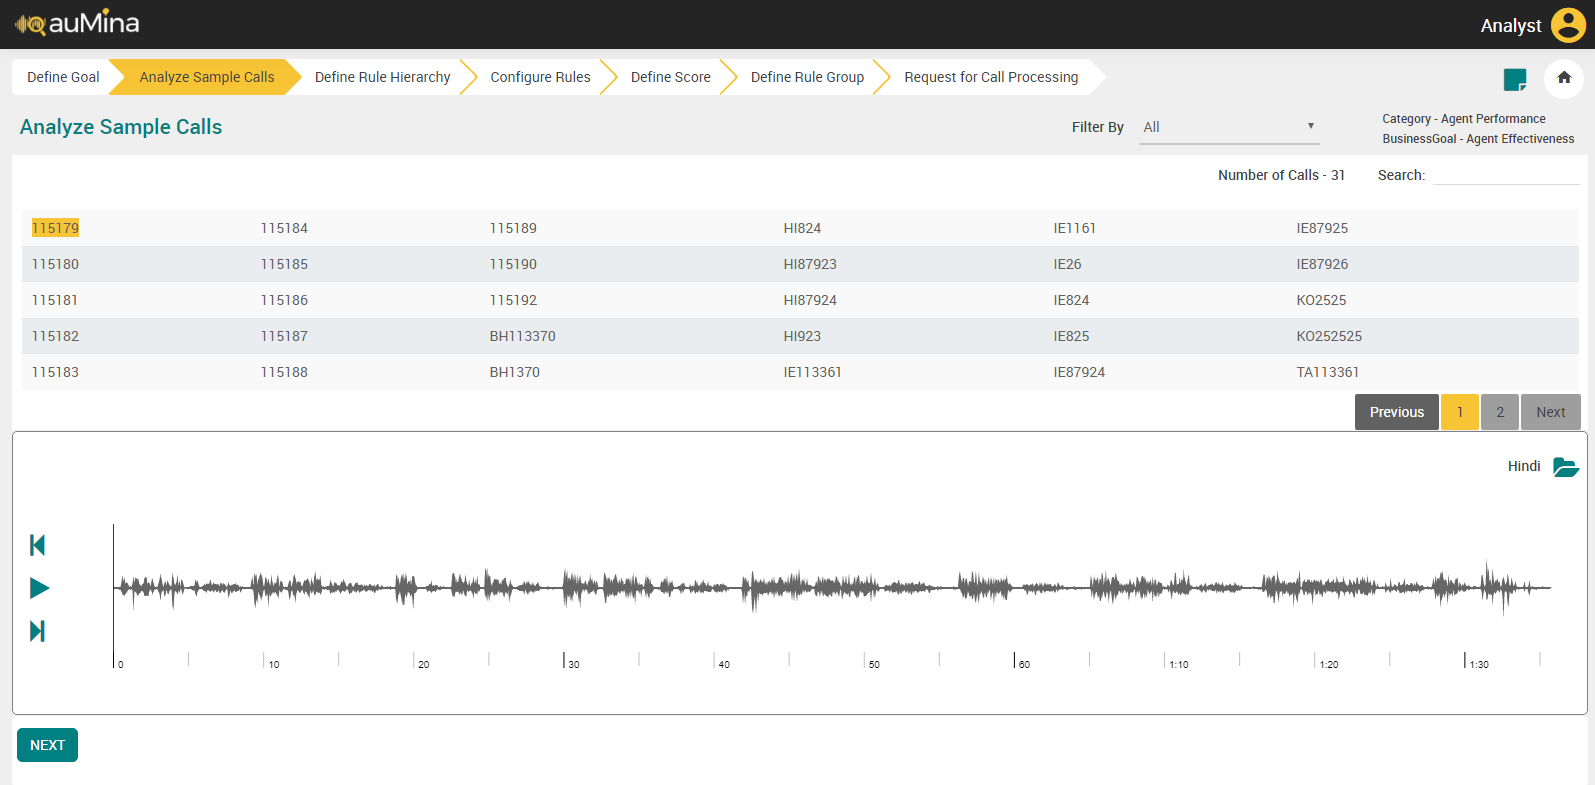
Analyze Sample Calls
For a set of Category of calls, Analyst defines Business Goal and then analyzes Sample calls to take notes and understand the context of the calls. Analyst will then define Business Rules based on the Key Performance indicators to be evaluated and the conversation in the calls.
Analyze Sample Calls and Define Business Rule Hierarchy will be enabled only after a Business Goal is created.
The Audio and Transcript are synchronized to highlight word by word when the audio is played instead of highlighting the entire turn. This is applicable for Stereo, Mono with SD, and Mono without SD calls.
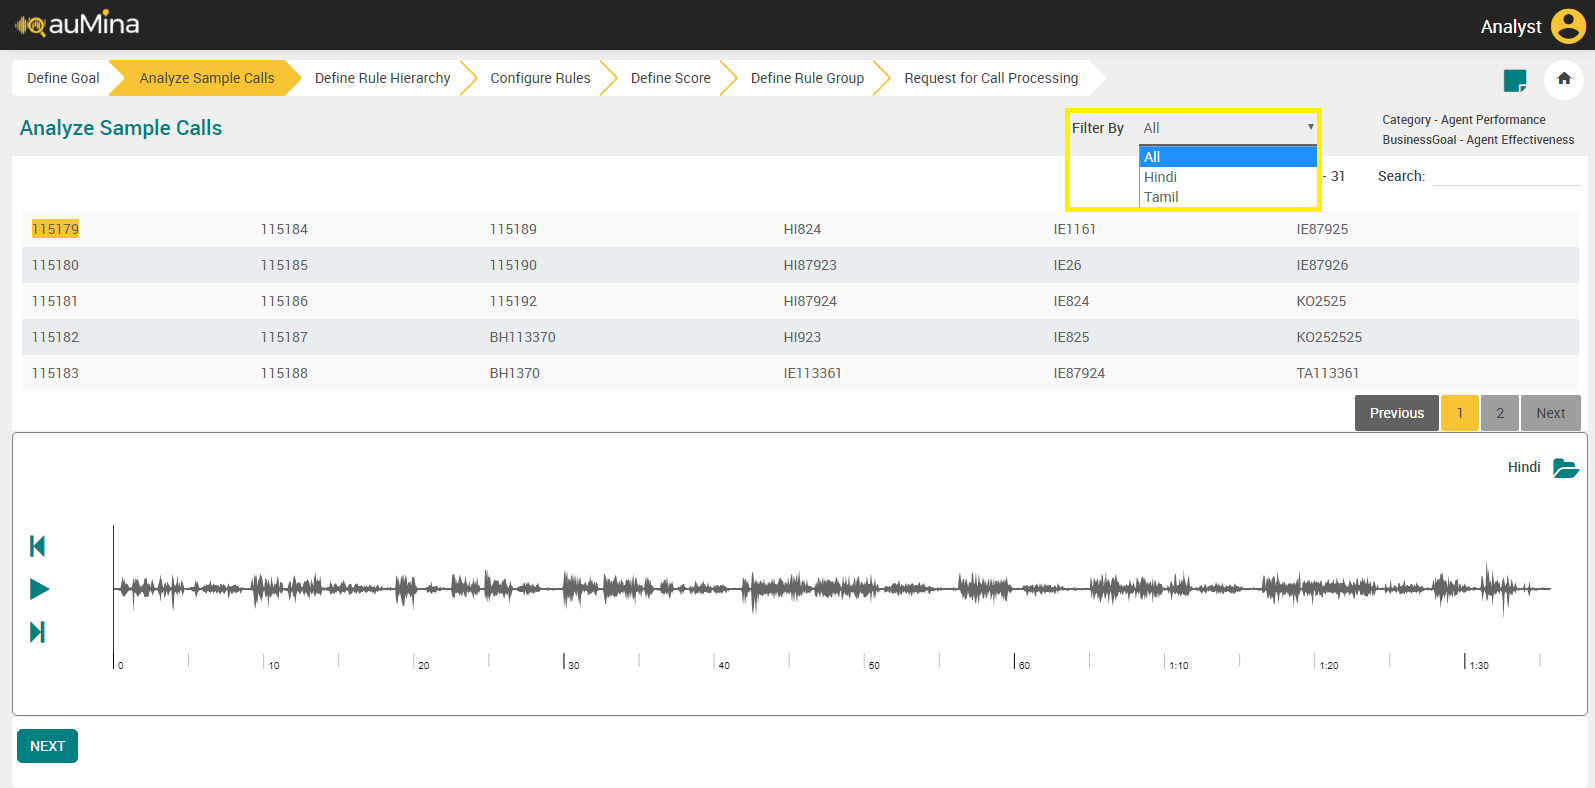
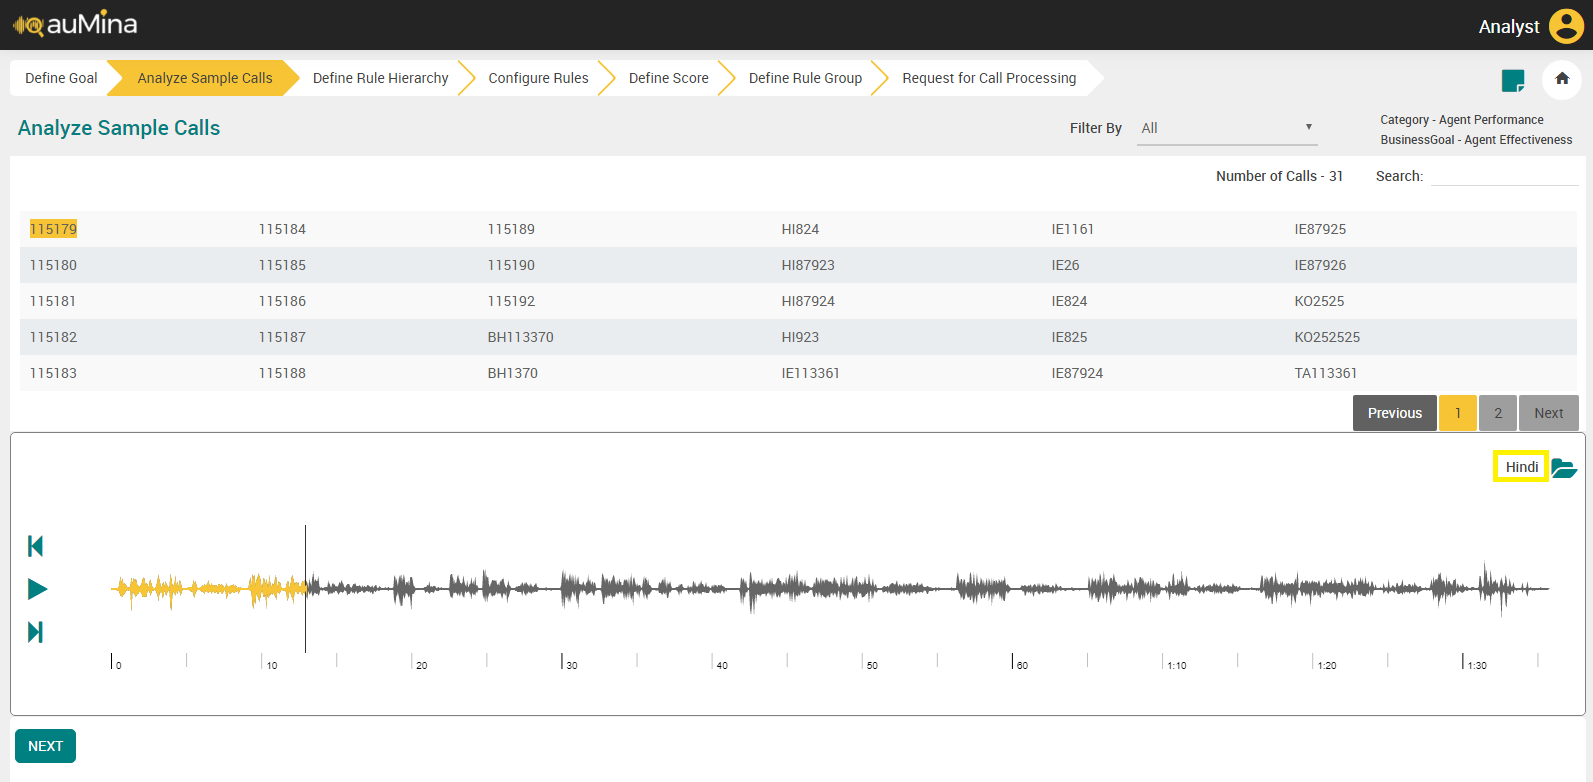
Click Analyze Sample Calls tab. By default, all the calls will be displayed with Call ID from the “Sample Calls” folder available for every Category along with File Collections folder.
Select the folder from the Filter By drop-down list to view the calls placed in that folder. By default, All option is displayed in the drop-down list. The list of folders created in the File Collection are available in this drop-down list.
Note
System will display an error message “No calls are available in the selected folder” when no calls are available in the selected folder.
By default, total number of calls is displayed at the top of the call list. The file names of the calls will follow the naming convention with the same regex as required for Call Processing. The Audio Files will be available in the required U-Analyze Format – 16-bit PCM wav format.
Note
System does not display the calls with call duration less than 10 seconds.
System displays an error message if no calls are available.
In the Search field, enter the call ID to search the specific call to listen.
Click on the specific audio file to listen the call. System will allow the Analyst to move the position of the audio by providing a horizontal scroll. System will display call duration and multiple offsets in between the call along with start and end audio offsets.

Note
In Mozilla Firefox, calls with maximum of 30 minutes call duration can be played.
In Google Chrome, calls with maximum of 60 minutes call duration can be played.
Click Notes (
 ) icon to open Notes section. Analyst can make a note of observations related to Business Goal, Business Rule, Score, etc., for a category based on the conversation in the call.
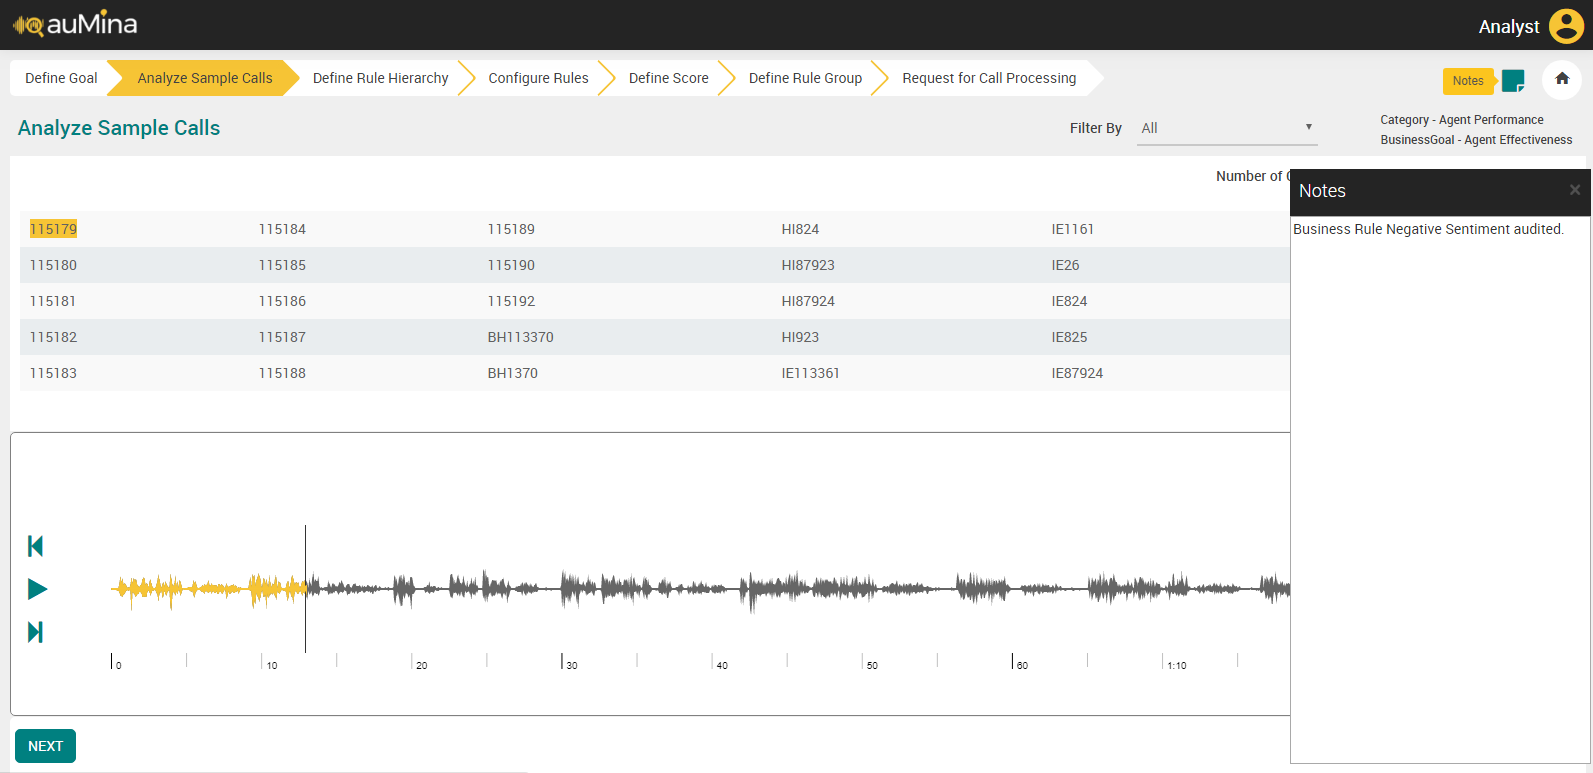
If folder name is available for a call, system will display the folder name when Filter by is selected as “All”.
Click Move Audio to Folder icon to move the call to another folder during listening. The call stops playing when Analyst clicks on Move Audio to Folder icon.
Select the folder from the drop-down list and click OK. After moving a call to another folder, system refreshes the page with the current folder and highlights the next call.
Note
System will not allow Analyst to select the source folder as the destination folder while trying to move the call from one to another folder.
When two or more calls with the same names or call IDs are kept in different folders, those calls will not be listed in any of the call lists.
System will not provide any system threshold for the number of calls to be available in the folder.
Click Pause button to stop playing of audio call.
Click Next button to play next audio file.
Click Previous button to play previous audio file.
Note
The following Hot Keys are available to perform the action:
Play & Pause – Spacebar
Next – Right arrow
Previous – Left arrow
When Analyst navigates from Analyze Sample Calls to another Tab, system automatically pauses the audio. When Analyst navigates back to the Analyze Sample Calls tab, system will retain the position of the call (to 5 seconds prior).
Note
Press B to navigate to Business Rule Hierarchy screen from Analyze Sample Calls.
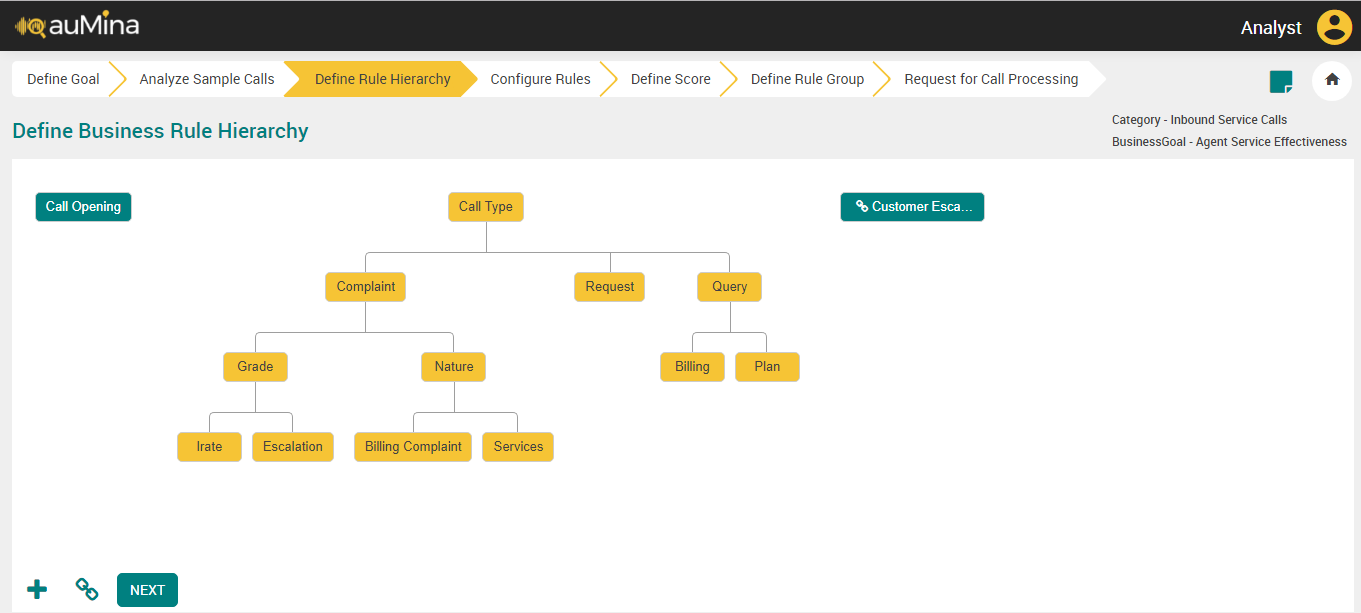
Define Business Rule Hierarchy (For On-premise Deployments)
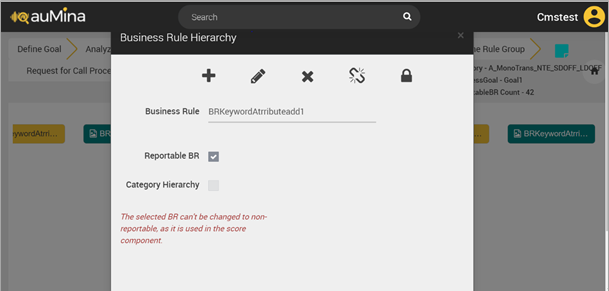
Business Rule Hierarchy is a framework for structuring the different dimensions (BRs) that are captured during agent and customer interaction using speech data (key words or phrases). By setting up the BR Hierarchy, an analyst can perform analysis on the reporting layer using the modeled dimensions (BRs). These BR Hierarchies could also be imported into the system as external metadata. Analyst can select Business Rule Hierarchies as Category Hierarchies, including the External BR Hierarchies. In a Business Process, only one BR Hierarchy can be a Category Hierarchy. Analyst can view the resultant Category Hierarchy for every call in Call Details.
Analyst can add maximum of 750 reportable business rules for a category.
By default, the selected Category and Business Goal, and Reportable Business Rule count will be displayed in top right side of the page.
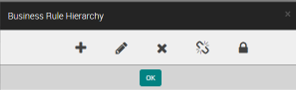
Click the Add Business Rule (
 ) button in the Define Business Rule Hierarchy page and add a business rule.
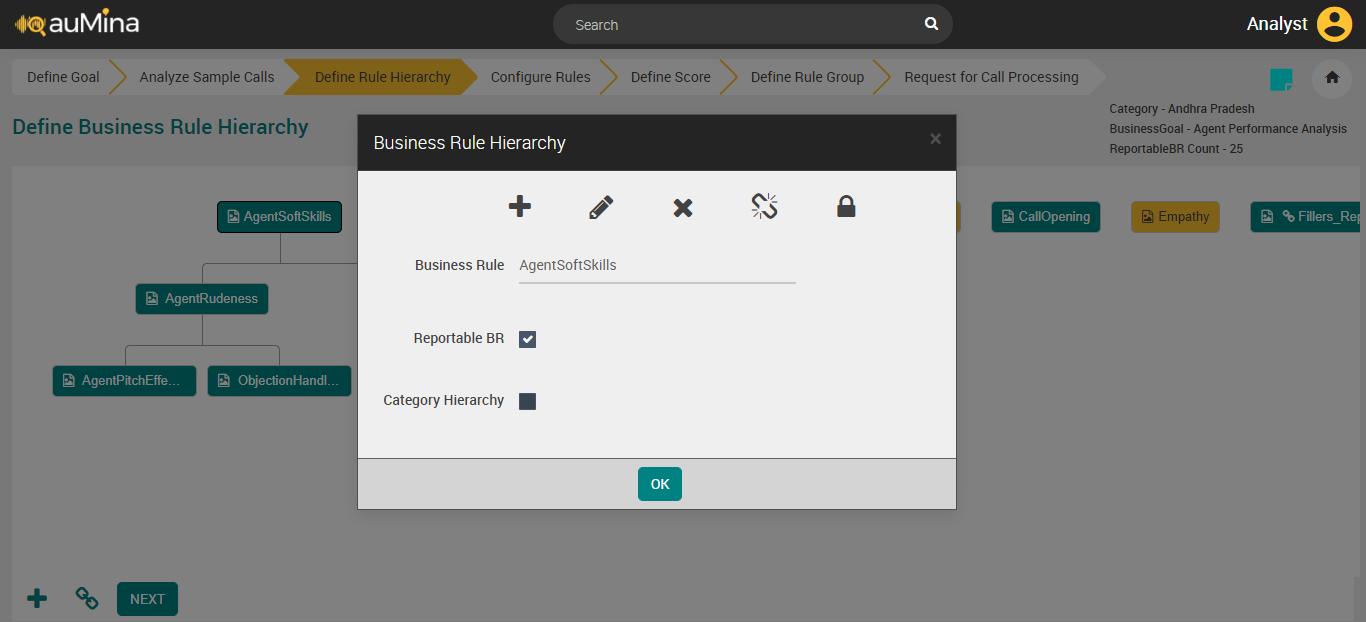
By default, the Reportable Business Rule checkbox is selected, while defining the business rule hierarchy. Only these business rules are selected as the score components and listed in the Reports Analysis page. If user unselect this checkbox, this business rule will not be considered as the score component and also not listed in the Reports Analysis page.
If the Business Rule is marked as a Reportable BR, this icon (
 ) will be displayed next to the Business Rule name.
Select the Category Hierarchy checkbox to select the Business Rule Hierarchy as Category Hierarchy. While selecting another Business Rule Hierarchy as Category Hierarchy, a warning message will be displayed as shown below.
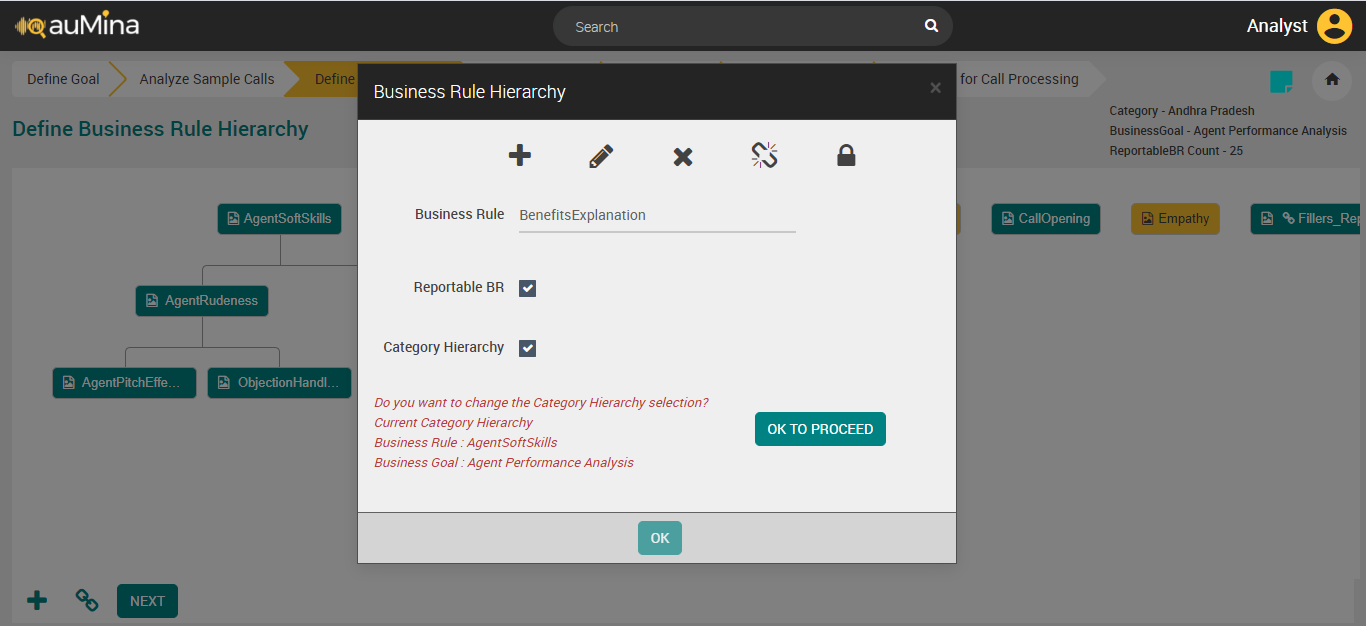
Click the newly added Parent Business Rule. A pop-up message will be displayed with the Add, Edit, Delete and Delink options (icons) as shown below.
Click Add Child Business Rule (
 ) button to add a child business rule to the parent business rule. System will enforce the user to create a minimum of two child business rules under the parent business rule.
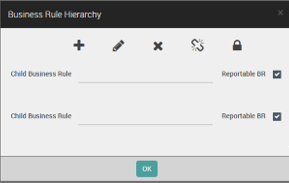
In the Child Business Rule field, enter the name of the business rule.
By default, the Reportable Business Rule checkbox is selected, while defining the child business rule hierarchy.
Click Link Business Rule (
 ) button to link to more than one Business Goal, business goal mapping will be same for all rules of a hierarchy. Linked Business Rules can be updated as Reportable Business Rules.
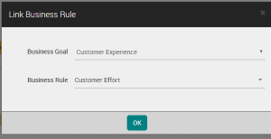
Click Edit Business Rule (
 ) button to edit the existing business rule.
Click Delete Business Rule (
 ) button to delete the Parent as well as children.
Click Delink Business Rule (
 ) button to delink Business Rules (Whole tree or Standalone). A Business Rule needs to be linked to at least one Business Goal at any point in time.
Click Activate Business Rule (
 ) button to activate business rule. Once activated, the button name is changed as Deactivate (
 ).
).Note
While deleting a Business Rule mapped to other Business Goals, the BR and its Child Business Rules (if any) from all Business Goals will be deleted.
System will allow user to delete External/Internal Business Rules. While deleting a BR, the corresponding child BRs will be automatically deleted.
BR Name cannot be the same as any Business Goal, Business Rule, Business Rule Group or Score names within a Category.
Validations for Deactivation of Business Rule:
Business Rule cannot be deactivated when it is a part of Score Component.
Only Parent Business Rule can be deactivated.
Nested Business Rule cannot be deactivated.
Linked Business Rule can be deactivated. If deactivated in one goal, it will deactivate across all goals.
In Advanced Reports, the list of all Active and Inactive Business Rules will be available to Business Analyst to create reports.
In System Reports (Score Analysis, Business Rule Analysis, etc.), only Active Business Rules will be available for Reports.
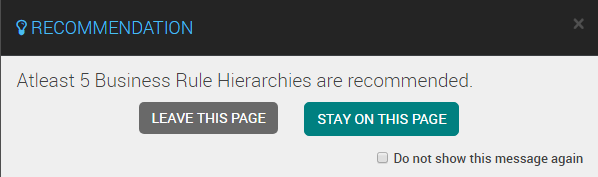
When Analyst navigates to the next screen, System checks if minimum 5 business rule hierarchies are created for analysis. If not, then system recommends Analyst to create 5 business rule hierarchies.
While deleting a Business Rule mapped to other Business Goals, the BR and its Child Business Rules (if any) from all Business Goals are deleted
System allows users to delete External/Internal Business Rules. While deleting a BR, the corresponding child BRs are automatically deleted
A BR Name cannot be the same as any Business Goal, Business Rule, Business Rule Group or Score names within a Category.
Define Business Rule Hierarchy (For X on Cloud Deployments)
Business Rule Hierarchy is a framework for structuring the different dimensions (BRs) that are captured during agent and customer interaction using speech data (key words or phrases). By setting up the BR Hierarchy, an analyst can perform analysis on the reporting layer using the modeled dimensions (BRs). These BR Hierarchies could also be imported into the system as external metadata. Analyst can select Business Rule Hierarchies as Category Hierarchies, including the External BR Hierarchies. In a Business Process, only one BR Hierarchy can be a Category Hierarchy. Analyst can view the resultant Category Hierarchy for every call in Call Details.
Analyst can add maximum of 750 reportable business rules for a category.
By default, the selected Category and Business Goal, and Reportable Business Rule count will be displayed in top right side of the page.
Click the Add Business Rule (
) button in the Define Business Rule Hierarchy page and add a business rule.With the introduction of near real time reports feature the restrictions that follow are enforced:
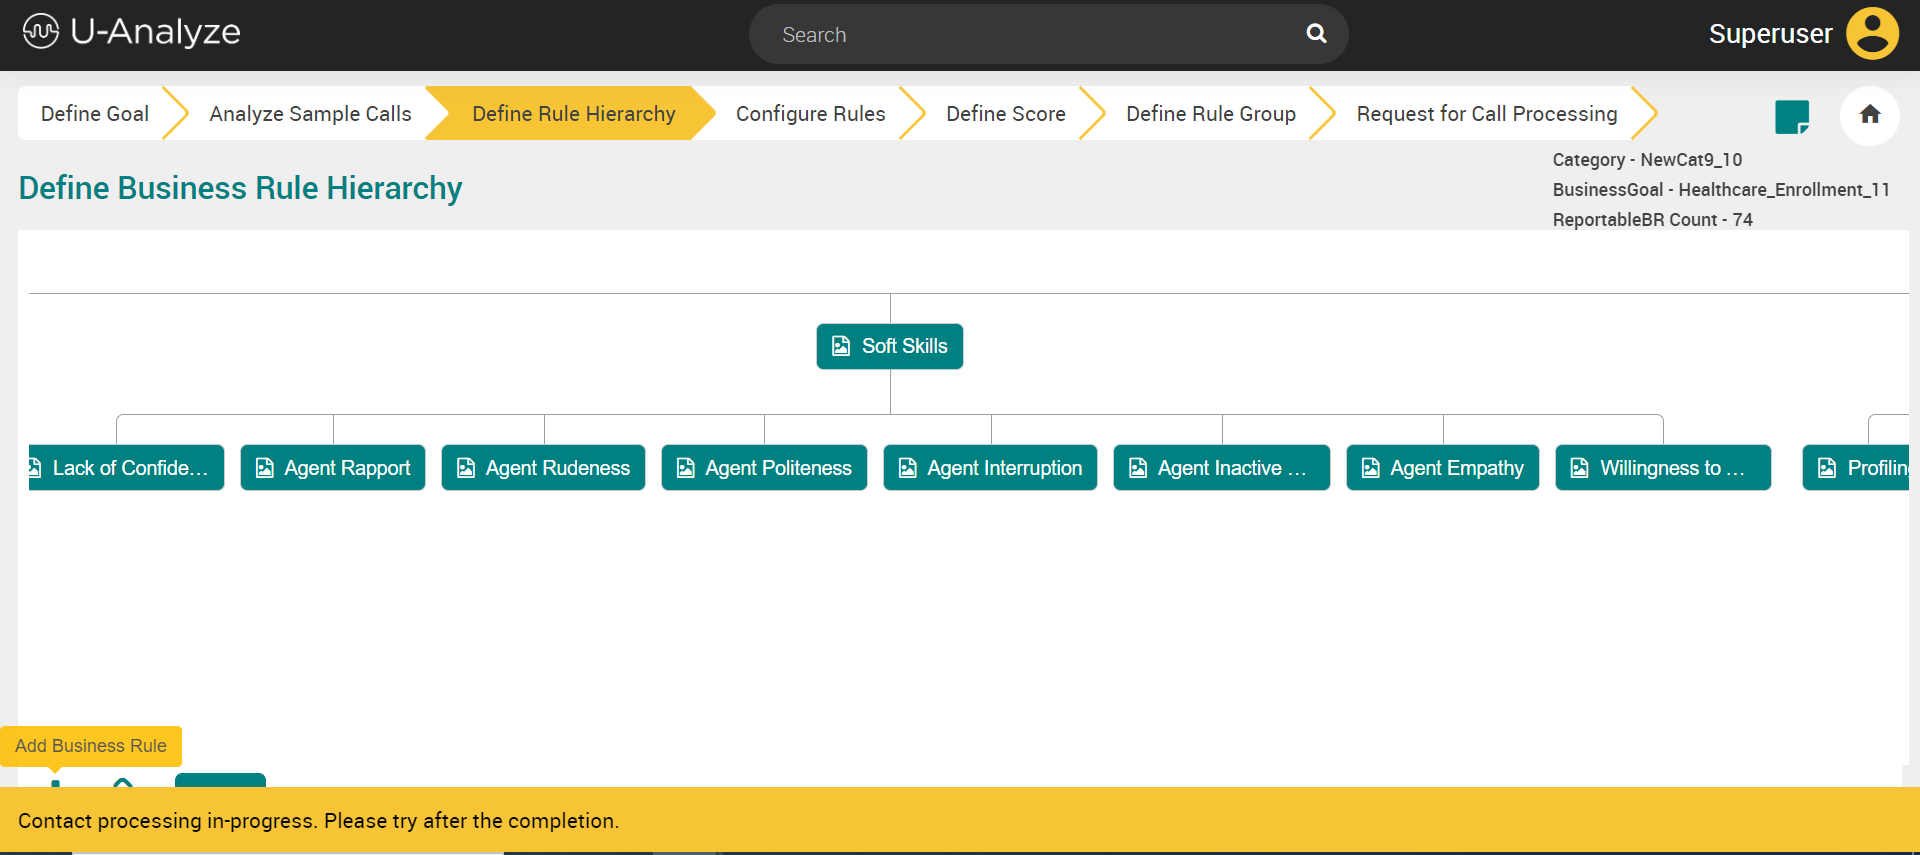
A Business Rule cannot be created when call processing is in progress.
If you click the Add Business Rule button when call processing is in progress a notification message is displayed as shown below.
A Business Rule name cannot be edited once it is created
A Business Rule can be updated.
By default, the Reportable Business Rule checkbox is selected, while defining the business rule hierarchy. Only these business rules are selected as the score components and listed in the Reports Analysis page. If user unselect this checkbox, this business rule will not be considered as the score component and also not listed in the Reports Analysis page.
If the Business Rule is marked as a Reportable BR, this icon (
) will be displayed next to the Business Rule name.Select the Category Hierarchy checkbox to select the Business Rule Hierarchy as Category Hierarchy. While selecting another Business Rule Hierarchy as Category Hierarchy, a warning message will be displayed as shown below.
Click the newly added Parent Business Rule. A pop-up message will be displayed with the Add, Edit, Delete and Delink options (icons) as shown below.
Click Add Child Business Rule (
) button to add a child business rule to the parent business rule. System will enforce the user to create a minimum of two child business rules under the parent business rule.In the Child Business Rule field, enter the name of the business rule.
By default, the Reportable Business Rule checkbox is selected, while defining the child business rule hierarchy.
Click Link Business Rule (
) button to link to more than one Business Goal, business goal mapping will be same for all rules of a hierarchy. Linked Business Rules can be updated as Reportable Business Rules.Click Edit Business Rule (
) button to edit the existing business rule.Click Delete Business Rule (
) button to delete the Parent as well as children.Click Delink Business Rule (
) button to delink Business Rules (Whole tree or Standalone). A Business Rule needs to be linked to at least one Business Goal at any point in time.Click Activate Business Rule (
) button to activate business rule. Once activated, the button name is changed as Deactivate ().Note
While deleting a Business Rule mapped to other Business Goals, the BR and its Child Business Rules (if any) from all Business Goals will be deleted.
System will allow user to delete External/Internal Business Rules. While deleting a BR, the corresponding child BRs will be automatically deleted.
BR Name cannot be the same as any Business Goal, Business Rule, Business Rule Group or Score names within a Category.
Validations for Deactivation of Business Rule:
Business Rule cannot be deactivated when it is a part of Score Component.
Only Parent Business Rule can be deactivated.
Nested Business Rule cannot be deactivated.
Linked Business Rule can be deactivated. If deactivated in one goal, it will deactivate across all goals.
In Advanced Reports, the list of all Active and Inactive Business Rules will be available to Business Analyst to create reports.
In System Reports (Score Analysis, Business Rule Analysis, etc.), only Active Business Rules will be available for Reports.
When Analyst navigates to the next screen, System checks if minimum 5 business rule hierarchies are created for analysis. If not, then system recommends Analyst to create 5 business rule hierarchies.
While deleting a Business Rule mapped to other Business Goals, the BR and its Child Business Rules (if any) from all Business Goals are deleted
System allows users to delete External/Internal Business Rules. While deleting a BR, the corresponding child BRs are automatically deleted
A BR Name cannot be the same as any Business Goal, Business Rule, Business Rule Group or Score names within a Category.
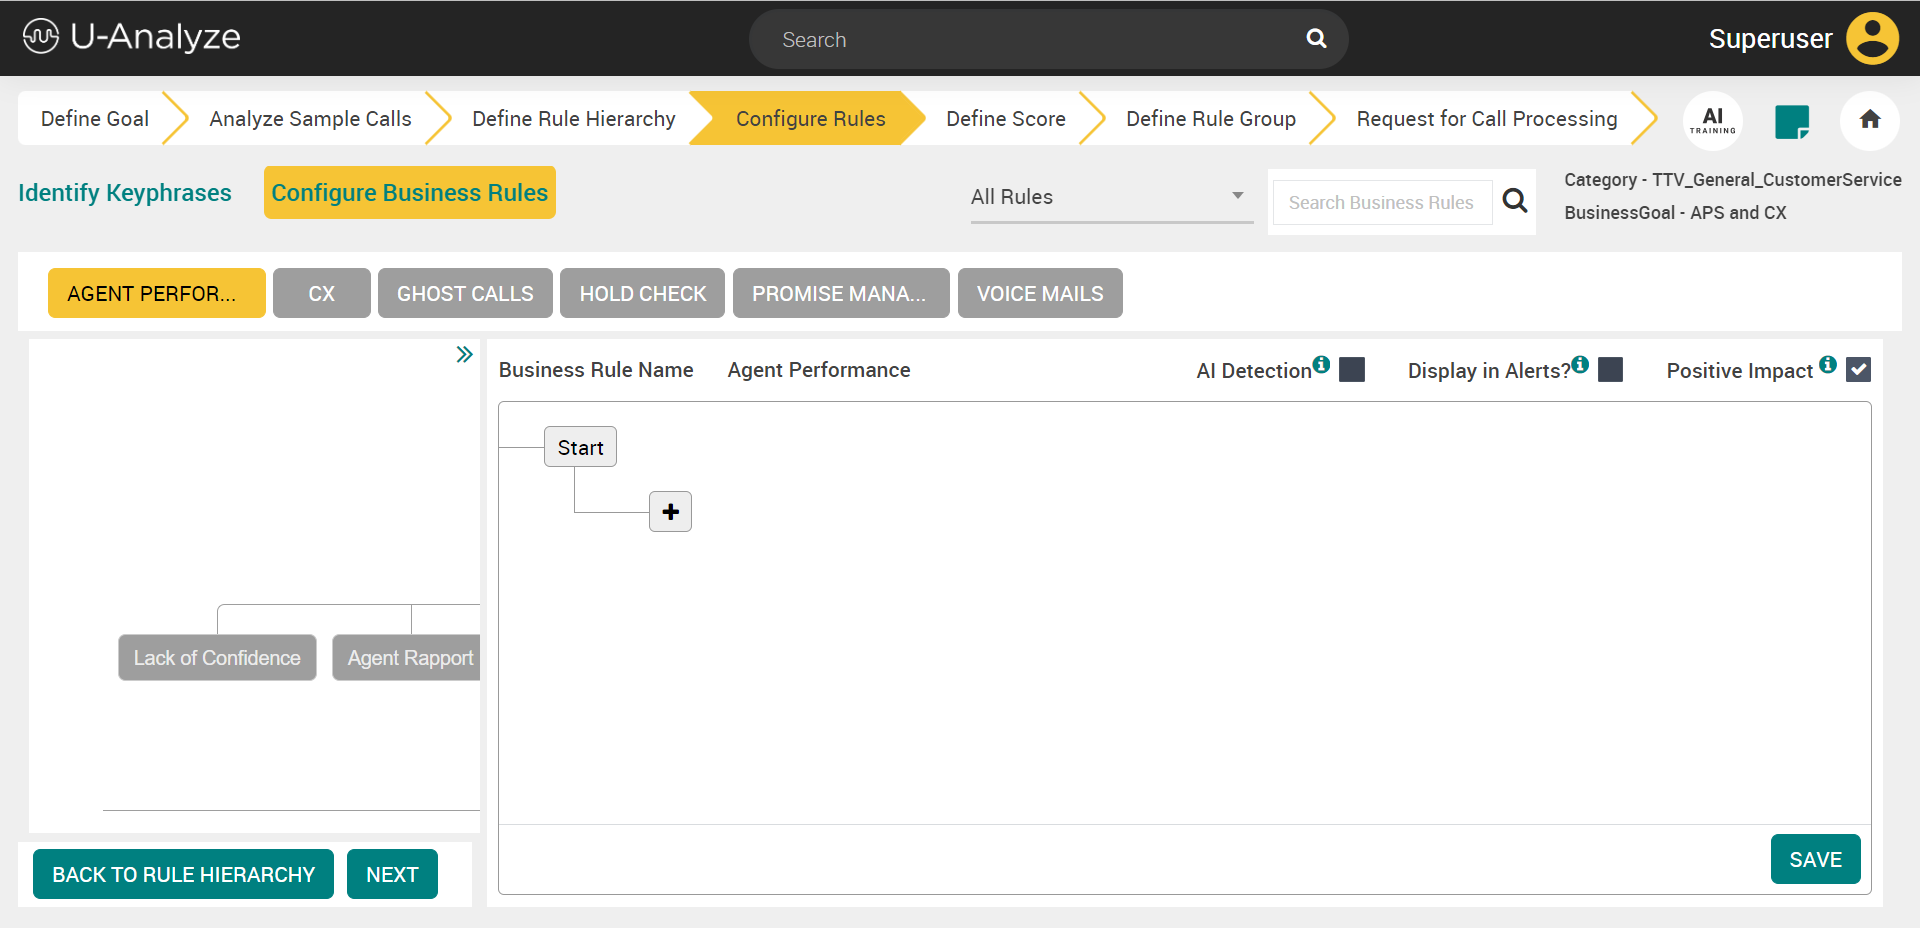
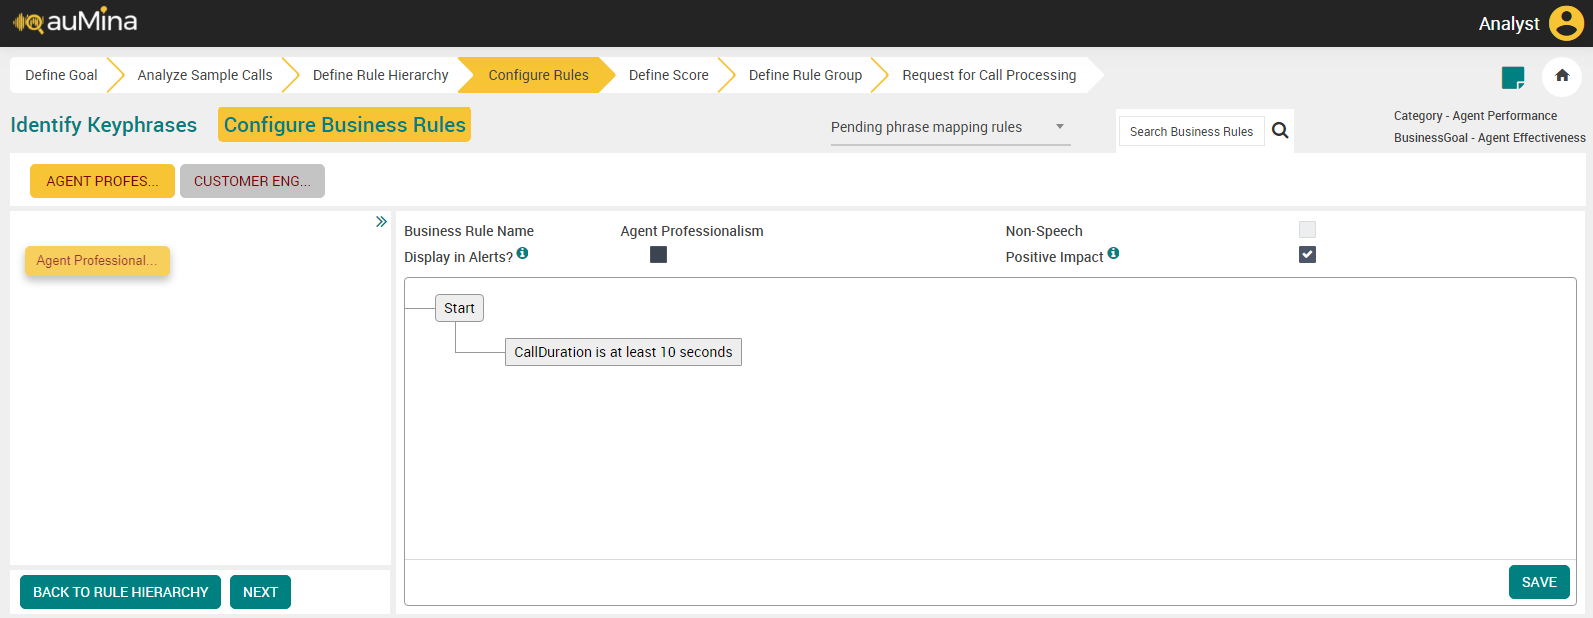
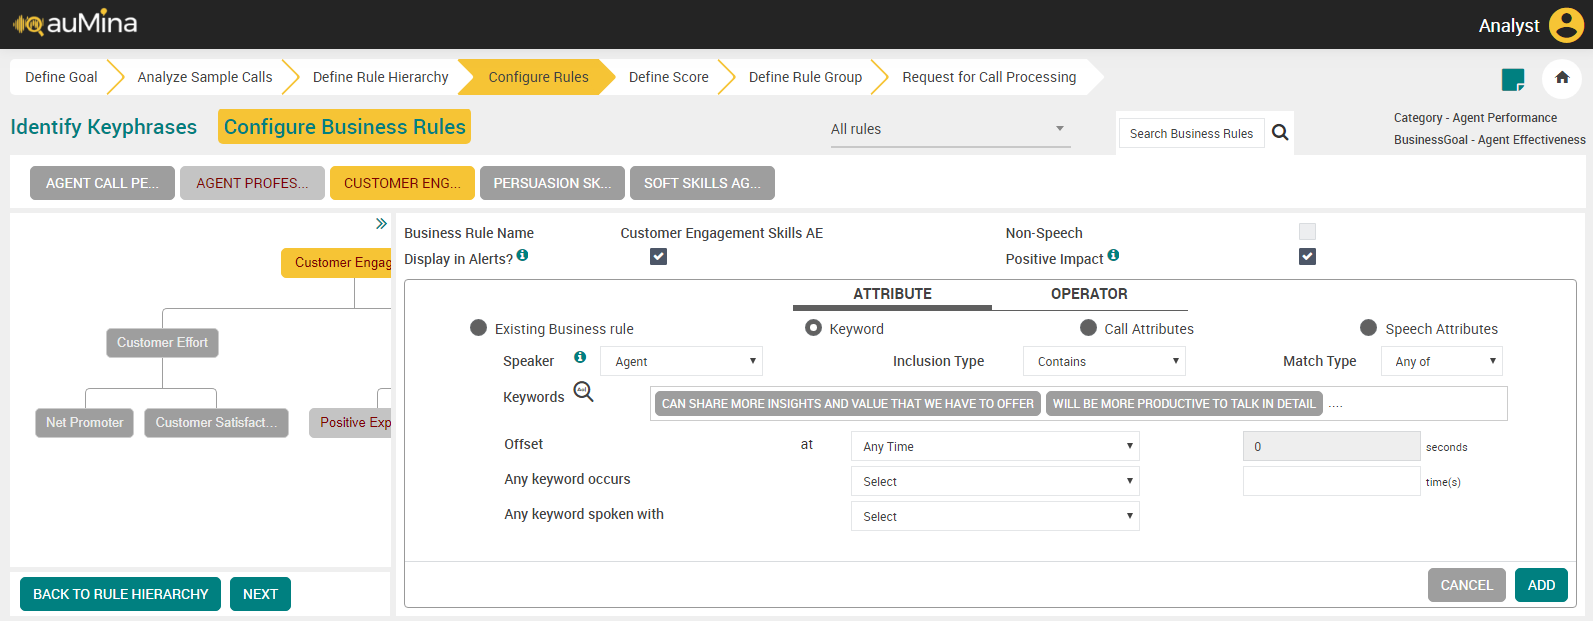
Configure Business Rules
Click Configure Business Rules tab to do additional configuration.
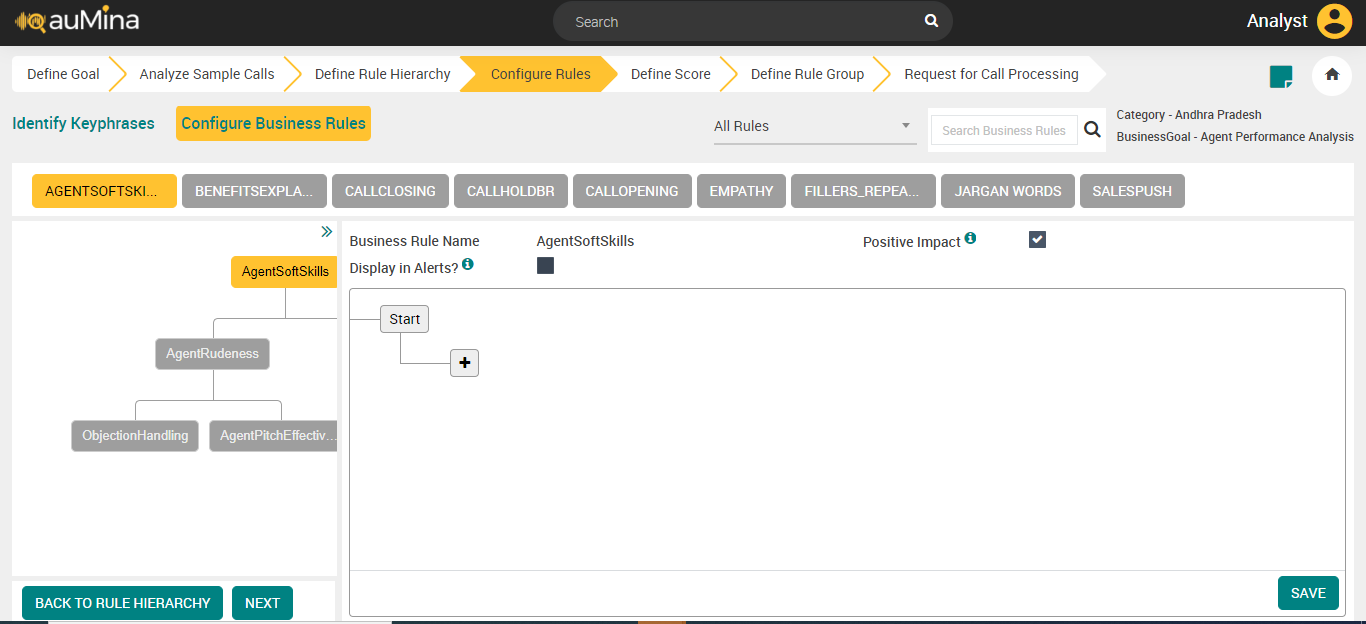
By default, “All Rules” option is selected in the drop-down. All the Parent Business Rules are displayed in the top panel. Only the Parent Business Rules with pending phrase mapping will be color coded.
Select the Business Rule to be configured.
By default, the name of the business rule is displayed in the Business Rule Name field. It is non-editable.
Select the Display in Alerts? Checkbox, if the business rule evaluated to True for a call will be displayed in U-Analyze Alerts on Call Analysis screen. Display in Alerts checkbox is disabled for external business rules.
Select the Positive Impact checkbox, to evaluate whether the business rule is positive impact on the call or not. For example, Good Call Opening business rule is positive impact on the call and Customer Escalation is not positive impact on the call.
By default, this checkbox is selected. If Analyst selects Business Rule as Positive Impact when it is evaluated to True, Business Rule is considered as Positive Business Rule. System will display Positive Impact on Score screen when Positive Business Rules are selected as Score Components. If Analyst does not select Business Rule as Positive Impact when it is evaluated to True, Business Rule is considered as Negative Business Rule. System will display Negative Impact on Score screen when Negative Business Rules are selected as Score Components. This identifier is used to drive the Normalization values of a Score and Score calculation for Fatal Errors.
Click Add (
 ) icon to configure the business rules.
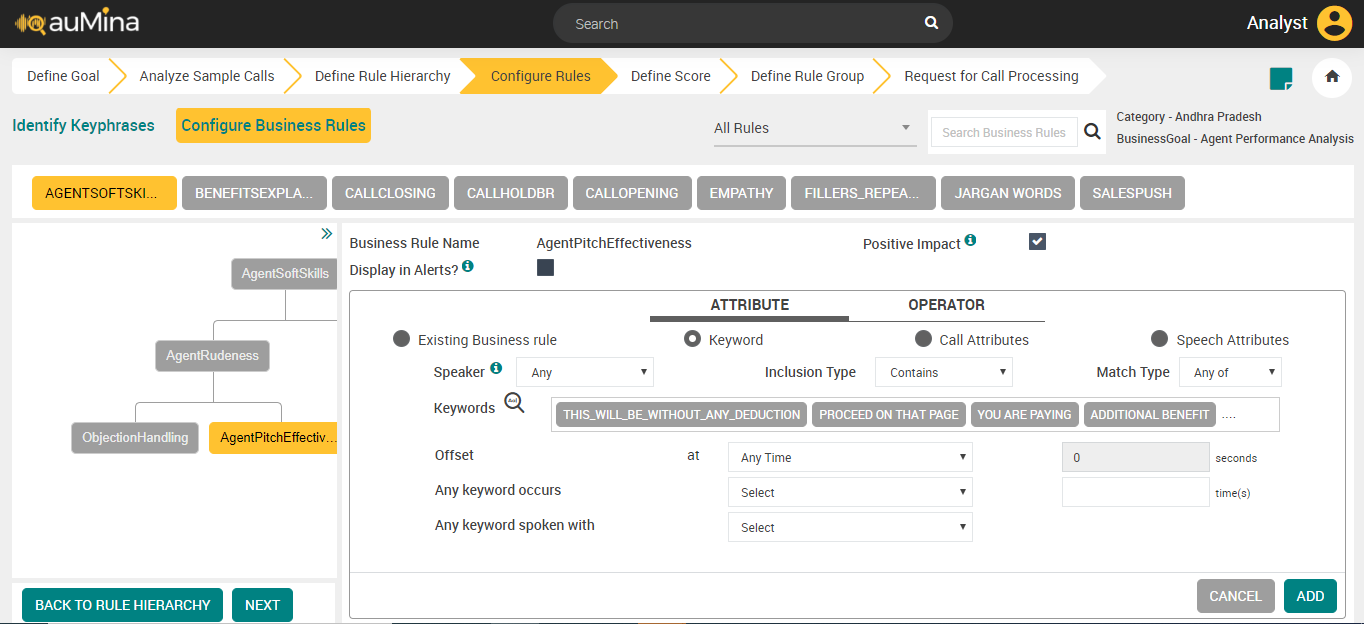
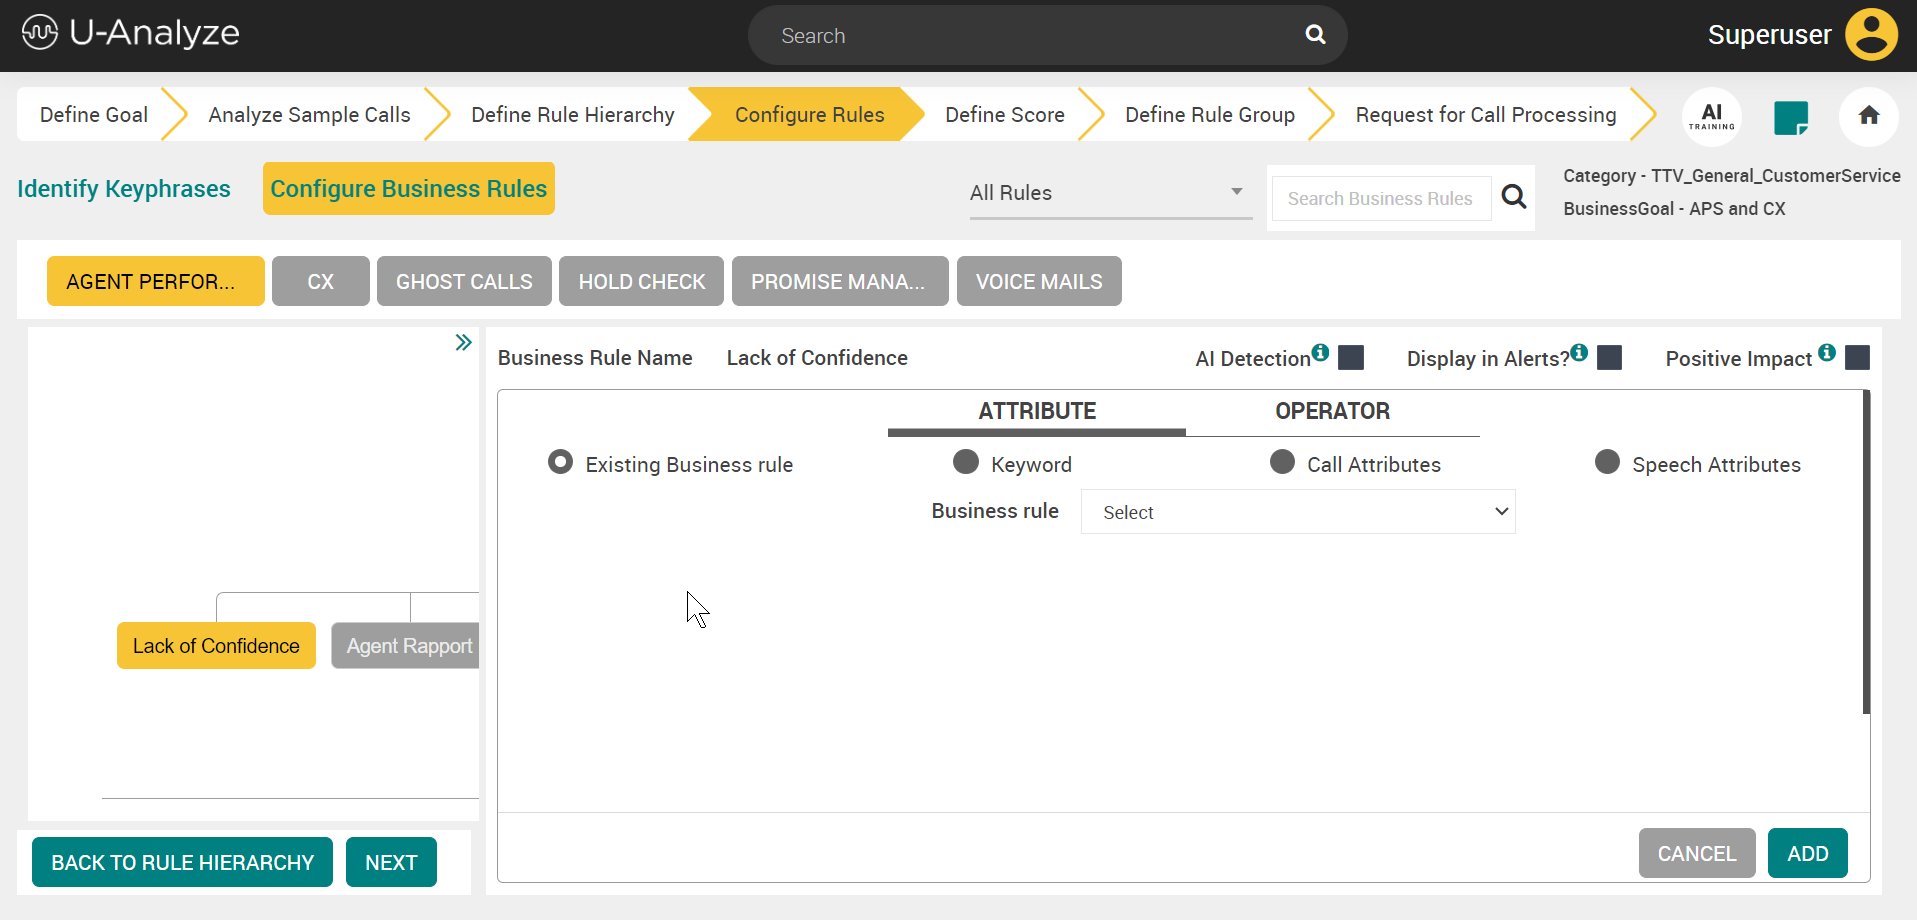
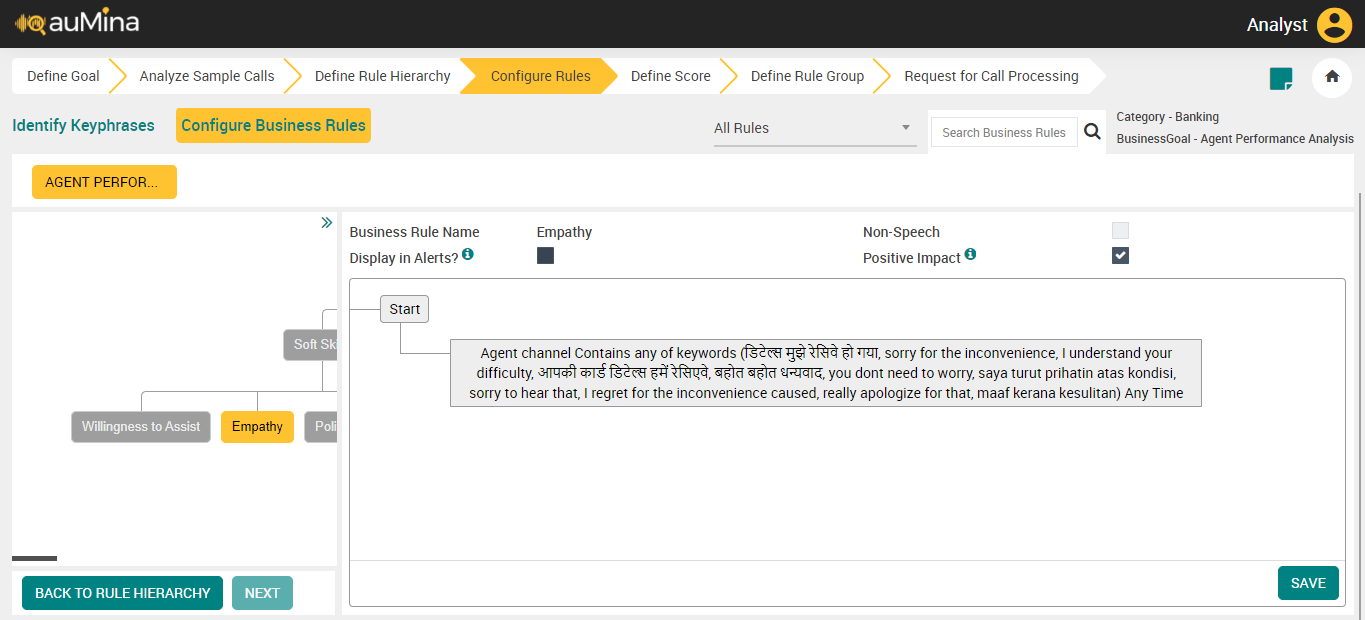
Select one of the available Attribute types – Existing Business Rule or Keyword or Call Attributes.
If you select the Attribute type as “Existing Business Rule”, the below screen appears.
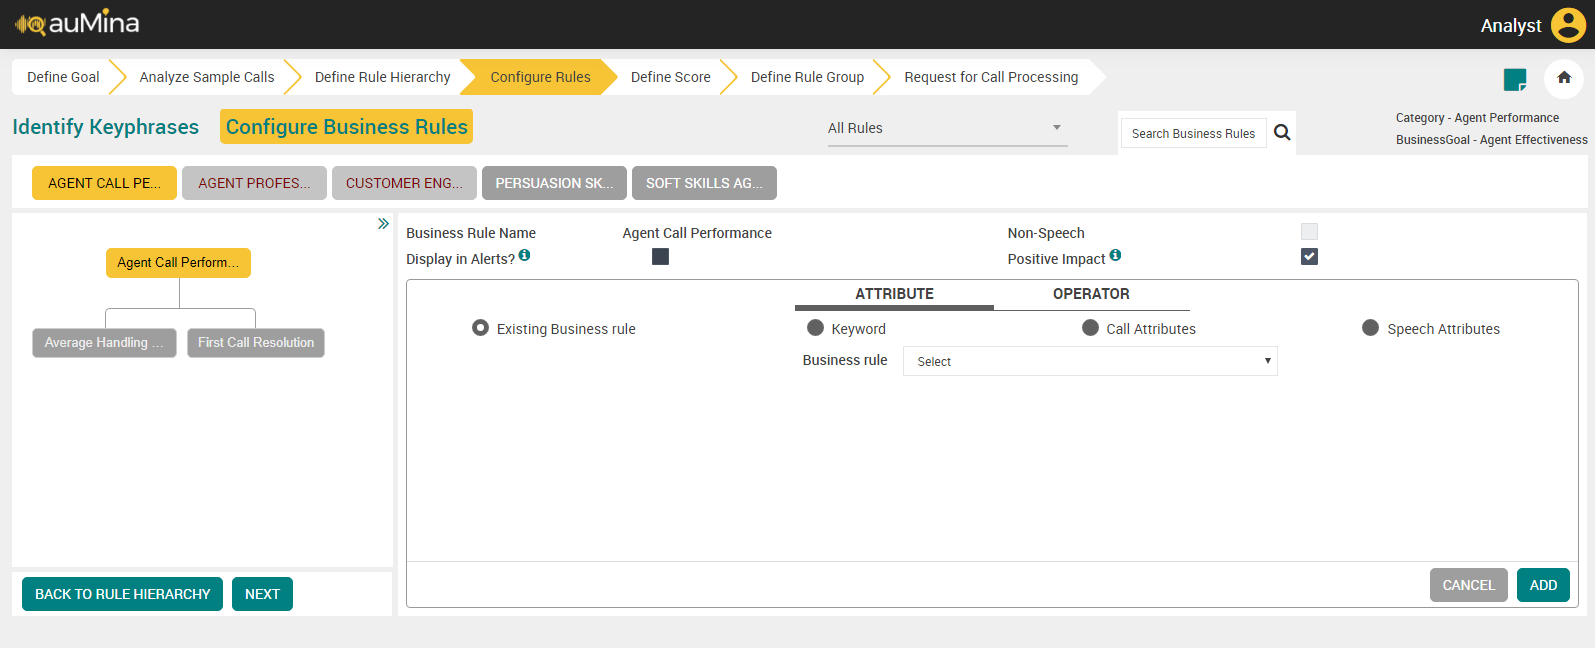
Select an available business rule from the drop-down list and click the ADD button to save.
If you select the Attribute Type as “Keyword”, the below screen appears.
Select Speaker (Agent, Customer or Any) from the drop-down list. When Analyst selects Any channel, Business rule will be evaluated for the entire call irrespective of the channel.
For Mono Audio files, only Any channel option is available which is selected by default as no distinct channels are available.
For Mono (with Diarization) and Stereo Audio Files, Analyst can select Agent, Customer or Any channel for Business Rule to be evaluated in a specific channel or for any channel.
Select any one of the values from the Inclusion Type drop-down list.
Contains – Rule should contain the selected keywords or phrases.
Does not contain – Rule should not contain the selected keywords or phrases.
Select any one of the values from the Match Type drop-down list.
Any of – Rule should contain any of the selected keywords.
All of – Rule should contain all the selected keywords.
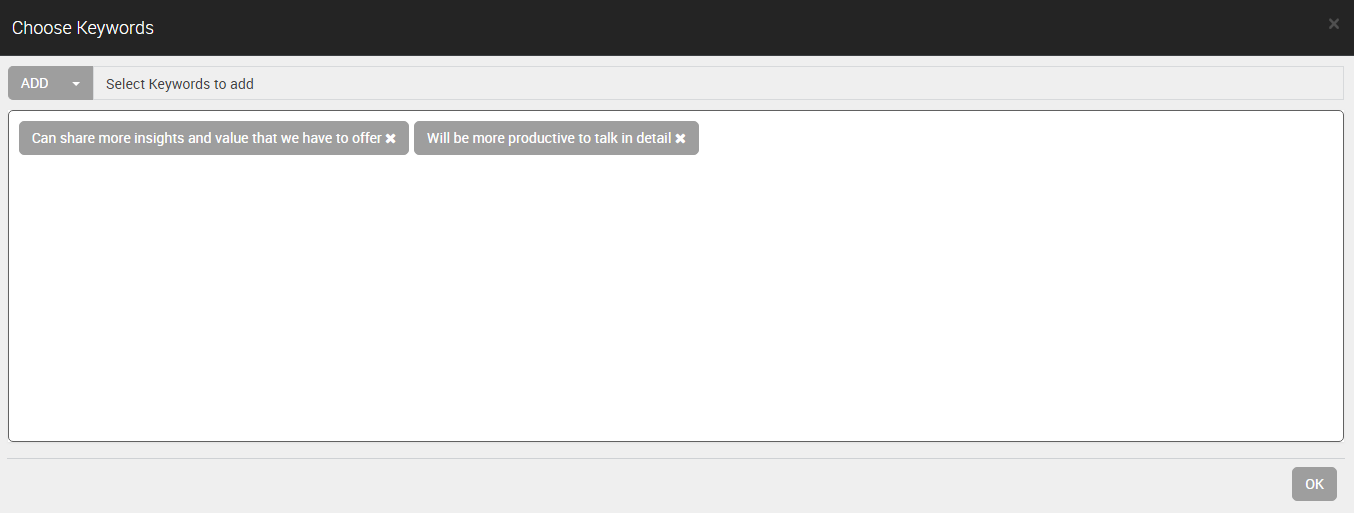
Click on Keywords section to add, create, or remove keywords. A Choose Keywords pop up will appear with available Keywords list.

The following options are available in the drop-down list.
Add – To add keywords from the list for the selected business rule.
Create – To create a new keyword for the selected business rule.
Remove – To remove the keywords for the selected business rule.
Select the keywords from the list and click the OK button to save.
Note
System will require atleast 1 character for Keyphrases. Analyst should not give single character as a keyword for English and other applicable languages, which will have the impact in accuracy. But, in Cantonese, Vietnamese and other Asian languages, it has been noted that 1 character signifies a word.
Select the Offset from the drop-down list.
At Any Time – Keywords are identified at any time.
At Call Opening in the first – Keywords are identified at call opening.
At Call Closing in the last – Keywords are identified at call closing.
In the Offset field, set the time period in which the keywords are detected.
Select any of the below values from the Any keyword occurs drop-down list:
at least (>=)
at most (<=)
less than (<)
more than (>)
Enter the number of occurrences in which the keywords are detected in the Any keyword occurs field.
Select any one of the values from the Any keyword spoken with drop-down list.
High Amplitude – Keywords spoken with high amplitude.
Low Amplitude – Keywords spoken with low amplitude.
Click the Add button to add the keywords.
If you select the Attribute type as Call Attributes, the below screen appears.
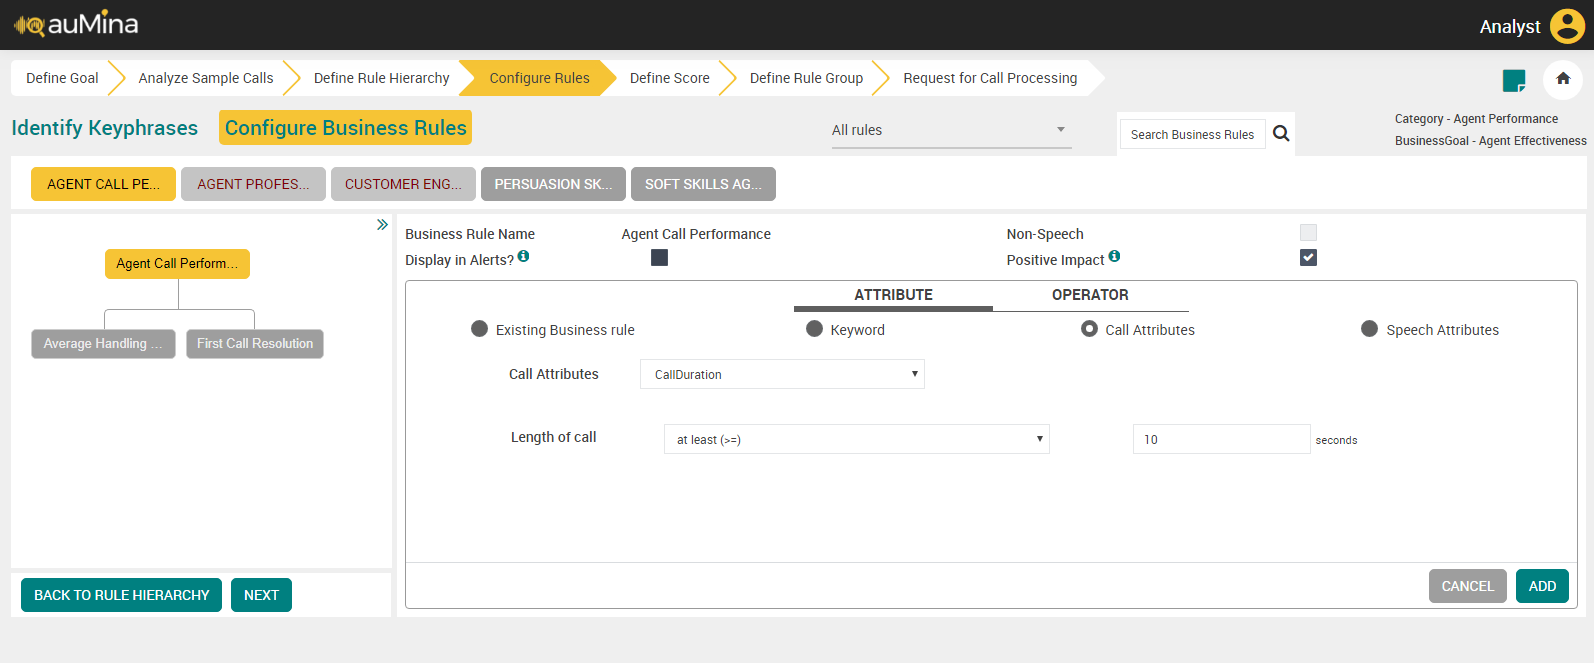
Call Attributes – Call Duration:
By default, the Call Duration option is displayed in the Call Attributes drop-down list.
Select any of the below values from the Length of drop-down list.
at least (>=)
at most (<=)
less than (<)
more than (>)
Enter the time period (in seconds) for the selected length of call duration.
Click the ADD button to save the details.
Call Attributes – Call Hold:
Select Call Hold from the Call Attributes drop-down list.
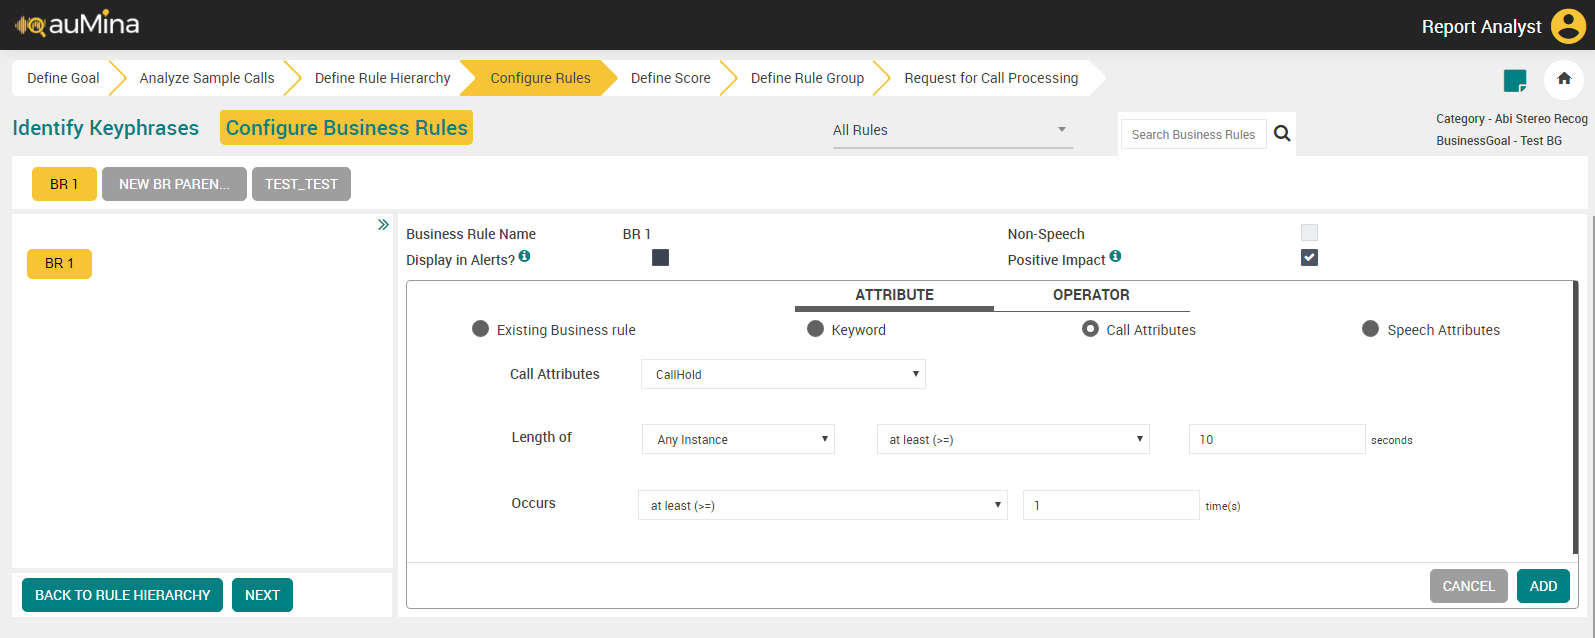
Select any one of the values from the Length of drop-down list.
Any Instance – To set time duration of occurrence of Call Hold at any one instance.
Cumulative – To set time duration of occurrence of Call Hold at all instances.
Select any of the below values from the Length of drop-down list.
at least (>=)
at most (<=)
less than (<)
more than (>)
Enter the time period (in seconds) for the selected length of call hold.
Select any of the below values from the Occurs drop-down list.
at least (>=)
at most (<=)
less than (<)
more than (>)
Enter the number of occurrences.
Click the ADD button to save the details.
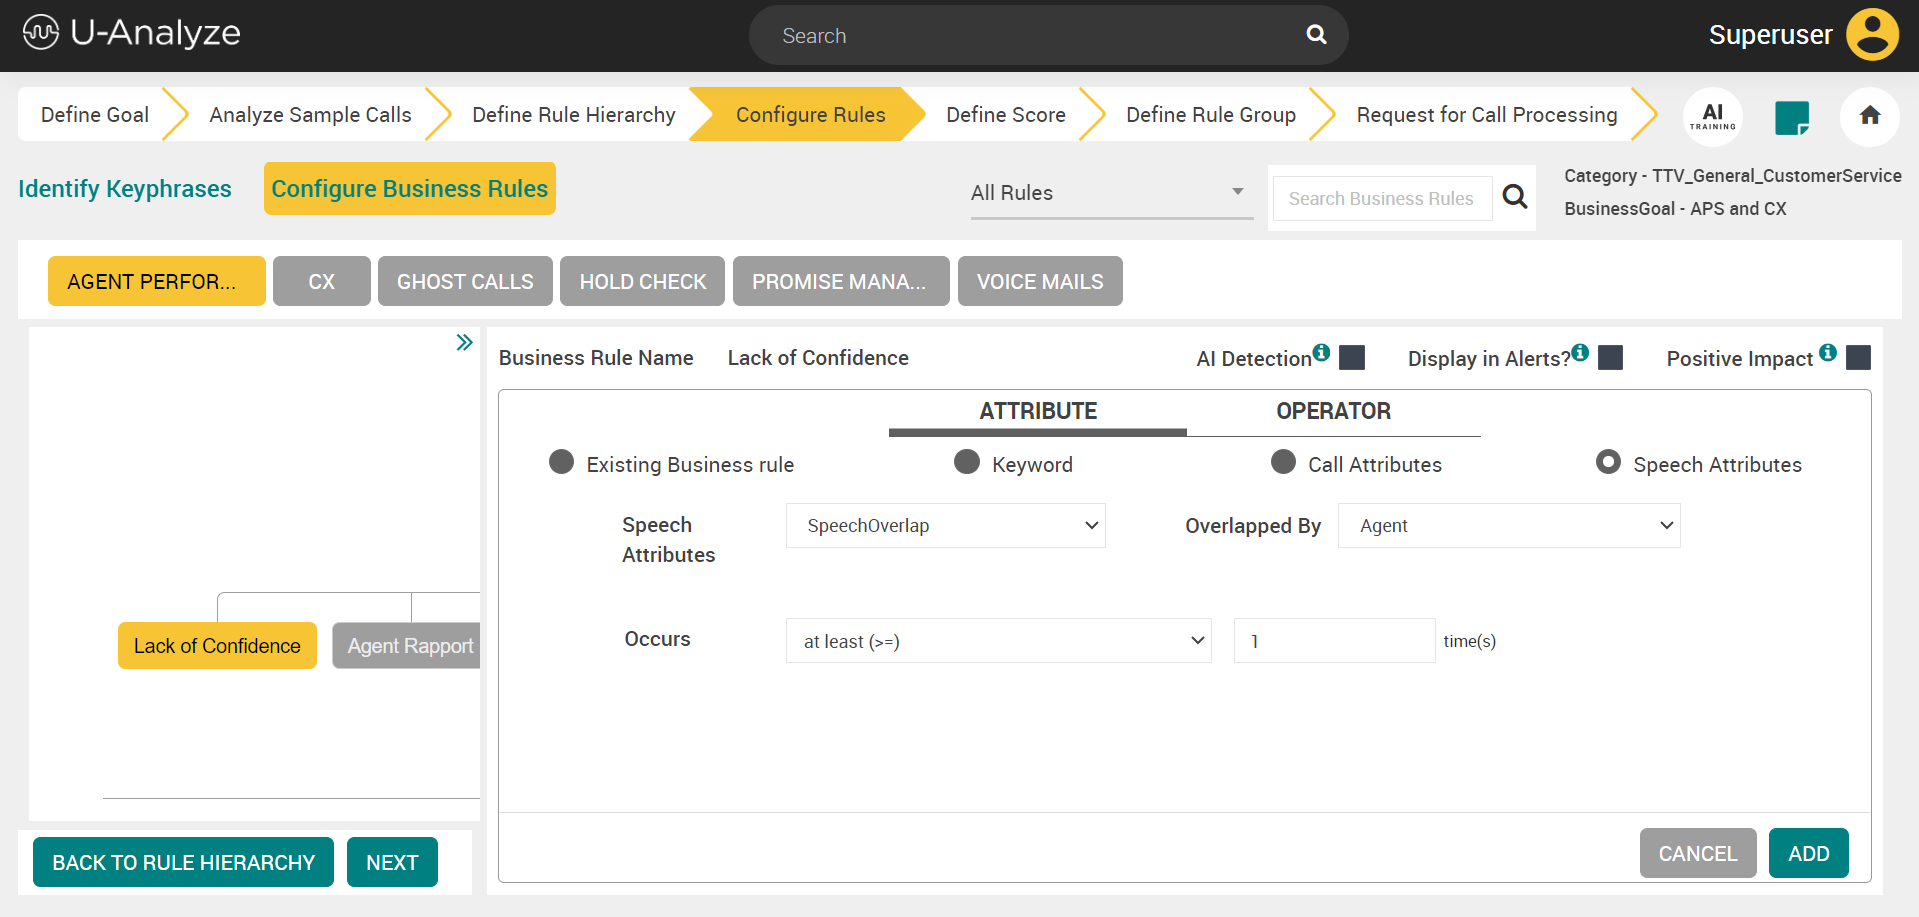
If you select the Attribute type as Speech Attributes, the below screen appears.
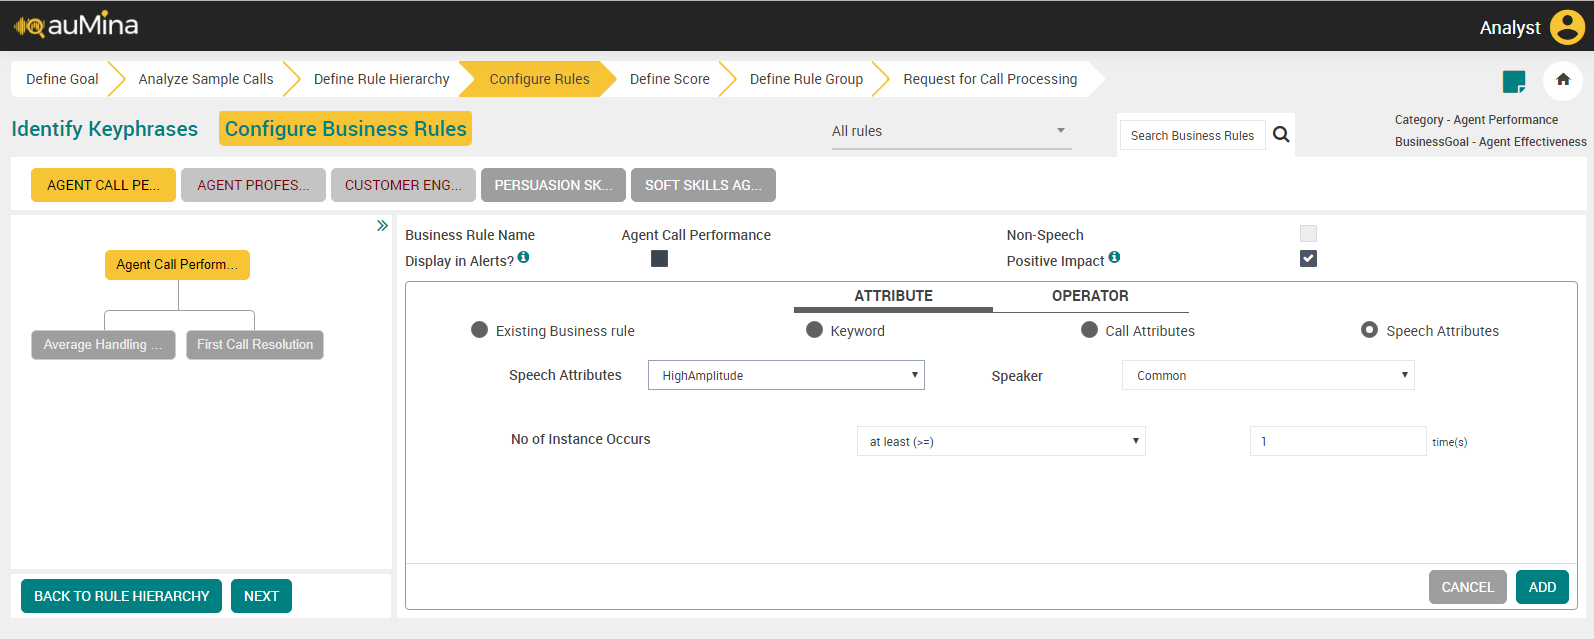
Speech Attributes – High Amplitude / Low Amplitude:
Select High Amplitude or Low Amplitude from the Speech Attributes drop-down list.
Select Speaker (Agent or Customer or Any) from the drop-down list. When Analyst selects Any channel, Business rule is evaluated for the entire call irrespective of the channel.
For Mono Audio files, only Any channel option is available which is selected by default as no distinct channels are available.
For Mono (with Diarization) and Stereo Audio Files, Analyst can select Agent, Customer or Any channel for Business Rule to be evaluated in a specific channel or for any channel.
Select any of the below values from the No of Instance Occurs drop-down list.
at least (>=)
at most (<=)
less than (<)
more than (>)
Enter the number of occurrences.
Click the ADD button to save the details.
Click the BACK TO RULE HIERARCHY button to go back to Define Rule Hierarchy page.
Click the NEXT button to navigate to Define Score page.
Configure Business Rules
Analysts configure Business Rules after the creation of Business Rule Hierarchy. After creating Business Rule Hierarchy, the analyst starts listening to actual calls, adds keyphrases, and maps them to Business Rules. An analyst can refer to his observations/notes while adding the keyphrases. Keyphrases associated with calls are captured with start and end offsets. Analysts may also enter keyphrases that may not necessarily be associated with calls.
In release 2024.1 the AI Detection checkbox and the AI TRAINING button are introduced to provide AI evaluation of business rules. Refer to Semantic Matching of Business Rules content for details.
In Create flow, unless a BR is created (Stand-alone or Parent BR with multiple levels), the analyst cannot navigate to Configure Business Rules screen.
Follow the steps given below to configure Business Rules.
 |
Create New Keywords
In Choose Keywords pop-up, select Create option from the drop-down.
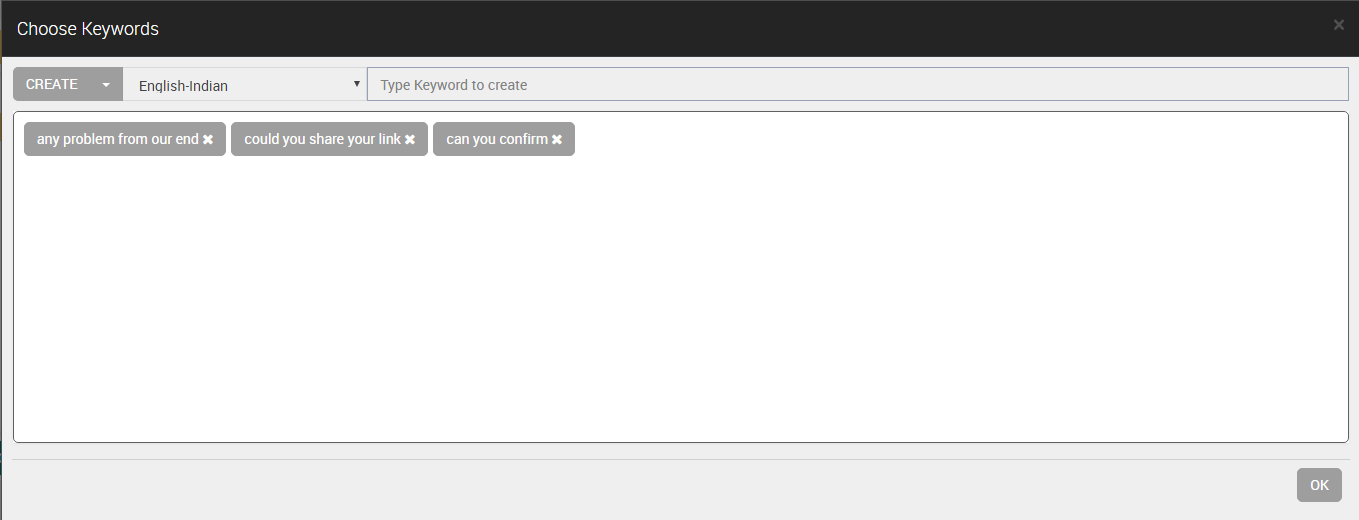
Select the required language from the drop-down list.
Enter the keyword to be created and click Enter. Analyst can create multiple keyphrases for the selected business rule.
Click OK button.
View Unconfigured Business Rules
Select “Unconfigured” option from the drop down. In the top panel, all Parent Business Rules which have unconfigured Leaf BRs are displayed. When Analyst selects a Parent Business Rule in the top panel, system automatically displays and highlights the Leaf Business Rule which is unconfigured in the left panel.
 |
Note
After completing configuration of all unconfigured Business Rules, refresh the page. System will automatically change the option as “All” in drop-down and display all the Parent Business Rules.
Non-Speech Activity Detection
Non-Speech Activity Detection is a technique in Speech Processing in which the presence of non-speech components is detected in Mono/Stereo calls. Non-Speech Activity detection will help in determining where only speech is present.
The Non-Speech components are:
Silence
Hold Music (greater than 4 seconds) (Does not include Background music)
Beep Tone, Phone Ringing Tone (Long duration only)
Stand Alone Noise (Does not include Background Noise)
Note
Any irrelevant noise (music, annoying noise, echo etc.) can be detected easily but not when there are multiple agents talking in the background.
Audio calls are sent from U-Analyze Conversations to Non-Speech Activity Detection module for pre-processing activities to detect non-speech components.
Non-Speech Activity Detection module returns the start and end offsets (timestamps) of the individual components which are used in U-Analyze for removal of non-speech component blocks or evaluation in Business Rules.
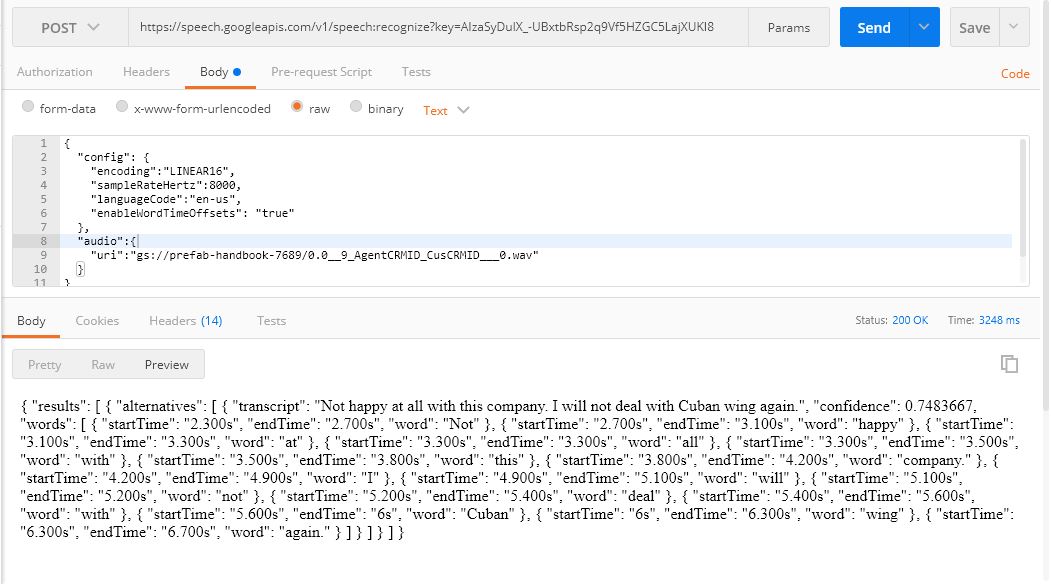
Incorporate Key Phrase Offset for Transcription Through Google Engine
Offsets will be provided for keyphrases for Transcription through Google engine. To obtain accurate word offsets through Google Speech API, set the enableWordTimeOffsets parameter to true in the Cloud Speech API, which includes time offset values for the start-offset and end-offset of each spoken word that is transcribed in the given audio.
{
"config": {
  "encoding":"LINEAR16",
  "sampleRateHertz":8000,
  "languageCode":"en-us",
    "enableWordTimeOffsets": "true"
  },
  "audio":{
  "uri": "file://C:/Users/2304151/Downloads/0.0__9_AgentCRMID_CusCRMID___0.wav"
 }
 }
 |
Configure Business Rules Tab
Click Configure Business Rules tab to do additional configuration.
By default, “All Rules” option is selected in the drop-down. All the Parent Business Rules are displayed in the top panel. Only the Parent Business Rules with pending phrase mapping will be color coded.
Select the Business Rule to be configured.
By default, the name of the business rule is displayed in the Business Rule Name field. It is non-editable.
Select the Display in Alerts? Checkbox, if the business rule evaluated to True for a call will be displayed in U-Analyze Alerts on Call Analysis screen. Display in Alerts checkbox is disabled for external business rules.
Select the Positive Impact checkbox, to evaluate whether the business rule is positive impact on the call or not. For example, Good Call Opening business rule is positive impact on the call and Customer Escalation is not positive impact on the call.
By default, this checkbox is selected. If Analyst selects Business Rule as Positive Impact when it is evaluated to True, Business Rule is considered as Positive Business Rule. System will display Positive Impact on Score screen when Positive Business Rules are selected as Score Components. If Analyst does not select Business Rule as Positive Impact when it is evaluated to True, Business Rule is considered as Negative Business Rule. System will display Negative Impact on Score screen when Negative Business Rules are selected as Score Components. This identifier is used to drive the Normalization values of a Score and Score calculation for Fatal Errors.
Click Add (
) icon to configure the business rules.Select one of the available Attribute types – Existing Business Rule or Keyword or Call Attributes.
If you select the Attribute type as “Existing Business Rule”, the below screen appears.
Select an available business rule from the drop-down list and click the ADD button to save.
If you select the Attribute Type as “Keyword”, the below screen appears.
Select Speaker (Agent, Customer, or Any) from the drop-down list. When an analyst selects Any channel, the business rule will be evaluated for the entire call irrespective of the channel.
For Mono Audio files, only Any channel option is available which is selected by default as no distinct channels are available.
For Mono (with Diarization) and Stereo Audio Files, analysts can select Agent, Customer or Any channel for Business Rule to be evaluated in a specific channel or for any channel.
Select any one of the values from the Inclusion Type drop-down list.
Contains – A rule should contain the selected keywords or phrases (Default selection)
Does not contain – A rule should not contain the selected keywords or phrases.
Select any one of the values from the Match Type drop-down list.
Any of – A rule should contain any of the selected keywords (Default selection)
All of – A rule should contain all the selected keywords.
Click on Keywords dialogue box to add, create, export, import or remove keywords. A Choose Keywords pop-up appears with the list of the available keywords.
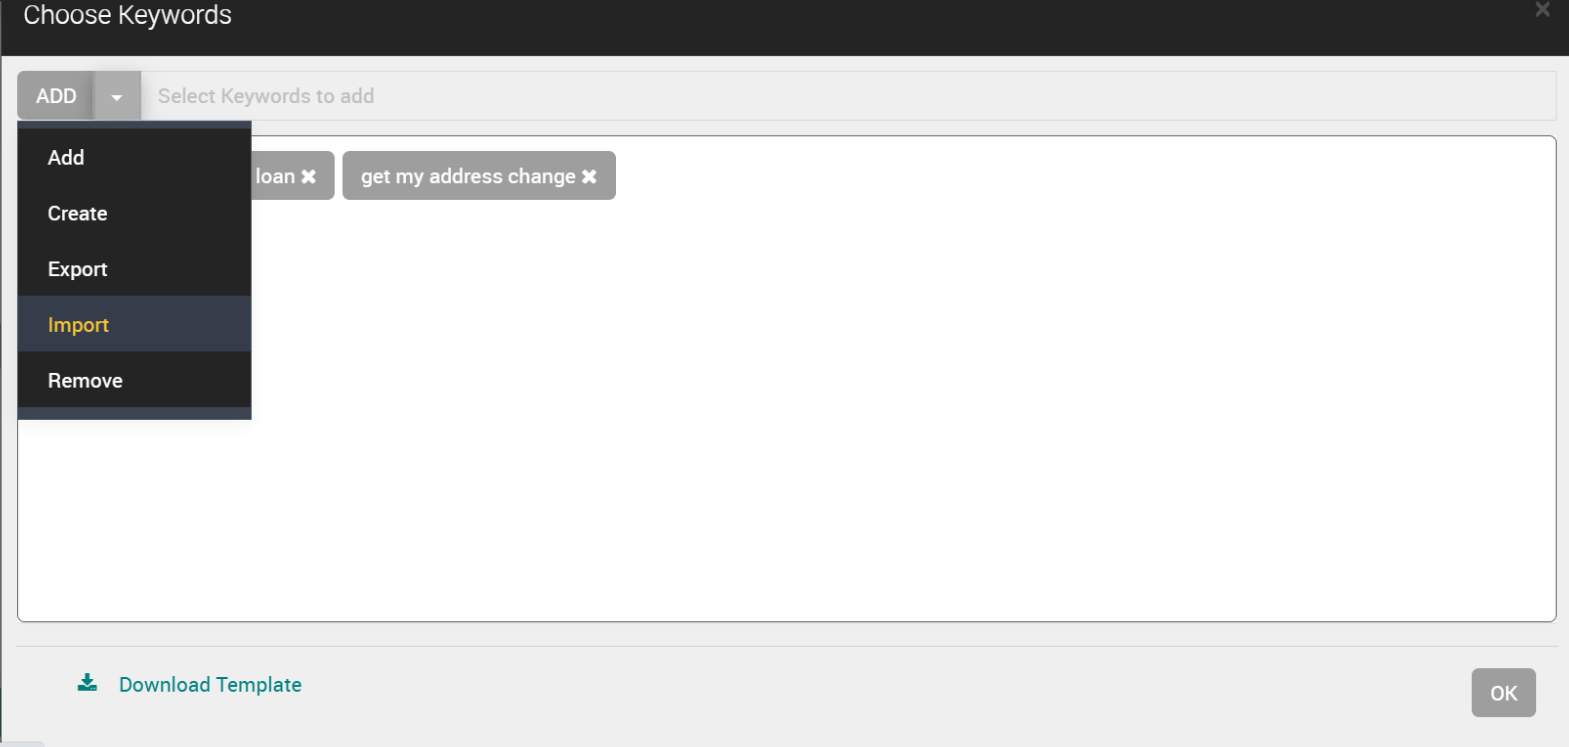
The options that follow are available in the drop-down list.
Add – To add keywords from the list for the selected business rule
Create – To create a new keyword for the selected business rule
Export – To export the keywords CSV file
Import – To import the keywords CSV file
Remove – To remove the keywords for the selected business rule.
The import and export of keywords functionality is introduced in the 2024.1 release.
The import and export buttons are available near the Keywords section.

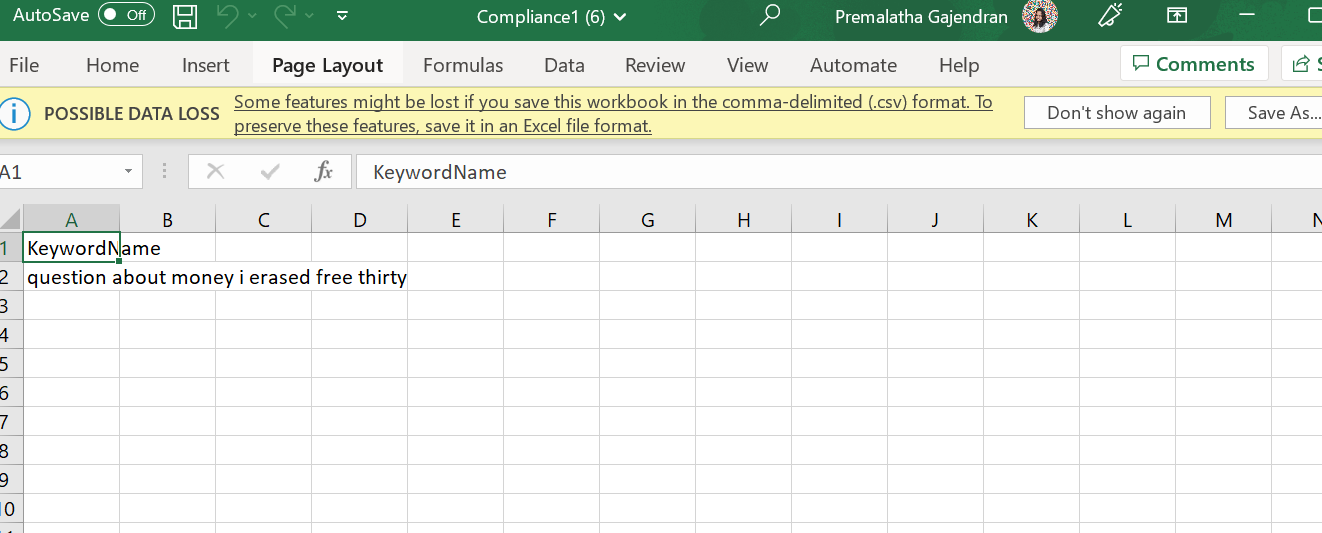
Click the import button to import the keywords from a CSV file. The sample CSV file is shown below.
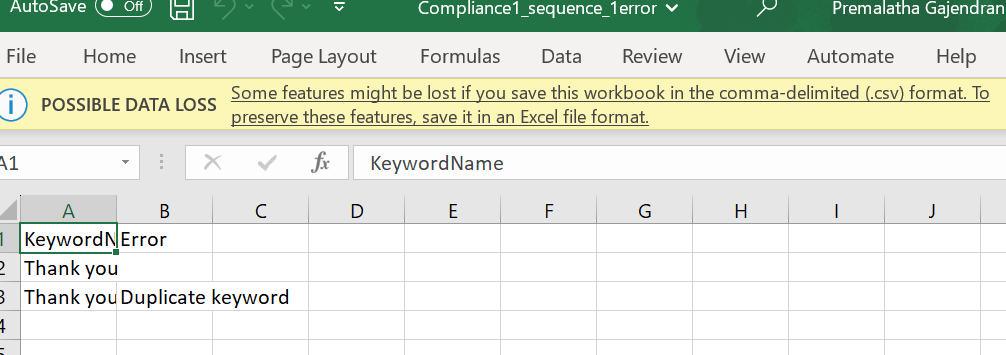
If the imported CSV file contains errors, an error CSV file is generated that can be downloaded. The error CSV file shows the errors that must be corrected to proceed with the import of keywords. The sample of the error CSV file is shown below.
Click the export button to export the configured keywords as a CSV file.
Select the keywords from the list and click the OK button to save.
Note
The system requires at least 1 character for keyphrases. An analyst must not give a single character as a keyword for English and other applicable languages, which impacts the accuracy. But, in Cantonese, Vietnamese and other Asian languages, it has been noted that 1 character signifies a word.
Select the Offset from the at drop-down list.
Any Time – Keywords are identified at any time
Call Opening in the first – Keywords are identified at call opening
Call Closing in the last – Keywords are identified at call closing
In the seconds field of Offset set the time period in which the keywords are detected. The offset time can be set for only "Call Opening in the first" and Call Closing in the last". The offset time must be greater than one second, less than 9999, and up to two decimals values.
Select any of the below values from the Any keyword occurs drop-down list:
at least (>=)
at most (<=)
less than (<)
more than (>)
Enter the number of occurrences in which the keywords are detected in the time(s) field of Any keyword occurs. This value must be a whole integer greater than one and less than 9999.
Select any one of the values from the Any keyword spoken with drop-down list.
High Amplitude – Keywords spoken with high amplitude.
Low Amplitude – Keywords spoken with low amplitude.
Click the Add button to add the keywords.
If you select the Attribute type as Call Attributes, the below screen appears.
Call Attributes – Call Duration:
By default, the Call Duration option is displayed in the Call Attributes drop-down list.
Select any of the below values from the Length of drop-down list.
at least (>=)
at most (<=)
less than (<)
more than (>)
Enter the time period (in seconds) for the selected length of call duration.
Click the ADD button to save the details.
Call Attributes – Call Hold:
Select Call Hold from the Call Attributes drop-down list.
Select any one of the values from the Length of drop-down list.
Any Instance – To set time duration of occurrence of Call Hold at any one instance.
Cumulative – To set time duration of occurrence of Call Hold at all instances.
Select any of the below values from the Length of drop-down list.
at least (>=)
at most (<=)
less than (<)
more than (>)
Enter the time period (in seconds) for the selected length of call hold.
Select any of the below values from the Occurs drop-down list.
at least (>=)
at most (<=)
less than (<)
more than (>)
Enter the number of occurrences.
Click the ADD button to save the details.
If you select the Attribute type as Speech Attributes, the below screen appears.
Speech Attributes – High Amplitude / Low Amplitude:
Select High Amplitude or Low Amplitude from the Speech Attributes drop-down list.
Select Speaker (Agent or Customer or Any) from the drop-down list. When Analyst selects Any channel, Business rule is evaluated for the entire call irrespective of the channel.
For Mono Audio files, only Any channel option is available which is selected by default as no distinct channels are available.
For Mono (with Diarization) and Stereo Audio Files, Analyst can select Agent, Customer or Any channel for Business Rule to be evaluated in a specific channel or for any channel.
Select any of the below values from the No of Instance Occurs drop-down list.
at least (>=)
at most (<=)
less than (<)
more than (>)
Enter the number of occurrences.
Click the ADD button to save the details.
Click the BACK TO RULE HIERARCHY button to go back to Define Rule Hierarchy page.
Click the NEXT button to navigate to Define Score page.
Configure Business Rules Tab
Click Configure Business Rules tab to do additional configuration.
By default, “All Rules” option is selected in the drop-down. All the parent Business Rules are displayed in the top panel. Only the parent Business Rules with pending phrase mapping are color coded. The other options available in the drop-down are Inactive Rules, Pending Phrase Mapping Rules, and Unconfigured Rules.
Select the Business Rule to be configured.
By default, the name of the business rule is displayed in the Business Rule Name field. It is non-editable.
Select the Display in Alerts? Checkbox, if the business rule evaluated to True for a call will be displayed in U-Analyze Alerts on Call Analysis screen. Display in Alerts checkbox is disabled for external business rules.
Select the Positive Impact checkbox, to evaluate whether the business rule is positive impact on the call or not. For example, "Good Call Opening" is a positive impact BR and "Customer Escalation" is not a positive impact BR.
By default, this checkbox is selected. If Analyst selects Business Rule as Positive Impact when it is evaluated to True, Business Rule is considered as Positive Business Rule. System will display Positive Impact on Score screen when Positive Business Rules are selected as Score Components. If Analyst does not select Business Rule as Positive Impact when it is evaluated to True, Business Rule is considered as Negative Business Rule. System will display Negative Impact on Score screen when Negative Business Rules are selected as Score Components. This identifier is used to drive the Normalization values of a Score and Score calculation for Fatal Errors.
Click Add (
) icon to configure the business rules.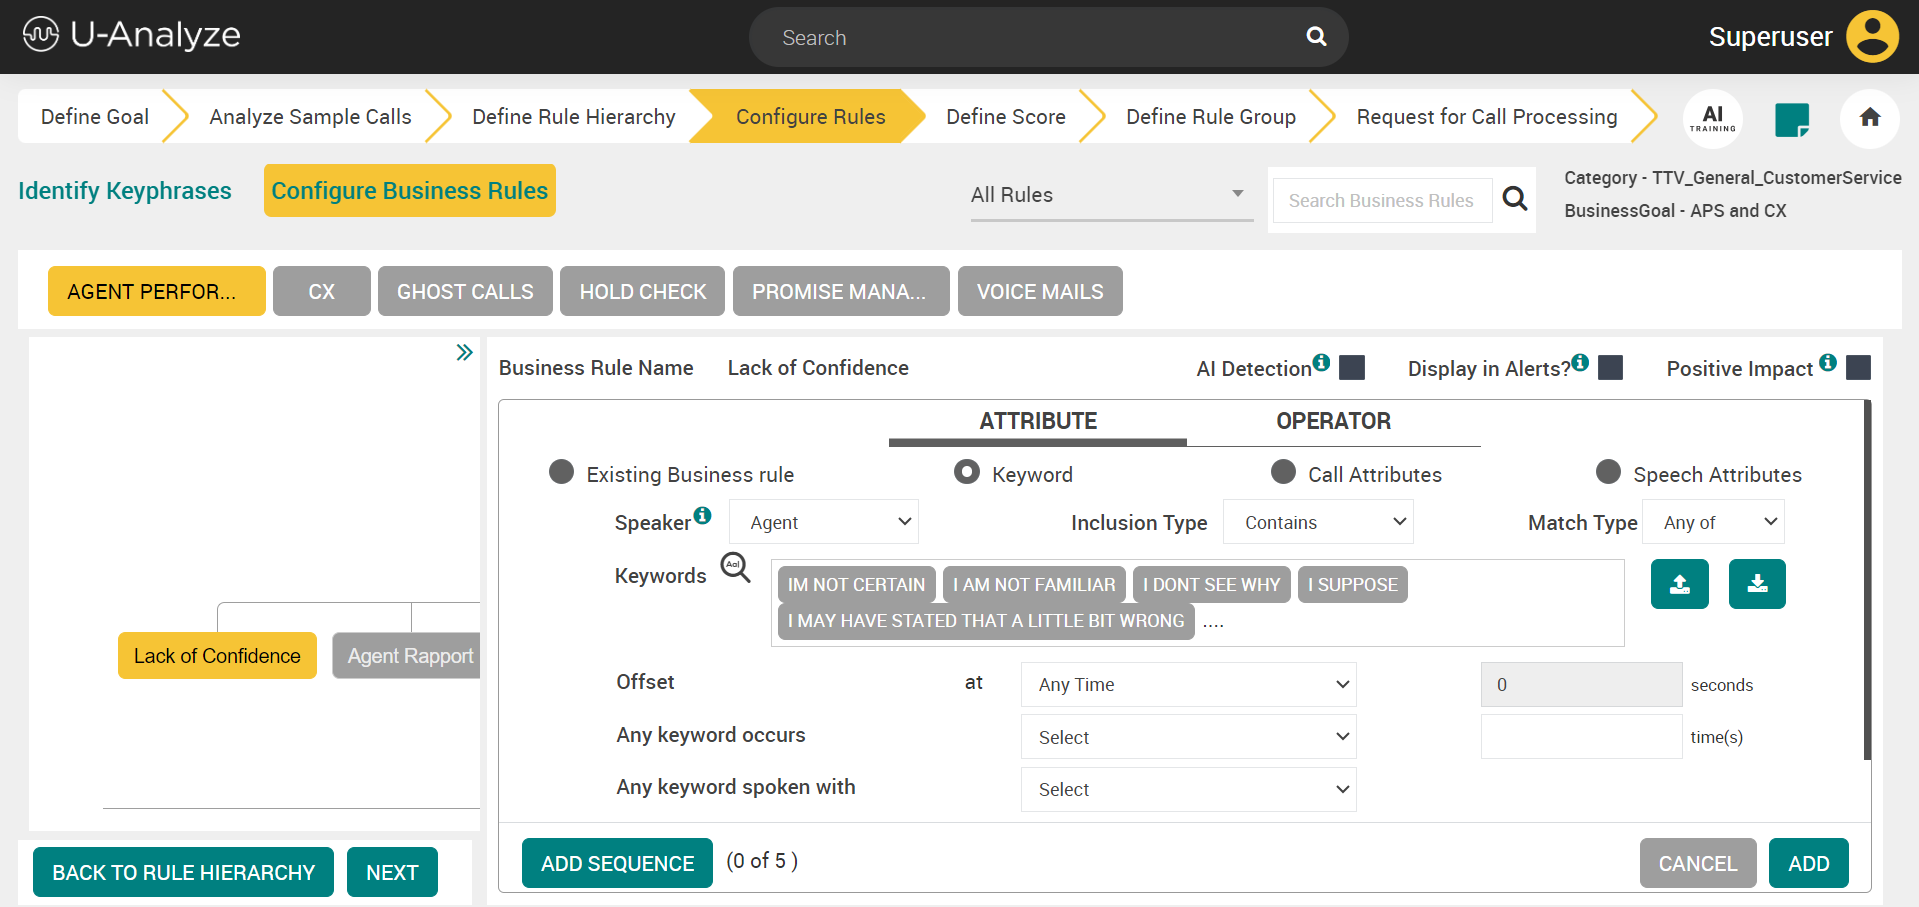
Select one of the available attribute types – Existing Business Rule, Keyword, Call Attributes, or Speech Attributes. The Keyword, attribute is the default selection.
If you select the Attribute type as “Existing Business Rule”, the below screen appears.
Select an available business rule from the drop-down list and click the ADD button to save.
If you select the Attribute type as “Keyword”, the below screen appears. Refer to Keyword Attributes content for configuration details.
If you select the Attribute type as Call Attributes, the below screen appears. Refer to Call Attributes content for configuration details.

If you select the Attribute type as Speech Attributes, the below screen appears. Refer to Speech Attributes content for configuration details.
Click the OPERATOR tab.

Select the operator from the Choose your operator drop-down. The operators that can be selected are as follows:
Any of (OR)
All of (AND)
Inverse of (NOT)
Click the BACK TO RULE HIERARCHY button to go back to Define Rule Hierarchy page.
Click the NEXT button to navigate to Define Score page.
Keyword Attributes
Select Speaker (Agent, Customer, or Any) from the drop-down list. When an analyst selects Any channel, the business rule will be evaluated for the entire call irrespective of the channel.
For Mono Audio files, only Any channel option is available which is selected by default as no distinct channels are available.
For Mono (with Diarization) and Stereo Audio Files, analysts can select Agent, Customer or Any channel for Business Rule to be evaluated in a specific channel or for any channel.
Select any one of the values from the Inclusion Type drop-down list.
Contains – A rule should contain the selected keywords or phrases (Default selection)
Does not contain – A rule should not contain the selected keywords or phrases.
Select any one of the values from the Match Type drop-down list.
Any of – A rule should contain any of the selected keywords (Default selection)
All of – A rule should contain all the selected keywords.
Click on Keywords dialogue box to add, create, export, import or remove keywords. A Choose Keywords pop-up appears with the list of the available keywords.
The options that follow are available in the drop-down list.
Add – To add keywords from the list for the selected business rule
Create – To create a new keyword for the selected business rule
Export – To export the keywords CSV file
Import – To import the keywords CSV file
Remove – To remove the keywords for the selected business rule.
The import and export of keywords functionality is introduced in the 2024.1 release.
The import and export buttons are available near the Keywords section.
Click the import button to import the keywords from a CSV file. The sample CSV file is shown below.
If the imported CSV file contains errors, an error CSV file is generated that can be downloaded. The error CSV file shows the errors that must be corrected to proceed with the import of keywords. The sample of the error CSV file is shown below.
Click the export button to export the configured keywords as a CSV file.
Select the keywords from the list and click the OK button to save.
Note
The system requires at least 1 character for keyphrases. An analyst must not give a single character as a keyword for English and other applicable languages, which impacts the accuracy. But, in Cantonese, Vietnamese and other Asian languages, it has been noted that 1 character signifies a word.
Select the Offset from the at drop-down list.
Any Time – Keywords are identified at any time
Call Opening in the first – Keywords are identified at call opening
Call Closing in the last – Keywords are identified at call closing
In the seconds field of Offset set the time period in which the keywords are detected. The offset time can be set for only "Call Opening in the first" and Call Closing in the last". The offset time must be greater than one second, less than 9999, and up to two decimals values.
Select any of the below values from the Any keyword occurs drop-down list:
at least (>=)
at most (<=)
less than (<)
more than (>)
Enter the number of occurrences in which the keywords are detected in the time(s) field of Any keyword occurs. This value must be a whole integer greater than one and less than 9999.
Select any one of the values from the Any keyword spoken with drop-down list.
High Amplitude – Keywords spoken with high amplitude.
Low Amplitude – Keywords spoken with low amplitude.
Click the Add button to add the keywords.
Tip
You can click BACK TO RULE HIERARCHY to go back to Define Rule Hierarchy page or click NEXT to go to Define Score page.
Call Attributes
In the Call Attributes tab you can select Call Duration or Call Hold options from the Call Attributes drop-down list. By default, the Call Duration option is selected.
Select any of the below values from the Length of call drop-down list.
at least (>=) (Default selection)
at most (<=)
less than (<)
more than (>)
Enter the time period (in seconds) in the seconds field for the selected length of call duration.
Click the ADD button to save the details.
Select Call Hold from the Call Attributes drop-down list.
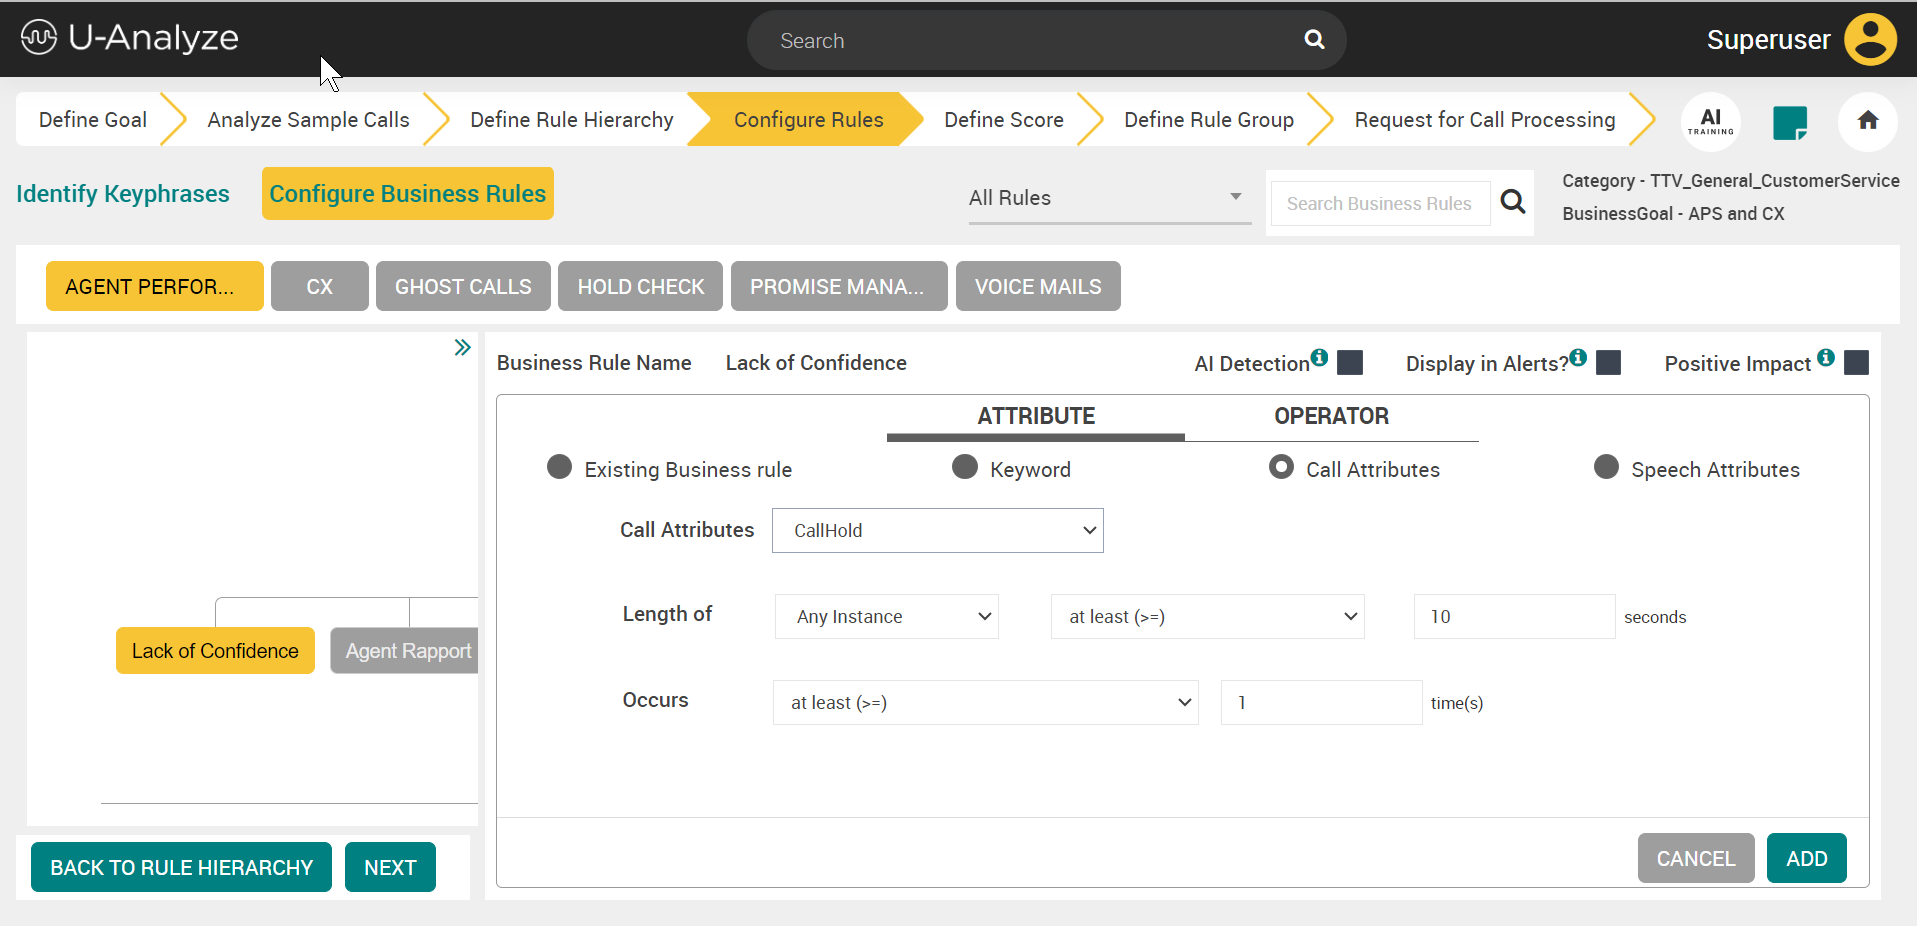
Select any one of the values from the Length of drop-down list.
Any Instance – To set time duration of occurrence of Call Hold at any one instance.
Cumulative – To set time duration of occurrence of Call Hold at all instances.
Select any of the below values from the length drop-down list.
at least (>=) (Default selection)
at most (<=)
less than (<)
more than (>)
Enter the time period (in seconds) in the seconds field for the selected length of call hold.
Select any of the below values from the Occurs drop-down list.
at least (>=) (Default selection)
at most (<=)
less than (<)
more than (>)
Enter the number of occurrences in the times(s) field.
Click the ADD button to save the details.
Tip
You can click BACK TO RULE HIERARCHY to go back to Define Rule Hierarchy page or click NEXT to go to Define Score page.
Speech Attributes
Select the speech attribute from the Speech Attributes drop-down list.
Speech Overlap (Default selection): Overlap (crosstalk) of agent and customer speech
Long Talk: When there is a long duration speech by either the agent or customer.
High Amplitude: Speech with high amplitude
Low Amplitude: Speech with low amplitude.
Select the speaker (Agent, Customer or Any) from the Overlapped By drop-down list. When an analyst selects Any channel, the business rule is evaluated for the entire call irrespective of the channel.
For Mono Audio files, only Any channel option is available which is the default selection since no distinct channels are available
For Mono (with Diarization) and Stereo audio files, an analyst can select Agent, Customer, or Any channel for the business rule to be evaluated in a specific channel or for any channel.
Select any of the below values from the Occurs drop-down list.
at least (>=) (Default selection)
at most (<=)
less than (<)
more than (>)
Enter the number of occurrences in the time(s) field.
Click the ADD button to save the details.
Tip
You can click BACK TO RULE HIERARCHY to go back to Define Rule Hierarchy page or click NEXT to go to Define Score page.
Semantic Matching of Business Rules
This feature is newly introduced in the 2024.1.1 release. It provides the ability to use AI models to detect and evaluate Business Rules. This is accomplished by training and using a SetFit model to detect the key moments in customer conversations.
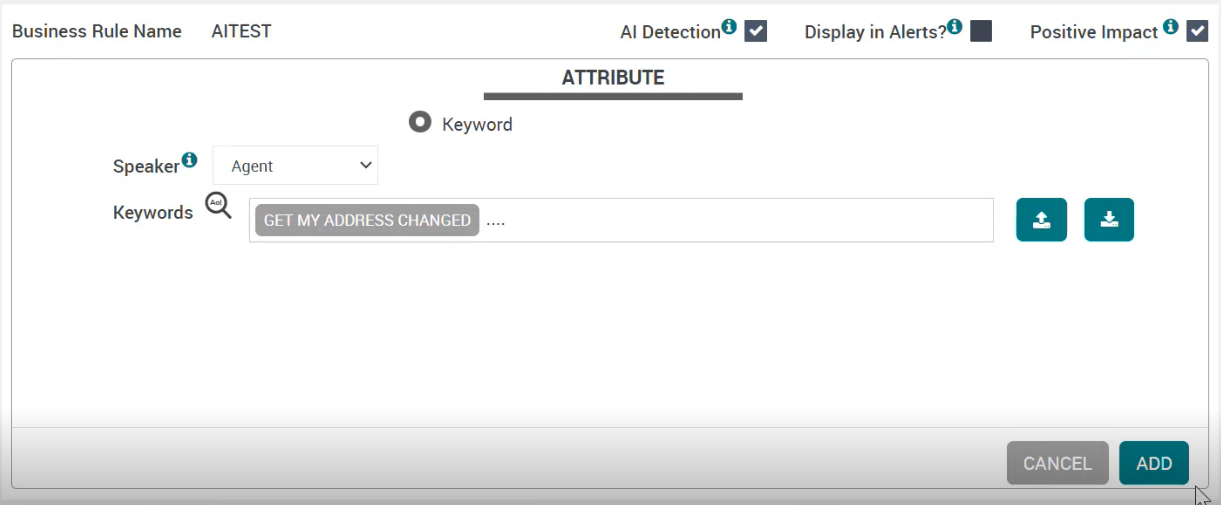
The AI Detection checkbox and the AI TRAINING icon are introduced in the Configure Business Rules tab.

Select the AI Detection checkbox to enable this feature.
Click the + button below the Start icon to add keywords.
Important
At least one keyword must be selected to configure the AI detected Business Rules.
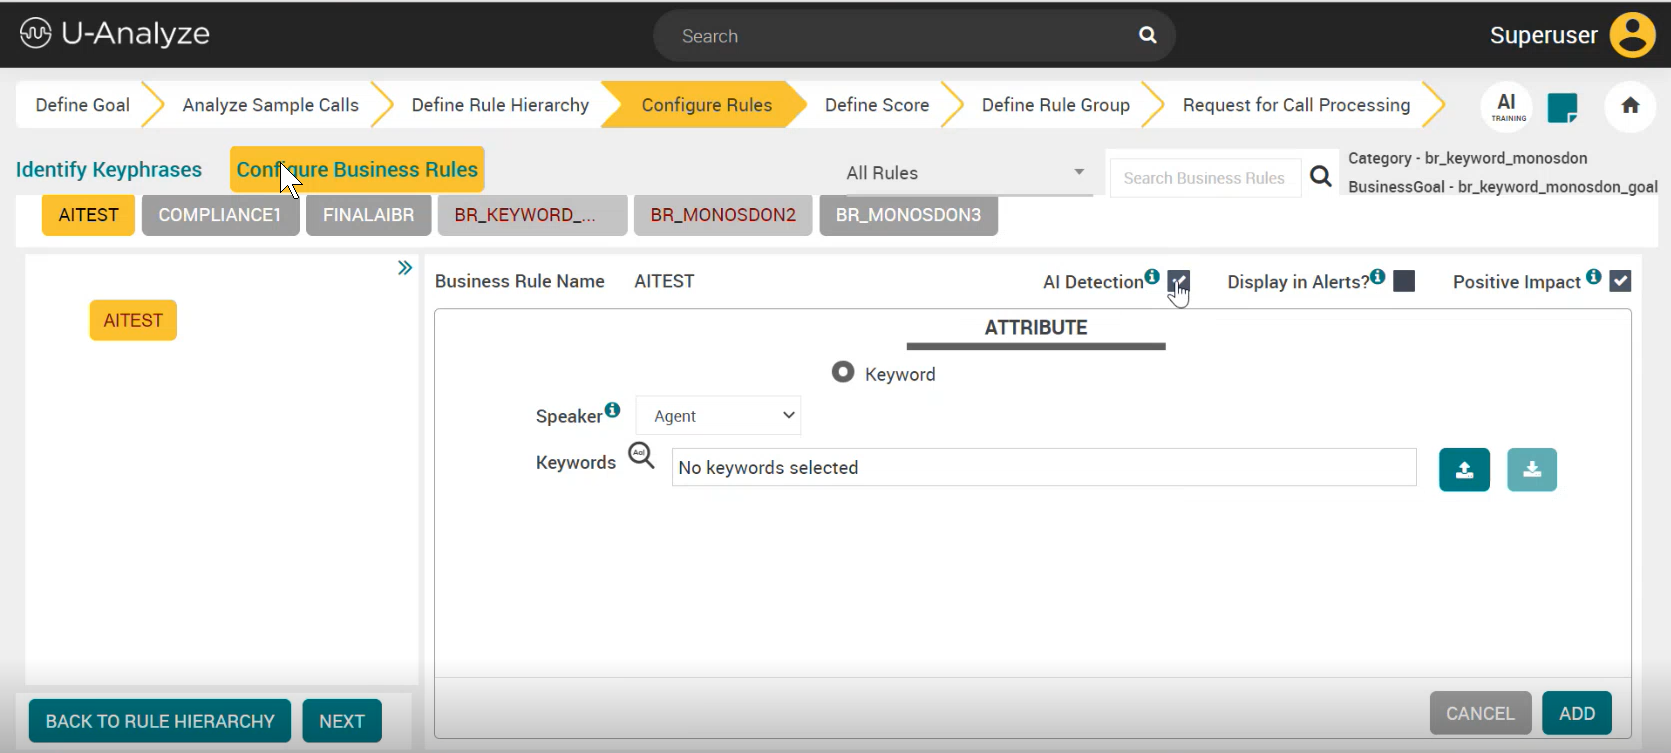
Note
In AI Business Rules only the Keyphrases can be configured without the Boolean OPERATOR. AI BR supports only keyword attributes and does not support speech or call attributes.
Select the speaker channel (Agent/Customer/Any) from the Speaker drop-down.
Click the Keywords dialogue box. The Choose Keywords window opens up.
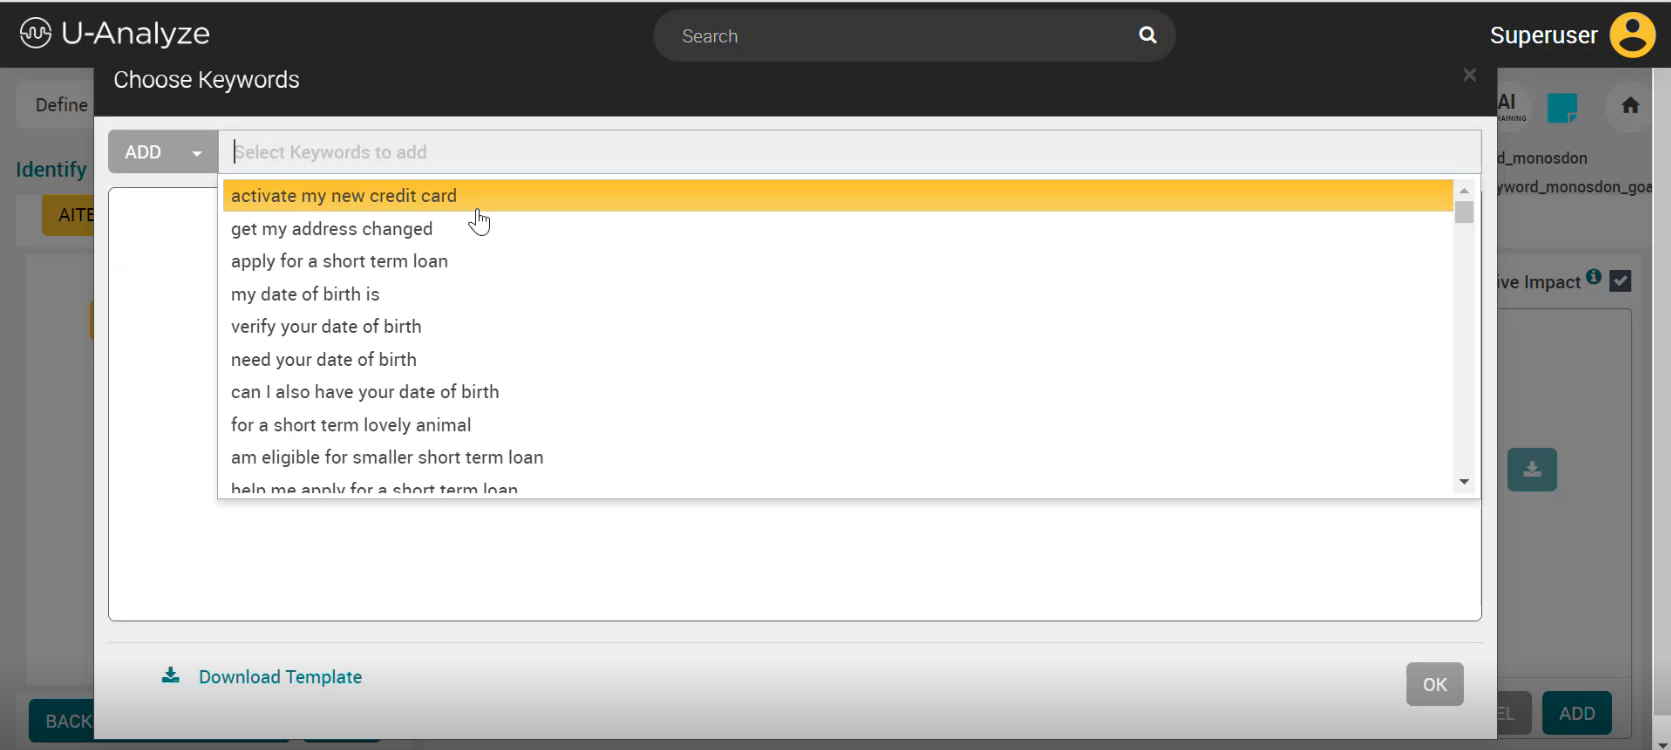
Click the Select Keywords to add dialogue box to select the keyword(s) from the drop-down.
Select the keyword(s) from the list and click OK button. The keyword(s) get added to the list.
Click ADD to add the keyword(s) to the attribute. Click CANCEL if you don't want to proceed with the addition of keyword(s).
Alternatively, you can click the import button to import the keywords from a CSV file. The sample CSV file is shown below.
If the imported CSV file contains errors, an error CSV file is generated that can be downloaded. The error CSV file shows the errors that must be corrected to proceed with the import of keywords. The sample of the error CSV file is shown below.
An export button is also provided to export the configured keywords as a CSV file.
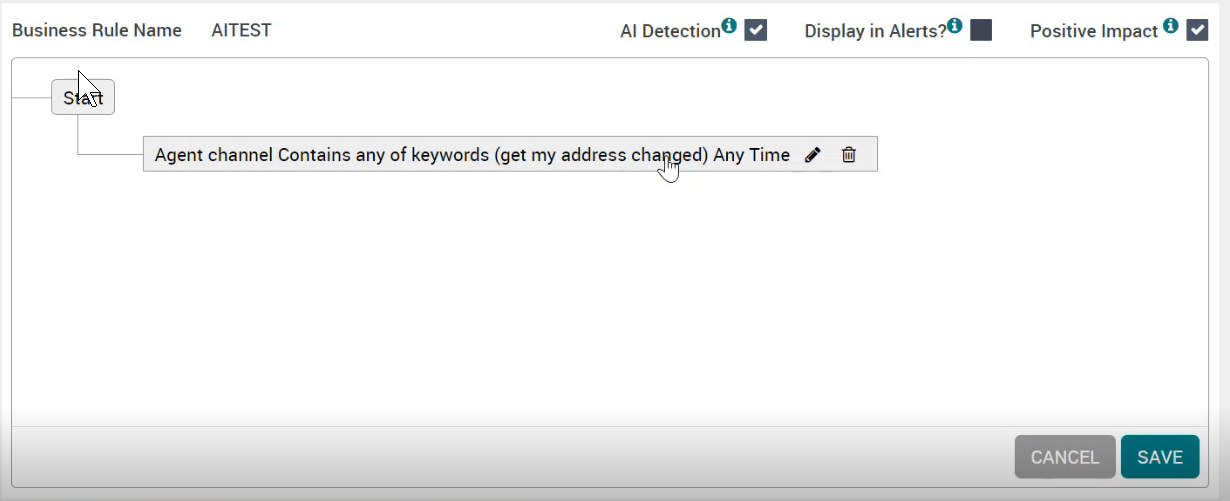
Click SAVE to save the business rule configuration. You can edit and delete the keyword(s) by clicking on the respective icons provided. Click CANCEL if you don't want to save the configuration.
A single keyword node is only allowed for AI evaluated business rules
A parent cannot be added in AI evaluated business rules. Hence, the Add Parent icon is not available
A sequence rule cannot be added to the primary business rule in AI evaluated business rules. Hence, the ADD SEQUENCE button is not available.
If the AI Detection check box is unchecked for an AI business rule, then it becomes a regular business rule with keyphrases
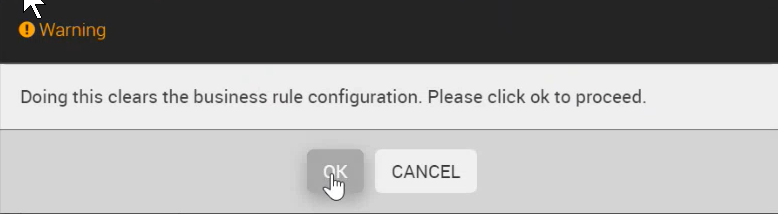
If the AI Detection check box is selected for a regular business rule, a warning message pops out. Clicking OK, clears the configuration.
Identify Keyphrases
By default, Identify Keyphrases tab is selected when no keyphrase exists in the system (else system defaults to Configure Business Rules tab).
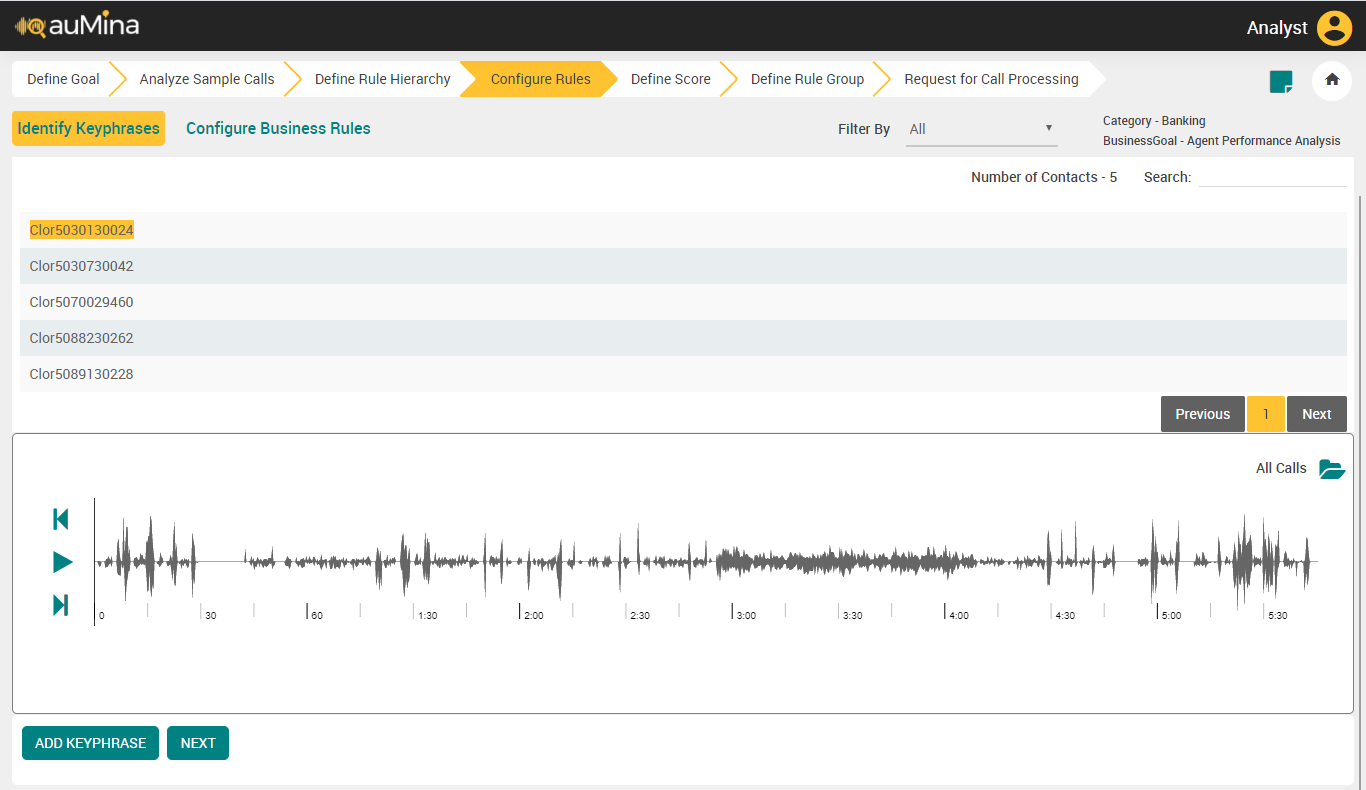
Select the folder from the Filter By drop-down list to view the calls placed in that corresponding folder. By default, All option is displayed in the drop-down list. The list of folders created in the File Collection are available in this drop-down list.
By default, total number of calls is displayed at the top of the call list.
In the Search field, enter the call ID to search the specific call to listen.
Click Play icon to listen the call and identify keyphrases.
If folder name is available for a call, system will display the folder name when Filter by is selected as “All”. Click Move Audio to Folder icon to move the call to another folder during listening. The call stops playing when Analyst clicks on Move Audio to Folder icon.
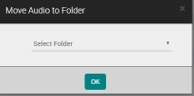
Select the folder from the drop-down list and click OK. After moving a call to another folder, system refreshes the page with the current folder and highlights the next call.
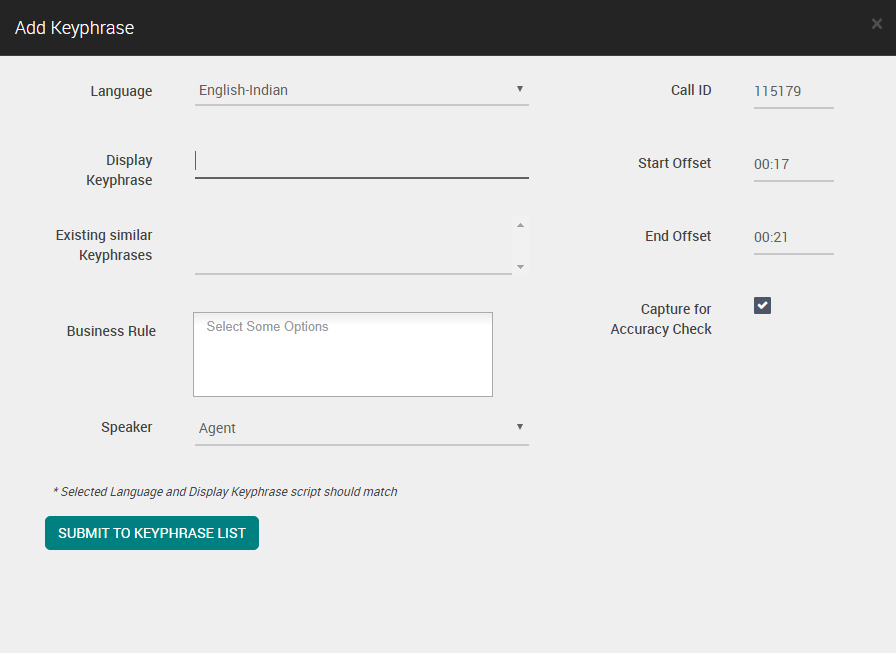
Add Keyphrase
To add a keyphrase follow the procedure listed below:
Click Add Keyphrase button, while listening to the call. Add Keyphrase pop-up window gets displayed as shown below.
Note
Press Spacebar or click the Pause icon on the player to open the Add Keyphrase pop-up window.
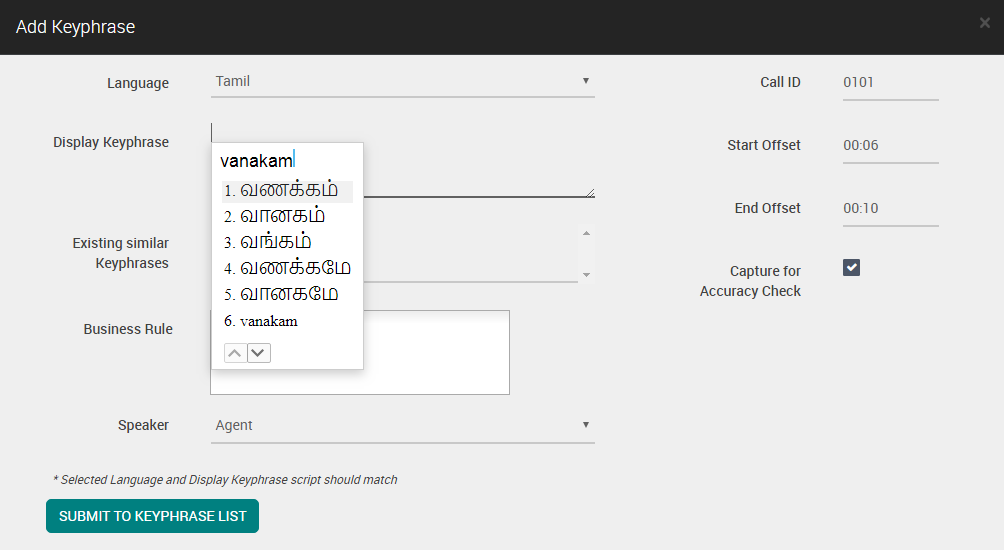
Select Language from the drop-down list.
If an analyst wants to enter the keyphrase in English, it can be directly entered in the Display Keyphrase field. While entering the keyphrase, an auto-scroll list of display keyphrases appears in the Existing Similar Keyphrases section. Analysts can select one keyword as a display keyphrase.
An analyst can enter multiple keyphrases separated by semicolons. The system allows a maximum of 100 Keyphrases
During the creation of display keyphrases, the system allows alphabets (a-z, A-Z), space, and underscore (_) for Grammar-based setup (Recognizer Category)
During the creation of Display keyphrases, the system allows alphabets (a-z, A-Z), space, underscore (_), and the below listed additional special characters for transcription-based setup:
Hyphen (-), Apostrophe ('), Period (.), and Ampersand (&)
Special characters are applicable for all the languages supported by the Speech Engine used for Transcription.
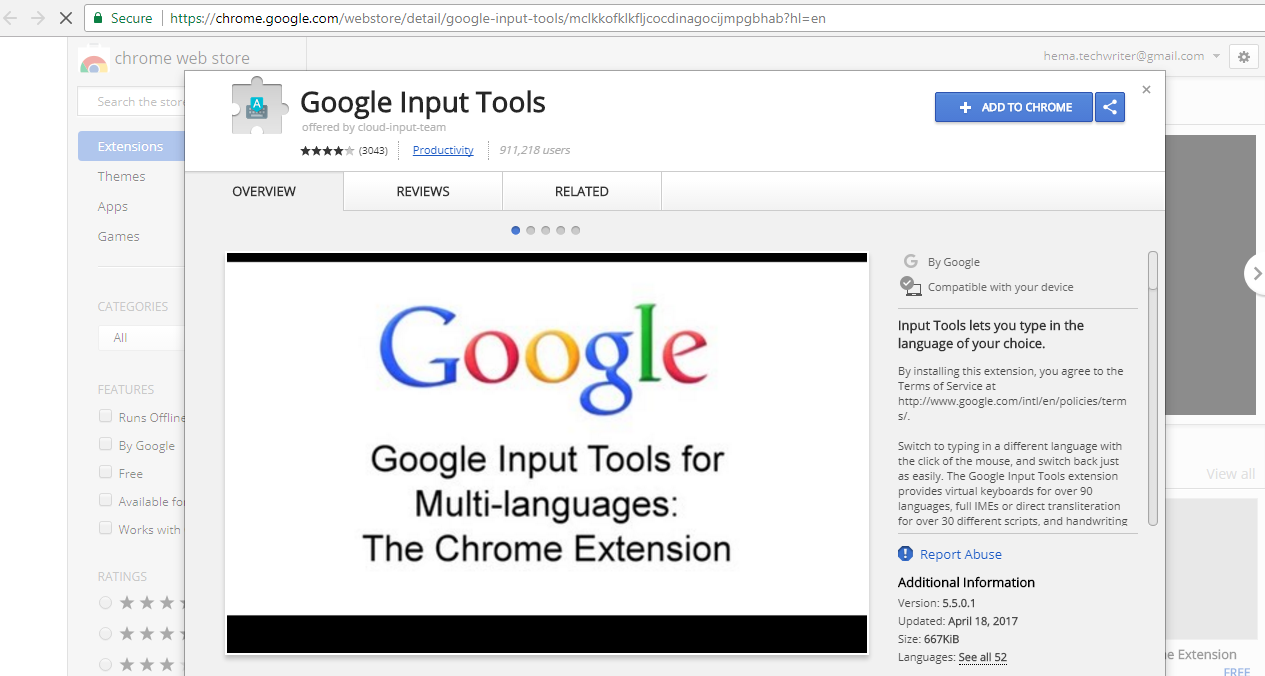
If an analyst wants to enter keyphrases in non-English, Google Input Tools for Multi Languages must be installed in the browser. Refer to Install Google Input Tools in Browser.
In the Display Keyphrase field, enter the keyphrase in the required language. The system transliterates the entered keyword to the selected language, and it is editable.
Note
Internet connection is required for Google Input Tools plugin to show the suggestion for the selected language, while entering the Display Keyphrase.
After providing the display keyphrase, click on the selected language icon and select the Turn off option.

Note
The system requires at least 1 character for Keyphrases. However, analysts must not give a single character as a keyword for English and other applicable languages, which impacts the accuracy. In Cantonese, Vietnamese, and other Asian languages, contain 1-character words. Hence, in these languages, the 1-character words can be used for Keyphrases.
Click on Business Rule field, the system displays the list of Business Goals along with corresponding Business Rules. Select a Business Rule under the respective Business Goals. Multiple Business Rules can be selected.
Click Remove icon or press Backspace to delete the selected Business Rule, if required.
Select the speaker (Agent, Customer, or Any) from the drop-down list. When an analyst selects Any channel, the Business Rule is evaluated for the entire call irrespective of the channel.
For mono audio files, only Any channel option is available which is selected by default since no distinct channels are available
For mono (with diarization) and stereo audio files, an analyst can select Agent, Customer, or Any channel for the Business Rule to be evaluated in a specific channel or for any channel
Note
All the keyphrases which are configured in the Business Rule are evaluated irrespective of the speaker channel (Agent/Customer) for a category with mono audio file type and Speaker Diarization selected On. This is applicable when the key value is set to True for the key name
IgnoreChannelForBREvaluationOnMonoSDin the system property table in the database.By default, the selected Call ID is displayed when an analyst selects a call. If no call is selected, the Call ID is not displayed. This field is non-editable
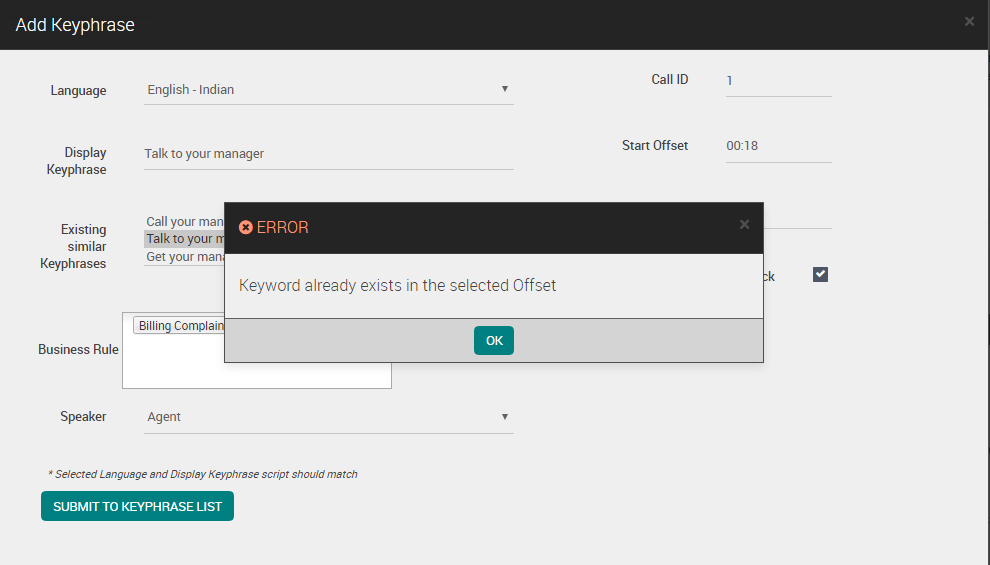
The start Offset and End Offset of the call are displayed in minutes and seconds. This field is non-editable. The system displays these values when a call is associated with Display Keyphrase. If keywords already exist for the selected offset, a pop-up message is displayed as shown below.
Select the checkbox Capture for Accuracy Check when there is a call associated with Display Keyphrase. By default, this checkbox is selected. An analyst can deselect the checkbox to disassociate the call from the Display Keyphrase. This is not available as a reference or for an accuracy check for speech tuning.
Click Submit to Keyphrase List button. The system automatically configures the keyword to the Business Rule with the default configuration of the Business Rule (i.e., contains, any of) if the selected business rule is a simple rule.
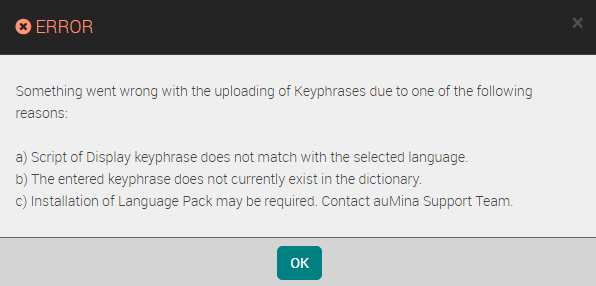
If there are any errors during the compilation of keyphrases, the system displays an error message when you click on Submit to Keyphrase List.
When Capture for Accuracy Check checkbox is selected and multiple keyphrases are given as Display Keyphrase, an error message is displayed when you click Submit to Keyphrase List.

Important
A simple rule is a rule which has one keyword component per channel (Agent/Customer)
A complex rule is a rule which has more than one keyword component for the same Channel
A pending mapping BR is a BR that has a keyphrase associated but is not configured
Display Keyphrases can be selected for multiple BRs
Display Keyphrases can be repeated for the same BR when offsets are captured
Display Keyphrases cannot be repeated (are unique) when the offset is not captured
The error message that follows is displayed when validation fails:
Display Keyphrase without offset cannot be entered again.
Install Google Input Tools in Browser
Follow this procedure to install Google input tools in the browser.
Enter the URL https://chrome.google.com/webstore/detail/google-input-tools/mclkkofklkfljcocdinagocijmpgbhab?hl=en in Google Chrome browser. The Google Input Tools page appears as shown below.
Click on Add to Chrome button. A pop-up window gets displayed as shown below.
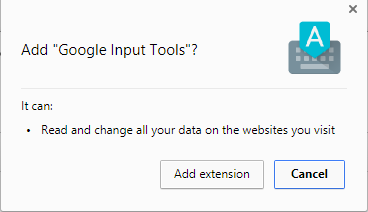
Click Add extension button. A confirmation message gets displayed as shown below.

The Google Input Tools (
 ) icon now becomes available in the browser.
Click Google Input Tools (
) icon and select Extension Options as shown below.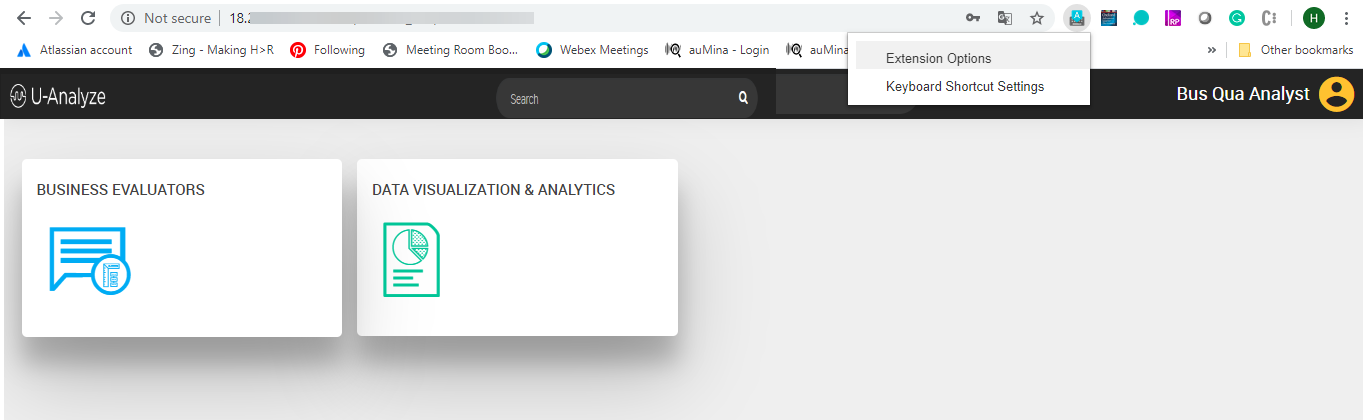
The Google Input Tools window gets displayed with the list of languages.
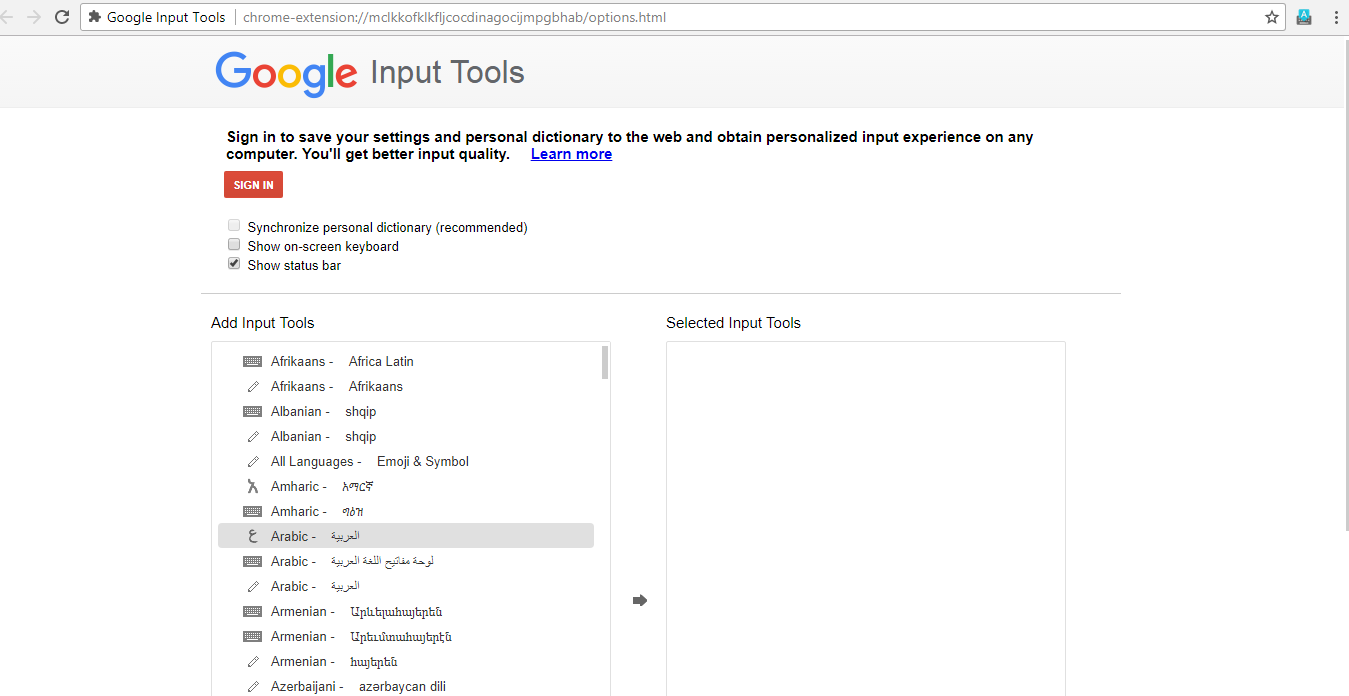
Select the language from the list and click the right arrow (
 ) to add the desired language.
Click Google Input Tools (
) icon. The list of selected languages gets displayed as shown below.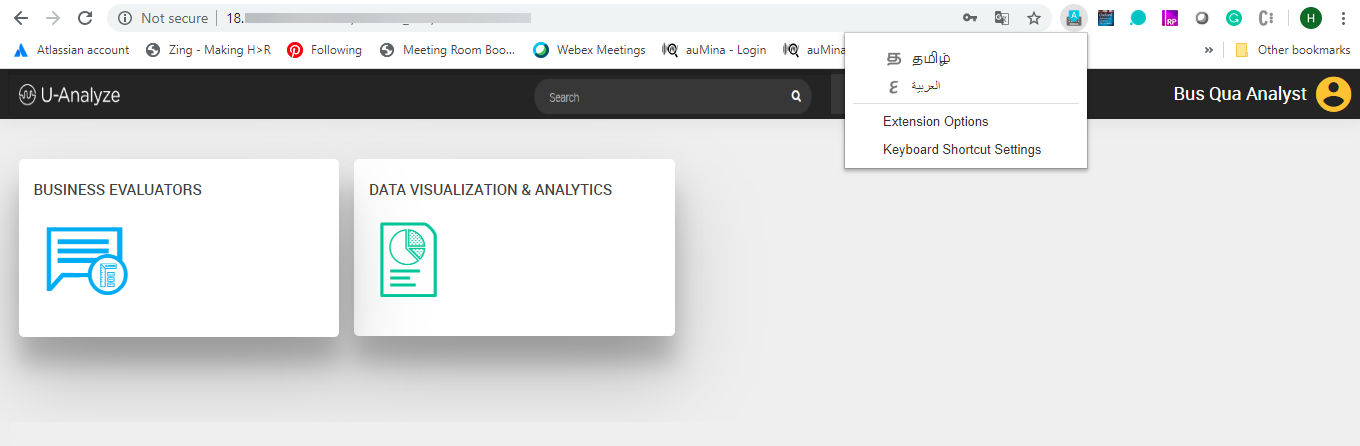
Select the language from the browser, while you enter the display keyphrase in Add Keyphrase screen. The selected language icon gets displayed in the browser.
Mapping of Keyphrases to Complex Business Rule of Same Business Goal
This procedure is applicable when an analyst maps a keyphrase to at least one complex Business Rule which belongs to the same Business Goal which the analyst is analyzing.
Follow the steps given below to map keyphrases to complex Business Rules of same Business Goal:
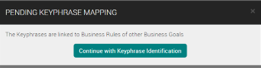
Click on Submit to Keyphrase List button. The Pending Keyphrase Mapping pop-up gets displayed.
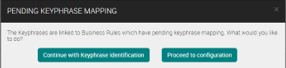
Click Continue with Keyphrase Identification button to continue listening to calls and adding keyphrases.
Click Proceed to Configuration button to close the pop-up. The Configure Business Rules section is displayed. The Pending Phrase Mapping option is selected by default in the drop down.
Note
Analyst can optionally click Esc key on Keyboard to close the pop-up and remain on the Add Keyphrase screen.
Tip
In the top panel, only parent Business Rules with pending phrase mapping or with any of their child Business Rules with pending phrase mapping are displayed automatically.
The Business Rule selected in the Add Keyphrase screen is the landing Business Rule. When there are more than one Business Rules selected in the Add Keyphrase screen, the landing Business Rule is selected as based on the alphabetical order. The parent Business Rules which have their phrase mapping pending are only color coded.
When analyst clicks on a parent Business Rule which is not color coded, system automatically displays and highlights the child Business Rules which have their phrase mapping pending in the left panel.
Click Edit icon to configure the complex Business Rule.
Click on Keywords section. The Choose Keywords pop-up gets displayed as shown below.
Select the keywords from the list and click OK. The Keywords get added to the list.
Click Add button. The keywords get added to the complex Business Rule. Click the Save button.
Note
After completing all Pending Phrase Mapping, refresh the page. System automatically changes the option as “All” in the drop-down and displays all the available parent business rules.
Mapping of Keyphrases to Complex Business Rules of a Different Business Goal
This procedure is applicable when an analyst maps a keyphrase to at least one complex Business Rule and none of the selected complex Business Rules belong to the same Business Goal which the analyst is analyzing.
Follow the steps given below to map keyphrases to complex Business Rules of a different Business Goal:
Click on Submit to Keyphrase List button. The Pending Keyphrase Mapping pop-up gets displayed.
Click Continue with Keyphrase Identification button to continue listening to calls and adding keyphrases.
Note
Analyst can optionally click Esc key on Keyboard to close the pop-up and remain on the Add Keyphrase screen.
Sequential Business Rules
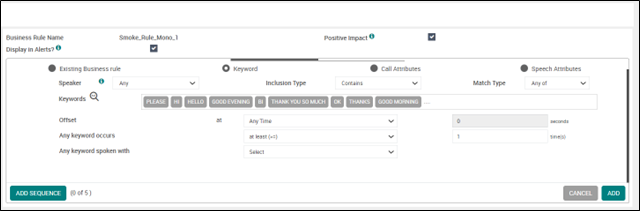
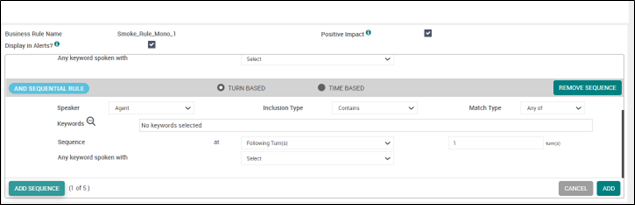
This feature allows Business Analyst to configure the sequential business rules using Turn-Based and Time-Based offsets. Sequential business rules provide the ability to analyze the specific sequence of words or phrases in a conversation. These sequences can be used to better identify sets of keywords/phrases that need to be spoken in a specific order, look for question and responses between agents/customer, and gain even deeper hidden insights into conversations. Sequence Business Rules are added to Primary BR (new and existing). A Primary BR can search a keyword or speech attribute or call attribute, whereas a sequence BR can search only keyword. It does not support call attributes and speech attributes. The sequence logic is a Boolean AND. Both the primary rule AND the sequential rule must be TRUE for the overall rule to be TRUE.
Important
Both Turn-Based and Time-Based Sequence Business Rules can be applied to voice conversations. For chat conversations, only Turn Based Sequence Business Rules can be applied. Email conversations do not support Sequence Business Rules.
Add Sequence Rule
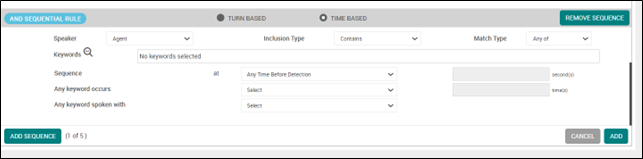
To add a sequence rule to the primary business rule, follow the below procedure:
Open an already configured business rule or configure a new Business Rule.
Click ADD SEQUENCE button. The window expands and the button label changes to AND SEQUENTIAL RULE.
The sequence options are TURN BASED or TIME BASED. By default, the TURN BASED option is selected.
TURN BASED – Select this option to search the keywords in the conversation turn.
TIME BASED – Select this option to search the keywords in the specified time interval.
Select the options of the fields that follow if you selected TURN BASED sequence rule:
Select Speaker (Agent, Customer or Any) from the drop-down list. When analyst selects Any channel, business rule is evaluated for the entire call irrespective of the channel.
For Mono Audio files, only Any channel option is available which is selected by default as no distinct channels are available.
For Mono (with Diarization) and Stereo Audio files, analyst can select Agent, Customer or Any channel for business rule to be evaluated for a specific channel or any channel.
Click on Keywords field, a Choose Keywords pop-up will appear with available keywords list. Also, you can add, create, or remove keywords in the pop-up window.
Add – To add keywords from the list for the selected business rule.
Create – To create new keywords for the selected business rule.
Remove – To remove the keywords for the selected business rule.
Select the Sequence from the dropdown list.
Previous Turn – Searches keywords that occurred in the previous turn
Current Turn – Searches keywords that occur in the same turn.
Note
The Current Turn option in the dropdown is disabled when the speaker in the sequence is different from the previous rule. If the speaker is same and on selecting Current Turn, the number of turns is disabled as it looks for the keywords in the same turn.
Following Turn - Searches keywords that occur in the subsequent turns.
Enter the number of turns in turn(s) dialogue box for the sequence to search the keyword.
Note
The first turn of a rule is counted from the last turn of the previous rule. It searches keywords in the specified number of turns of the speaker that you selected.
Select the options of the fields that follow if you selected TIME BASED sequence rule:
Select Speaker (Agent, Customer or Any) from the drop-down list. When analyst selects Any channel, business rule is evaluated for the entire call irrespective of the channel.
For Mono Audio files, only Any channel option is available which is selected by default as no distinct channels are available.
For Mono (with Diarization) and Stereo Audio files, analyst can select either Agent, Customer or Any channel for business rule to be evaluated for a specific channel or any channel.
Click on Keywords field, a Choose Keywords pop-up will appear with available keywords list. Also, you can add, create, or remove keywords in the pop-up window.
Add – To add keywords from the list for the selected business rule.
Create – To create new keywords for the selected business rule.
Remove – To remove the keywords for the selected business rule.
Select the Sequence from the dropdown.
Any time before detection - Searches keywords that occur any time prior to detection.
Any time after detection – Searches keywords that occur any time post detection.
Note
If Any Time Before Detection or Any Time After Detection is selected, then the time for seconds is disabled as it searches for the keyword until it is found.
Before detection - Searches keywords that occur before detection.
After detection - Searches keywords that occur after detection.
Enter the number of Seconds for the sequence to search the keyword.
Note
The seconds are counted from the time the previous rule has stopped searching. It searches keywords for the specified number of seconds of the speaker that you selected.
Click ADD.
You can add up to five sequence rules to a Primary Business Rule.
Previous Turn, Any time before detection, and Before detection searches keywords in backward direction. If you select any of these sequence, then Following Turn, Any time after detection, and After detection are disabled in the subsequent sequence business rules.
Following Turn, Any time after detection, and After detection searches keywords in forward direction. If you select any of these sequence, then Previous Turn, Any time before detection, and Before detection are disabled in the subsequent sequence business rules.
Current Turn can be used anywhere in the Sequence Business Rules.
Note
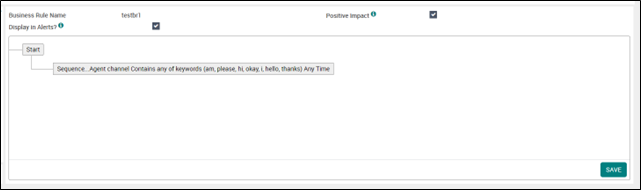
If a Sequence Business Rule (s) is added to a Primary Business Rule, then the branch is appended (with Sequence) at the beginning.
To remove a sequence rule, click REMOVE SEQUENCE button.
Define Score (For On-premise Deployments)
Analyst creates Scores for the business outcomes using the configured business rules. In Create and Review flows, unless an internal business rule is created and configured, analyst cannot navigate to the Define Score page to create a score.
Important
At least one score must be defined for a business goal. A business goal that does not have any defined score is not available in the Select a business goal drop down in Category and Business Goal pop out under Advanced Reports.
An analyst can define a maximum of 50 scores for a category.
 |
Find the below steps to be followed in Scores Configuration.
 |
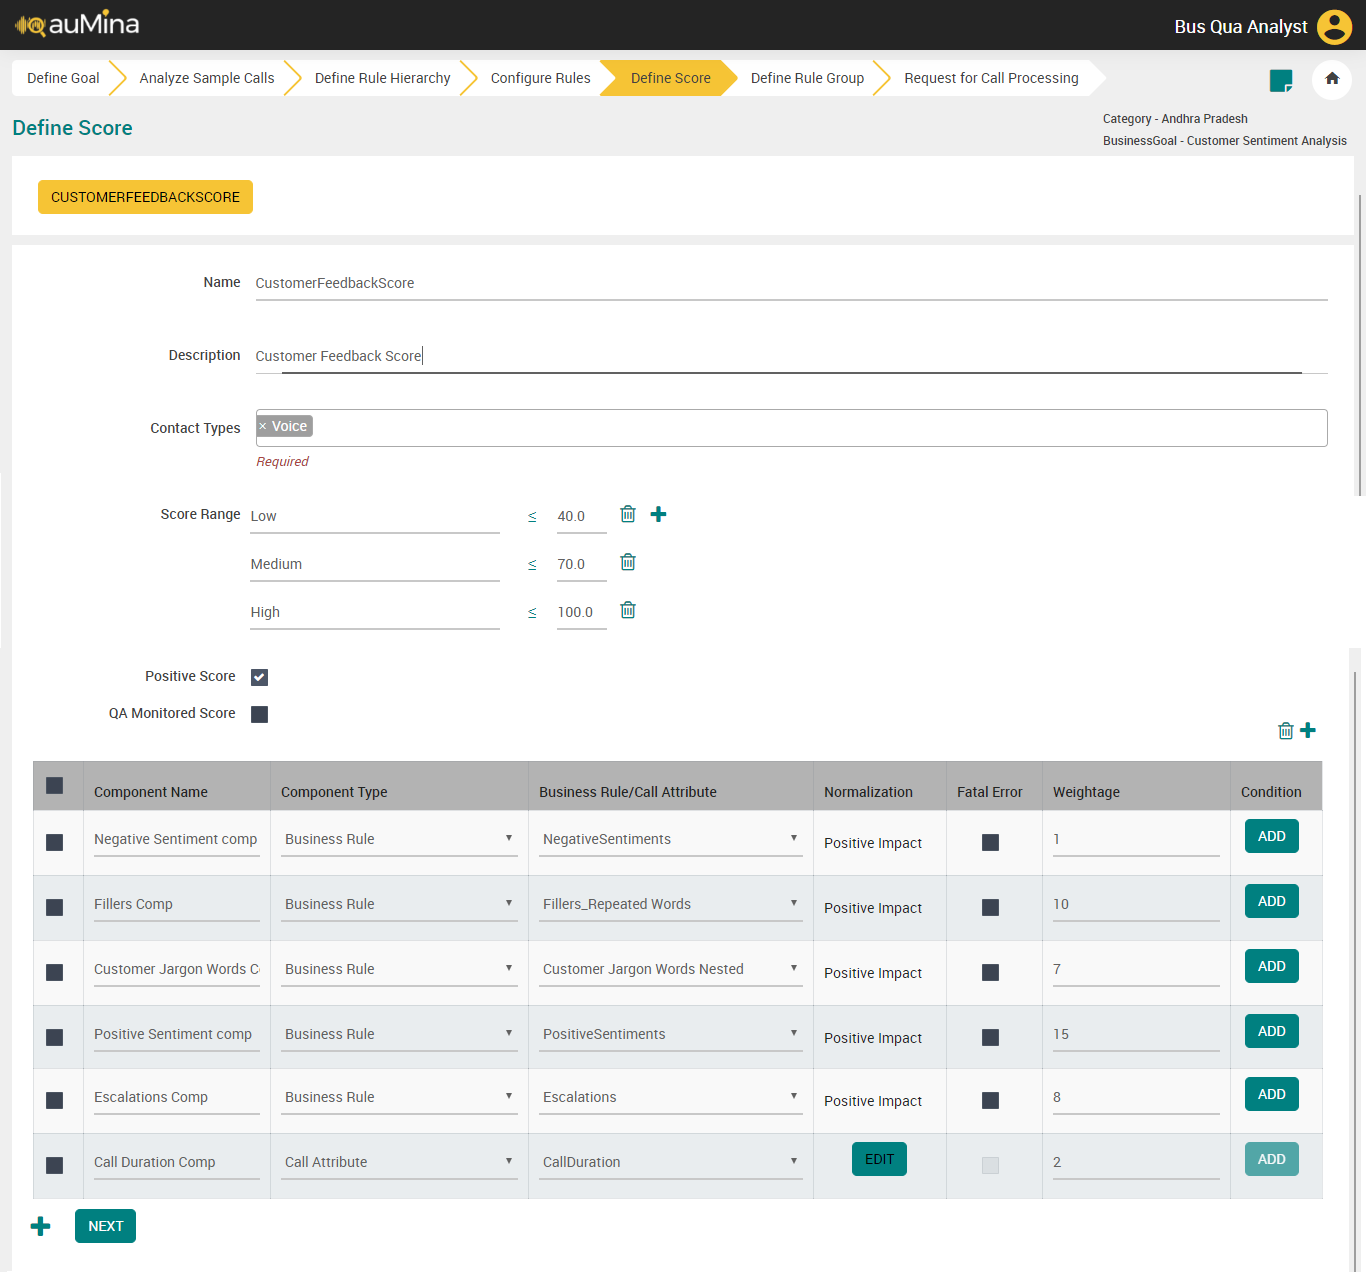
In the Name field, enter the score name. Score name cannot be the same as Business Rule or Business Rule Group name within a Category.
In the Description field, enter the description for the score.
Select different Contact Types (Voice, Chat or Email) from the drop-down list. Score can be mapped to one specific contact type - Voice, Chat or Email or to all 3 together or in combinations. For scores which are not mapped to a contact, system will display as “Not Applicable” and will not be considered in calculation of Average scores.
Add a score range less than 100 with a score name and click the Add button to add another score slab, if the first score range is <=100 then no more score slab can be added.
Note
System will allow user to add minimum of two score slabs and maximum of ten score slabs.
Select the Positive Score checkbox, if required. For example, Positive Score ‘Customer Satisfaction’, high score is good and Negative Score ‘Customer Effort’, high score is not good.
Select the QA Monitored Score checkbox to monitor this score on U-Analyze Quality Tool and also for the Agent to track his/her performance on U-Analyze Quality Tool.
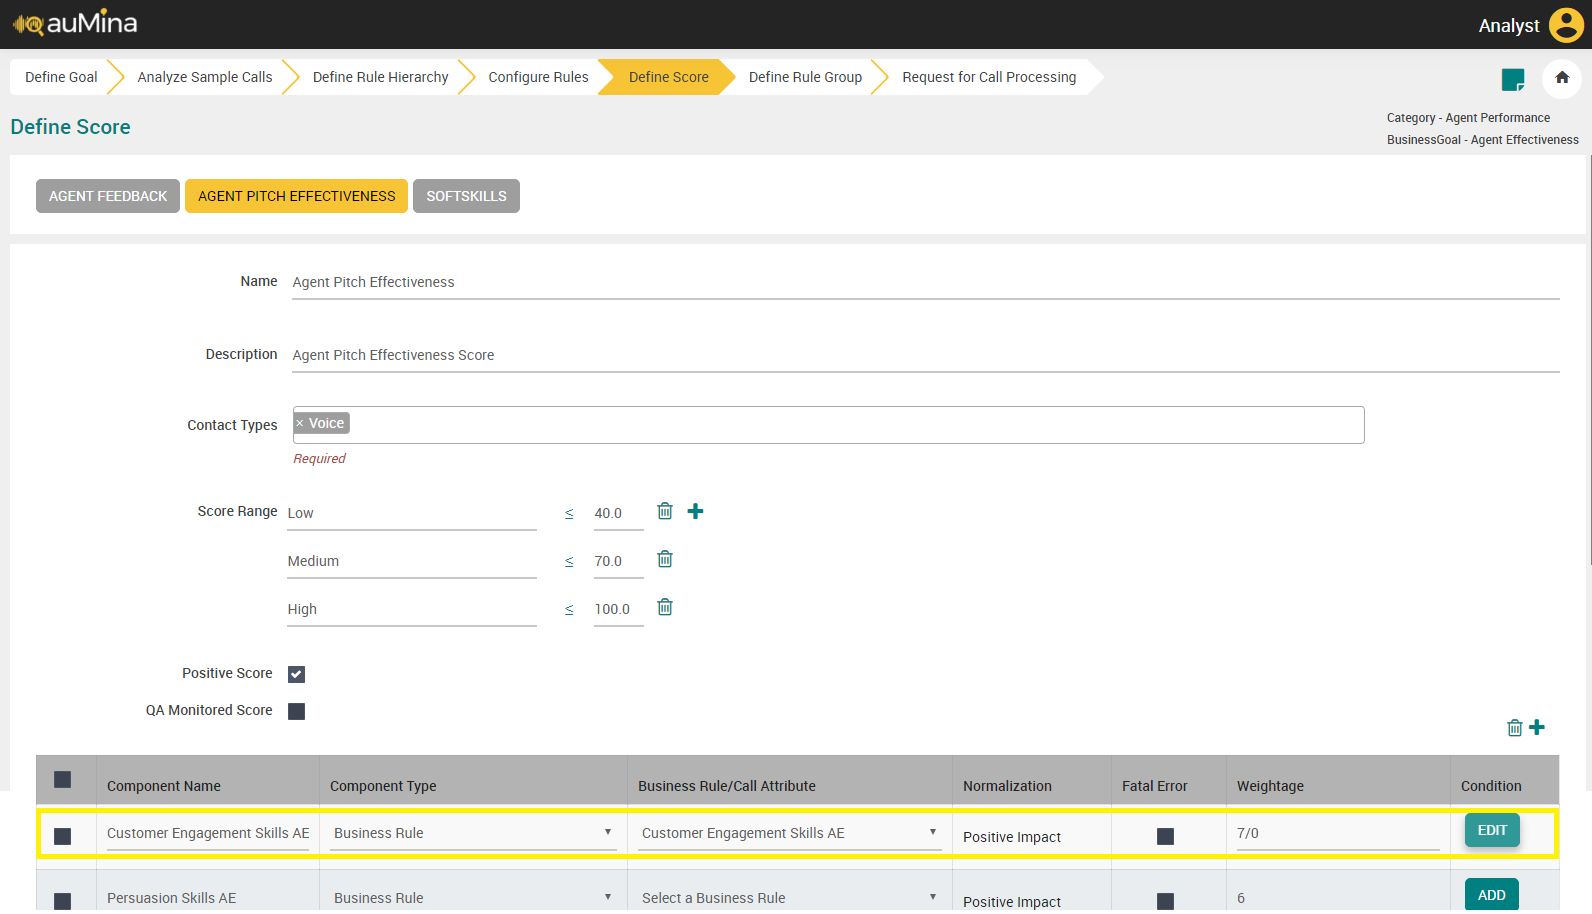
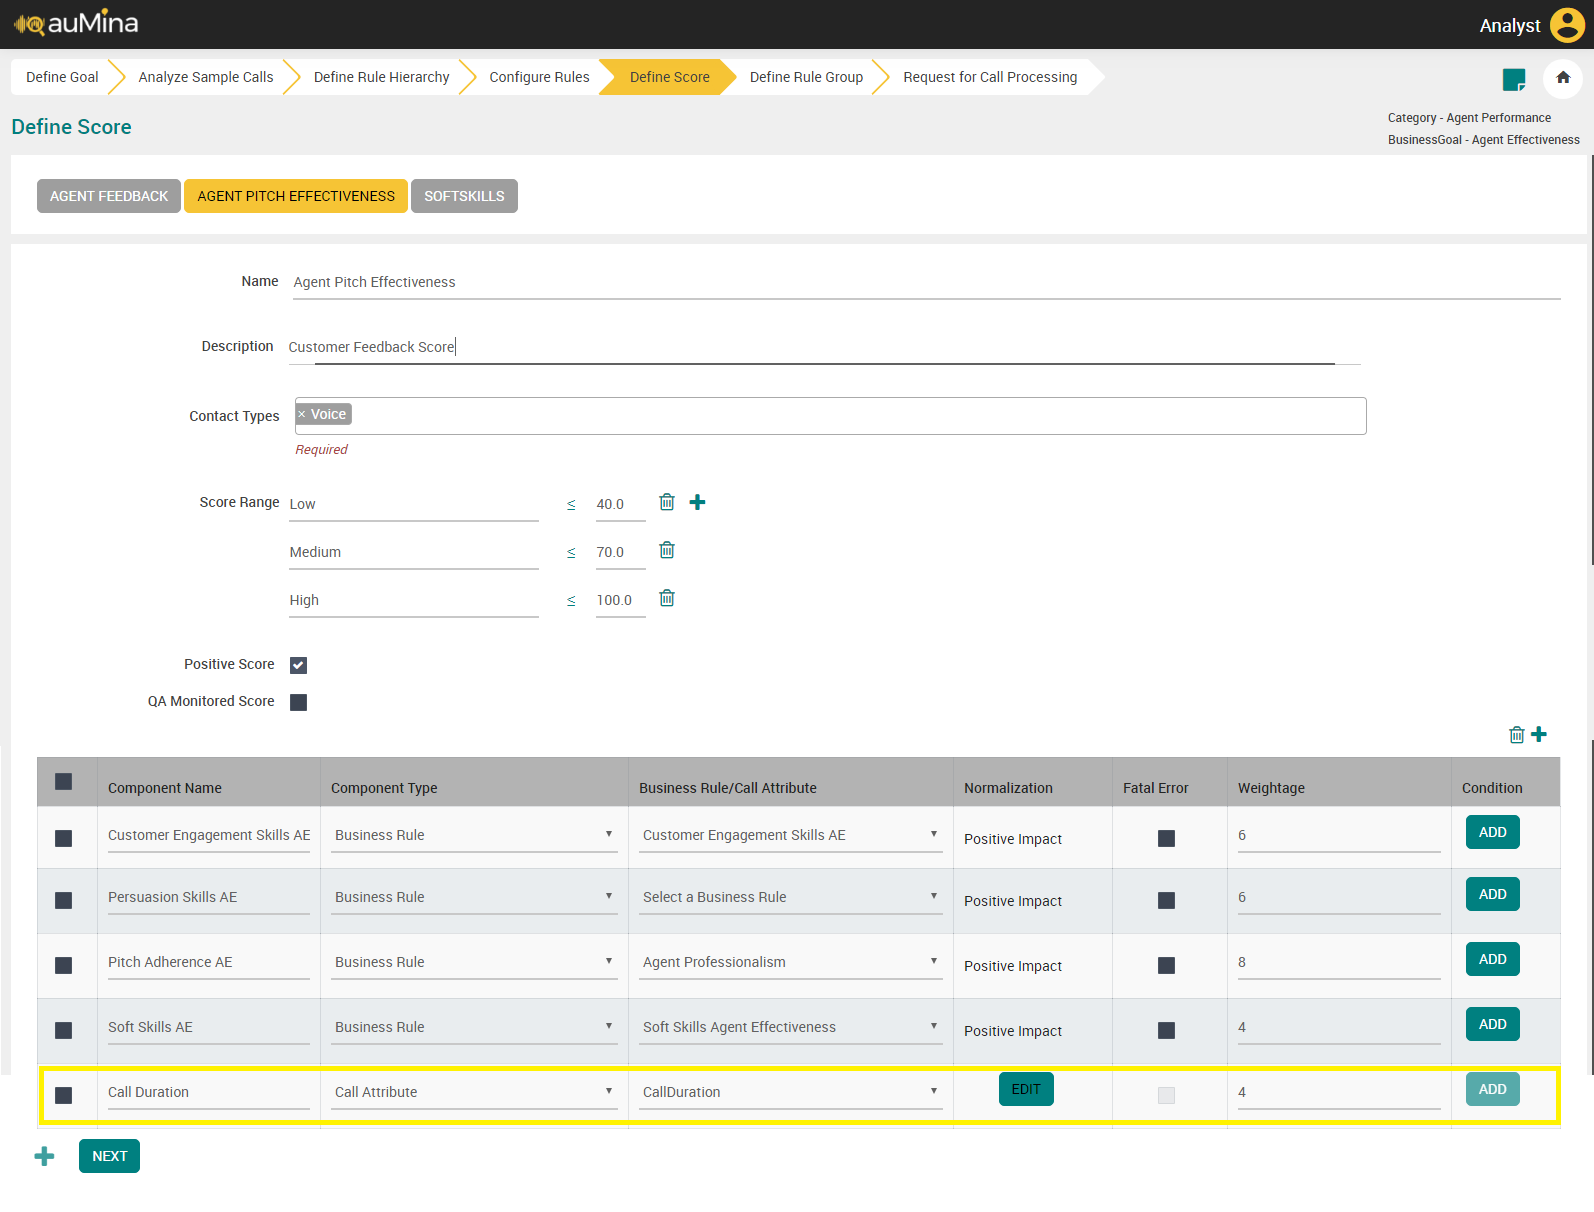
Click the Score Component Name and assign a name for that score.
Select the Score Component Type (Business Rule or Call Attributes) from the drop-down list.
Score Component Type: Business Rule Select the Business Rule from the drop-down list. Only the reportable Business Rules are listed in the drop-down.
Note
When the user tries to change the Reportable Business Rule which is added as the score component, an error message is displayed.
Any Business Rule (Parent, Leaf, Standalone) - External or Internal can be added as a BR score component.
Normalization values can be automatically calculated based on Business Rule and Score identifiers and determined by the System based on Positive/Negative Business Rule and Positive/Negative Score.
Business Rule if marked as Fatal Error will automatically nullify the Score (if Positive score) or set the score as 100 (if Negative Score)
Assign weightage to the score component.
Apply condition for score component whether to include or exclude in the score calculation or to apply different weightages based on the condition. If the score component is selected as Business Rule, the Conditional button is enabled. If the score component is selected as Call Attribute, the Conditional button is disabled.
Define Score (For X on Cloud Deployments)
Analysts create Scores for the business outcomes using the configured business rules. In Create and Review flows, unless an internal business rule is created and configured, analyst cannot navigate to the Define Score page to create a score.
Important
At least one score must be defined for a business goal. A business goal that does not have any defined score is not available in the Select a business goal drop down in Category and Business Goal pop out under Advanced Reports.
An analyst can define a maximum of 50 scores for a category.
|
follow the steps given below to configure the Scores:
|
Important
With the introduction of near real time reports feature the restrictions that follow are enforced:
A Score cannot be created when call processing is in progress.
If you click the Add Score button when call processing is in progress a notification message is displayed as shown below.

A Score name cannot be edited once it is created
A Score can be updated.
In the Name field, enter the score name. Score name cannot be the same as Business Rule or Business Rule Group name within a Category.
In the Description field, enter the description for the score.
Select different Contact Types (Voice, Chat or Email) from the drop-down list. Score can be mapped to one specific contact type - Voice, Chat or Email or to all 3 together or in combinations. For scores which are not mapped to a contact, system will display as “Not Applicable” and will not be considered in calculation of Average scores.
Add a score range less than 100 with a score name and click the Add button to add another score slab, if the first score range is <=100 then no more score slab can be added.
Note
System will allow user to add minimum of two score slabs and maximum of ten score slabs.
Select the Positive Score checkbox, if required. For example, Positive Score ‘Customer Satisfaction’, high score is good and Negative Score ‘Customer Effort’, high score is not good.
Select the QA Monitored Score checkbox to monitor this score on U-Analyze Quality Tool and also for the Agent to track his/her performance on U-Analyze Quality Tool.
Click the Score Component Name and assign a name for that score.
Select the Score Component Type (Business Rule or Call Attributes) from the drop-down list.
Score Component Type: Business Rule Select the Business Rule from the drop-down list. Only the reportable Business Rules are listed in the drop-down.
Note
When the user tries to change the Reportable Business Rule which is added as the score component, an error message is displayed.
Any Business Rule (Parent, Leaf, Standalone) - External or Internal can be added as a BR score component.
Normalization values can be automatically calculated based on Business Rule and Score identifiers and determined by the System based on Positive/Negative Business Rule and Positive/Negative Score.
Business Rule if marked as Fatal Error will automatically nullify the Score (if Positive score) or set the score as 100 (if Negative Score)
Assign weightage to the score component.
Apply condition for score component whether to include or exclude in the score calculation or to apply different weightages based on the condition. If the score component is selected as Business Rule, the Conditional button is enabled. If the score component is selected as Call Attribute, the Conditional button is disabled.
Apply condition for Score Component (For On-premise Deployments)
Click Add button in Condition column to apply condition for a Score Component. A pop-up message will be displayed as shown below.
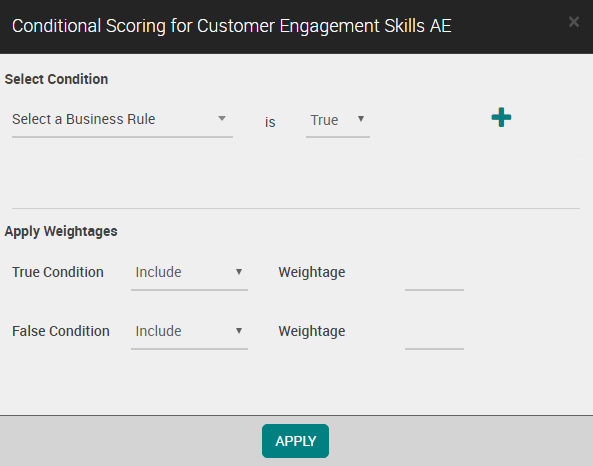
Select the Business Rule from the drop-down list. All the Business Rules available for the category is displayed in the drop-down list.
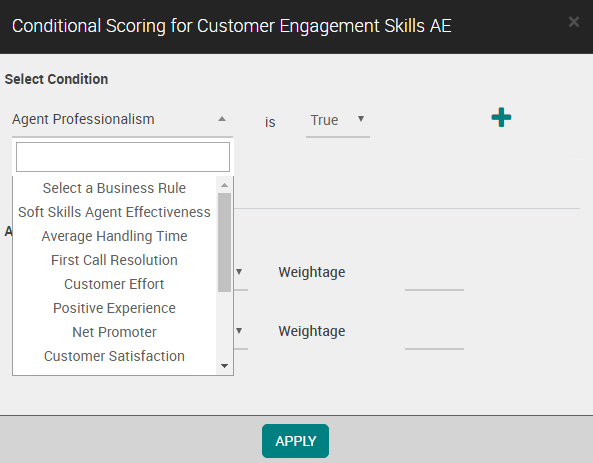
Select condition where the selected Business Rule is ‘True’ or ‘False’.
Click on + icon. System will allow Analyst to add single or multiple conditions by selecting any Business Rule except the score component for which condition is being applied.
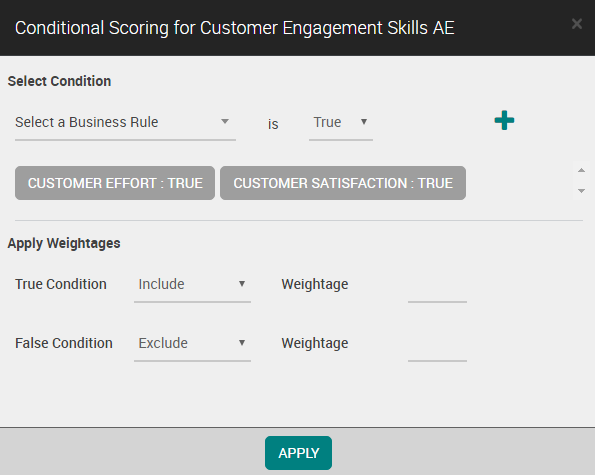
After a condition is applied, Analyst needs to decide whether to include the score component or not and provide the weightages. For both True and False conditions, Analyst includes the Score component and gives weightages.
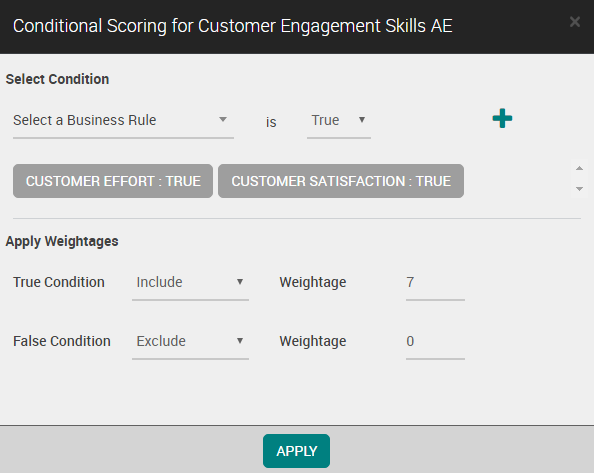
If multiple conditions are applied, system will AND the results of the condition to get a value of True or False.
For True condition, if the score component is included for score calculation, Analyst will provide weightage and if the score component is excluded for score calculation, system will display weightage as 0 and the field is disabled.
Similarly, for False condition, if the score component is included for score calculation, Analyst will provide weightage and if the score component is excluded for score calculation, system will display weightage as 0 and the field is disabled.
Click Apply button. Both the weightages are displayed in Weightage column. After applying the condition, the button name is changed as “Edit” indicating that Business Rule has some conditions applied.
For score calculation for every call, weightages will be considered based on the conditions applied for the score component.
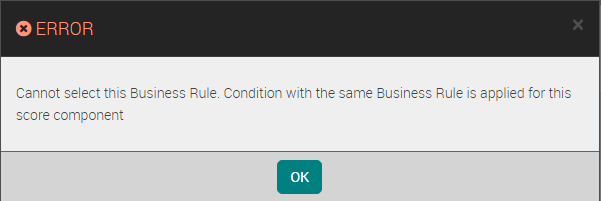
When user tries to add a Business Rule in score component which is already added as a condition for the same score component, an error message is displayed as shown below.
Score Component Type: Call Attributes Select Call Duration from the drop-down list.
Click Edit Normalization to add Start Range, End Range and Value for the score component.

Assign weightage to the score component.
Click the ADD button to add score.
Click the NEXT button to navigate to Define Rule Group page.
Score Calculation
Business Rule | BR evaluates to True/False (System-determined) | Normalization Value (System-determined) | Positive/Negative Impact | Weightage |
|---|---|---|---|---|
Listening & Comprehension | 1 (True) | 100 | Positive | 6 |
Agent Soft Skills | 0 (False) | 0 | Positive | 7 |
Professionalism | 1 (True) | 100 | Positive | 8 |
Agent Rudeness | 1 (True) | 0 | Negative | 9 |
Score Calculation with Conditional Scoring
Business Rule | BR True/False (System-determined) | Normalization Value (System-determined) | Impact | BR Condition | Include/Exclude | Weightage | Conditional Weightage |
|---|---|---|---|---|---|---|---|
Listening & Comprehension | 1 (True) | 100 | Positive | True | Include | 6 | 9 |
Agent Soft Skills | 0 (False) | 0 | Positive | N/A | N/A | 7 | N/A |
Professionalism | 1 (True) | 100 | Positive | N/A | N/A | 8 | N/A |
Agent Rudeness | 1 (True) | 0 | Negative | N/A | N/A | 9 | N/A |
Agent Performance Score = = 51.51
Define Business Rule Group
Business Rule Groups are logical grouping of Business Rules. These are created for the purpose of reporting and analytics. In Create and Review flows, unless a Score is created, Analyst cannot create a Business Rule Group. Navigation to Business Rule Group screen is restricted.
In the Business Rule Group field, enter the group name.

Select a list of Business Rules from the drop-down list.
Click the Add button to save the newly added business rule group.
Click the Close button in each business rule to remove the rules from the list.
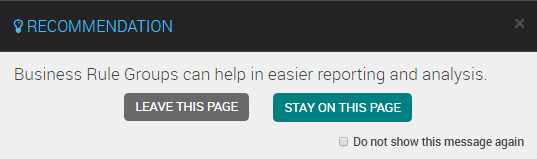
Click the Next button to navigate to Request for Call Processing page. A pop-up message will be displayed as shown below.
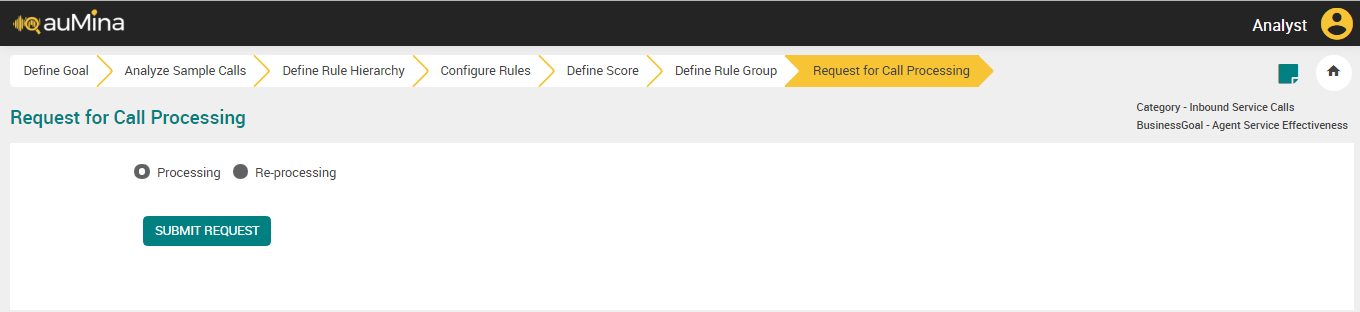
Request for Call Processing
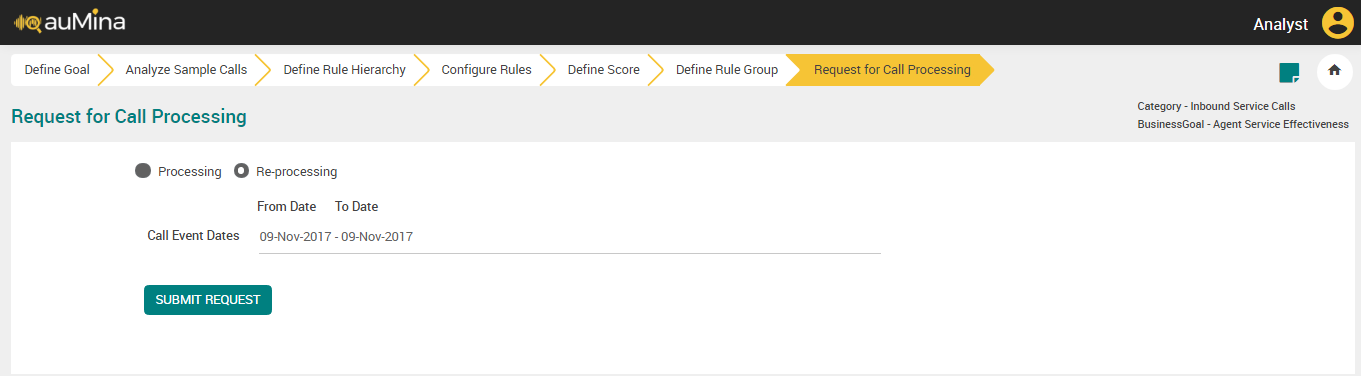
After Analyst completes the Business Evaluator Configuration, the next step is to request the Admin to start Processing. In certain scenarios, after few calls are processed, some changes in Keywords or Score Slab or BR Configuration are made. Analyst then requests Admin to reprocess the same set of calls which are selected based on the Call Event Date.
Select Processing radio button and click Submit Request button.
For Re-processing, select Re-processing radio button with Call Events Dates and click Submit Request button.
Business Evaluators: Import (For On-premise Deployments)
This feature allows Analyst to import Business Evaluator configuration from an external environment. This feature is useful in scenarios like - setting up a testing environment, creating a copy of configuration to another similar category of organization.
Analysts can import selected Business Evaluators (Business Goal, Business Rule, Score, BR Group) into a selected Category from an external U-Analyze supported Configuration file. System import the configuration data along with keywords for the selected Business Rules.
 |
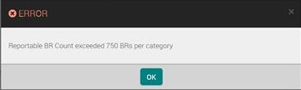
An error message is displayed, if the reportable Business Rule count exceeds maximum limit i.e.,750, while importing the business rules.
 |
Select the Transcription or Recognizer Category from the available drop-down list.
Select the Source Configuration File (.auf) from the desired path.

Important
System allows import of configuration file from Transcription category into a Category with Transcription only.
System allows import of configuration file from Stereo/Mono file into a Category with Stereo/Mono respectively.
Click Load button once Category and source configuration file selected.
When Analyst tries to Import the configuration and the languages for source and destination categories are different, a warning message is displayed as shown below.

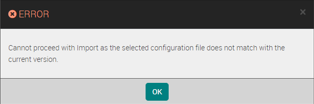
When Analyst tries to Import the configuration from a configuration file with different version, an error message is displayed as shown below.
When Analyst tries to Import the configuration from a Recognition Category to a Transcription category or vice versa, an error message is displayed as shown below.
Note
Load button is enabled only after Category and Source Configuration File are selected.
Business Evaluators: Import (For X on Cloud Deployments)
This feature allows Analyst to import Business Evaluator configuration from an external environment. This feature is useful in scenarios like - setting up a testing environment, creating a copy of configuration to another similar category of organization.
Analyst can import the selected Business Evaluators (Business Goal, Business Rule, Score, BR Group) into a selected Category from an external U-Analyze supported Configuration file. System imports the configuration data along with keywords for the selected Business Rules.
|
An error message is displayed, if the reportable Business Rule count exceeds maximum limit i.e.,750, while importing the business rules.
|
Select the Transcription or Recognizer Category from the available drop-down list.
A category that contains an active Business Rule or Score is not listed in the Category selection drop-down list
A category whose call processing is in progress cannot be imported. If you select such a category a warning message is displayed as follows:
"Contact processing in progress. Please try after the completion."
Select the Source Configuration File (.auf) from the desired path.
Important
System allows import of configuration file from Transcription category into a Category with Transcription only.
System allows import of configuration file from Stereo/Mono file into a Category with Stereo/Mono respectively.
Click Load button once Category and source configuration file selected.
When Analyst tries to Import the configuration and the languages for source and destination categories are different, a warning message is displayed as shown below.
When Analyst tries to Import the configuration from a configuration file with different version, an error message is displayed as shown below.
When Analyst tries to Import the configuration from a Recognition Category to a Transcription category or vice versa, an error message is displayed as shown below.
Note
Load button is enabled only after Category and Source Configuration File are selected.
Business Evaluators: Review
Important
This content is applicable only for users of U-Analyze without the Semantic Matching of Business Rules feature.
This feature allows Analyst to review Business Evaluator configuration. It will be useful in scenarios like reviewing the business evaluator configuration with edit functionality wherever applicable.
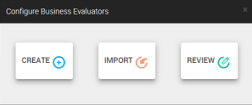 |
Click Review in Home page. The Review Category page will be displayed with a list of added business goal.
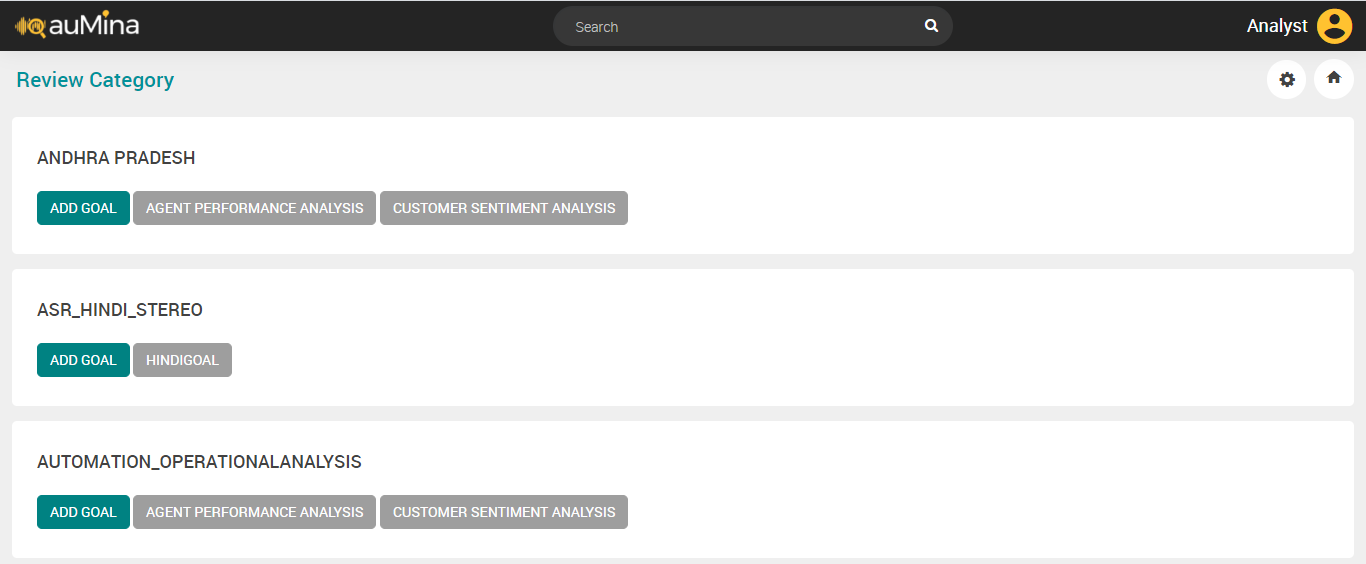
Click Business Goal to get into the same flow as Create but here analyst can also perform edit, delete operations on applicable areas.
Business Evaluators: Review
Important
This content is applicable only for users of U-Analyze with the Semantic Matching of Business Rules feature.
This feature allows analysts to review the Business Evaluator configuration. It is useful in scenarios like reviewing the business evaluator configuration with edit functionality wherever applicable.
|
Click Review in the Configure Business Evaluators pop-out. The Review Category page is displayed with a list of added business goals.
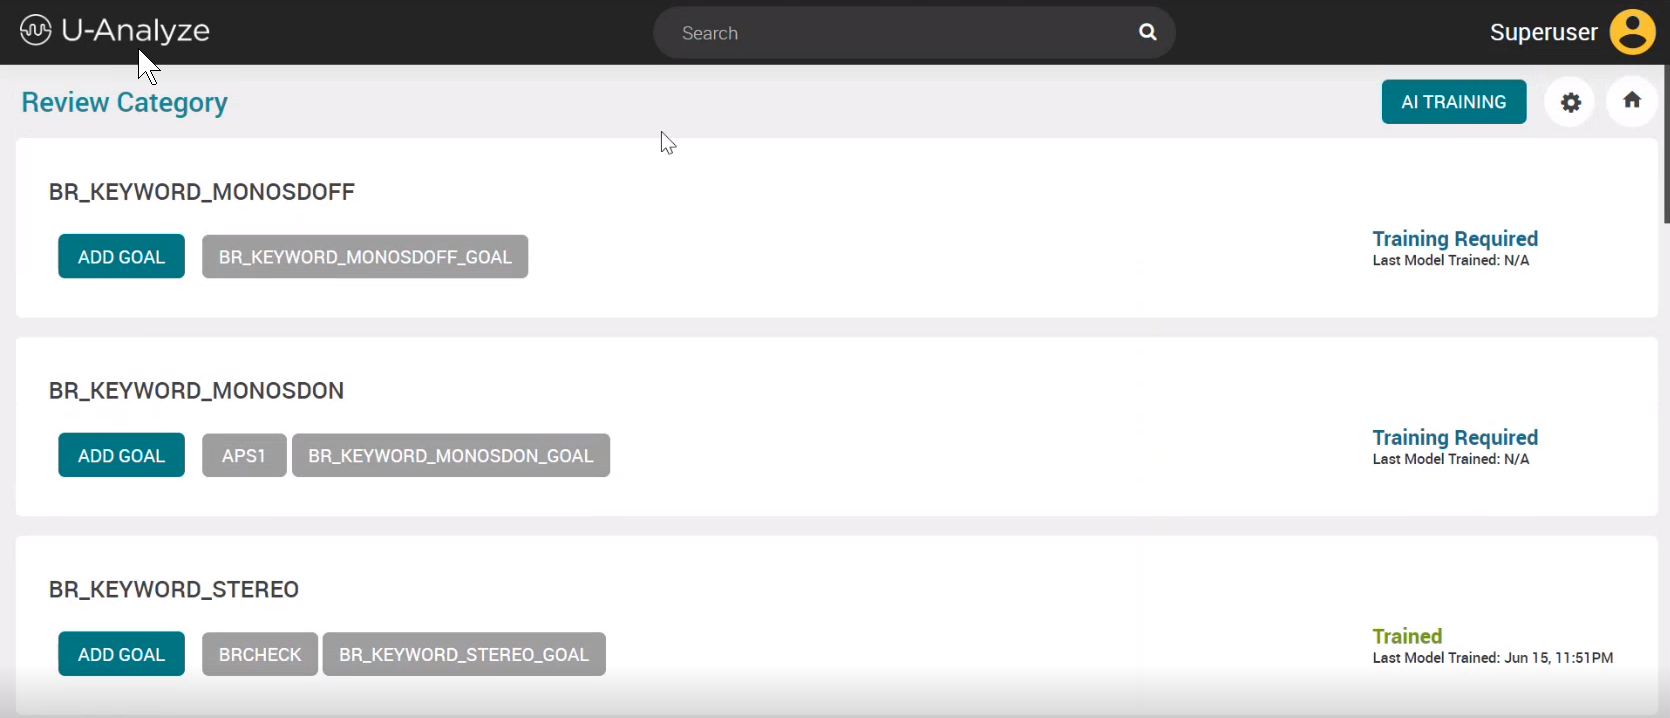
The AI TRAINING button is newly introduced in version 2024.1. It is located beside the settings cog wheel in the top ribbon.
The training status and the last model trained information (i.e., date and time stamp) are displayed on the right of the business goals. The AI training statuses are as follows:
Training Required: When a category contains business rules with AI Detection configured
Trained: The model was successfully trained. The date and time of training are shown
In Progress: The training has started and is yet to be completed.
N/A: There are no business rules with AI Detection configured
Note
For business goals that do not have any semantically matched Business Rules the training status and the last model trained information are shown as N/A.
Click a business goal to get into the same flow as create but here analysts can also perform edit and delete operations on applicable areas.
Click AI TRAINING. The AI Model Training page is displayed. By default, the BR TRAINING tab is selected with no category selected.

Important
You must select a category to view the BR TRAINING details.
You can click the back arrow to go back to the Review Category screen or click the TRAIN AI MODEL button to proceed with training the AI model.
Select a category from the Category drop-down list. The BR TRAINING details for the selected category are displayed.
Note
The Category drop-down lists all the categories that have AI business rules only.
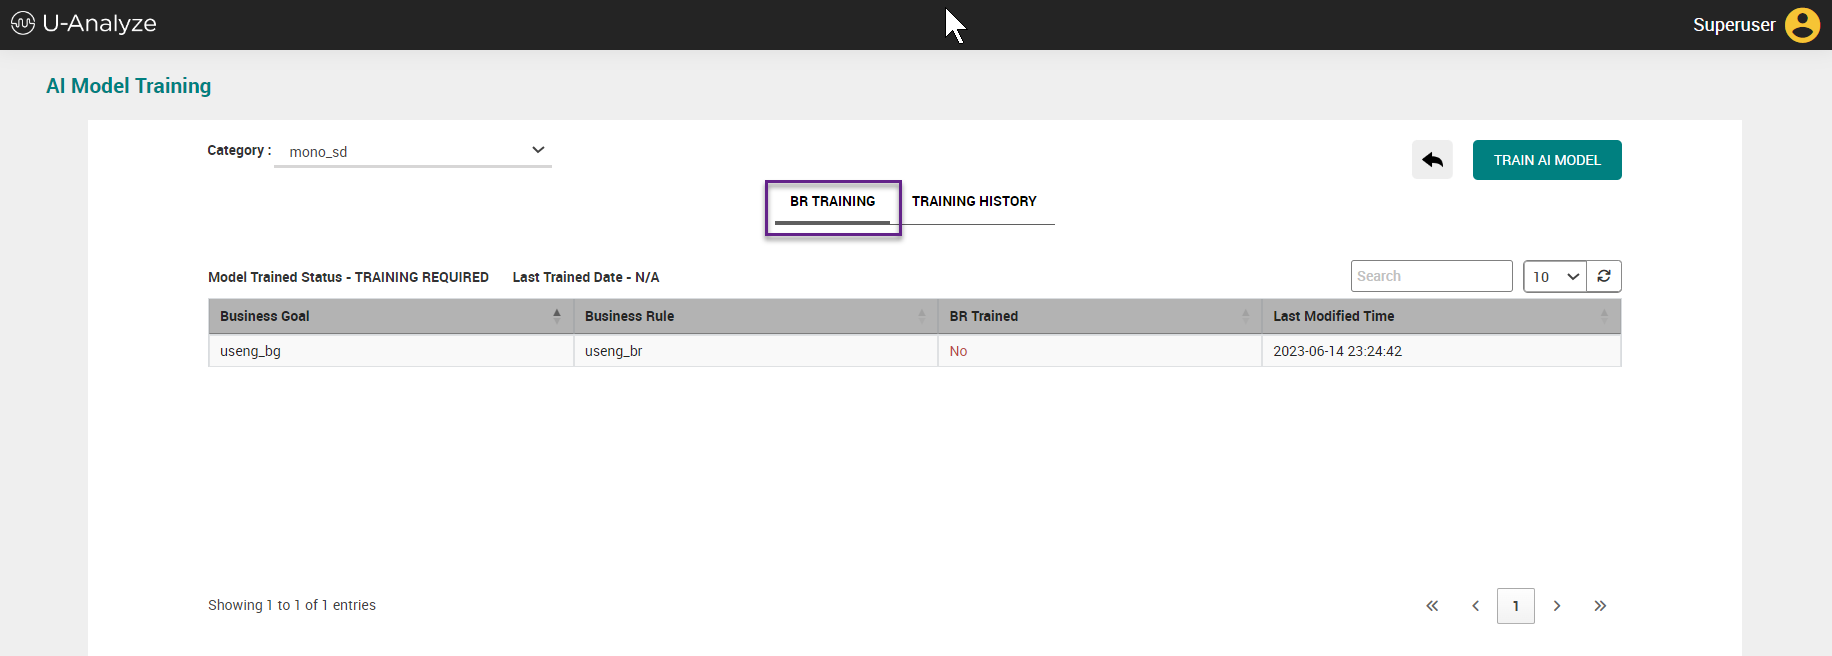
The Model Trained Status and Last Trained Date information is shown.
The information that follows is shown in a tabular format:
Business Goal
Business Rule
BR Trained
Last Modified Time
All the table fields are sortable. By default, the table is sorted based on the BR Trained status with the not trained (i.e., Value is "No") business goals positioned at the top. The trained (i.e., Value is "Yes") business goals are positioned at the bottom.
A search box is provided to search within the table.
The number of rows to be displayed in the table per page can be selected from the drop-down provided beside the search box.
You can click the refresh icon to refresh the table to view any updated information without the need to refresh the whole page.
Page navigation icons and page selections are provided at the bottom right of the table for the convenience of navigation when there are multiple pages available in the table.
Click on TRAIN AI MODEL button to start the AI model training. The training status gets reflected in the TRAINING HISTORY tab.
The AI training is applicable to the selected Category. Hence, all the BRs are processed for AI training irrespective of the BR trained status (Yes/No).
If you click the TRAIN AI MODEL button again an error message gets displayed as follows:
Can't start AI training since it is in progress.
Click the TRAINING HISTORY tab to view the training history details for the selected category.
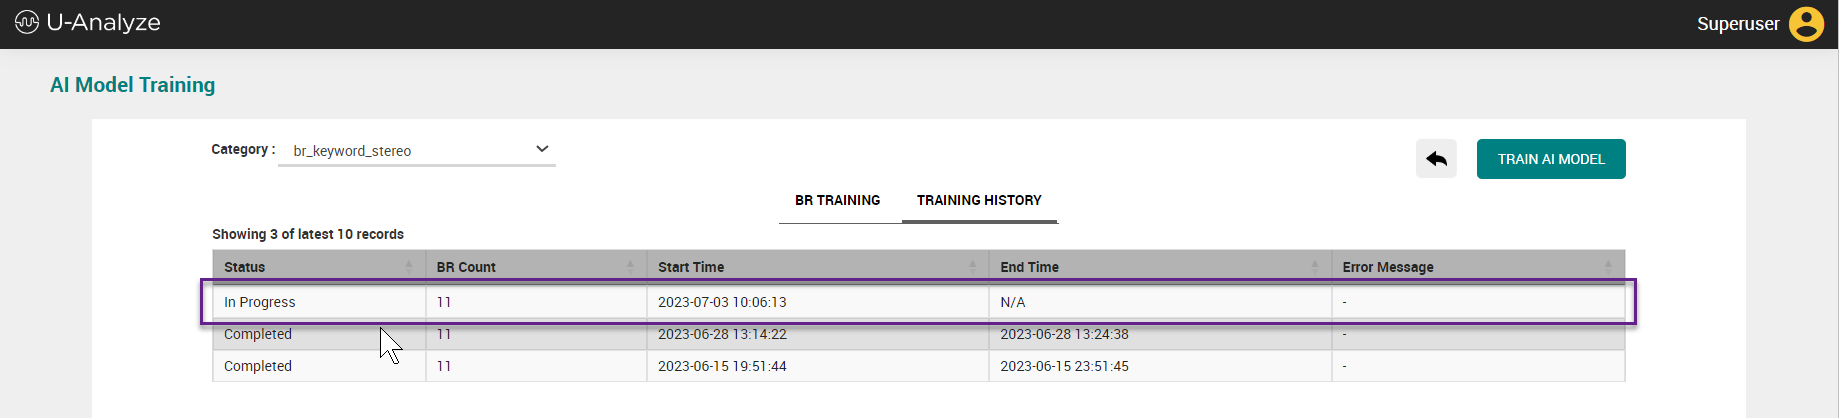
The details listed below are shown in a tabular format:
Status
BR Count
Start Time
End Time
Error Message
Export Configuration File
This feature allows Analyst to export business evaluator configuration to an external environment. This feature will be useful in scenarios like - setting up a testing environment, creating a copy of a configuration to another similar organization of a client.
Analyst will export selected Business Evaluators (Business Goal, Business Rule, Score, BR Group) from a Category.
Export and import of business evaluators (Scores, Business Rules and Keywords) in AUF format is now supported across product versions starting from version 2.15 onwards. Only forward compatibility is supported which means export and import can be done from lower to upper versions.
Click the Review button in Configure Business Evaluators and click the Settings (
 ) icon in the right corner of the page.
Select Export Configuration File option.
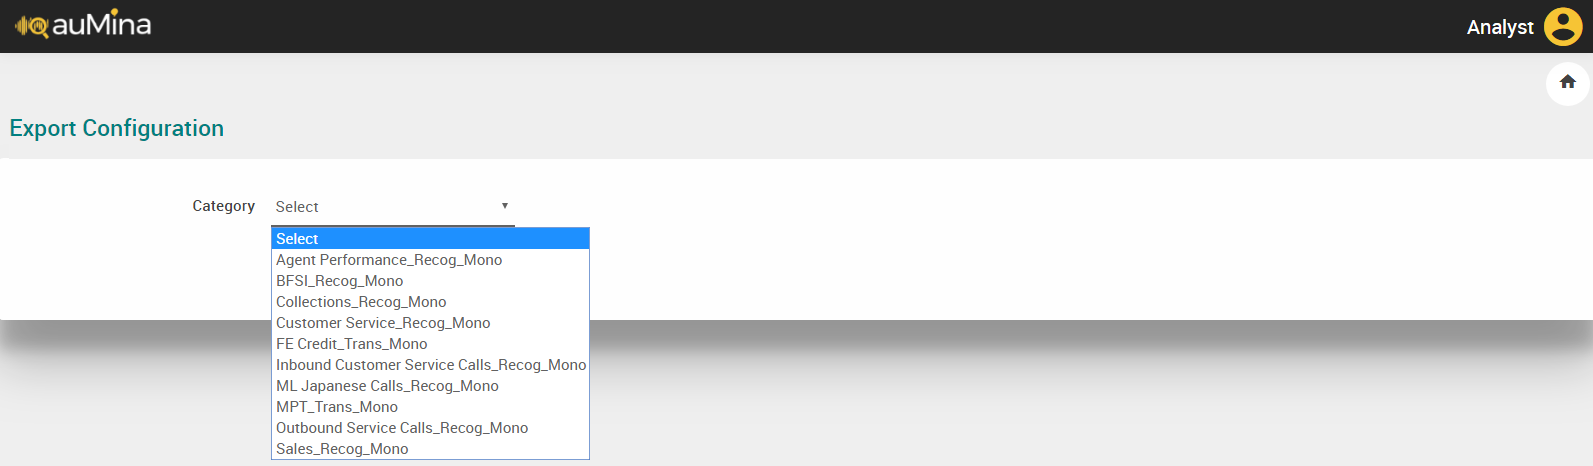
Select Transcription or Recognizer Category from which the Configuration needs to be exported. System will follow the naming convention as <Category Name>_<Trans/Recog>_<Stereo/Mono>
Click Export button, configuration data will get exported to the following path U-Analyze Home Path > File Collection > Configuration File in .auf format. System will follow the naming convention for .auf file as <Organization Name>_<Category Name>_<Trans/Recog>_<Stereo/Mono>_<YYYY_MM_DD>.auf
Call Duration Range
Call Duration Slabs can be set for a selected Category and this option will be available on Review Business Goals screen along with Export Configuration file option.
Click the Review button in Configure Business Evaluators and click the Settings
icon in the right corner of the page, a pop up will open.Select Set Call Duration Range from the pop up.
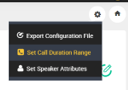
Select a Category and set the call duration range for value less than or equal to or greater than.
Click Add button to add new call duration range for less than or equal to value.
Click Delete button to remove newly added call duration range.
Click Save button to save the newly added call duration range.
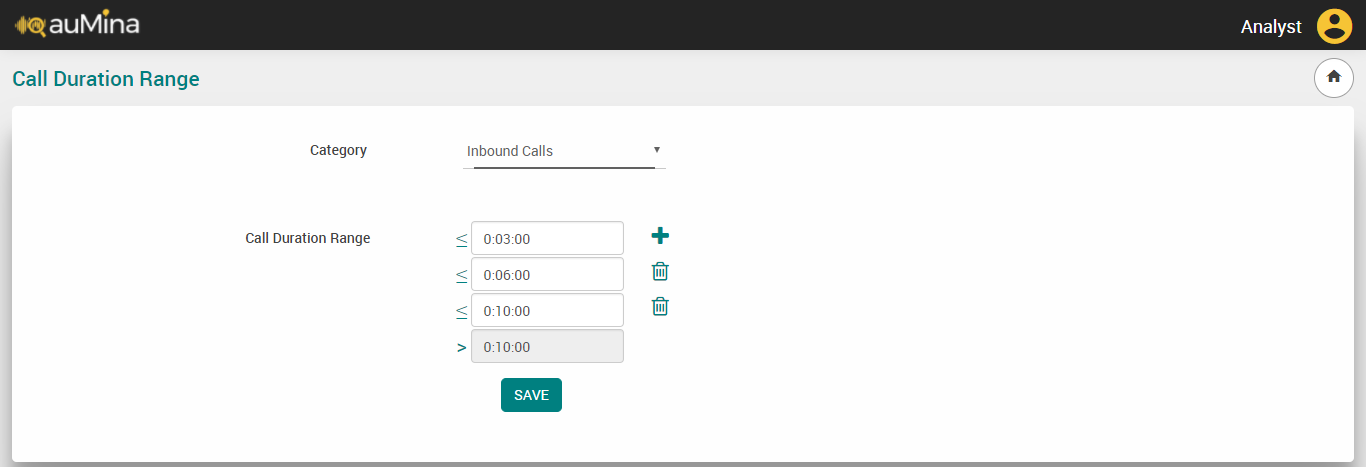
Note
Initially call duration range will be available for one lesser than and one greater than value, we can add two lesser than values by clicking add button, no more values can be added.
Speaker Attributes
At a Category level, the Business Analyst selects and provides speaker identification related attributes.
Click the Review button in Configure Business Evaluators and click the Settings (
) icon in the right corner of the page.Select Set Speaker Attributes option to set speaker attributes for specific category.

Select Category from the drop-down list.
Select First Speaker as Agent or Customer. The default First Speaker is Agent. Reprocessing is required after changing the speaker.
Select the Keyphrase approach to identify first speaker as agent. By default, option ‘No’ is selected. If Keyphrase option is selected as ‘Yes’, the below screen appears.
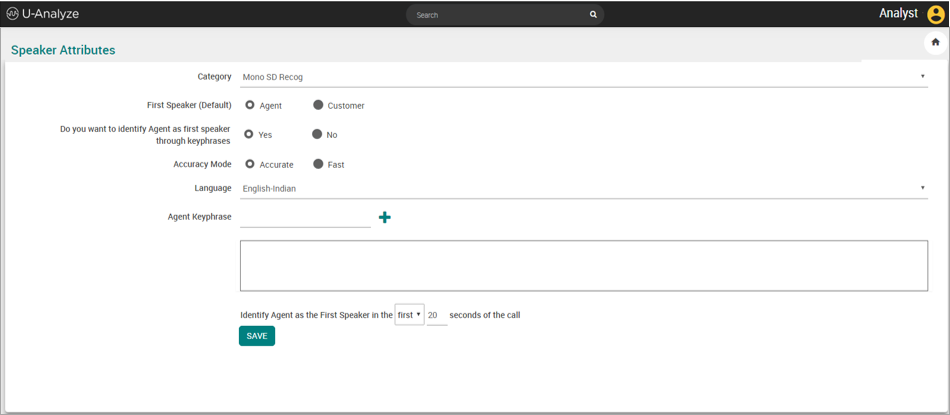
Select Accuracy Mode as Accurate or Fast.
Accurate – First speaker is identified accurately as Agent or Customer. It takes more time for speaker identification.
Fast – First speaker is identified quickly as Agent or Customer. It can result in less accuracy in speaker identification.
Select language from the drop-down list. Languages are available in the drop-down list based on the selected BR Evaluation Engine which can be either Recognizer”or Transcriber.
Enter multiple agent-related keyphrases in Agent Keyphrase section. If entered keyphrases are detected, agent is considered as first speaker, else customer. For example: “Welcome to <Company Name>”, “How may I help you”, “How may I assist you”, “What can I do for you.”
If no hits are found through Keyphrase detection, system will automatically consider first speaker as customer.
Enter the first “n” seconds or last “n” seconds for speaker identification detection. First 20 or last 20 seconds of the audio are processed for speaker identification.
For Recognizer category, system automatically creates grammars for the given keyphrases. Single grammar is created for multiple languages.
For Transcriber category, system detects the keyphrases through transcription.
Click Save button to save the information entered.
Note
Reprocessing is required when keyphrases are changed, or any parameter is updated.