Adding a Wait Point
A Wait Point is a logic element that enables other steps in a Flow to halt processing until a specified condition is met.
For example, you might use a Wait Point to check the processing status of a Service Flow and retrieve any data that is produced by the Flow.
You can add a Wait Point navigation logic step to any type of Flow.
X-Designer provides three types of Wait Points:
Concurrent flow - Used to Wait for a Concurrent Flow that will execute and provide data within up to 60 minutes. For more details, click here.
Delay timer - Used to Wait for an execution delay of up to 10 seconds at the Wait Point location in the Flow. For more details, click here.
Resume request - Used to Wait for a Resume Request API call that will be received by X‑Platform within up to 99 days. For more details, click here.
Using a Concurrent Flow Wait Point
Use this Wait Point type when a Concurrent Flow is expected to complete processing within a short time, typically under 60 seconds. It is intended mainly for use with an Integration Point, a real-time external network service, or execution of an RPA command.
Because a Concurrent Flow executes asynchronously from its calling Flow, the calling Flow can continue execution while the Concurrent Flow performs external processing. A Wait Point step is positioned at the point in the calling Flow where any data produced by Concurrent Flow processing will be needed.
Open the Flow where you want to use the Wait Point. This is the calling Flow.
At the top left of the Flow Map, click the round Add Steps Toolbox icon. The Add Steps Toolbox opens.
From the Logic Elements group, select, drag and connect the Wait Point element to the desired location on the Flow Map. The Wait Point element editor is displayed:
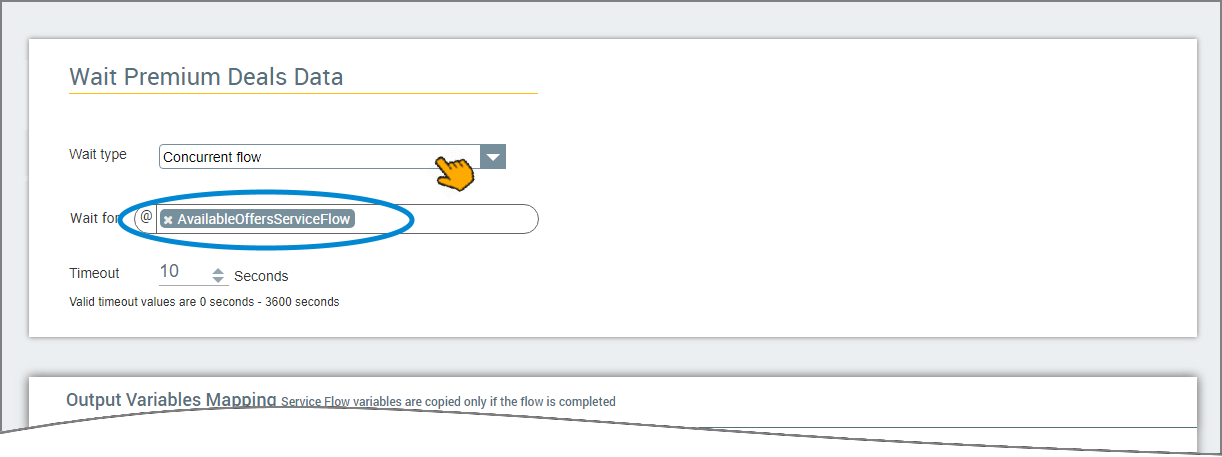
In the Wait Point Name field, enter a unique name for the Wait Point step element.
From the Wait Type dropdown list, choose Concurrent flow.
In the Wait for field, select the Service Flow Custom Type variable that is being used to store runtime data for the related Concurrent Flow.
Note
This field accepts only the ServiceFlow Custom Type variable. For more information, see Using Service Flow Custom Types.
In the Timeout field, enter the maximum length of time that the calling Flow should wait for related Concurrent Flow runtime data before it is determined that the required data will not be received. Regardless of the data or processing results of the Concurrent Flow, the calling Flow will continue to execute when this timeout period is reached.
The maximum timeout duration for this type of Wait Point is 60 minutes. Should you expect a longer Wait time for the Flow, consider using the Resume Request Wait Point type.
Click Create Wait Point. The Wait Point step is added to the Flow Map.
The following shows a typical pairing of a Concurrent Flow step and a Wait Point step.
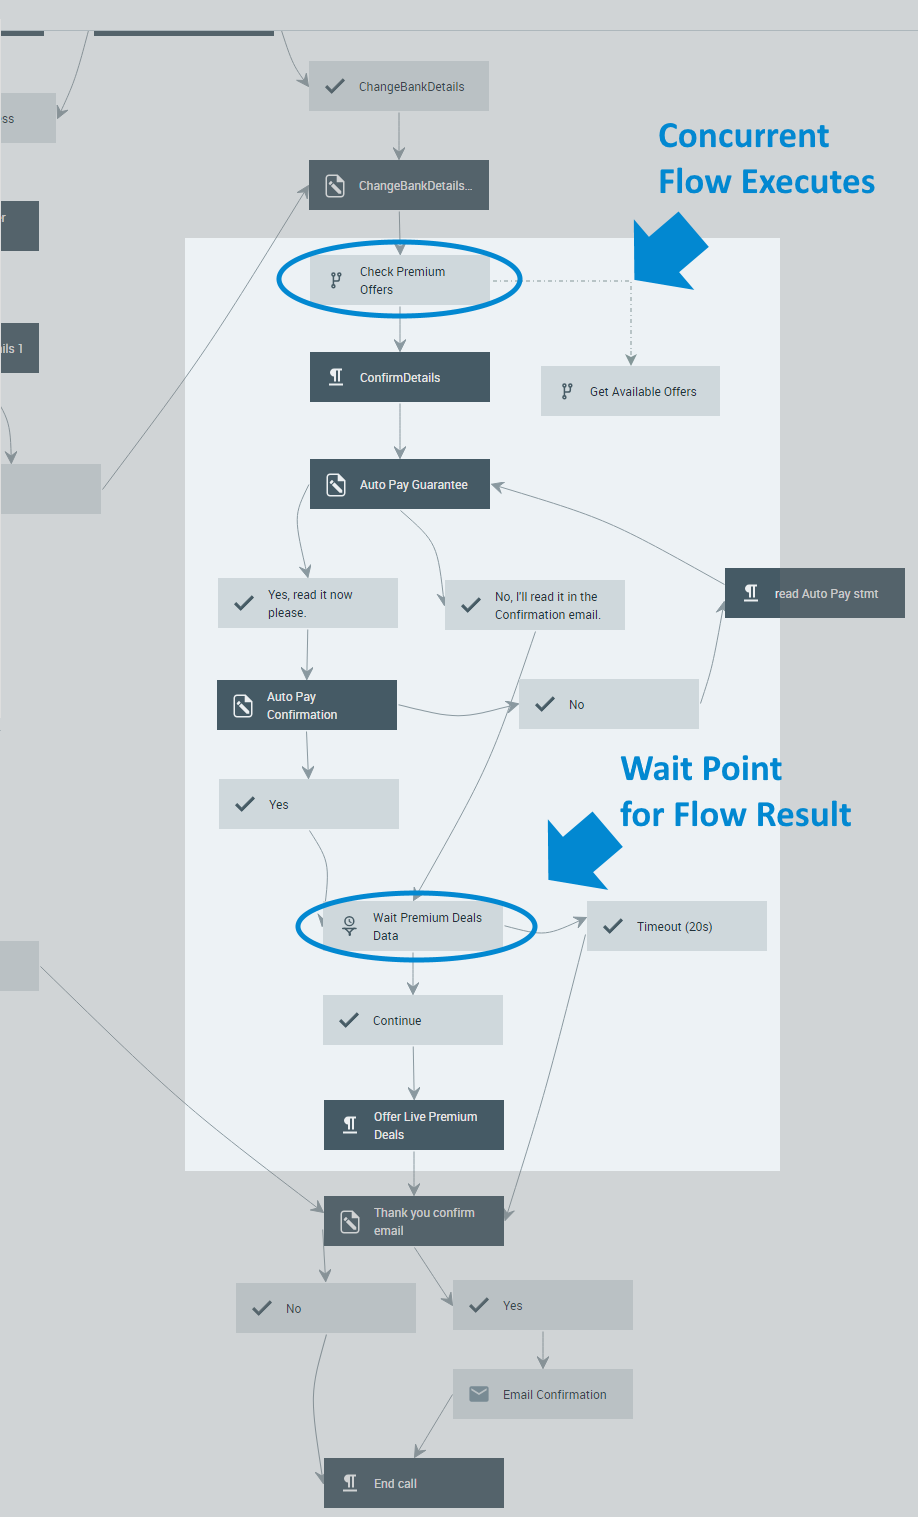 |
The Concurrent Flow step is added to the calling Flow several steps before its data will be required. The goal is to provide sufficient time for any external processing to occur.
The Wait Point step is added to the Flow at the ideal location for using the data produced by its paired Concurrent Flow. The Wait Point is always displayed together with both Continue and Timeout exit points. In this way, you can specify which action should be taken:
When the required data is received, workflow proceeds to the Continue step.
When the required data is not received within the timeout period, workflow proceeds to the Timeout step.
Using a Delay Timer Wait Point
Use this Wait Point type to intentionally delay Flow execution for a brief time. This Wait Point does not return data, and does not need to be assigned an output variable.
The Flow step that appears immediately before this Wait Point will execute, and then the Flow will halt for the chosen time duration before proceeding to the step that follows the Wait Point. The maximum duration for the delay is 10 seconds.
The delay is useful when you want to stop all current Flow activity while waiting for another process to occur. For example, if a Flow's progress will need to wait until RPA command execution is completed.
Open the Flow where you want to use the Wait Point. This is the calling Flow.
At the top left of the Flow Map, click the round Add Steps Toolbox icon. The Add Steps Toolbox opens.
From the Logic Elements group, select, drag and connect the Wait Point element to the desired location on the Flow Map.
In the Wait Point Name field, enter a unique name for the Wait Point step element.
From the Wait Type dropdown list, choose Delay timer.
In the Timeout field, enter the maximum length of time that the calling Flow should halt operation before continuing.
Click Create Wait Point. The Wait Point step is added to the Flow Map.
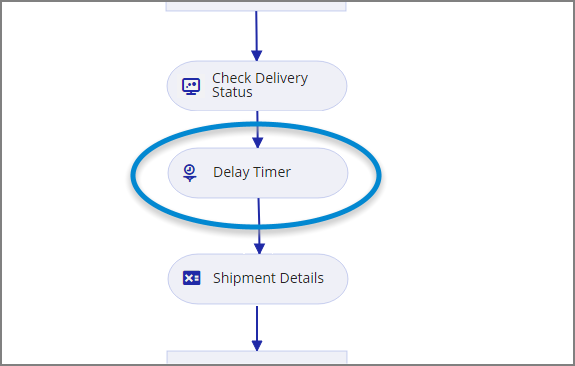
The following shows a Delay Time Wait Point step used as a buffer for an RPA operation which is known to take time:
 |
Using a Resume Request Wait Point
Use this Wait Point type when you need to wait for a process to complete in an external system. The external system must be able to send an explicit notification using the X‑Platform Resume Request API.
For example, you can use this Wait Point to track Promises that are created in U-Assist. At the location where the Wait Point is added, the Flow will pause execution and wait until X‑Platform receives the relevant API call.
A Resume Request Wait Point can wait up to 99 days before indicating a timeout has occurred.
Note
The Resume Request Wait Point type is only available for use in a Service Flow or Data Flow.
Open the Service Flow or Data Flow where you want to add the Wait Point. This is the calling Flow.
At the top left of the Flow Map, click the round Add Steps Toolbox icon. The Add Steps Toolbox opens.
From the Logic Elements group, select, drag and connect the Wait Point element to the desired location on the Flow Map. The Wait Point element editor is displayed:
In the Wait Point Name field, enter a unique name for the Wait Point step element.
From the Wait Type dropdown list, choose Resume request.
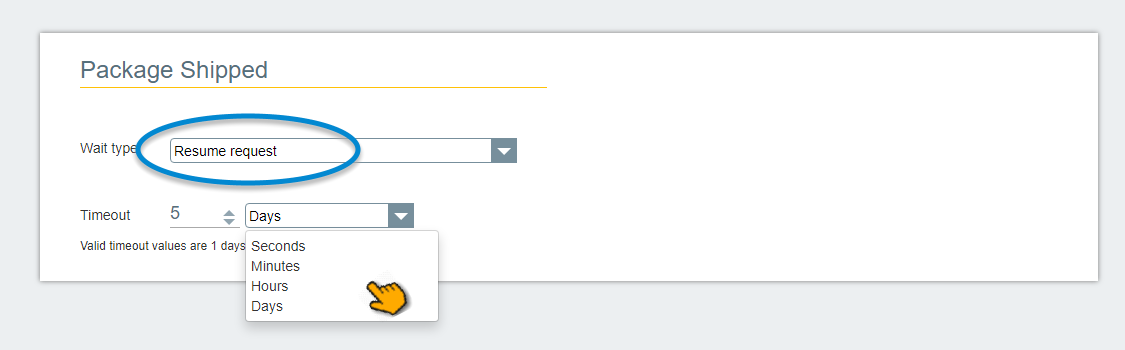
In the Timeout field and dropdown, enter the maximum length of time that the calling Flow should wait for its related Resume Request API call.
You can configure timeout duration in increments of Seconds, Minutes, Hours or Days. The maximum timeout supported is 99 days.
Click Create Wait Point. The Resume Request Wait Point step is added to the Flow Map.
The following shows a Service Flow containing a single Resume Request Wait Point step:
 |
The Wait Point is always displayed together with both On resume and Timeout exit points. In this way, you can specify which action should be taken:
When the Resume Request is received, workflow proceeds to the On resume step.
When the Resume Request is not received within the timeout period, workflow proceeds to the Timeout step.
The Service Flow shown above is used to track a U-Assist Promise for Router Box delivery. Delivery process time is 5 days or less.
When the Router is shipped, U-Assist Promise sends a Resume Request API call to Interact, along with shipment details. When it receives the Request, the Service Flow instance resumes its execution, using an Integration Point element to send all Shipment Details to the target Flow for continued processing.
If the Router is not shipped within 5 days, a timeout occurs in both the Service Flow and the target Flow, triggering an email that notifies the customer about the delay.
You can use multiple Resume Request Wait Points in a Flow. For example, while the Flow will track only a single 'Router Delivery' promise, it can contain different Wait Points that monitor each step of the delivery process (e.g., 'Ordered from Logistics', 'Sent for Shipping', and 'Shipped'), triggering different activities at each step.
For details on using the Resume Request API, click here.
For more information about U-Assist Promises, refer to the Uniphore U-Assist User Guide.