Adding a REST Integration Point
You create a REST Integration Point using the New Integration Point wizard.
To define a REST IP, you specify a REST service URL, select a Request type and define the Request Headers and Body as needed.
You can map both Request and Response parameters to X‑Platform variables, so that a REST call can easily include values that are taken from a Flow during runtime.
Each REST IP can support one of the following activity types:
User-Defined (Basic). Returns a standard JSON or XML formatted Response that can be parsed and mapped to one or more X‑Platform variables.
Custom Validation. Validates an end user's answer to an input question using a REST call.
Callback Handling. Used specifically with the X‑Platform Call Return callback method to invoke an external service which will schedule and perform the callback.
Note
It is recommended that only string parameter types be passed to REST IPs.
Add a User-Defined REST IP
A User type REST call returns a standard JSON or XML formatted Response that you can parse and map to one or more X‑Platform variables.
As detailed below, you can specify either simple or advanced mapping for each REST IP you define.
At the top of the Integration Points page, click Add, and then select REST from the dropdown menu. The New REST Integration Point wizard opens:
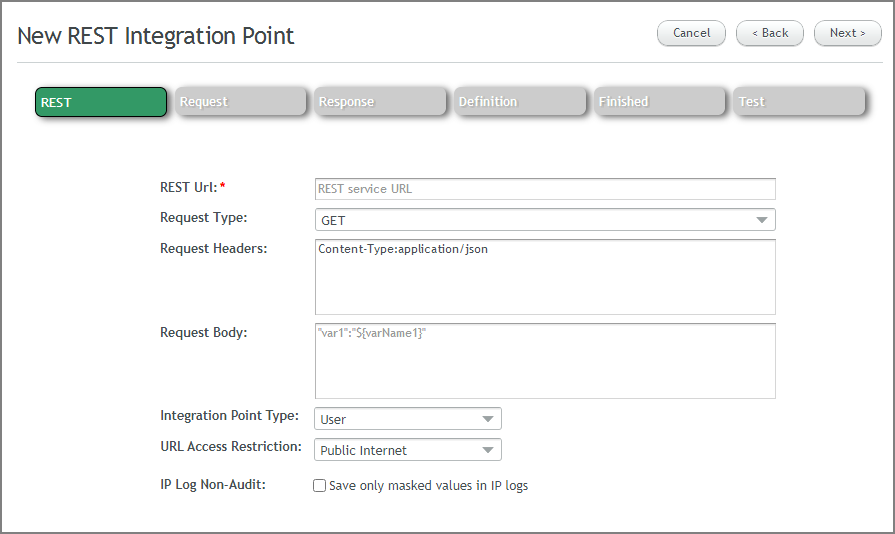
Configure the following settings, as required. The Request Type and Headers/Body are not mandatory.
REST URL: The URL format may include parameters in brackets, for example:
http(s)://[host]:[port]/[appname]/version/[version]/account/[accountId]/interaction/[interactionId]/[interactionInstanceId]/[elementId]
X‑Platform will encode all URL parameters before passing them to the Integration Point.
Request Type: Select the required type from the dropdown list (i.e., GET, POST, PUT or DELETE).
Request Headers/Body: You can add bracketed parameters to these fields, for example: content-type:${type}
Integration Point Type: Select User.
URL Access Restriction: If required, from the URL Access Restriction dropdown list, select Private Virtual Network. (The default selection is Public Internet.)
IP Log Non-Audit: Optionally activate this checkbox to instruct X‑Platform to mask specified sensitive data when writing to IP Logs. Masking is performed on data that matches Regular Expression patterns that are defined for the account.
Click Next. The Request page is displayed:
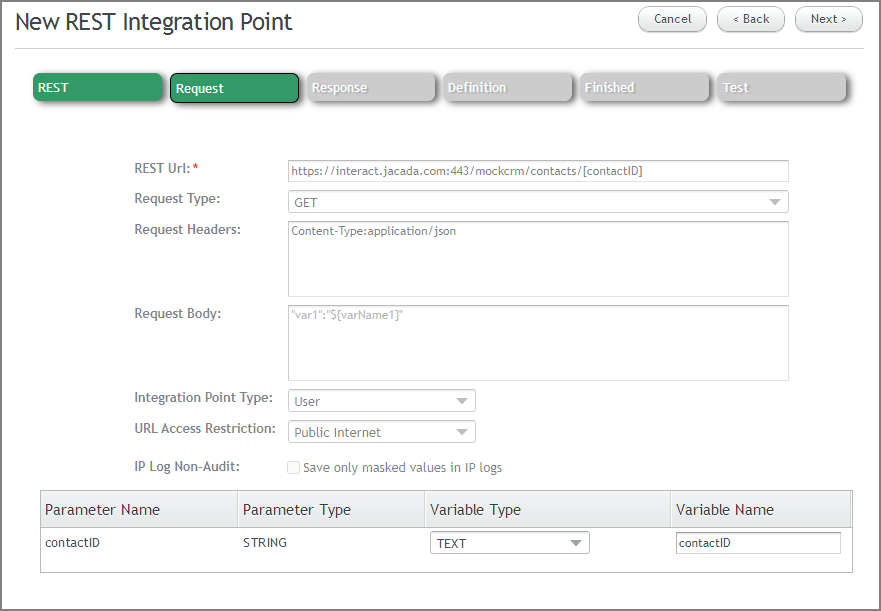
For each Request parameter that appears, in the Variable Type column, select the relevant parameter type. In the Variable Name column, optionally change the default name to a more meaningful name. The name you assign in this column will be displayed to users in the X-Designer.
Important
X‑Platform will encode all URL parameters before passing them to the IP Request. If the parameters contain non-English letters and/or special characters, ensure that the receiving web service can perform the required URL decoding.
Click Next. The Response page is displayed. Each REST IP Response supports one of the following mapping options:
Basic Response Mapping. The Response is mapped to a single X‑Platform variable (Simple, Custom or Collection type). This is the default mapping.
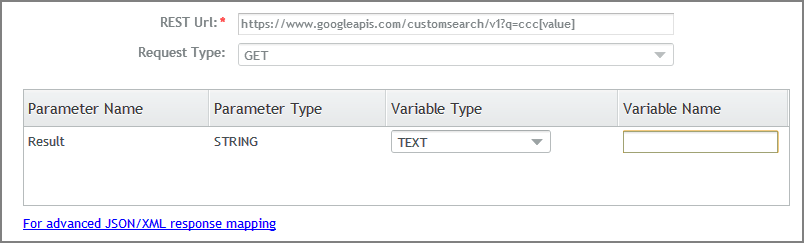
For each Basic Response parameter that appears, from the Variable Type dropdown, select the appropriate parameter type.
If you select a Collection, be sure to also specify its type from the Type dropdown list. Either Simple or Custom Types may be used. When using a Custom Type, verify that the fields (i.e., keys) of the selected Custom Type exactly match the data that is returned in the JSON response.
Note
For details about creating new Custom Types and advanced mapping of custom types, click here.
In the Variable Name field, optionally enter a meaningful name for the variable. The name assigned in this column is the one displayed to users in the X-Designer
Advanced JSON/XML Response Mapping. Enables parsing of a JSON or XML response into separate variables. Advanced mapping is useful when the required variable is part of a complex type. Multiple parameters and variables can be defined.
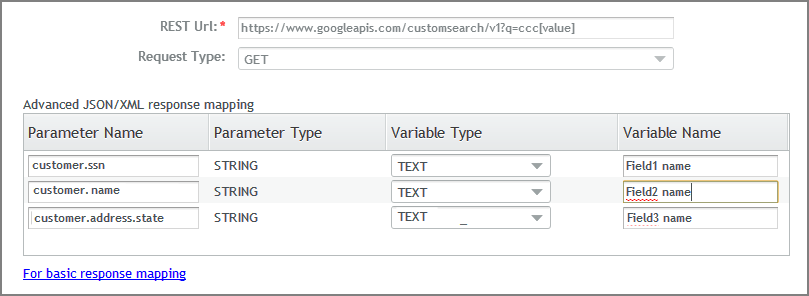
The parameter name is an element specified inside the JSON or XML response. For example:
{
  customer:
            {
              ssn: 12345678,
              name: Paul Smith,
              address:
               {
                 street: 70 Main Street,
                 city: Anytown,
                 zip: 123456,
                 state: NY
               }
             }
}
You use dot notation to access specific fields inside the JSON response. Above, the parameter customer.ssn is used above to get to the ssn field inside the customer object, for mapping to a TEXT variable. To access the address field, you use customer.address, mapping it to a matching Custom variable type.
To use Advanced Response Mapping, click For advanced JSON/XML response mapping at the bottom left side of the page. For each parameter that appears, enter both a Parameter Name and Variable Name and select the appropriate Variable Type from the dropdown menu.
To add a new parameter, click Add at the right side of a row. To delete a parameter, click Remove.
Click Next. The Definition page is displayed, showing the defined Request and Response parameters:
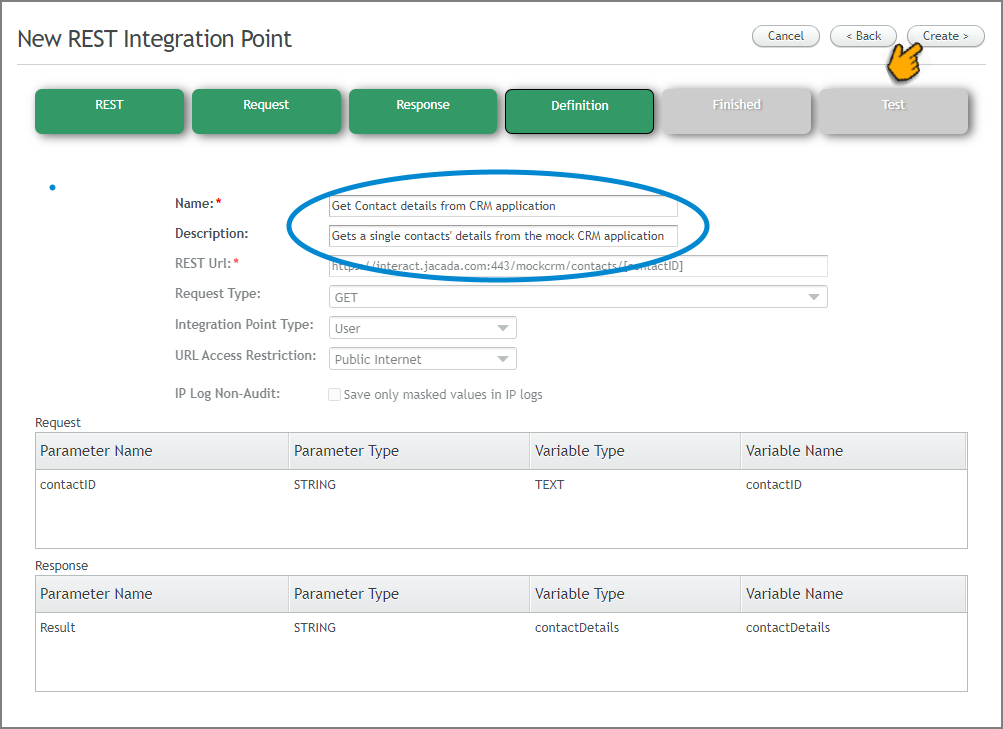
Enter a relevant Name and Description, then, click Create. A confirmation message appears, and the Finished page is displayed.
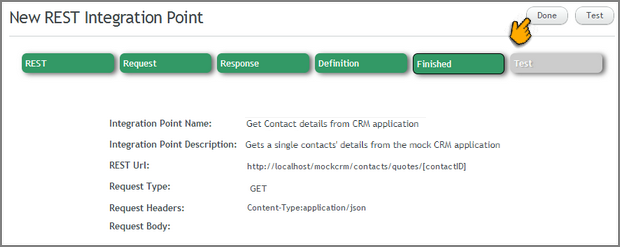
To complete and exit the wizard, click Done.
Important
We recommend testing the Integration Point by clicking Test. This takes you to the Test Integration Point page. For more details, click here.
Custom Validation Integration Points
This type of IP enables you to validate an end user's answer to an Input question. To operate as required in a Flow, the X-Designer needs to select this custom validation IP while building the validation settings for the Input question.
Custom validation IPs return two values:
Boolean: A flag that indicates whether the input is valid or not.
String: An error message to be displayed when input is invalid.
Create a new REST IP as described above. The New REST Integration Point wizard opens.
Configure the initial settings as required. However, from the Integration Point Type dropdown menu, select Custom Validation..
Click Next. The Request page is displayed, with input parameter(s) listed by default.
For each Request parameter that appears, in the Variable Type column, select the relevant parameter type. In the Variable Name column, optionally change the default name to a more meaningful name. The name you assign in this column will be displayed to users in the X-Designer.
Click Next. The Response page is displayed, together with the custom validation Response fields:

In the Parameter Name column, enter meaningful names for both Response parameters, as in the example above. The names assigned in this column will be displayed to users in the X-Designer.
Click Next. The Definition page will be displayed, showing all Request and Response parameters.
Enter a relevant Name and Description, then, click Create. A confirmation message appears, and the Finished page is displayed.
To complete and exit the wizard, click Done.
Important
We recommend testing the Integration Point by clicking Test. This takes you to the Test Integration Point page. For more details, click here.
Callback Handling Integration Points
This type of IP is used when an External Service method is being used for Call Return Handling. When the customer clicks a Request Callback button, the IP will be invoked to call the specified external web service to schedule the callback.
Important
The web service called must support CTI services (e.g., Twilio, Avaya Callback, Cisco Courtesy Callback, etc.).
When you use a Callback IP, you must specify:
the endpoint URL to be used; and
the specific request to be sent.
The Callback IP Request will automatically include the Unique Interaction ID for the Flow, ensuring that all data for the Flow data can be accessed by the Agent who handles the call.
Note
As Callback IPs do not contain Response parameters, no Response tab will be displayed.
Create a new REST IP as described above. The New REST Integration Point wizard opens.
Configure the initial settings as required. However, from the Integration Point Type dropdown menu, select Callback..
Click Next. The Request page is displayed, with input parameter(s) listed by default:
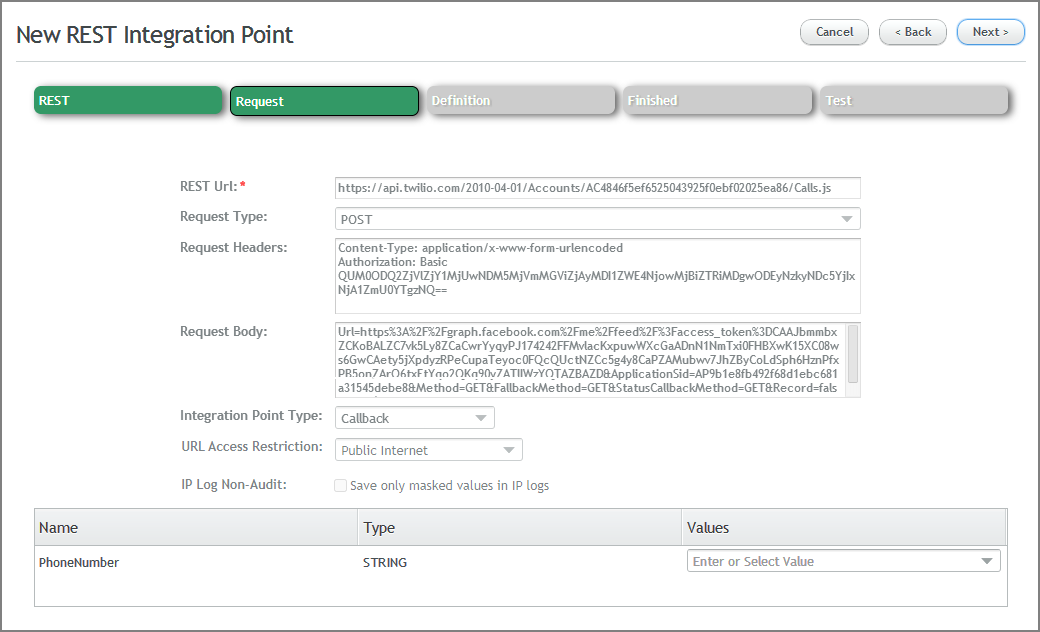
For each parameter in the Values column, from the dropdown list, select a value (all Session Variables will be listed) or enter the name of the parameter to be mapped, e.g., 'User Entered Phone Number'.
Click Next. The Definition page is displayed, listing the Request parameters.
Enter a relevant Name and Description, then, click Create. A confirmation message appears, and the Finished page is displayed.
To complete and exit the wizard, click Done.
Important
We recommend testing the Integration Point by clicking Test. This takes you to the Test Integration Point page. For more details, click here.