Setup Uniphore Voice Connector
In Uniphore Voice Connector (UVC), you can configure the following:
To Setup Uniphore Voice Connector:
Select U-Self Serve from the left menu and select AI Model.
Click the name of the Virtual Agent for whch the UVC related configurations need to be made.
Click Connectors card and the following screen is displayed.
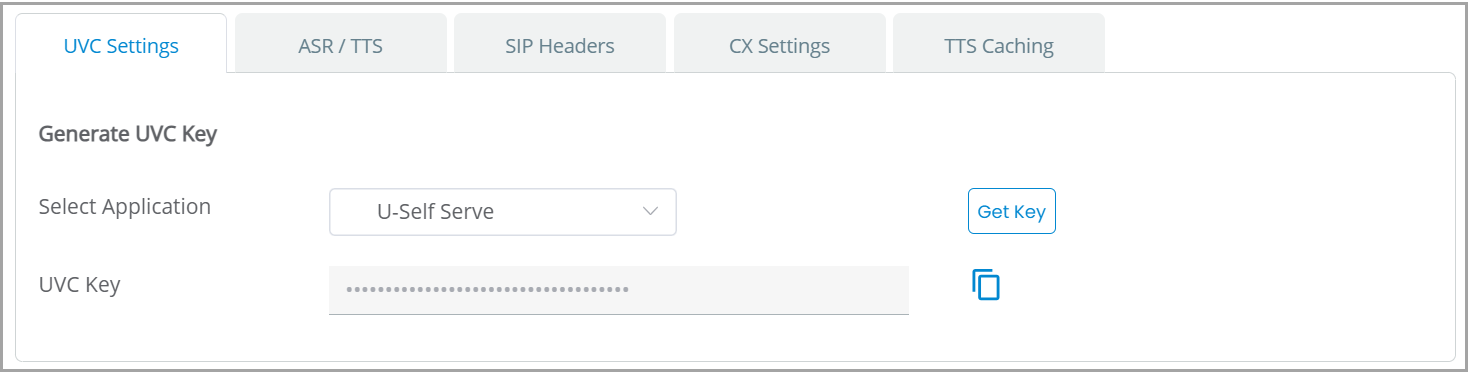
UVC Settings
Generate or copy the UVC key which is required to be passed by the source telephony system in SIP headers for a USS session to start. The required configuration must be done in the routing plan of the telephony system. A valid U-Self Serve session cannot be generated unless the UVC key is passed in SIP headers.
From the Select Application, you can select the application for which UVC key need to be generated.
Click Get Key button to generate the UVC key.
Click Copy icon to copy the UVC Key and use in the routing plan configuration.
Configure ASR/TTS Settings
In ASR/TTS tab, you can configure the ASR and TTS settings for the selected language.
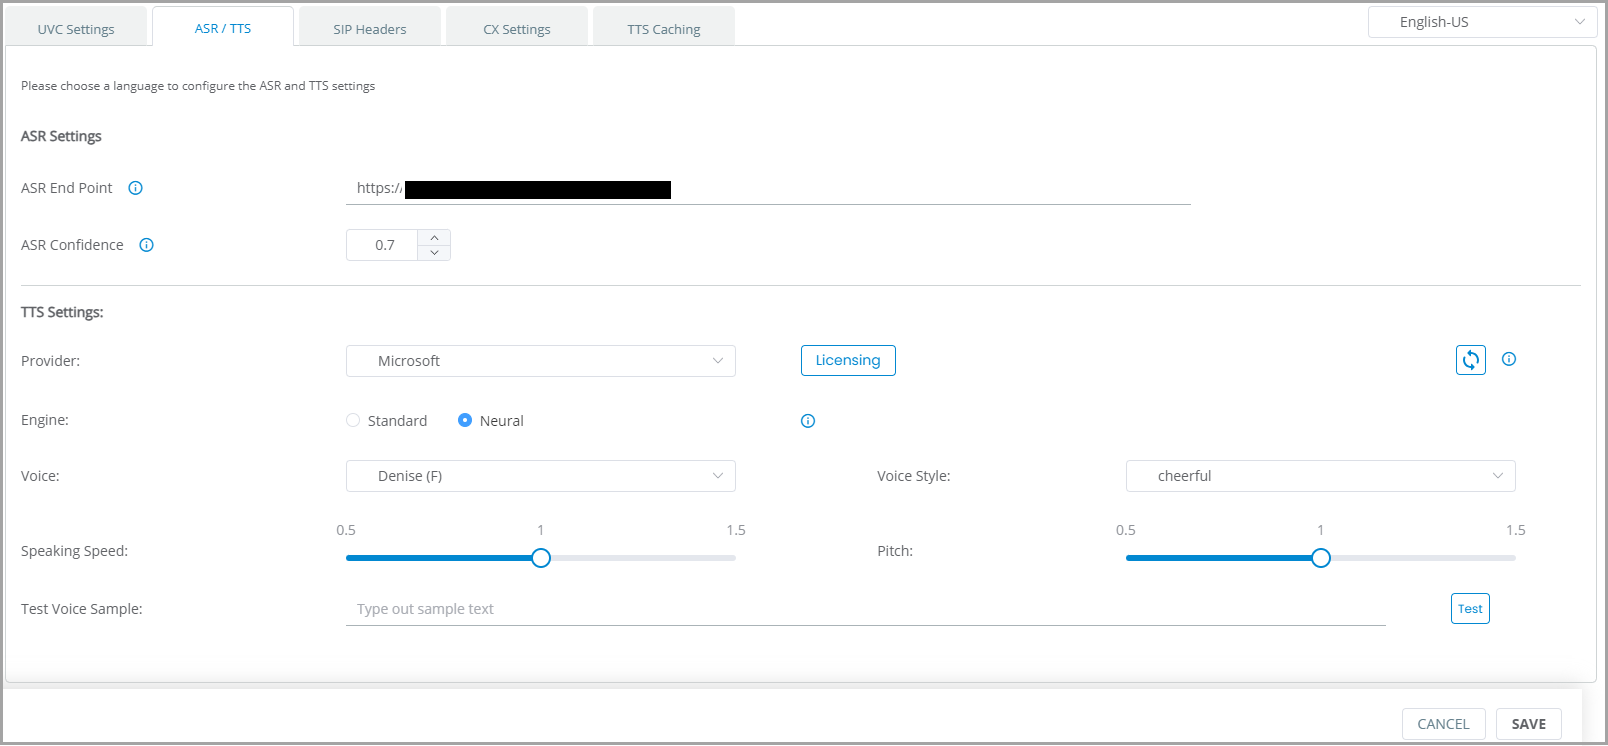
Select the language from the dropdown.
Go to ASR Settings. In ASR endpoint, enter the URL of the ASR.
Note
Reach out to U-Self Serve support team to obtain the ASR endpoint.
In ASR Confidence, add a value between 0 and 1. The recommended value is 0.7. If the ASR send incorrect transcripts then the ASR Confidence value can be modified.
Caution
Do not modify the ASR confidence value without confirming with support team.
Go to TTS Settings section. In Provider, select a TTS provider from the drop down. Currently supports Microsoft and Amazon.
Note
To learn more about obtaining Amazon Polly License, click here.
When you select one of the below mentioned languages, the Select Dialect drop down appears where you can select the dialect of the language.
Caution
If the Dialect field appears with no value, enable the Dialect feature flag for the tenant. Ensure Dialect feature flag is enabled for all new tenants.
Note
Dialect selection is applicable for the languages—Arabic-SA, French-FR, Spanish-US, Spanish-ES and English (any dialect).
Click Licensing button to add the TTS License details for the selected provider. Once you click the Licensing button, a popup screen opens where you can add the following details:
In Name, enter the License Name.
In Licensing Key, enter the key given for your provider.
In Secret Key, enter the Secret key available for the License.
In Licensing Region, enter the region. Example: US-East.
Note
For exact region details, refer to TTS Provider documentation.
In Min Connections, add the minimum number of connections that are required for the license.
In Max Connections, add the maximum number of connections available for the license.
Click Save. Once saved click ADD button to add additional license details.
Click Delete icon to delete a license information.
Caution
Once saved, you cannot delete all license details. At least one license information is required.
In Engine, select Standard or Neural.
Note
Amazon does not support Pitch when Neural engine is selected.
In Voice, select the voice of your choice from the drop down.
In Voice Style, select the voice style of your choice from the drop down.
In Speaking Speed bar, adjust the speaking speed for the voice as per your requirement.
In Pitch bar, adjust the Pitch of the voice as per your requirement.
To test the output of your selection, enter a sample text in Test Voice Sample and click Test button.
Click Save. The ASR/TTS settings will be configured.
Ensure the given below mandatory steps are followed, before selecting AWS as the TTS engine.
Raise a ticket to Cloud ops to create an IAM role with the following Permission Policies:
AmazonPollyFullAccess
AmazonPollyReadOnlyAccess
Obtain the Access key ID (Licensing Key), Secret access key (Secret Key) and Region details (Licensing Region).
Map SIP Header Data to Session Variable
The UVC connection is established by passing the SIP header data from the telephony to the UVC. The SIP header data is broadly categorized into default and configurable SIP header and they are mapped as follows:
Default SIP header to out-of-the-box Session Variable
Configurable SIP header to Session Variable.
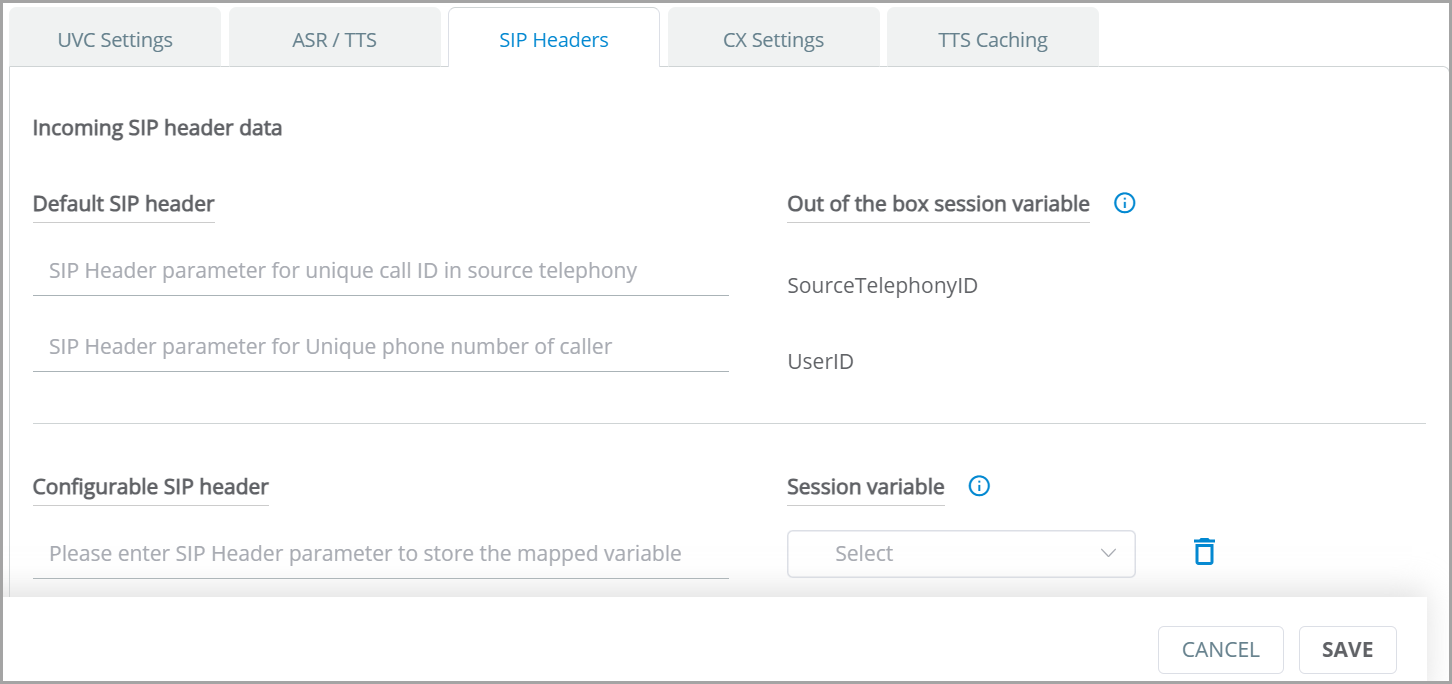
Default SIP header: The SIP Header data named SourceTelephonyID and UserID should be passed in every incoming call. These Two data points are mapped to out-of-the-box Session Variables which is built-in in the application. As each telephony has different header names for these data, you can map the name used by the source telephony to the respective out-of-the-box Session Variable.
SourceTelephonyID refers to the unique call id available in every incoming call. The name used by the telephony system in SIP header to address the call id should be entered to map to the SourceTelephonyID.
UserID refers to the caller's phone number. The name used by the telephony in SIP header to address the caller's phone number should be entered to map to the UserID.
Example: In Twilio, the unique call id of an incoming call and the caller's phone number are labeled as X-Twilio-Call SID and Phone Number respectively in SIP header, therefore in SourceTelephonyID, enter X-Twilio-Call SID and in UserID, enter Phone Number.
Note
The SIP header names must be the prefixed with X-.
Configurable SIP header: Any additional meta data passed in the SIP header of the incoming call along with the default header data are categorized as Configurable SIP header. Enter the additional meta data name and map it to a relevant Session Variable. If an appropriate Session Variable is not available then create a Session Variable in the X-Console and then map the same.
Configure CX Settings
In CX Settings tab, you can configure customer experience related parameters.
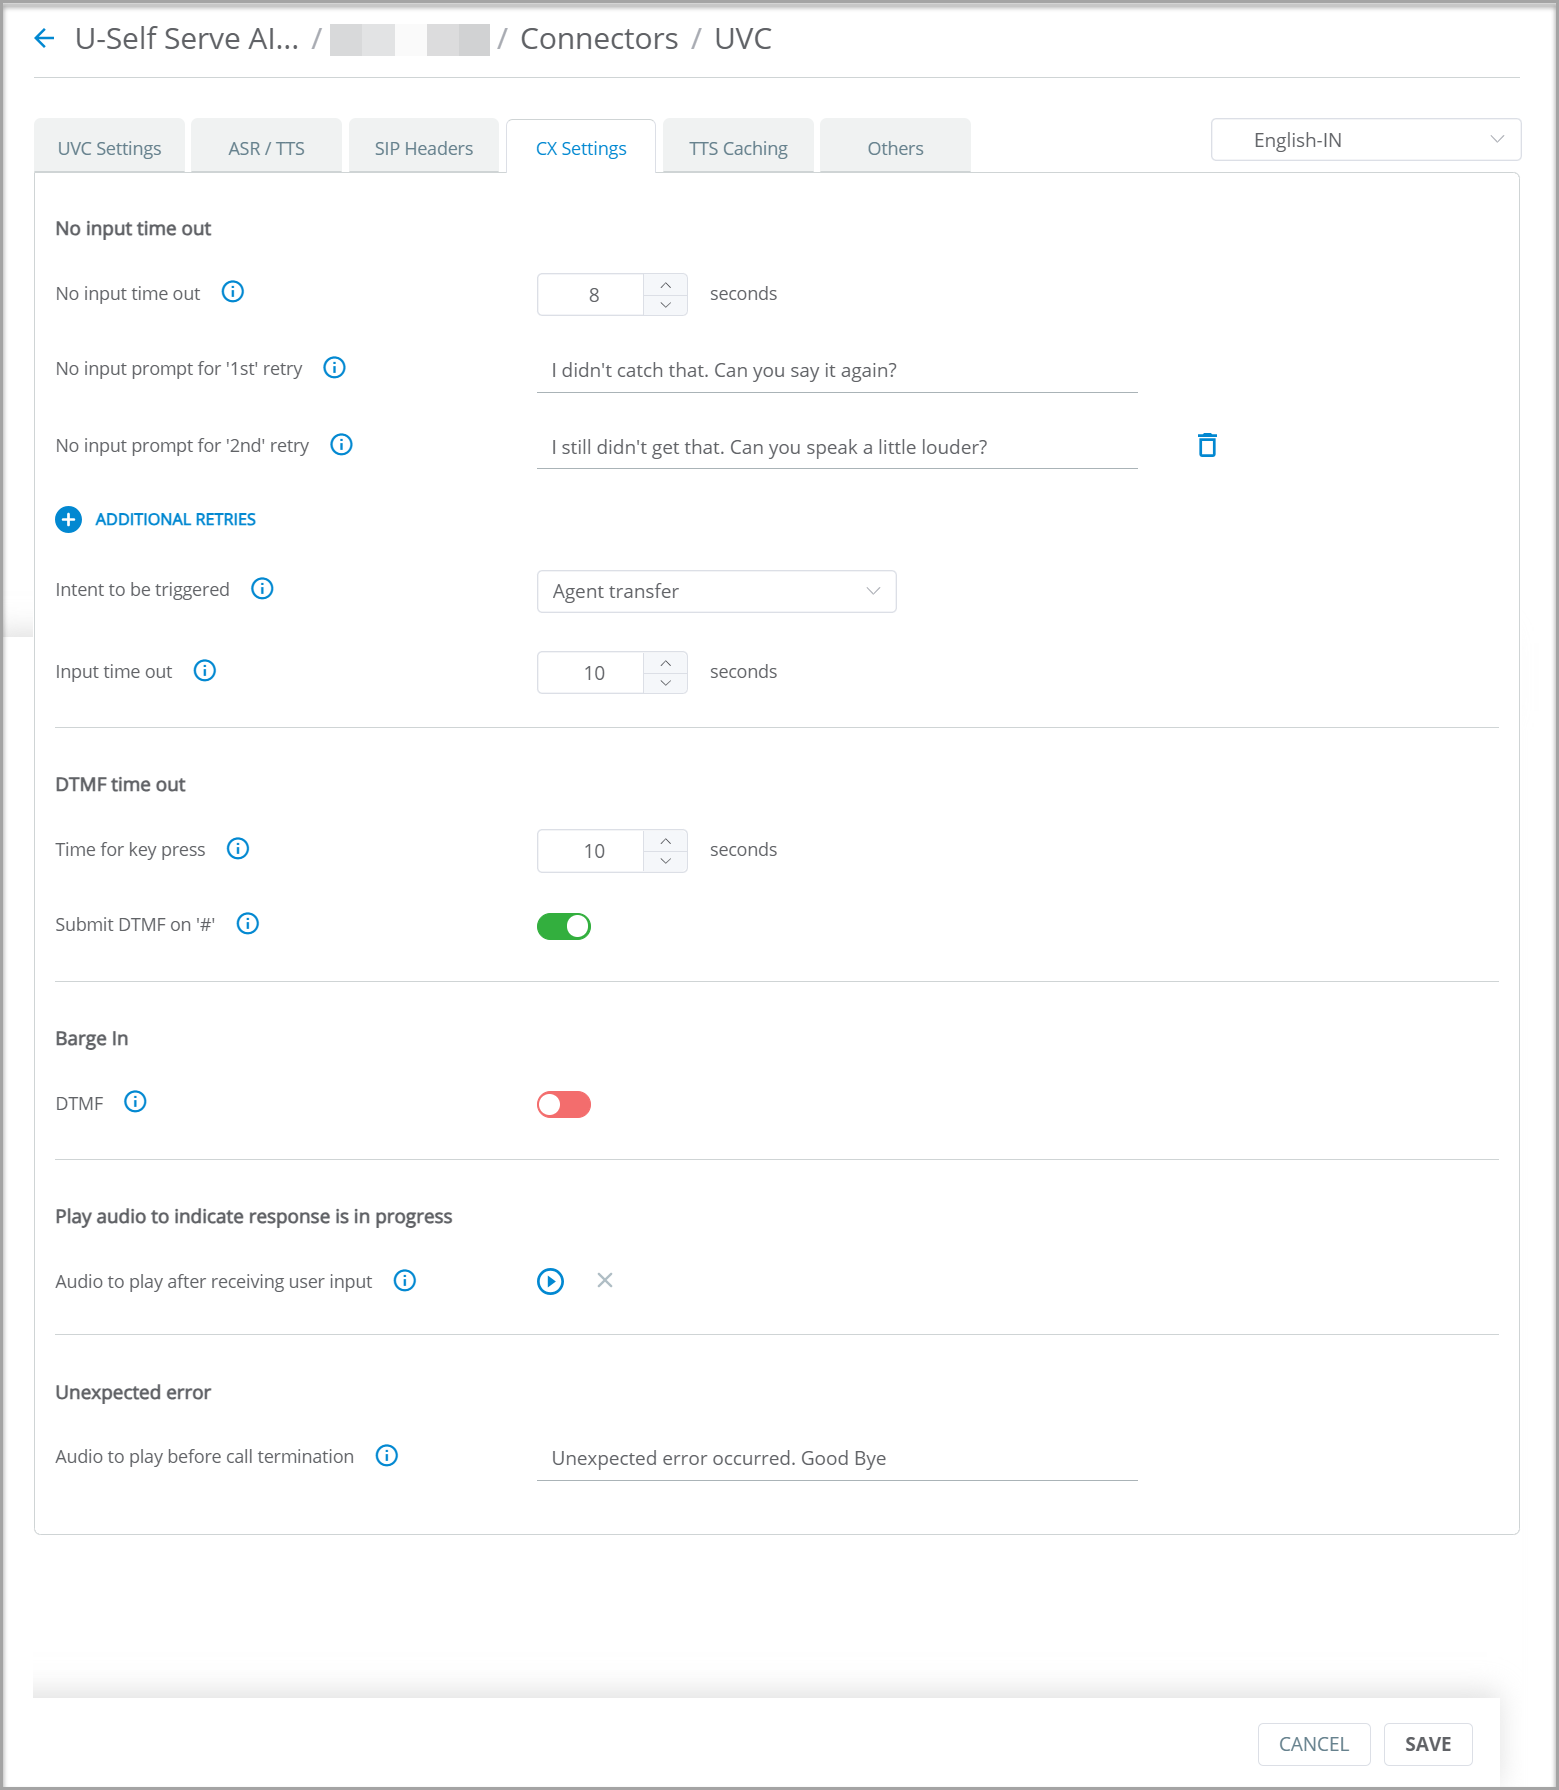
In No Input Time Out, specify the number of seconds the VA needs to wait before playing the no input prompt.
In No input Prompt for '1st' retry, enter the first message to be played if the user does not respond.
Click + ADDITIONAL RETRIES to add prompt messages for the subsequent retries. Up to 10 prompt messages can be added.
In Intent to be triggered, select the Intent to be triggered after prompting all no input retry messages.
The flow will continue based on the selected Intent. For example, if Agent Transfer Intent is selected, then after all no input retry messages, the conversation will be transferred to the Live Agent.
In Input Time out, specify the number of seconds the user can speak as a response to the VA's query.
From DTMF Time Out section, you can use Time for key press to specify the number of seconds the VA needs to wait between two key presses of DTMF.
From DTMF Time Out section, you can toggle Submit DTMF on # to manage DTMF input processing.
When the user responds to a Slot question by entering one or more digits from the DTMF keypad and
If Submit DTMF on # is enabled and
If the user presses pound key (#), then it is considered as end of user input and the BOT starts processing the data. The number of digits defined in slot resolver is ignored.
If the user does not press pound key (#) then UVC will start processing the user input immediately after the expected number of digits for the slot resolver is entered.
If the user does not press pound key (#) and number of digits for the Slot value is not available then all digits entered by the user will be processed after the time configured in DTMF time out.
If Submit DTMF on # is disabled and
If the number of digits expected for the Slot is available, then user input is processed after expected number of digits are entered.
If the number of digits expected for the Slot is not available, then the user input is processed after DTMF time out.
If the user presses # key, it will be treated as a digit and will be sent for processing after the time configured for DTMF time out.
Toggle DTMF from Barge-In section.
If DTMF is enabled, then the user can barge in VA's response and enter data. Once the user enters the data, the VA stops the response and start processing the user input.
If DTMF is disabled, then the user cannot interrupt when the VA is responding.
Note
Barge-In section can be enabled or disabled through feature flag.
In Audio to play after receiving user input, you can upload the audio to be played when the VA is processing the user input. Example: Typing sound. Click Upload Audio button to add the audio file.
In Audio to play before Call termination, enter the message to be played when an error is encountered during a call. This message is played before terminating the call.
Click SAVE button the save the changes made.
Add Phrases for TTS Caching
The list of frequently used TTS responses (with no slots or dynamic values) are configured in design flow, which can be cached for cost optimization.
Copy the TTS responses configured in the design flow and add in TTS Caching page.
Language Identification and Selection
For all calls processed through the UVC connector, U-Self Serve can detect if the user switches to a different language other than the original language in which the call has started. The VA prompts the user to select a language, based on which the language of the call can be changed and the same call is being continued.
When Language change is detected, a specific flow is triggered which can be configured in the UVC settings page in the Others tab.
Let's say, a call starts in English and the user speaks in English. After few turns the caller speaks in Arabic then the application prompts that the user is speaking in a different language and asks if they would like to switch the conversation to one of the identified languages. The user is asked to pronounce the name of the language in which they wish to continue the call. Based on language mentioned by the user, the conversation will be switched to the selected language.
Note
Currently, this feature supports English, Arabic and Hindi languages.
User should speak for at least 5 seconds so that the VA can identify the language.
The language identification functionality can be configured through UVC UI.
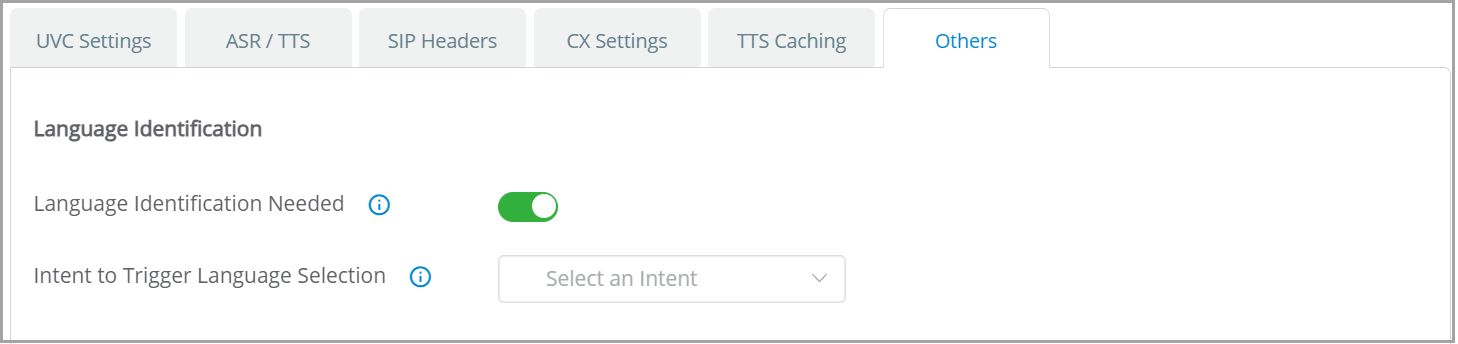
In UVC page, go to Others tab.
Language Identification Needed can be enabled or disabled using the toggle switch.
By enabling Language Identification Needed, the UVC allows to detect the language spoken by the end user and to switch between languages in the same call.
When Language Identification Needed is disabled, the UVC stops detecting the end user's language and does not allow to switch to other language in the same call. In such cases Language selection need to be configured manually.
When Language Identification Needed is enabled, the Intent to Trigger Language Selection field appears.
In Intent to Trigger Language Selection, select the Intent to be triggered to prompt the language selection question.
Voice Streaming using UVC
When a call is passed through UVC, the user’s voice input is streamed to an end point in X-Platform. Any application of choice can be deployed at the end point to process the voice stream for other actions such as voice authentication service. The voice authentication service is outside the scope of U-Self Serve whereas any third party service can be integrated.
UVC will have 2 streaming API calls. Start API to start the streaming of audio to the Voice streaming end point and Stop API to stop the streaming once authentication is completed.
The flow admin can use these API's at any point in the flow. An Integration point will be used to call these API's.
Ensure the Start Streaming API, Stop Streaming API and are added in the Integration Points in X-Console.
From X-Designer, select the Flow where Authentication flow is required.
In the Flow, add an Integration Point element to call the Start API.
Create a Response element to prompt user to provide Voice Input to Authenticate the user's voice.
Add an Integration Point element to call an API to validate the user input.
Add a Decision Point to validate whether the voice is authenticated or not.
Loop back to retry if the voice is not authenticated.
Add an Integration Point element to call the Stop API.