Operational Reports
Operational Reports include Analysis of Call Attributes (Call Duration, Call Hold), Distribution and Correlation, Detailed Analysis at Call-level (Listening, Transcription, Key Phrases), Agent Analysis and Customer Analysis.
Call / Speech Attributes
System displays the Call Attributes reports for the specific category. These reports include Call Attributes Metrics, Call Distribution across Duration Slabs, Call Duration / Call Hold Duration Trend, Call Hold across Duration Slabs, Call Duration / Call Hold Duration Correlation with Metadata (Top) and Call Duration / Call Hold Duration Correlation with Metadata (Bottom).
Select Operational > Call / Speech Attributes. The Call Attributes Reports are displayed.
By default, the number of contacts for the selected date period for which the reports are displayed is indicated.
Select the Period (Week, 2 Weeks, Month, Custom Range) from the Calendar.
Select the From date and To date in which the report is to be generated in the respective fields.
Note
System allows BA to select maximum of 1 year date range and allows user to select for previous 2 years.
Select Contact Type - Voice, Chat or Email from the drop-down list. The values selected for Contact Type are remembered by the system during the session in the Reports module when logged in. Selection of single or multiple contact types are allowed while filtering. By default, the Contact Type is displayed as All Contacts.
Click Filter button to select any of the options including Business Rule, Score, Call Attributes or Metadata. This filter is not mandatory.
Click Apply button to save the change in Filter.
Click Download (
 ) icon to download the chart in .png format.
Click Favorite (
 ) to mark the chart as Favorite.
Note
Call Duration and Call Hold Duration are displayed in HH:MM:SS.
Chart | Chart Title | Example |
|---|---|---|
Call / Hold Duration Averages | Call / Hold Duration Averages | |
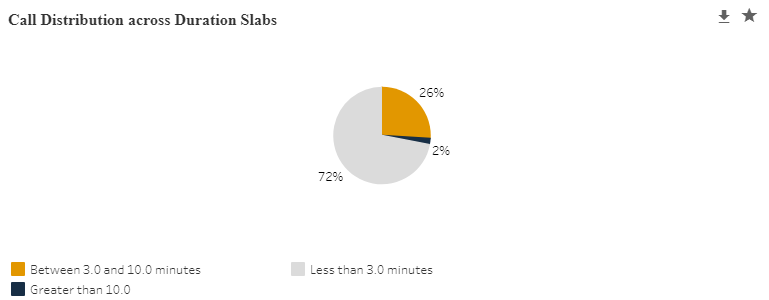
| Call Distribution across Duration Slabs | Call Distribution across Duration Slabs |
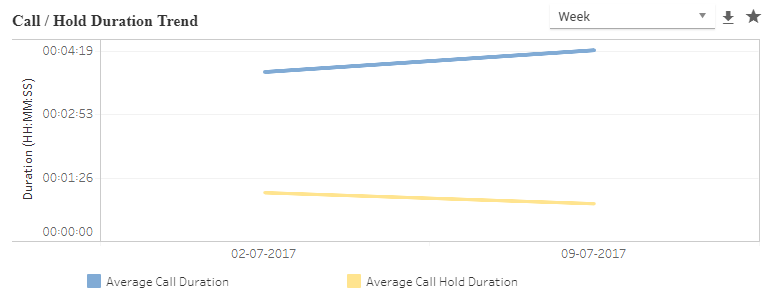
| Call / Hold Duration Trend | Call / Hold Duration Trend |
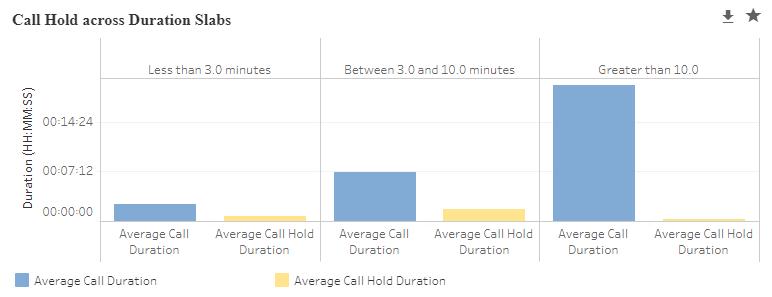
| Call Hold across Duration Slabs | Call Hold across Duration Slabs |
| Top: Call / Hold Duration - <Metadata> | Top: Call / Hold Duration – Loan Type |
| Bottom: Call / Hold Duration - <Metadata> | Bottom: Call / Hold Duration - Loan Type |


Call / Speech Attributes
Important
From version 2024.1.1 onwards the Call/Speech Attributes Reports are available only for users using U-Analyze On-prem/Ansible deployments and is not available for U-Analyze X on cloud deployments.
System displays the Call Attributes reports for the specific category. These reports include Call Attributes Metrics, Call Distribution across Duration Slabs, Call Duration / Call Hold Duration Trend, Call Hold across Duration Slabs, Call Duration / Call Hold Duration Correlation with Metadata (Top) and Call Duration / Call Hold Duration Correlation with Metadata (Bottom).
Select Operational > Call / Speech Attributes. The Call Attributes Reports are displayed.
By default, the number of contacts for the selected date period for which the reports are displayed is indicated.
Select the Period (Week, 2 Weeks, Month, Custom Range) from the Calendar.
Select the From date and To date in which the report is to be generated in the respective fields.
Note
System allows BA to select maximum of 1 year date range and allows user to select for previous 2 years.
Select Contact Type - Voice, Chat or Email from the drop-down list. The values selected for Contact Type are remembered by the system during the session in the Reports module when I am logged in. Selection of single or multiple contact types are allowed while filtering. By default, the Contact Type are displayed as All Contacts.
Click Filter button to select any of the options including Business Rule, Score, Call Attributes or Metadata. This filter is not mandatory.
Click Apply button to save the change in Filter.
Click Download (
) icon to download the chart in PNG format.Click Favorite (
) to mark the chart as Favorite.Note
Call Duration and Call Hold Duration are displayed in HH:MM:SS.
Chart | Chart Title | Example |
|---|---|---|
Call / Hold Duration Averages | Call / Hold Duration Averages | |
| Call Distribution across Duration Slabs | Call Distribution across Duration Slabs |
| Call / Hold Duration Trend | Call / Hold Duration Trend |
| Call Hold across Duration Slabs | Call Hold across Duration Slabs |
| Top: Call / Hold Duration - <Metadata> | Top: Call / Hold Duration – Loan Type |
| Bottom: Call / Hold Duration - <Metadata> | Bottom: Call / Hold Duration - Loan Type |
Contact Analysis
Analyst can drill down from individual reports to the individual contact level to view the details of a Call, Chat, Email or to further drill down into the contact level transcript and key words used within the calls through the Contact Analysis report. Analyst can view the list of calls, chats and emails with highest/lowest Scores, Call Duration, Call Hold Duration and Call Hold Count.
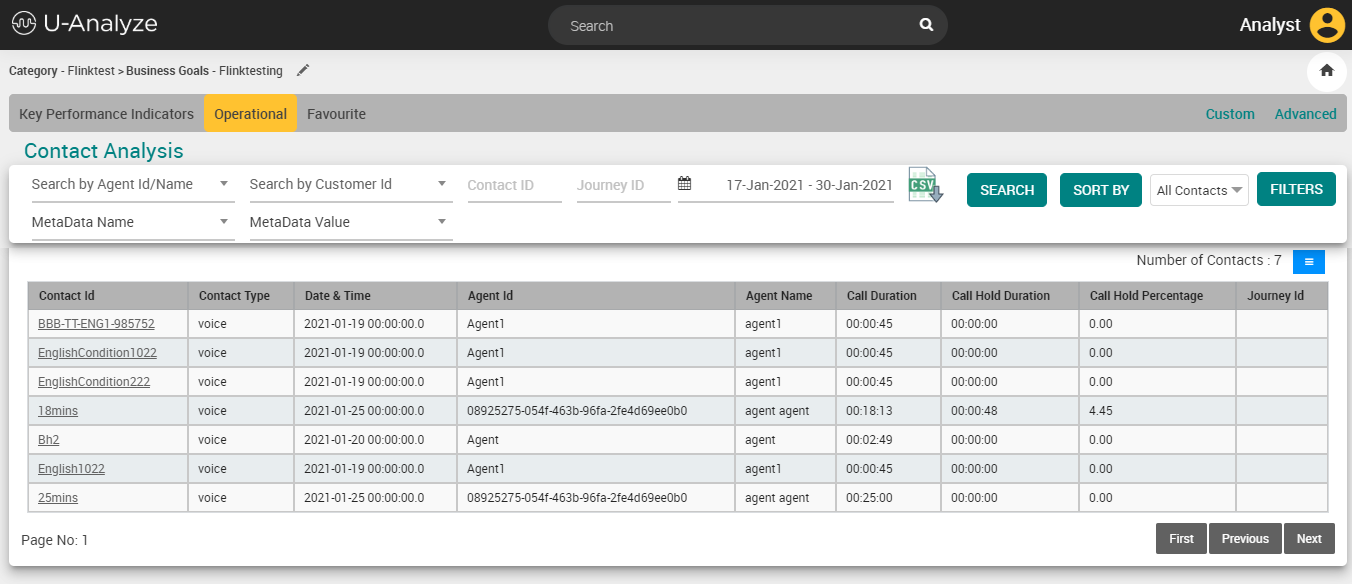
Select Operational > Contact Analysis. A list of calls with details are available as shown below.
Enter any one of the below values in Search field to search the specific interaction detail.
Agent ID/Name – Search the list by Agent ID/Name.
Customer ID – Search the list by Customer ID.
Contact ID - Search the list by Voice ID, Chat ID or Email ID.
Journey ID - Search the list by specific ID which links Voice, Chats and Emails.
Metadata – Search the list by Metadata name and Metadata value.
Select the Period (Week, 2 Weeks, Month, Custom Range) from the Calendar.
Select the From date and To date in which the report is to be generated in the respective fields. Click Search button to get the interaction details for analysis.
Note
System allows BA to select maximum of 1 year date range and allows user to select for previous 2 years.
Click Download CSV icon to download interaction details in csv file which is an add-on functionality enabled through License attributes and is not available by default in the product. System saves the CSV file as Contact-wise Report_<Organization Name>_<Category Name>_<StartDate>_<EndDate>.
Start Date and End Date are in YYYY/MM/DD format.
Note
System allows to download maximum of 5 lakhs records in CSV file. If the search exceeds 5 lakh records, an error message is displayed as “The specified search criteria exceeds the maximum limit of records to be downloaded. Please narrow your search criteria.”
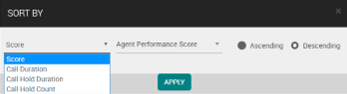
Click Sort By button to sort the contact list based on the selection of any of the score, call duration, call hold duration or call hold count. List of Scores across all Business Goals are available for sorting.
Select Contact Type - Voice, Chat or Email from the drop-down list. The values selected for Contact Type is remembered by the system during the session in the Reports module when logged in. Selection of single or multiple contact types are lowed while filtering. By default, the Contact Type is displayed as All Contacts.
Click Filter button to select any of the options including Business Rule, Score, Call Attributes or Metadata to filter the interaction details. This filter is not mandatory.
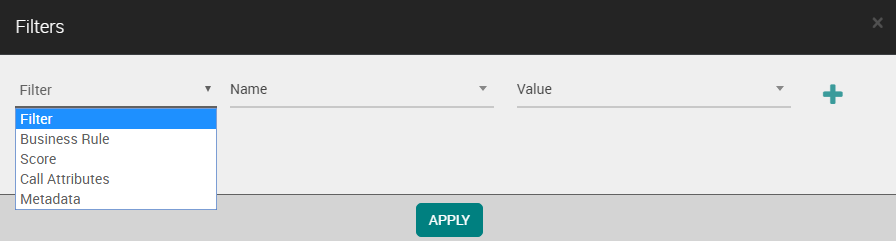
Click Apply button to save the changes in filter.
Click Column Settings (
 ) icon to select specific score values and metadata to be displayed for analysis of the list of calls. Analyst can change the order of preference to view the score values and metadata in the columns. The selected preference order is remembered by the system when Analyst logs in next time.
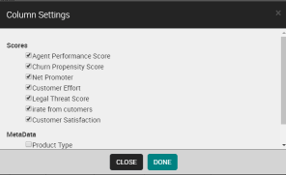
In the Number of Contacts field, system displays the number of contacts available after applying the filters. When Analyst navigates directly to the screen, system displays the default number of contacts based on the date filter. When Analyst navigates from a specific chart, the number of contacts are displayed as per the filters applied on that chart.
Note
System displays a maximum of 250 sample set of contacts matching with the filter criteria.
Select Next button to navigate to the next 10 interaction details and previous button to navigate to the previous 10 interaction details and click number to navigate to the particular number page.
Note
Call Duration and Call Hold Duration are displayed in HH:MM:SS.
By default, when Analyst navigates to this screen, list of contacts are displayed for the last date range selected.
Interaction details are displayed in descending order of date.
By default, 10 records are displayed.
When Analyst clicks on a meter gauge, pie or a bar or a trend value of a chart, system navigates to Contact Analysis screen, applies the filters and displays the list of contacts.
Number of filters applied is displayed to indicate to the Analyst.
Filters are applied as long as the Clear All Filter is done.
If the Analyst navigates to another tab and drills down to a contact, then the new set of filters are applied on the Contact Analysis.
Interaction Details
In the Interaction Details screen Scores, Business Rules/Alerts, Keyphrases and Metadata are displayed. For an interaction, the scores are mapped to the business rules/alerts and the selected business rules are mapped to the keyphrases. The corresponding metadata information which has been imported into the application is also displayed for an interaction.
There are three different ways an interaction can occur:
Voice
Chat
Email
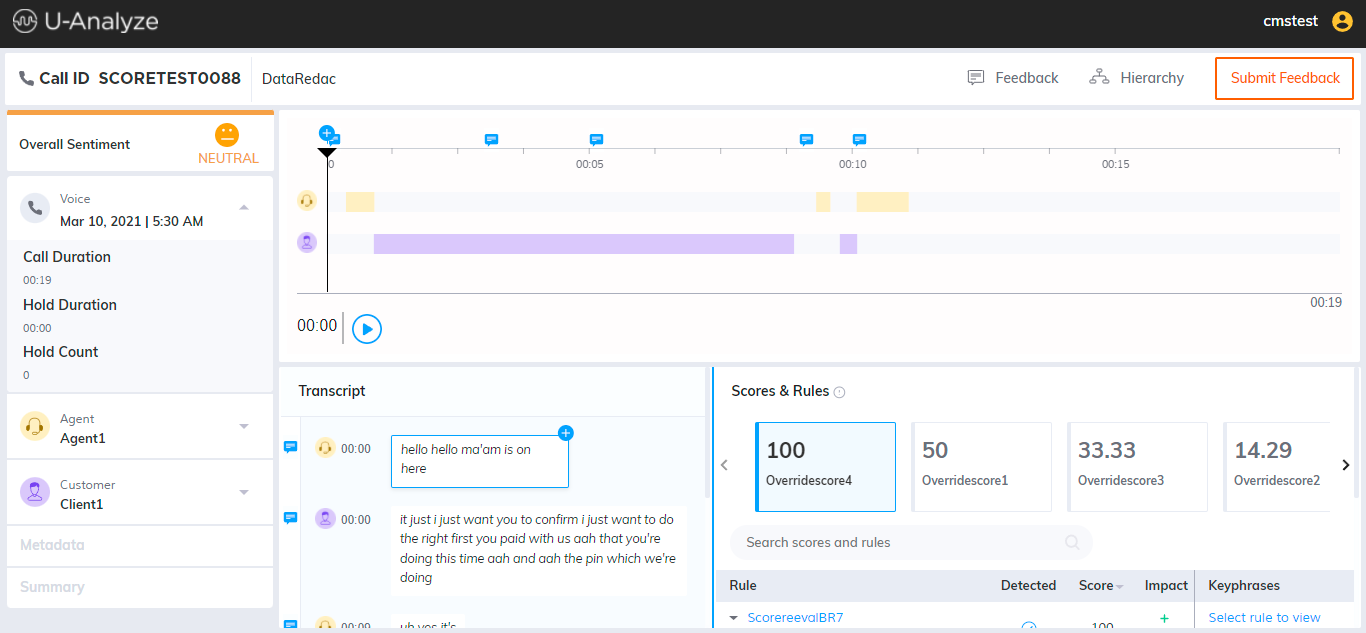
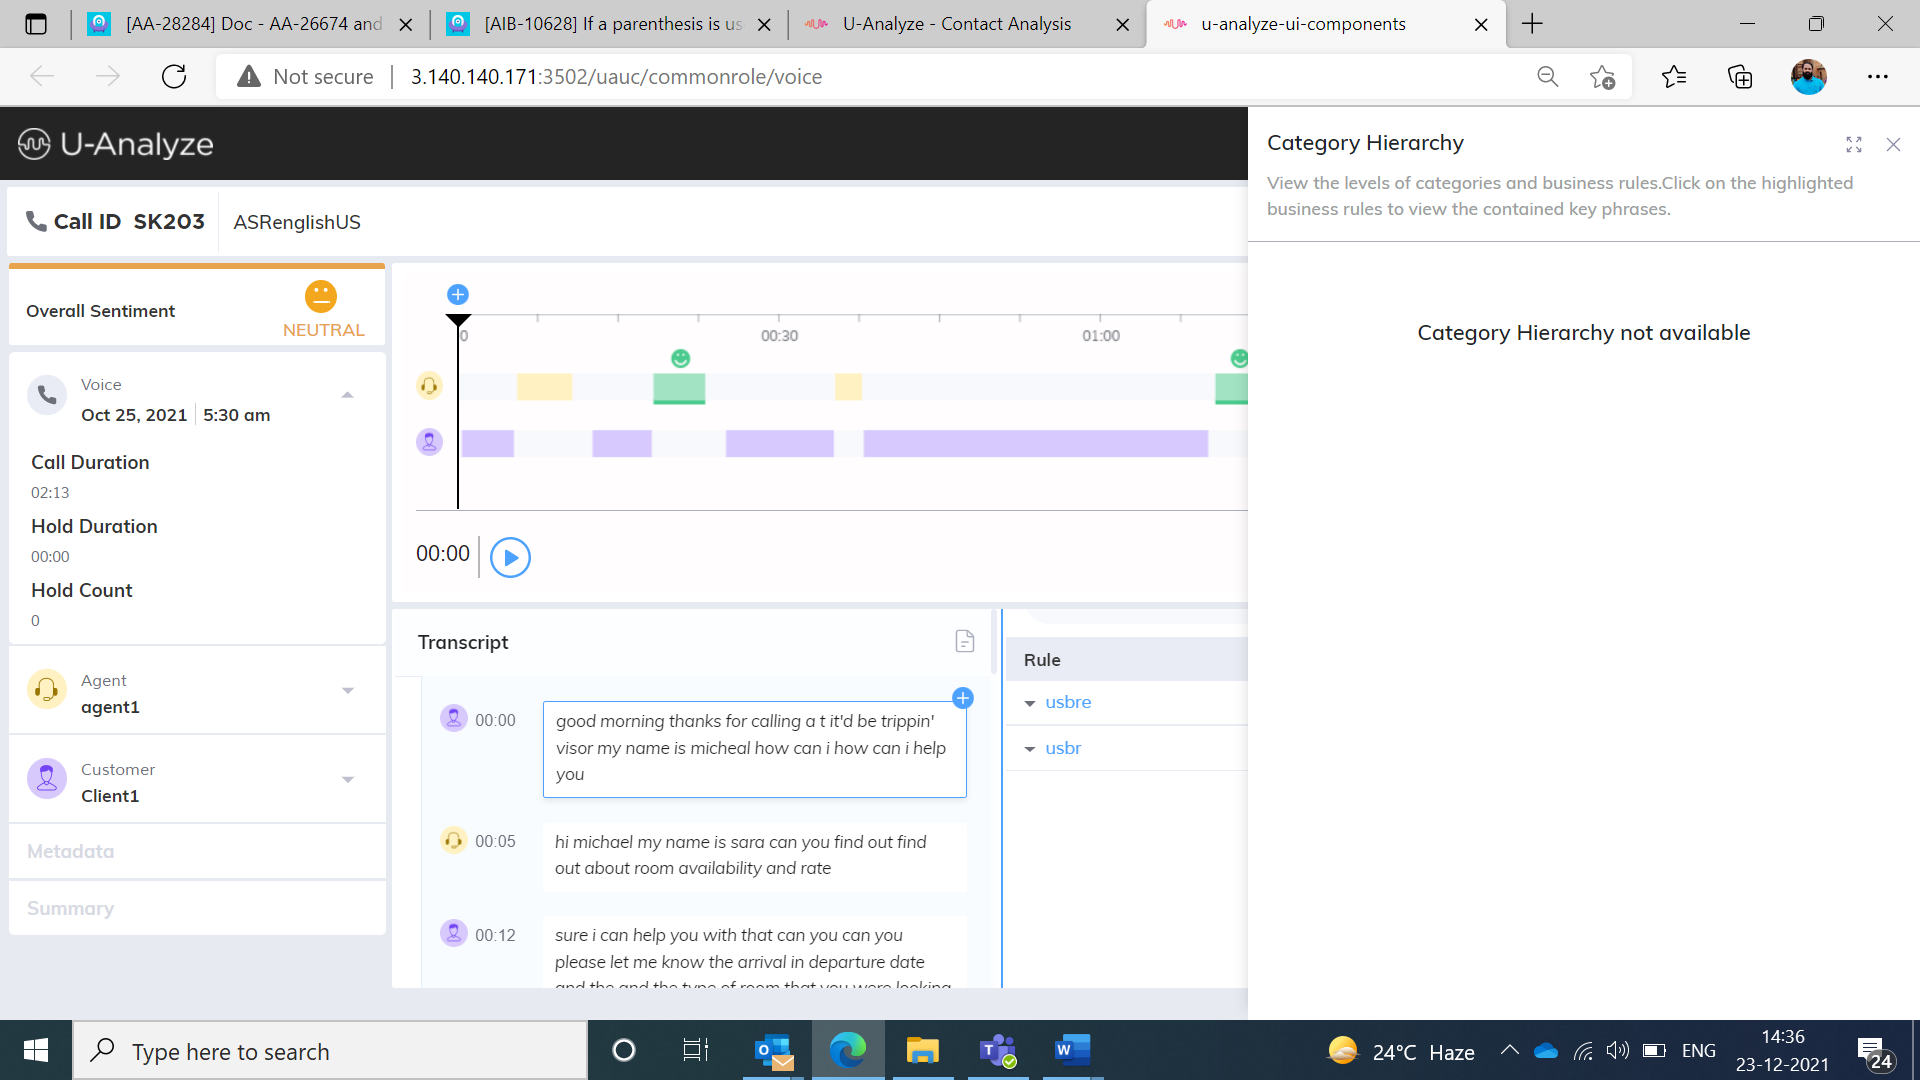
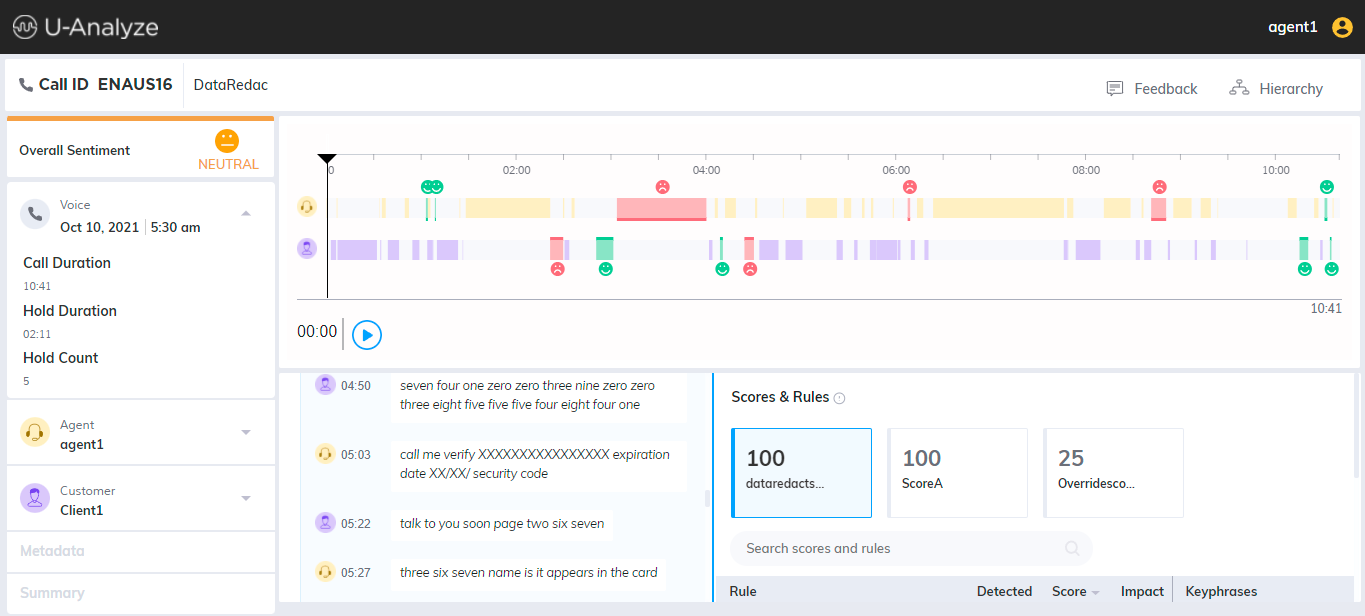
Voice Interaction
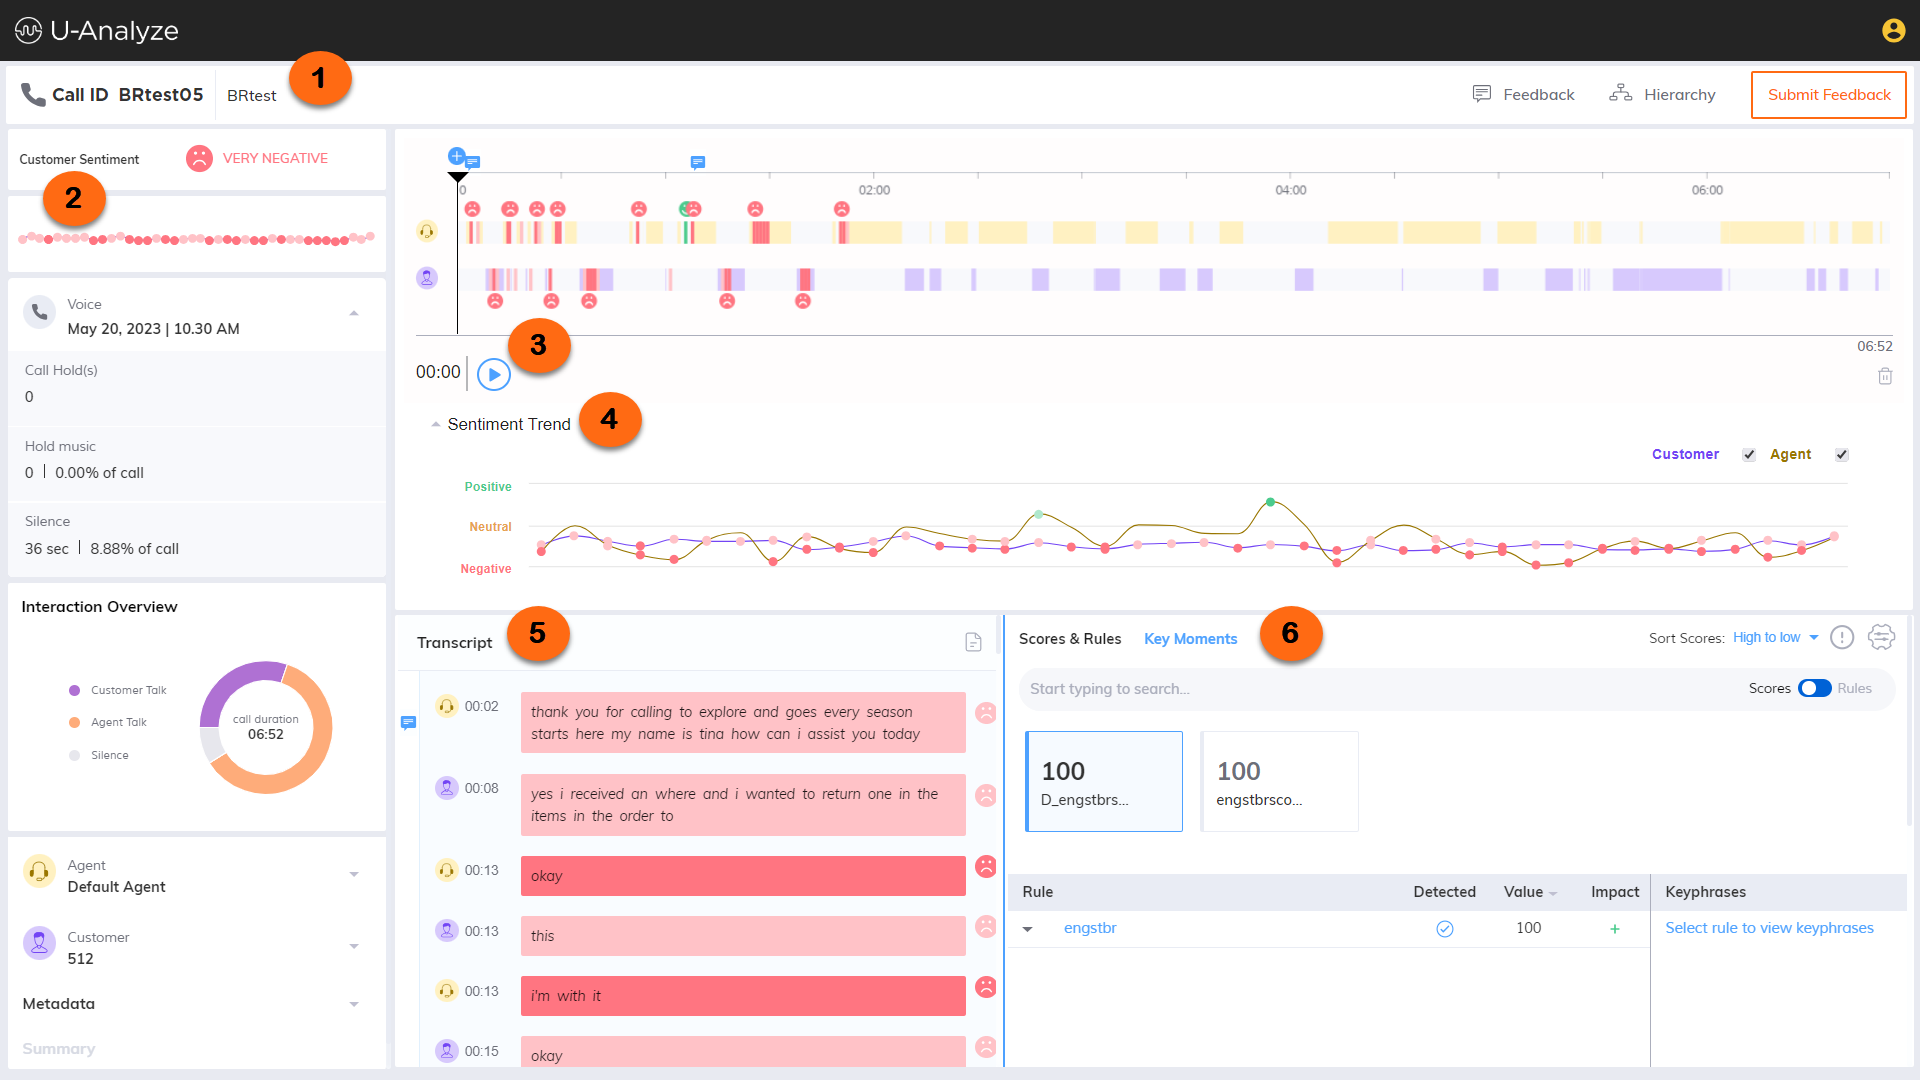
In the Contact Analysis screen, click the contact id to get the interaction details with Scores, Business Rules/Alerts, Keyphrases and Metadata. These details open in a new tab.
Item | Description |
|---|---|
1 | Header panel |
2 | Left panel |
3 | Audio Player panel |
4 | Sentiment Trend panel NoteThe sentiment trend panel is available only for organizations who have opted for the Tonal Sentiment Analysis feature. |
5 | Transcript panel |
6 | Scores and Rules/Key Moments panel |
Header Panel
 |
Item | Display | Description |
|---|---|---|
1 | Call ID | Unique Interaction ID for the Call. |
2 | Category | The name of the category under which the interaction was processed. |
3 | Feedback | Users who were given the privilege to Feedback can provide the feedback. The comments which are provided by the user are also displayed along with the timestamp. Refer to the section Add and View Feedback. |
4 | Hierarchy | The resultant Category Hierarchy is displayed at a call level for the Business Rules which are evaluated to True. Refer to the section View Category Hierarchy. |
5 | Submit Feedback | Allows you to submit the feedback to Agent. |
Left Panel
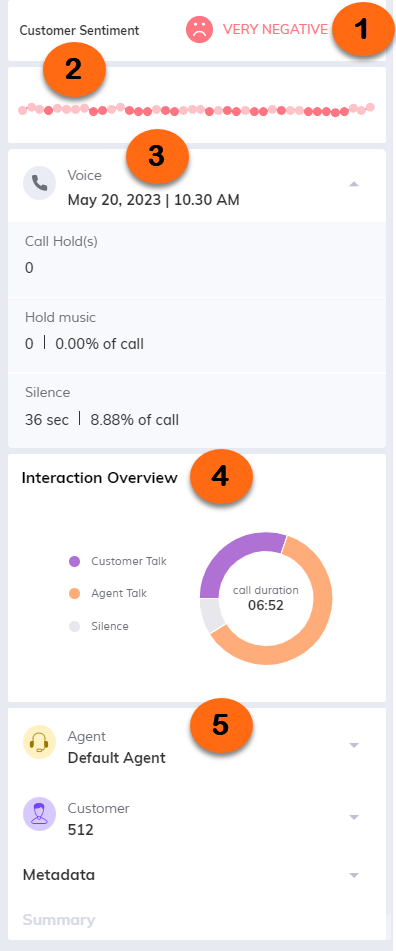
Customer’s sentiment throughout a conversation. Overall sentiment analyzed in the customer’s conversation are shown as different colored emojis as mentioned below:
Dark Green – Very Positive
Light Green – Less Positive
Dark Red – Very Negative
Light Red – Less Negative
Amber – Neutral
The customer sentiment is displayed as a plotted colored graph as mentioned below. On hovering over the colored dots on the graph the sentiment name pops out.
Dark Green – Very Positive
Light Green – Less Positive
Dark Red – Very Negative
Light Red – Less Negative
Neutral is not shown.
The voice contact details that follow are shown here:
Date (MMM DD, YYYY format) and time (HH:MM format)
Call Hold duration
Hold Music duration
Silence duration
The interaction overview donut chart displays a donut chart depicting the duration summary of the interaction between the customer and the agent. The donut consists of the parameters that follow:
Customer Talk
Agent Talk
Talkover
Music Talkover
Hold Music
Silence
The interaction details that follow are shown here:
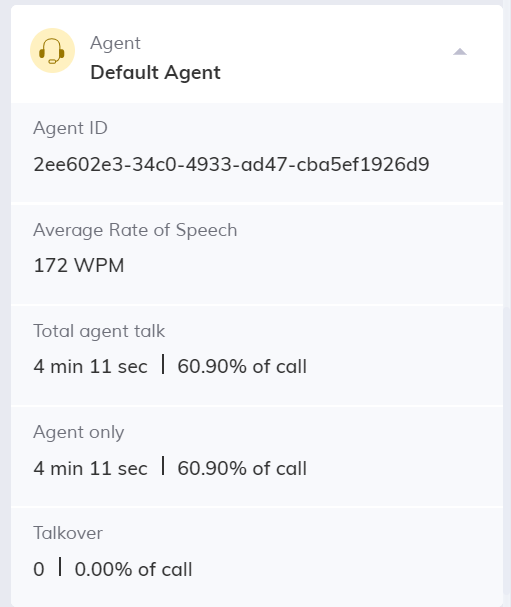
Agent:
The agent's name, agent ID, average rate of speech, total agent talk time (duration and percentage), agent only talk time (duration and percentage) and talkover (duration and percentage) are displayed here.
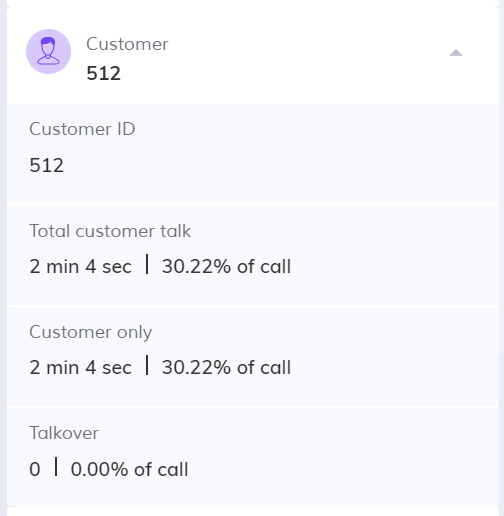
Customer:
The customer's name, customer ID, total customer talk time (duration and percentage), customer only talk time (duration and percentage) and talkover (duration and percentage) are displayed here.
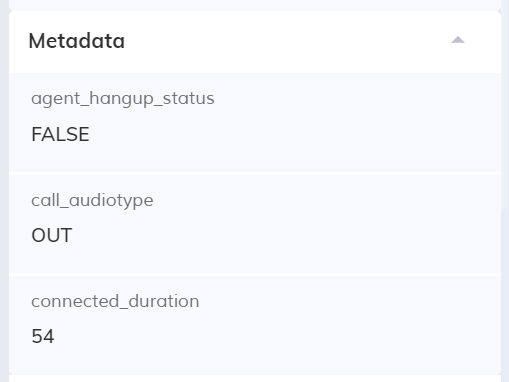
Metadata: All the Metadata types are shown in alphabetical order and the values associated with the call are also displayed. This section is disabled when the system does not process any Non-Speech Metadata.
Summary: Summarization of calls processed in batch mode are displayed to view and understand the call. This is only populated if the user is also using U-Assist After Call Work (ACW). Refer to View Contact Summary for details.
Audio Player Panel
Allows you to play, pause and replay the call.
Note
The Audio Player is not available for Chat and Email interaction types.
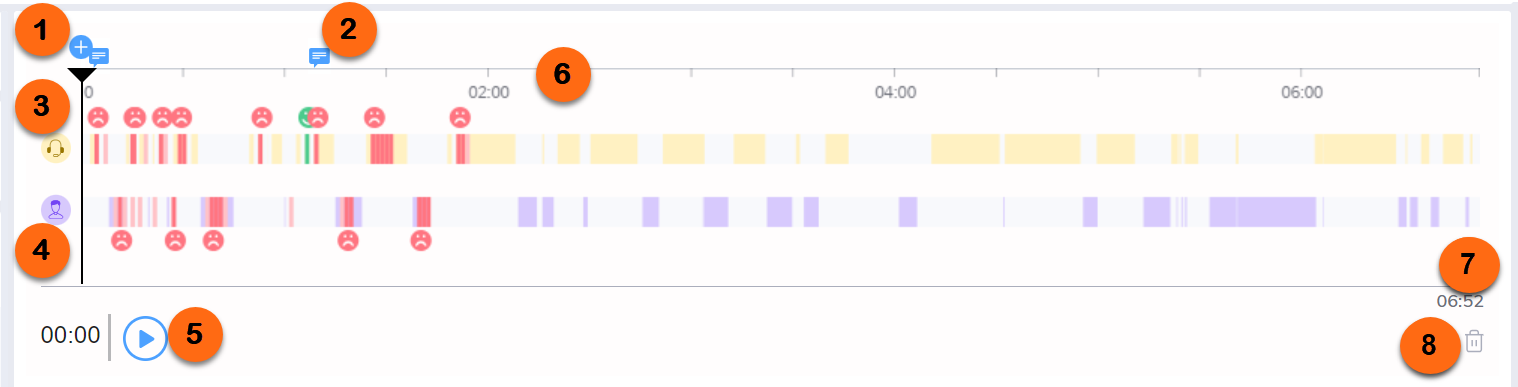
Item | Display | Description |
|---|---|---|
1 | Plus icon ( | Allows you to provide a comment in the specific time period. Refer to the section Add Comment. |
2 | Message icon ( | This message icon is displayed on the specific time in audio track, if any comments are provided. Refer to the section View comments. |
3 | Agent sentiment track | Displays the agent sentiment in the call as colored bands along with sentiment emojis as mentioned below. Clicking on the band or emoji highlights the associated transcript in the transcript panel.
|
4 | Customer sentiment track | Displays the customer sentiment in the call as colored bands along with sentiment emojis as mentioned below. Clicking on the band or emoji highlights the associated transcript in the transcript panel.
|
5 | Playback button | Click on the Playback button to play, pause or replay the call. |
6 | Timeline | Displays the timeline of the call. |
7 | Total call duration | Displays the total call duration of the contact. |
8 | Delete icon ( | Allows you to delete the audio file. Refer to the section Delete Audio File. |

Sentiment Trend Panel

Note
The sentiment trend feature is available only for organizations who have opted for the Tonal Sentiment Analysis feature.
The sentiment trend of agent and customer is displayed as a plotted graph. Users can select/deselect the agent and or customer check boxes to show/hide the respective plots in the graph. It helps to view the overall agent and customer trend in terms of positivity/negativity as a pictorial representation. This panel can be collapsed and expanded by clicking the downward/upward pointer. By default, it is collapsed.
The sentiment is classified as:
Dark Green – Very Positive
Light Green – Less Positive
Dark Red – Very Negative
Light Red – Less Negative
Neutral is not plotted on the graph
Transcript Panel
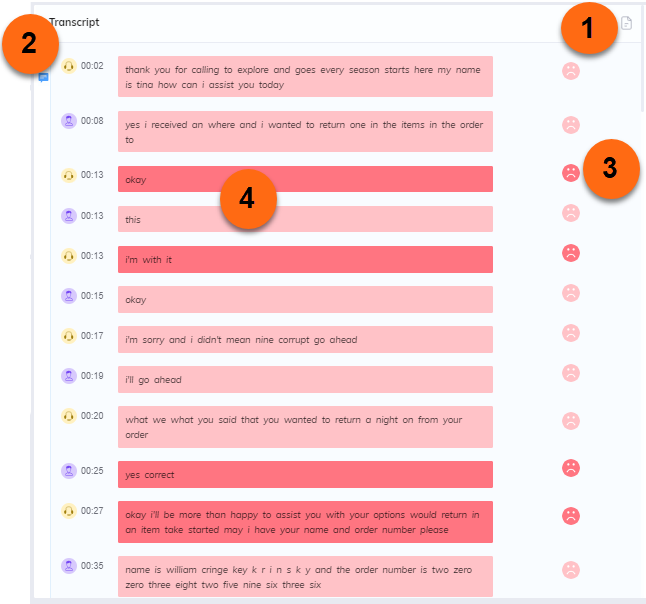

Users who were given the privilege to manual redaction, can review the transcripts, redact and save them manually. Refer to the section Manual Redaction.

This icon is displayed in the Transcript section on the specific time period if any comments are available. Refer to the section View Comments in Transcript.
Sentiment expressed and analyzed at every turn in agent and customer conversation are highlighted in different colors as mentioned below along with accessibility emojis.
Dark Green – Very Positive
Light Green – Less Positive
Dark Red – Very Negative
Light Red – Less Negative
Neutral is not shown.
Transcription is displayed along with that start timestamp for every speaker conversation for stereo calls and for mono calls which are diarized.
The plus Icon  allows to provide a comment in the specific time period. Refer to the section Add Comment in Voice Transcript.

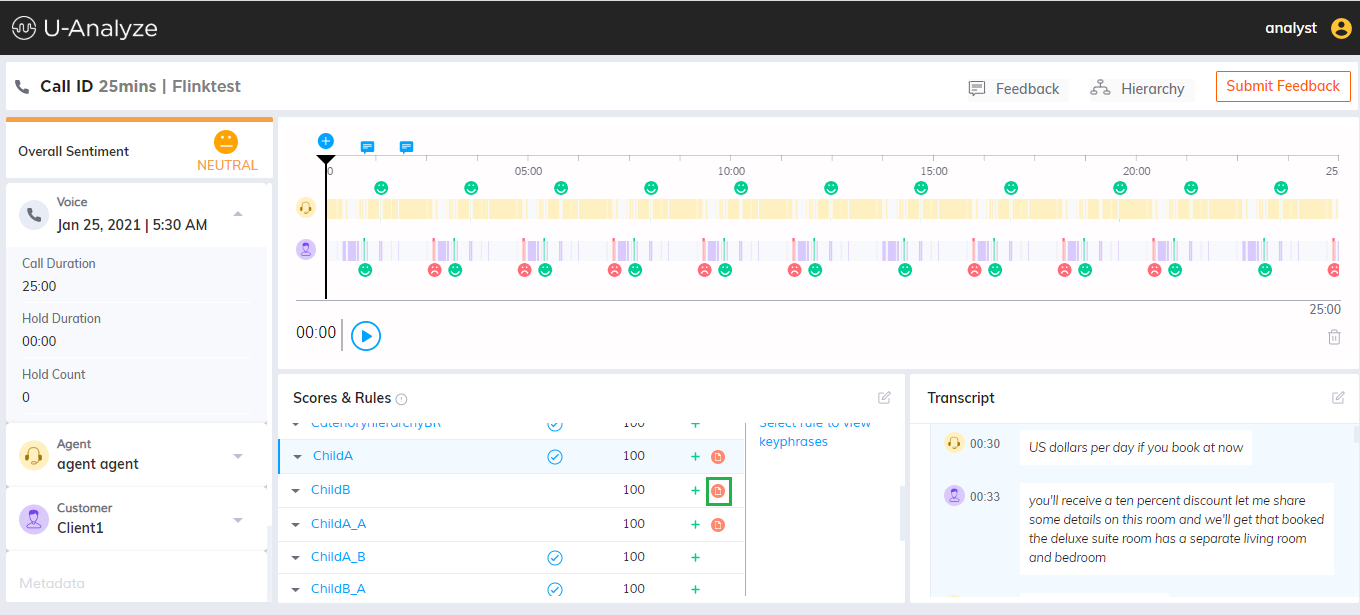
Scores and Rules/Key Moments Panel
Either Scores and Rules or Key Moments can be viewed by selecting the respective tabs.
Scores and Rules
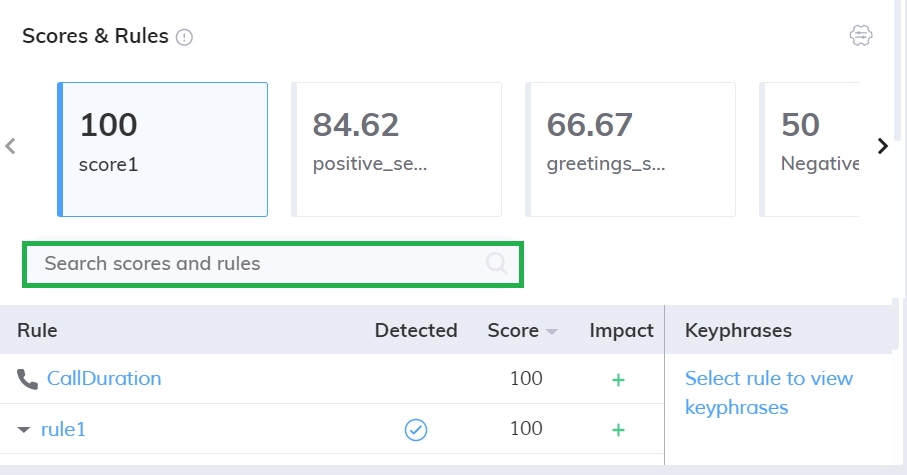
In the Scores & Rules section, system displays both QA Monitored and BA scores for this interaction. Select a score to analyze the contributing business rules and detected keyphrases. When selected, the Scores and Rules tab is highlighted in black color.
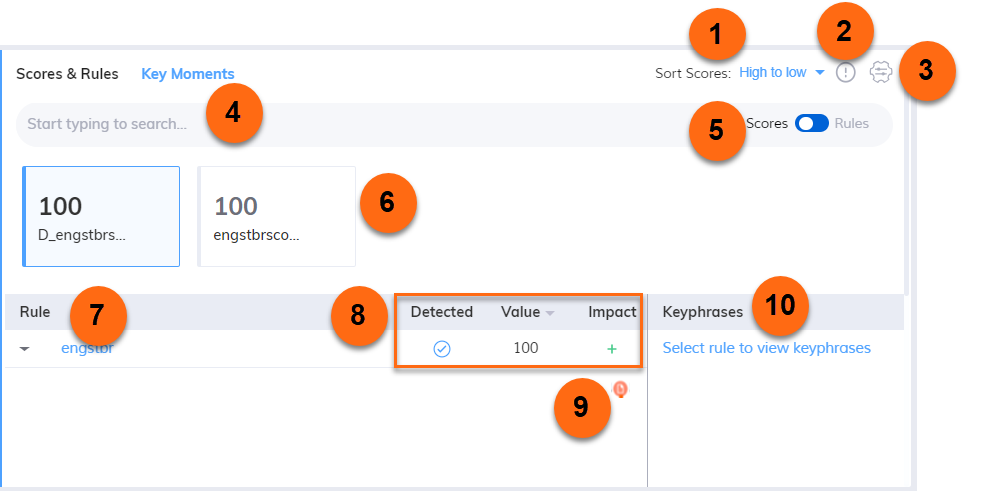
Use Sort Scores to:
Sort the scores alphabetically in both ascending and descending order (A-Z and Z-A)
Sort the scores by score value (High to low and low to high)
Click the tool tip icon to view the tool tips.

Allows you to override the business rules. A list of business rules and call attributes corresponding to the selected score are listed. Refer to the section Override Business Rules.
Important
After the business rules override is executed manually, reprocessing may reset the business rules status.
In the search field, enter the score name or the rule name to search the specific scores and rules. Scores/Rules search toggle button is provided to search either scores or rules. By default, it is set to scores.
Search with toggle button selected to Rules:
With the toggle button selected to Rules only the names of rules are searched. The visibility of scores is not affected.
If no score contains a rule matching the search, no rules are displayed.
Search with toggle button selected to Scores:
With the toggle button selected to Scores, search is applied to scores alone and not to rules. Only the available scores that match the searched text are shown. All the associated rules are visible underneath and are not affected by the search.
If a searched score does not have matching rules within it, the searched score alone is displayed. The rules section under the score is empty.
The score values (both QA monitored and BA scores) for this interaction. Refer to the section View Scores & Rules.
The contributed business rules of the selected score. Click a rule to expand/collapse the available child Business Rules.
Allows to identify business rule evaluation, impact on the call and score value of the corresponding business rule.
The alertable business rules are shown with a yellow-colored key icon on the left of the business rule.

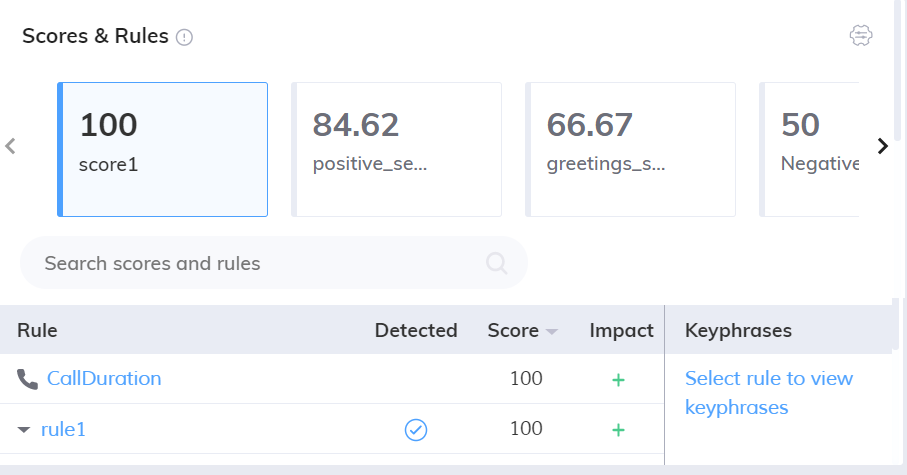
Detected:
If a Business Rule is evaluated as True, a tick mark (
 ) is shown in the Detected column. If a Business Rule which is evaluated as False, a blank value is shown in the Detected column. If a Business Rule is evaluated as False, a blank value is shown in the Value column.
Value:
The numeric score value is displayed which can range from 0 to 100. It can be sorted by High to Low and Low to High.
Impact:
If a Business Rule is configured as positive impact on the call, it is shown as + in the Impact column. If a Business Rule is not configured as positive impact on the call it is shown as - in the Impact column.
The note icon ( ) allows to identify the overridden business rules. Refer to the section View override comments.
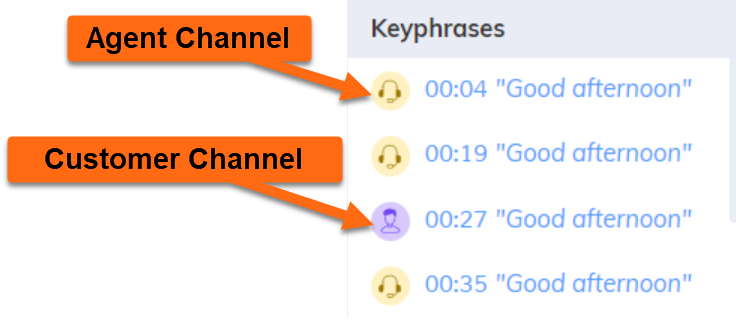
The keyphrases configured for the selected business rule are displayed with the offsets in seconds or minutes/seconds.
The detected keyphrases are channelized by showing customer and agent icons. It is applicable only for stereo and mono diarized voice calls. This feature is introduced from version 2023.4 onwards.
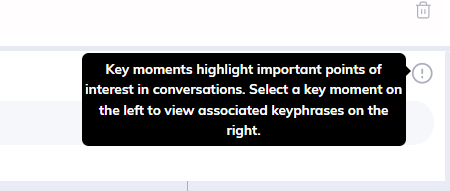
Key Moments
Displays all the alertable business rules, whether they are part of a score or not along with their evaluation and impact type. Select an alertable rule on the left to view the associated detected keywords on the right. When selected the Key Moments tab is highlighted in black color.

The tool tip icon is provided at the top right. Click to view the tool tip.
View Contact Summary
In the Contact Summary section, summarization of Calls processed in Batch mode is displayed to view and understand the call. It is available only for Voice interaction. Analyst can also view Contact Summary with Free form Entities and email address based on the configuration of Contact Summary. Free form Entity is displayed as multiple lines of text and email address is displayed in name@domain.com format. After reprocessing contact summary, summarization of calls processed in Batch mode is refreshed in Interaction Details page.
Note
If there is a change in entity configuration and summary configuration, reprocess of contact summary is performed. After reprocessing, contact summary is reloaded in the Interaction Details page.
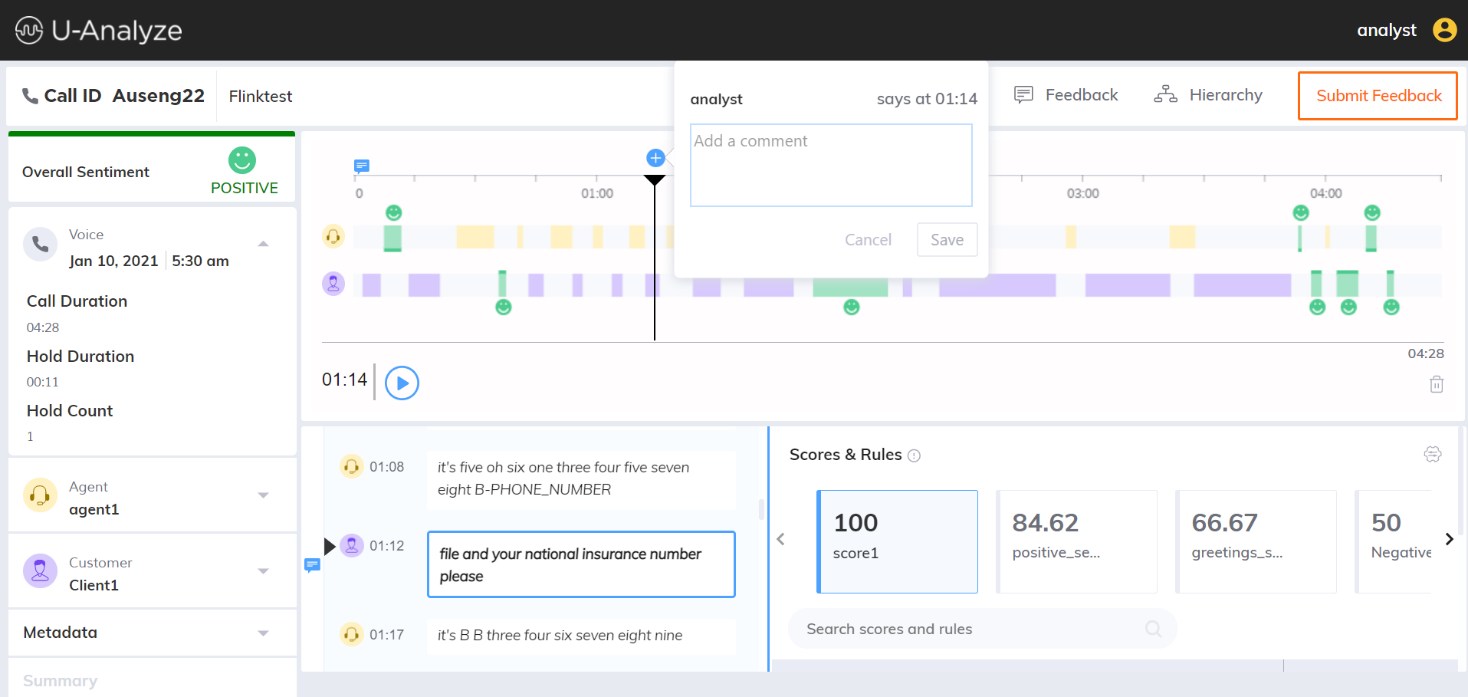
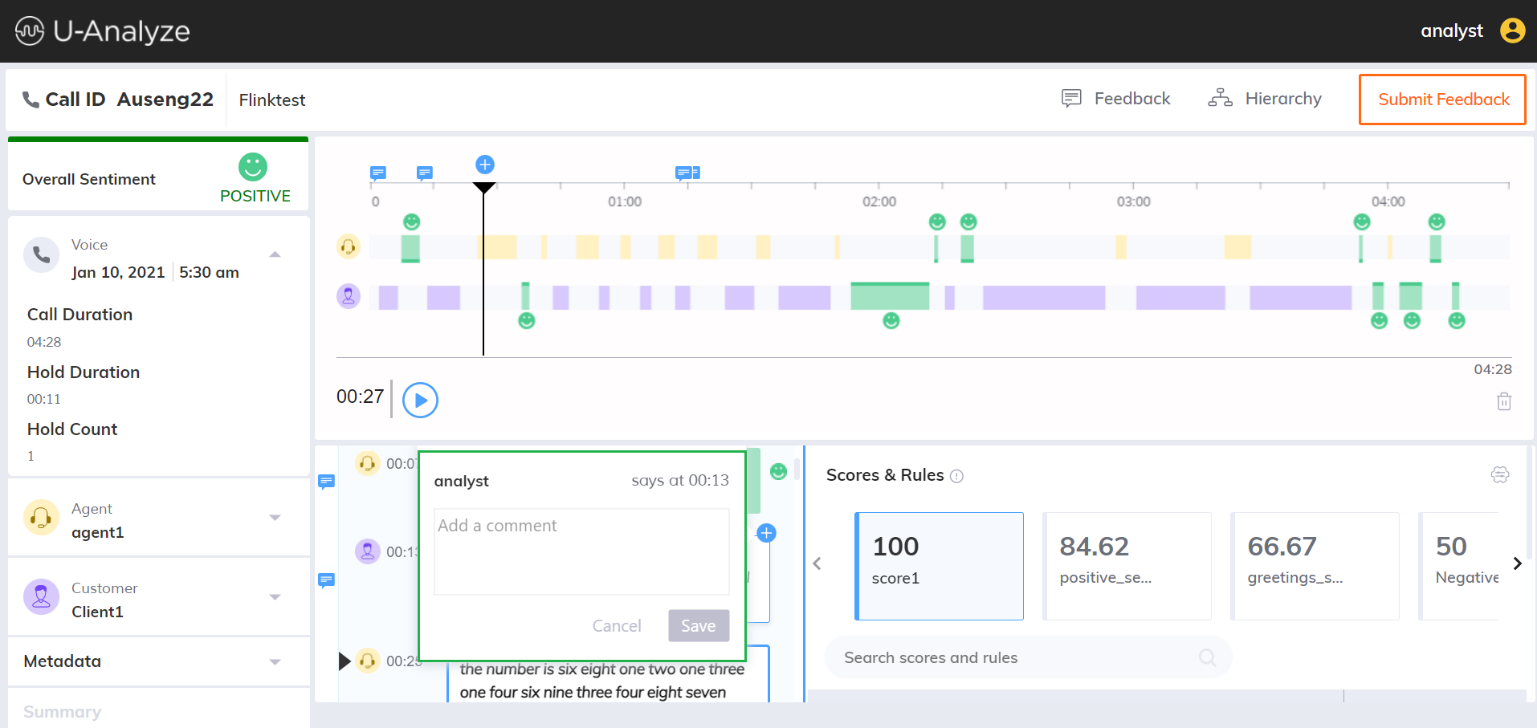
Add Comment
In the Audio Player section, click Play button to listen to the call and Pause button to pause the call and play again.
Click plus icon () to provide a comment in the specific time period. Analyst name and time period is shown in the top of comment box. After providing the comment, click Save button.
 |
View comments
The message icon () is displayed on the specific time in audio track, if any comments are provided. If you mouse hover the message icon, the message gets displayed.
 |
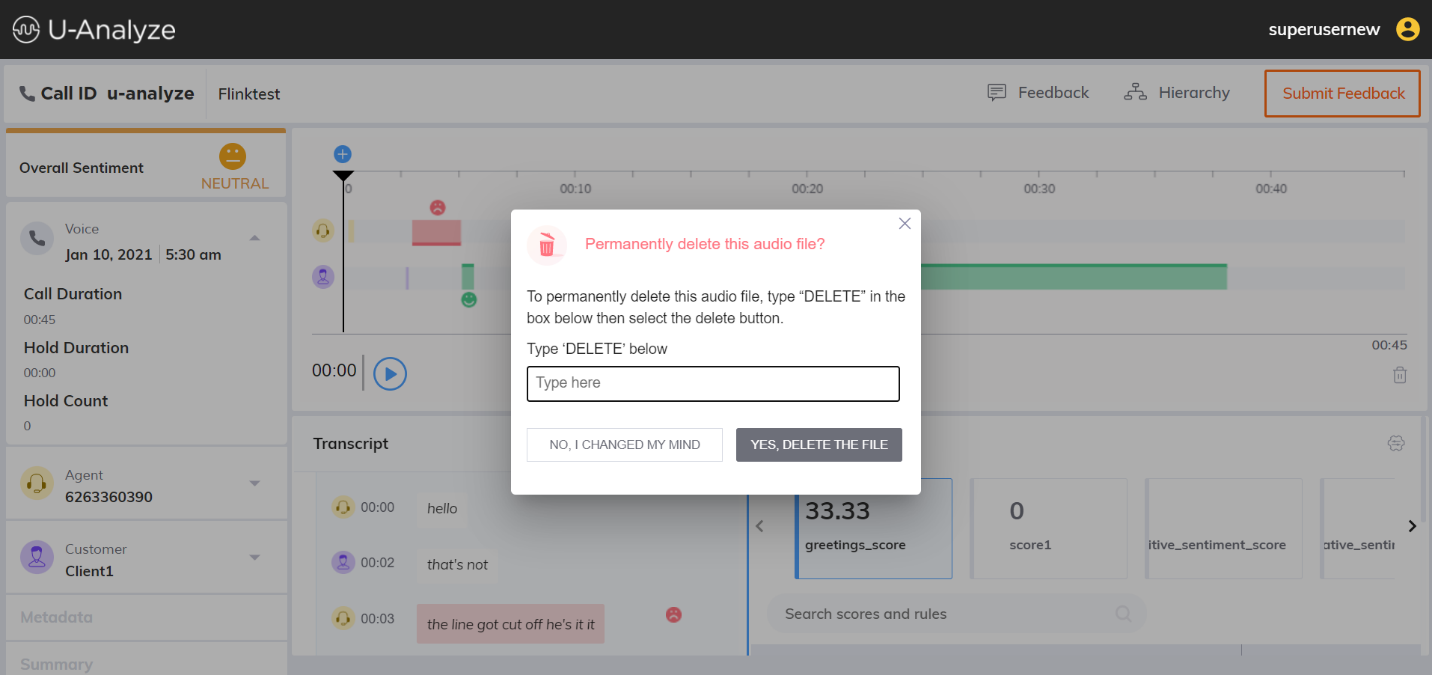
Delete Audio File
Click Delete ( ) icon to delete the audio file. A confirmation message is displayed as shown below. Enter ‘Delete’ in the text field and click Delete button.
 |
Scores and Rules
In the Scores & Rules section, system will display both QA Monitored and BA scores for this interaction. Select a score to analyze contributing business rules of QA monitored and BA scores, attributes and keyphrases.
If a Business Rule which is evaluated as True, a tick mark (
) will be shown in the Detected column. If a Business Rule which is evaluated as False, a blank value will be shown in the Detected column.If a Business Rule which is configured as positive impact on the call will be shown as ‘+’ in the Impact column. If a Business Rule which is not configured as Positive Impact on the call will be shown as ‘-‘ in the Impact column.
 |
In the Search field, enter the rule name or score value to search the specific rules and scores.
 |
Override Business Rules
If the system has not correctly evaluated the Agent based on certain parameters, user with appropriate privilege can override at the business rule level, while listening to the call. Click Override ( ) icon in the Scores & Rules section to override the business rules. A list of business rules and call attributes corresponding to the selected score will be listed.
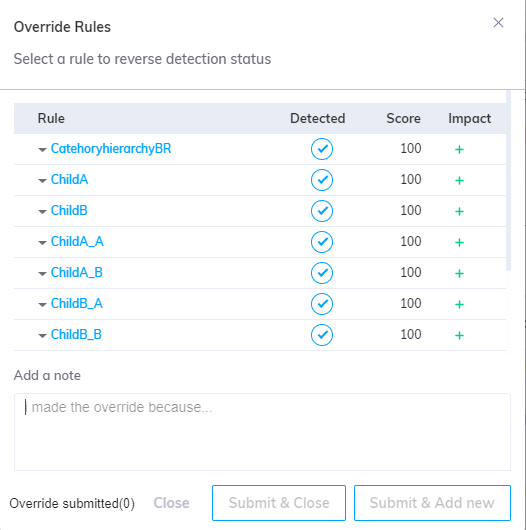 |
Click Edit icon corresponding to the Business Rule and make the change whether this business rule is detected or not.

Select/unselect the Detected option and click Submit & Close button. A confirmation message will be displayed as “Rule updated successfully.”
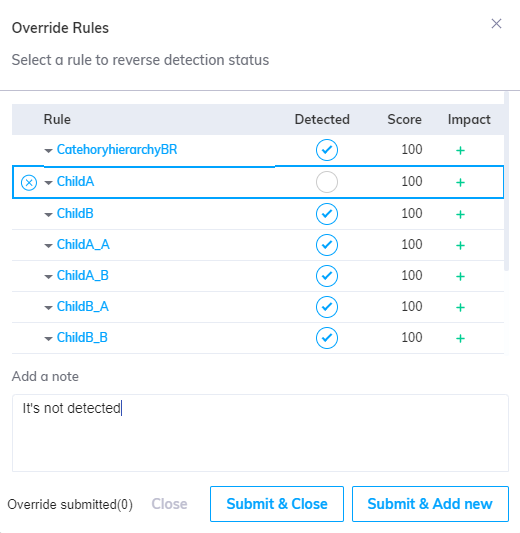
Click Submit & Add new button to update the selected rule and continue overriding the rules.
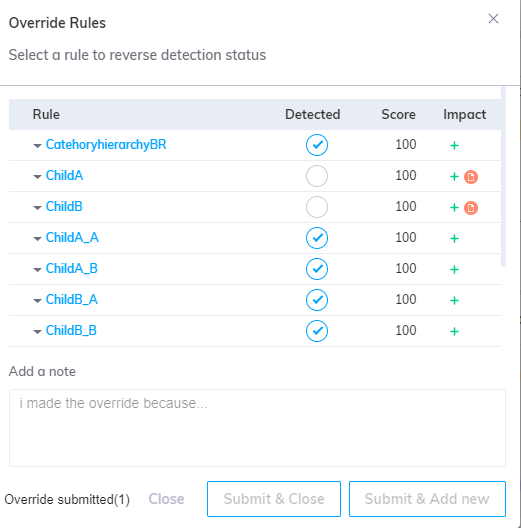
The number of submitted rules which are overridden are shown in the bottom of the window.
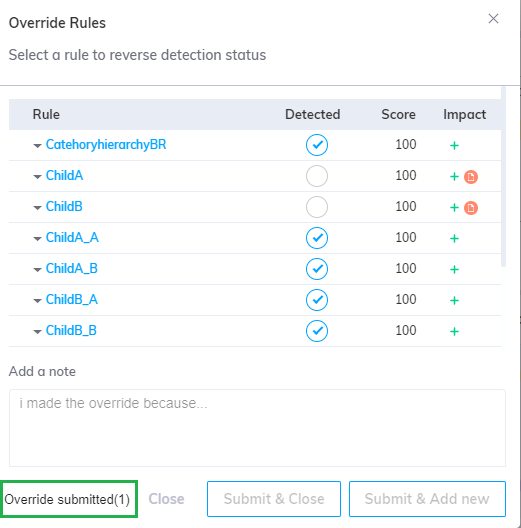
Click Close button to navigate back to Interaction Details page.
After overriding a business rule, the Score is automatically recalculated, and the updated value is displayed. The manually overridden scores will be shown in the Reports Dashboard and all the Score Analysis charts.
This Override () icon is disabled when the audio file is not available for the voice interaction type.
View override comments
The Note () icon will be shown to identify the overridden business rules. If you mouse hover this icon, you can view the override comments which are added in the Override Rules window.
 |
Add Comment in Voice Transcript
User can also provide call comments from Transcript section. Click plus icon () to provide a comment in the specific time period. Analyst name and time period will be shown in the top of comment box. After providing the comment, click Save button.
 |
View Comments in Transcript
The message icon () will be displayed in the Transcript section on the specific time period if any comments are available. If you mouse hover the message icon, the message will be displayed.
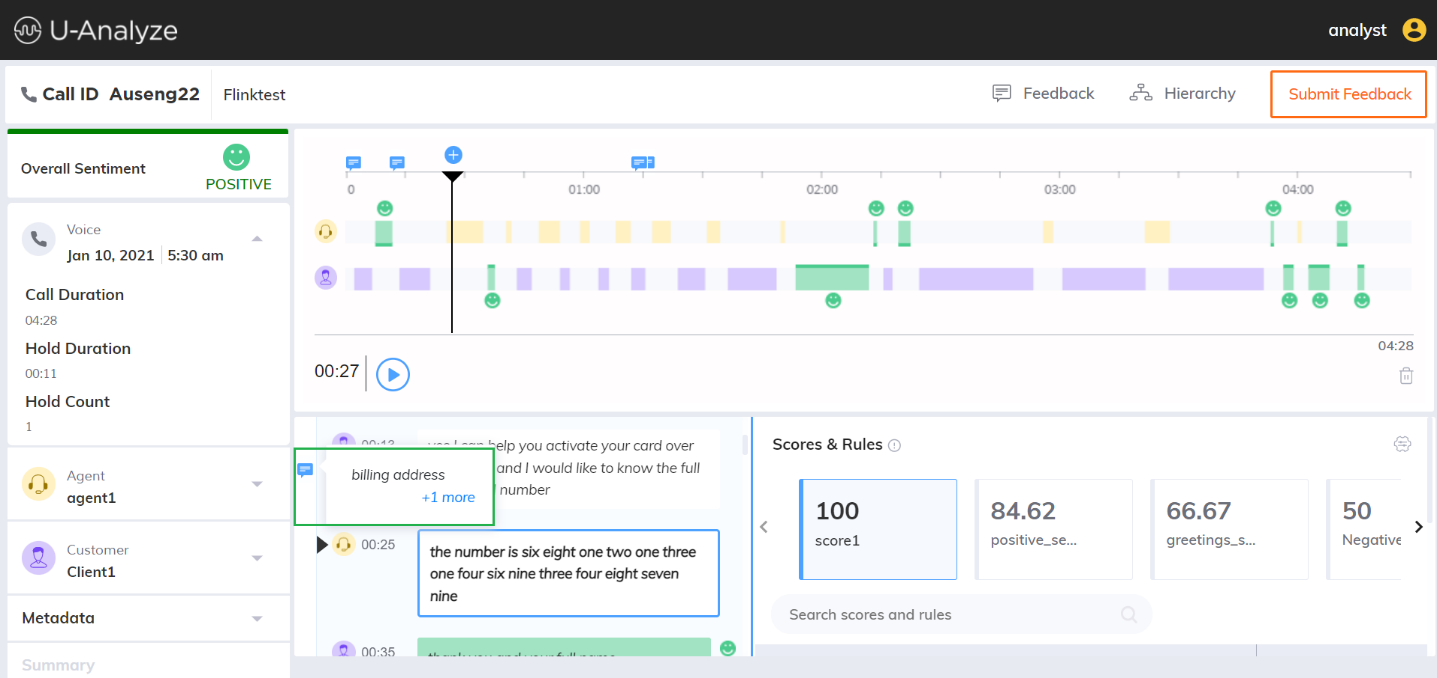 |
Click on more link to view all the call comments, if more than one comment is provided in the same time period.
 |
View Category Hierarchy
Click on Hierarchy button in the top of the page. The resultant Category Hierarchy will be displayed at a call / chat / email level for the Business Rules which are evaluated to True. The Category Hierarchy is the BR Hierarchy which was selected for a Parent BR at the time of creation of a BR Hierarchy.
 |
 |
Click on Full screen ( ) icon to view the Category Hierarchy in full page.
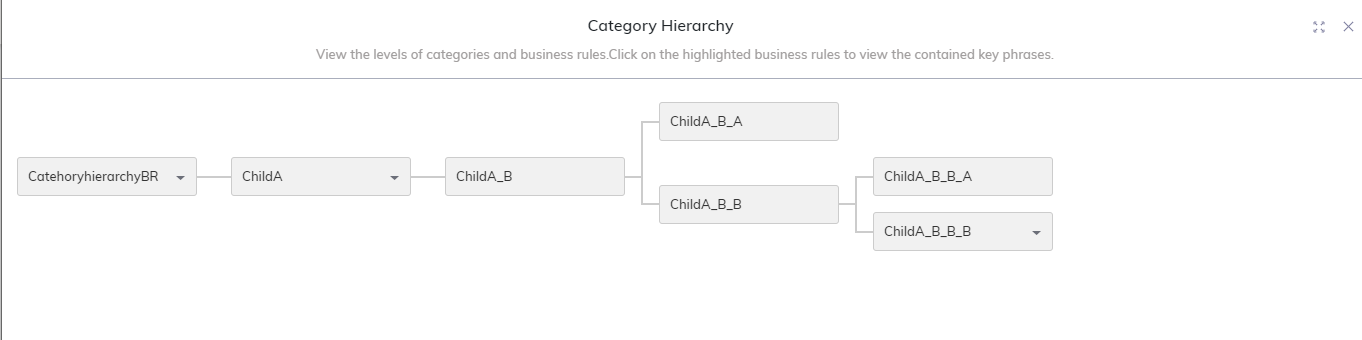 |
If the keyphrases configured for the business rule, a down arrow icon will be displayed next to the business rule. Click on the Business Rule in the Category Hierarchy to view the list of corresponding key phrases which are mapped to that BR and also spoken on the call.
Note
If the Business Rule is incomplete or inactive, it will not be displayed in the Category Hierarchy section.
Add and View Feedback
Click on Feedback button in the top of page to draft feedback to Agent and view Feedback logs containing list of Quality Analysts and feedback which is already sent to the Agent for that specific contact. This button will be displayed with the number of feedbacks sent for the contact. The feedback which is shared to Agent is shown with the icon (
 ) in the Feedback window. Users have only rights to edit/delete their feedback.
Users who were given the privilege to give feedback can provide the feedback. The call comments which are provided by the user while listening to the call in the Transcript section are also displayed along with the timestamp.
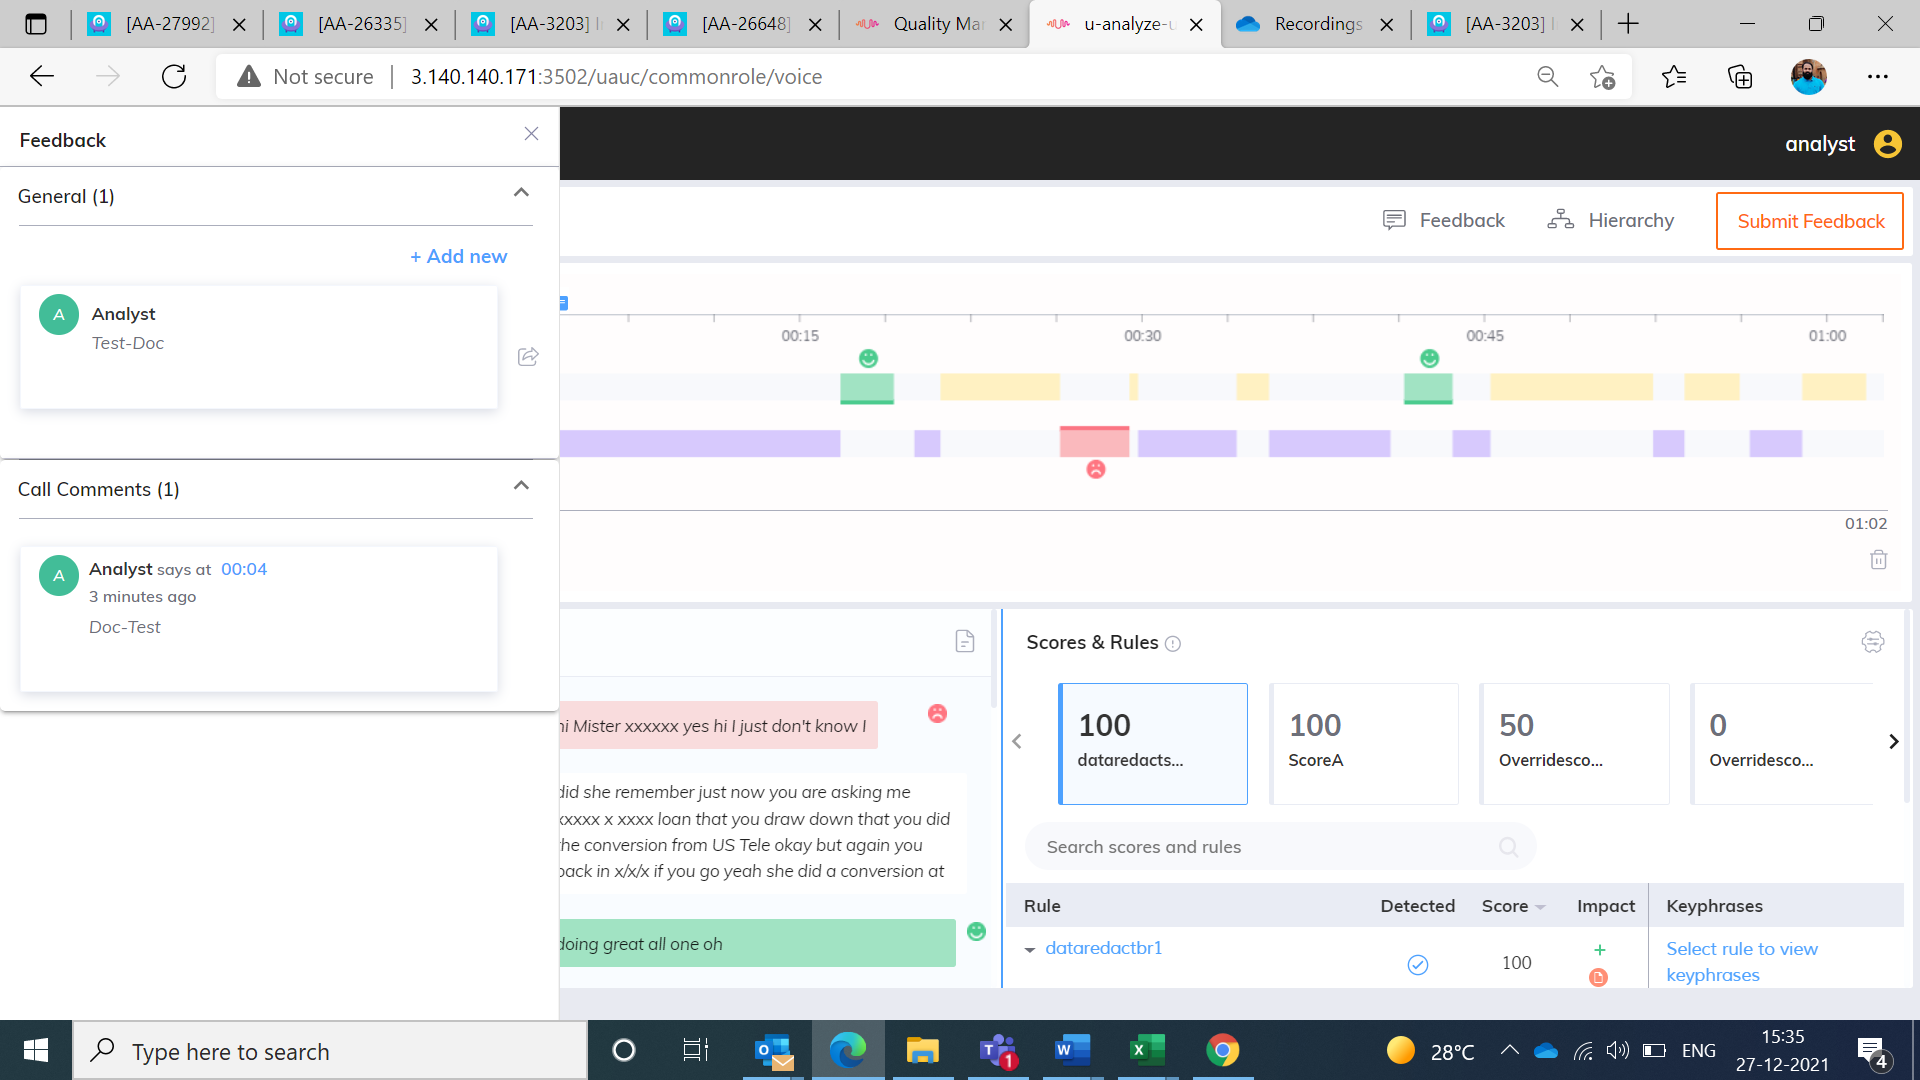
Click Add new button to add feedback.
Click Submit button to submit the feedback to Agent.
Chat Interaction
In the Contact Analysis screen, click the contact id of chat type to get the chat details with Scores, Business Rules/Alerts, Keyphrases and Metadata. These details will be opened in new tab.
 |
Item | Display | Description |
|---|---|---|
1 | Chat ID | Unique Interaction ID for the Chat. |
2 | Category | The name of the category under which the interaction was processed. |
3 | Chat details | For a chat type, the following chat details are displayed in the left pane.
|
4 | Metadata | All the Metadata types are shown in alphabetical order and values associated with the chat are also displayed. This section is disabled, when the system does not process any metadata. |
5 | Chat Transcript | Chat Transcription of agent and customer are displayed along with that Start Timestamp. |
6 | Sentiment expressed at every turn | Sentiment analyzed at every turn in the agent and customer chat – Positive or Negative is highlighted in different colors along with accessibility emojis.
|
7 | Plus icon ( | Allows you to provide a comment in the specific time period. Refer to the section Add comment. |
8 | Message icon ( | This message icon is displayed on the specific time in chat conversation, if any comments are provided. Refer to the section View comments. |
9 | Scores | Both QA Monitored and BA score values for this interaction. Refer to the section Scores and Rules/Key Moments Panel. |
10 | Business Rules | The contributed business rules of QA monitored scores. |
11 | Rule attributes | Allows you to identify business rule evaluation, impact on the call and score value of the corresponding business rule. |
12 | Keyphrases | The keyphrases configured for the selected business rule are displayed with the offsets in seconds or minutes/seconds. The detected keyphrases are channelized by showing customer and agent icons. This feature is introduced from version 2023.4 onwards.  |
13 | Override Business Rules | Allows you to override the business rules. A list of business rules and call attributes corresponding to the selected score are listed. Refer to the section Override Business Rules. |
14 | Note icon ( | Allows you to identify the overridden business rules. Refer to the section View override comments. |
15 | Redaction ( | Users who were given the privilege to manual redaction, can review the chat transcripts, redact and save them manually. Refer to the section Data Redaction. |
16 | Hierarchy | The resultant Category Hierarchy is displayed at a chat level for the Business Rules which are evaluated to True. Refer to the section View Category Hierarchy. |
17 | Feedback | Users who were given the privilege to Feedback can provide the feedback. The comments which are provided by the user are also displayed along with the timestamp. Refer to the section Add and View Feedback. |
18 | Submit Feedback | Allows you to submit the feedback to Agent. |
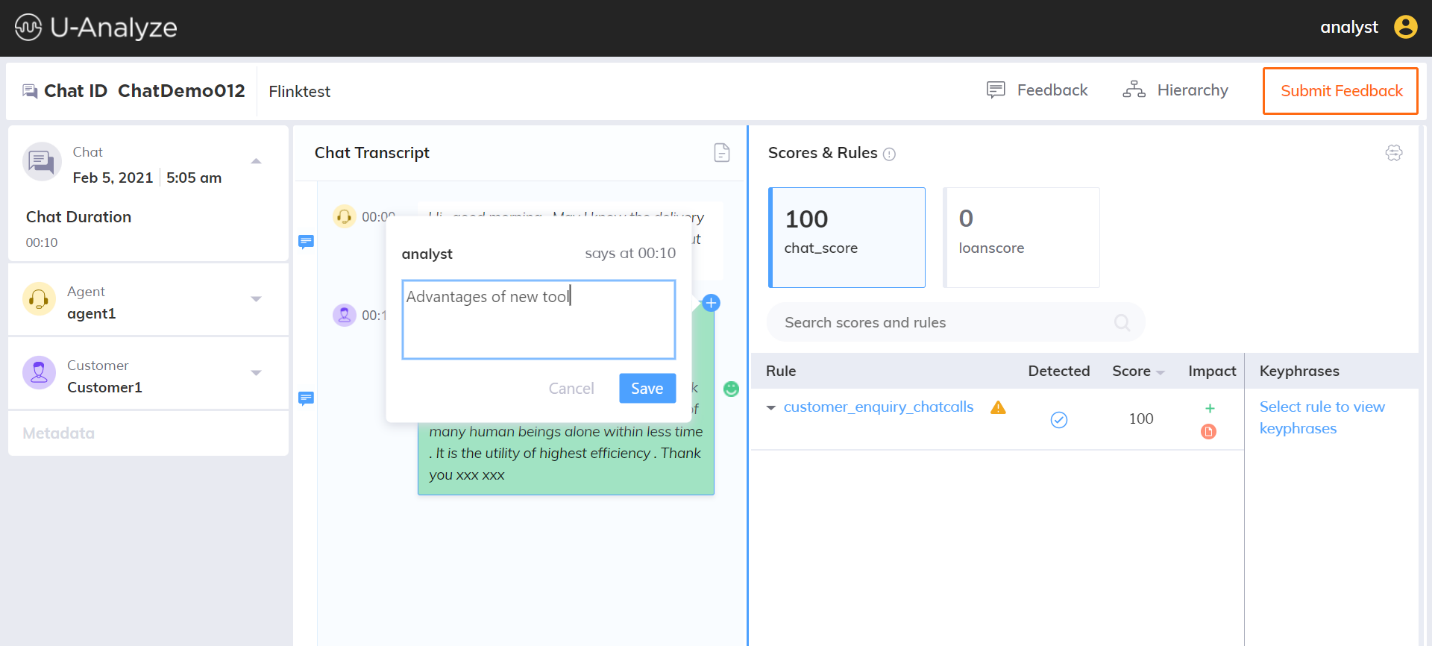
Add comment
Click plus icon () to provide a comment in the specific time period. Analyst name and time period will be shown in the top of comment box. After providing the comment, click Save button.
 |
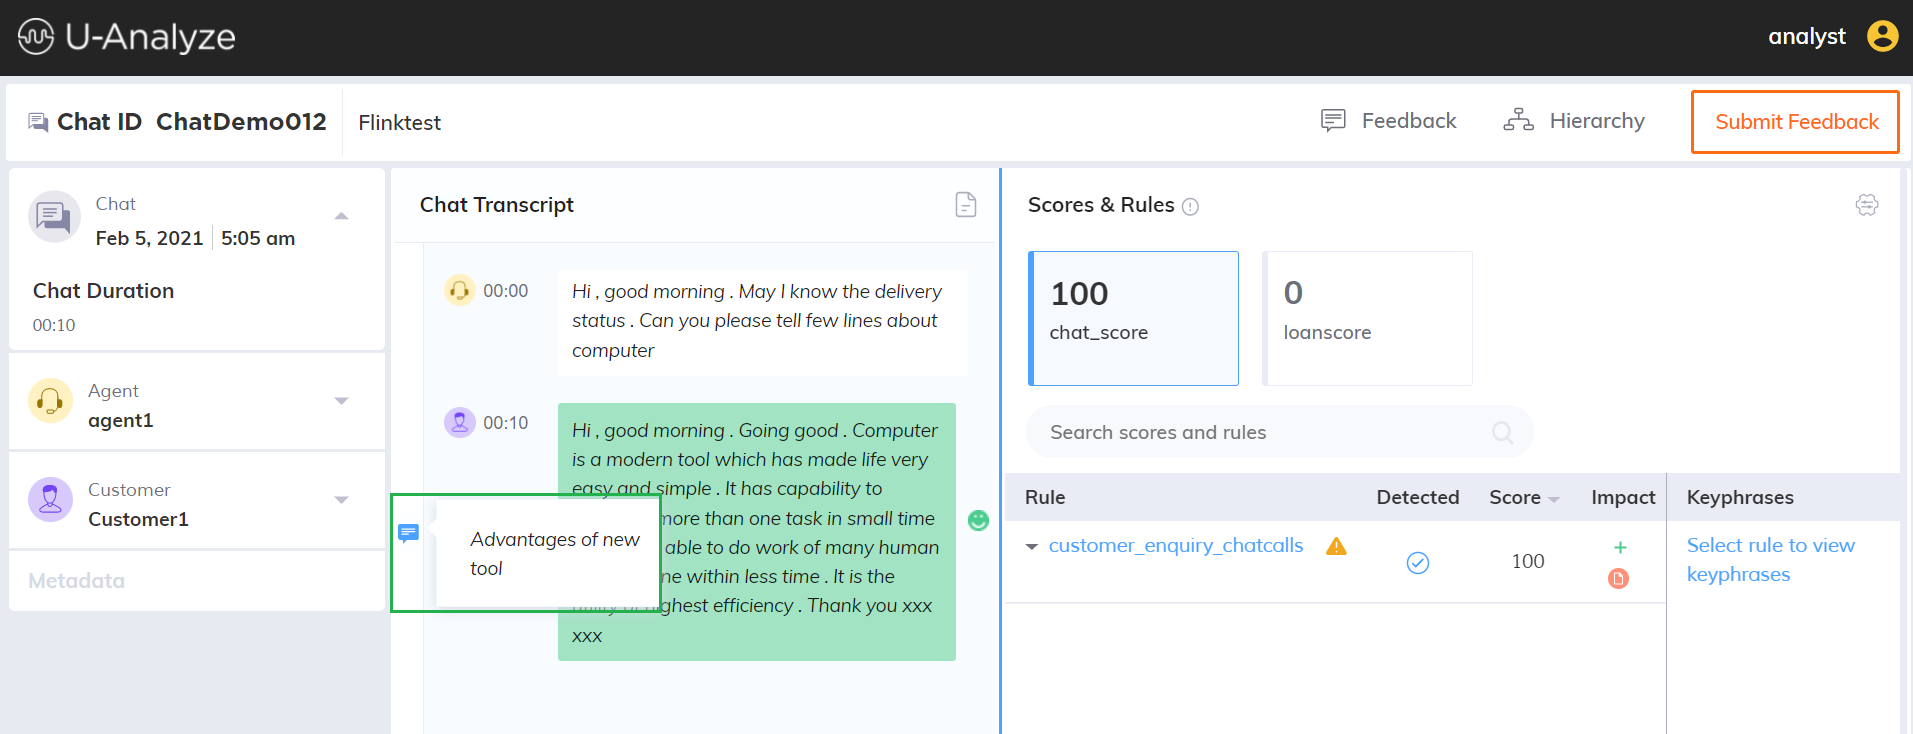
View comments
If you mouse hover the message icon, the comments which are provided in the specific time period will be displayed.
 |
Email Interaction
In the Contact Analysis screen, click the contact id of an email type to get the email details with sender and recipient email addresses, subject and body of email.
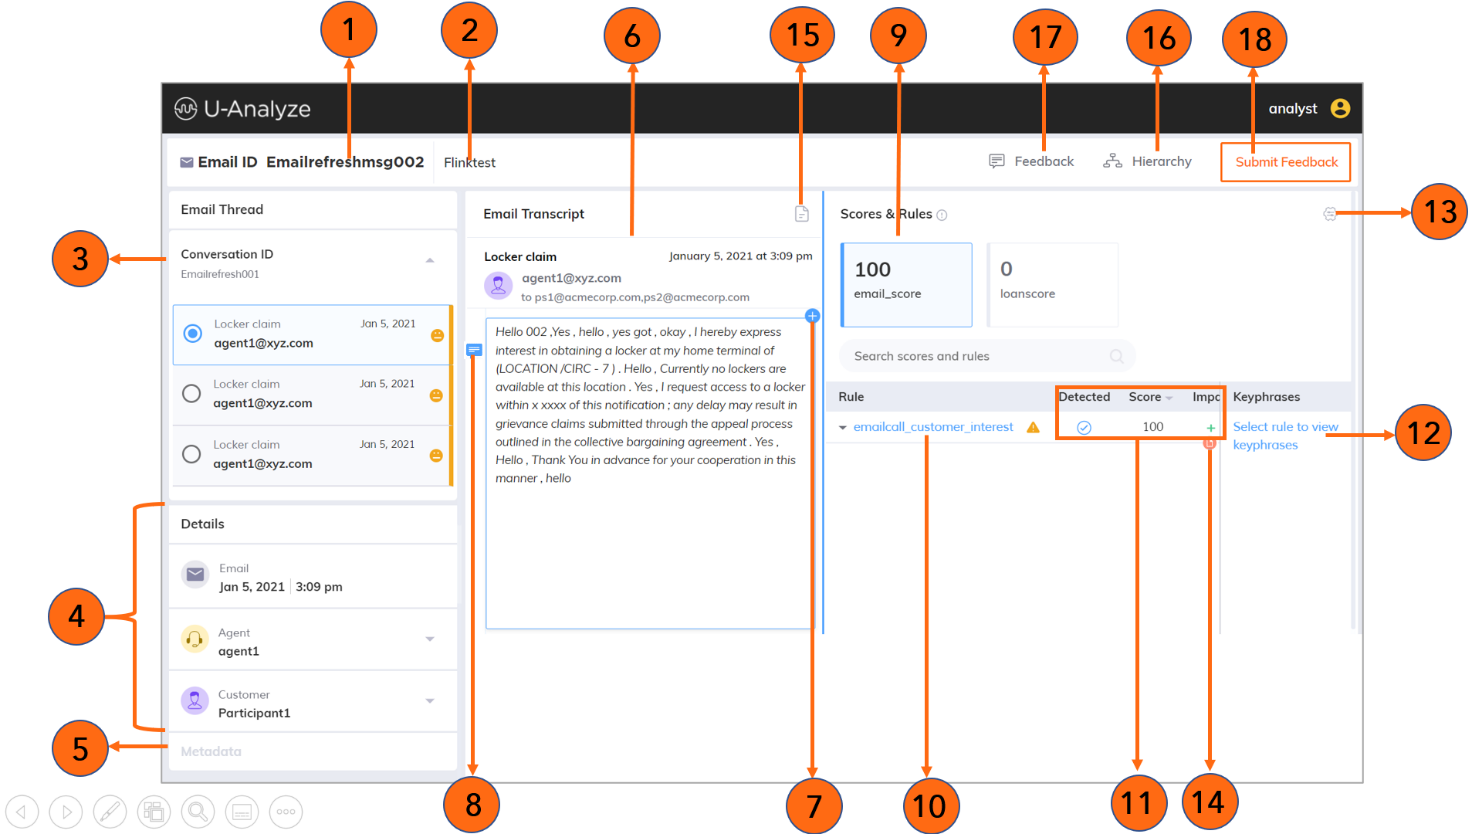 |
Item | Display | Description |
|---|---|---|
1 | Email ID | Unique Interaction ID for the mail. |
2 | Category | The name of the category under which the interaction was processed. |
3 | Conversation ID | It is a unique identifier which connects all the associated email threads. |
4 | Email details | For an email type, the following email details are displayed in the left pane.
|
5 | Metadata | All the Metadata types are shown in alphabetical order and values associated with the email are also displayed. This section is disabled, when the system does not process any metadata. |
6 | Email Transcript | Based on the selected conversation from the conversation ID, the email details are displayed in the Email Transcript section. The email transcript contains the following details.
|
7 | Plus icon ( | Allows you to provide a comment in the specific time period. Refer to the section Add comment. |
8 | Message icon ( | This message icon is displayed on the specific time in chat conversation, if any comments are provided. Refer to the section View comments. |
9 | Scores | Both QA Monitored and BA score values for this interaction. Refer to the section Scores and Rules/Key Moments Panel. |
10 | Business Rule | The contributed business rules of QA monitored scores. |
11 | Rule attributes | Allows you to identify business rule evaluation, impact on the call and score value of the corresponding business rule. |
12 | Keyphrases | The keyphrases configured for the selected business rule are displayed with the offsets in seconds or minutes/seconds. The detected keyphrases are channelized by showing customer and agent icons. This feature is introduced from version 2023.4 onwards. |
13 | Override Business Rules | Allows you to override the business rules. A list of business rules and call attributes corresponding to the selected score are listed. Refer to the section Override Business Rules. |
14 | Note icon ( | Allows you to identify the overridden business rules. Refer to the section View override comments. |
15 | Redaction ( | Users who were given the privilege to manual redaction, can review the chat transcripts, redact and save them manually. Refer to the section Data Redaction. |
16 | Hierarchy | The resultant Category Hierarchy is displayed at an email level for the Business Rules which are evaluated to True. Refer to the section View Category Hierarchy. |
17 | Feedback | Users who were given the privilege to Feedback can provide the feedback. The comments which are provided by the user are also displayed along with the timestamp. Refer to the section Add and View Feedback. |
18 | Submit Feedback | Allows you to submit the feedback to Agent. |
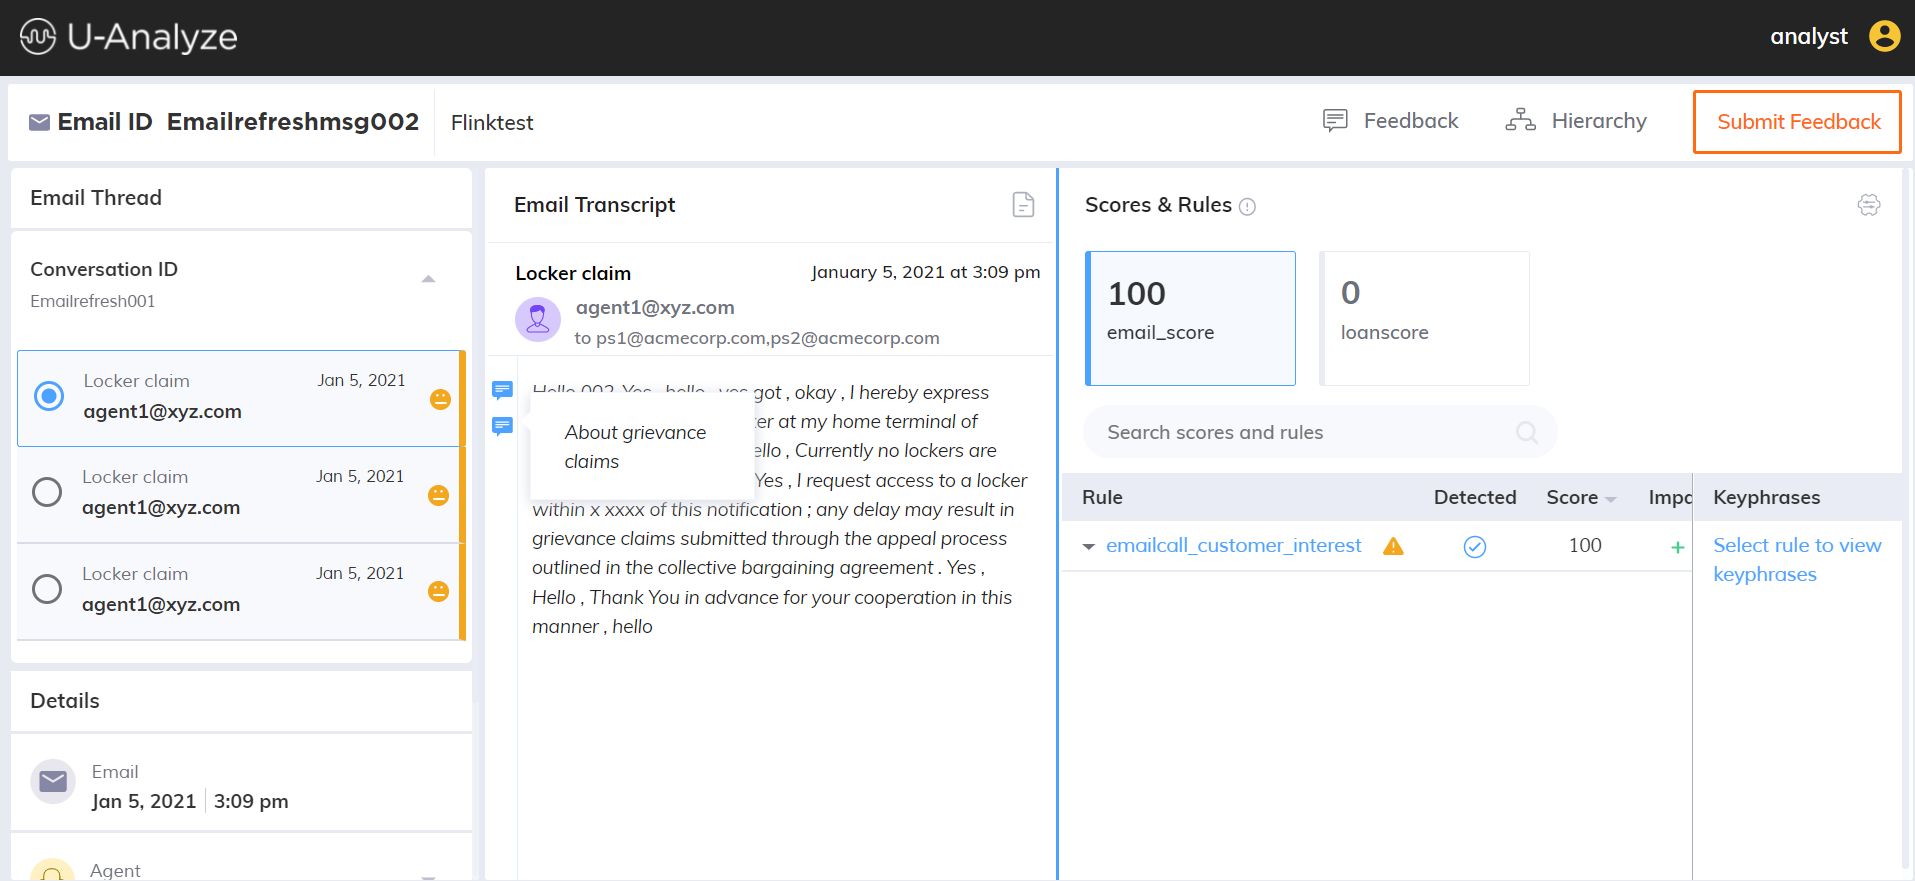
Add comment
Click plus icon () to provide a comment in the specific conversation. Analyst name and time period will be shown in the top of comment box. After providing the comment, click Save button.
 |
View comments
If you mouse hover the message icon, the comments which are provided in the specific conversation will be displayed.
 |
Data Redaction
Data Redaction is the process of masking or hiding sensitive information such as Personally Identifiable Information (PII) and Payment Card Industry Data (PCI).
PII Data Redaction
Personally identifiable information - PII Data is used to identify a specific Individual. Some of the common PII data are Name, Social Security Number, Driver's License, Date of Birth, Email address, Telephone Numbers, Mother's middle and maiden names, Spouse or Child's information, and more.
The Data Redaction model in U-Analyze identifies PII data and replace the data with a field name &lt;Name&gt; in the transcripts.
U-Analyze is intended to keep PII (Personally Identifiable Information) secured in Call Transcripts, Chat Transcripts and Email.
To redact the PII data, you can check or uncheck (select or deselect) the RedactPII in the System Properties. By default, the Redact PII is not selected. The PII fields are neither redacted at audio nor at DB, but only masked at UI layer based on the user privilege.
Data Redaction – Off | PII Data |
|---|---|
Audio | Not Redacted |
Transcript - UI | Masked at UI layer based on privilege |
Transcript - DB | Not Redacted |
If PII Data Redaction is ON, at the audio level, PII fields are replaced with silence block. At the transcript level, PII fields are represented with field names in UI as well as DB (Data at REST).
Data Redaction – On | PII Data |
|---|---|
Audio | Redacted - Silence |
Transcript - UI | Redacted – Displays <Field Name> |
Transcript - DB | Redacted – Displays <Field Name> |
When the Administrator enables the PII data redaction after processing a set of calls, the reprocessing needs to be performed for these calls to redact the PII data at audio and transcript.
Note
A Superuser has no privilege to hear the PII data at audio or view in UI or DB.
PCI Data Redaction
PCI (Payment Card Industry Data Security Standard) Compliance is a process set by PCI Standards Council to secure and protect credit card data provided by cardholders and transmitted through card processing transactions.
U-Analyze maintains PCI Compliance for Call Transcripts, Chat Transcripts and Email.
The Data Redaction model in U-Analyze identifies PCI data and replace the data with static symbols "xxxx” in the transcripts (voice, chat, email) at rest.
Note
For chat contact type, the expected input format of expiry date should be in dd/mm/yy, dd/mm/yyyy, mm/yy or mm/yyyy.
Manual Redaction
In U-Analyze, the user who were given the privilege to manual redaction, can review the transcripts (email, chat, voice), redact and save them manually. They can delete the audio file too.
By default, the Superuser has the privilege to view PII data in transcripts and manually redact them.
The Organization, Business Process, User details, Interaction details (Contact ID), Date and Time, Changes made in the Transcript, Audio file deleted, are logged for Audit purposes.
The following steps shows how sensitive data can be manually redacted.
Click Redaction icon (
 ) in the Transcript section to redact data from the transcript.
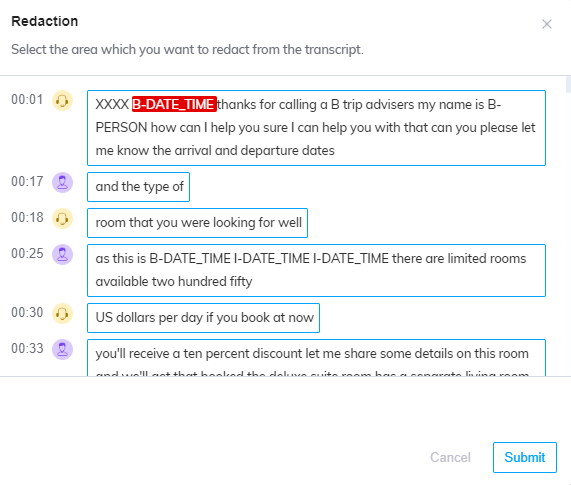
Select any sensitive data to be redacted from the transcript. The selected data will be displayed at the bottom of window.
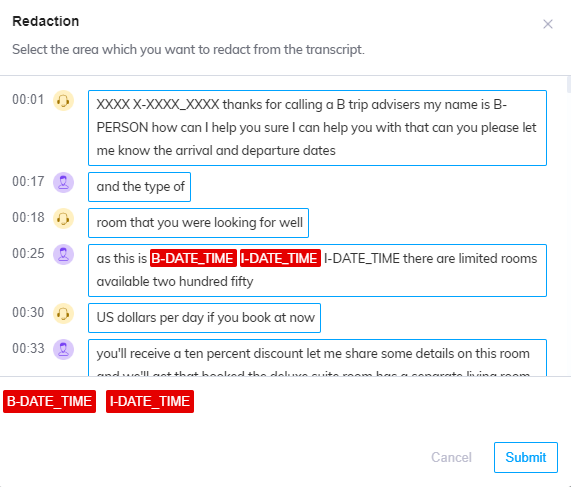
Click Submit button. A confirmation message will be displayed as “Redaction successfully submitted.”
After submission, the data will be replaced with XXXXXX and displayed the same in Transcript section.
Audio Redaction
By default, the PCI data is redacted from audio files and replaced with a silence block. This redacted PCI information is not available in any loggers or database. User can listen to the audio with redacted PCI data.
The PII data is also redacted from audio files when the PII data redaction is enabled in the System Properties.
Note
Manual redaction of transcripts will not redact the respective portion in the audio files and only system redacted PCI data will be replaced with silence block in the audio files.
In System Properties the RedactExceptionDeleteFileEnabled check box is disabled by default. If the check box remains disabled the audio file is deleted based on the configured audio retention period. If the check box is enabled, system purges the audio file in case of audio redaction exception.
Audio redaction exception handling
In System Properties the RedactExceptionDeleteFileEnabled check box is disabled by default. If the check box remains disabled, the audio file is deleted based on the configured audio retention period. If the check box is enabled, system purges the audio file in case of audio redaction exception.
Signal Analysis and Scoring
Uniphore Signal Analysis and scoring enables customers and partners to identify abruptly disconnected call, hung-up calls and audio with poor quality and publishes the following speech attributes such as SNR, abruptly disconnected call, Speech & Non-speech percentage to advanced reports. This allows operations and professional service field teams to validate the same and exclude the calls from scoring using the Score exclusion APIs so that average score of the agents remains intact.
Note
Uniphore Signal Analyzer provides best accuracy for only Stereo calls.
Refer “Uniphore Signal Analysis and Scoring” section in U-Analyze Installation Guide to understand how the contacts are processed through Uniphore Signal Analyzer.