Creating Extensions
Although an Extension can be made up of any JavaScript code, some special code supported by the X‑Platform framework needs to be invoked so the Extension can be used by the Application. The following sections explain how to properly create Application Extensions and present several examples.
Registering the Extension
Before an Extension can be used, it needs to be initialized by calling the initExtensions function. When the Extensions file is loaded, it will be called with a callback function passing the app argument, which is the handle to the Application. Through the app argument you can access everything in the running client.
The following example shows how the timeout Extension is used to override the Application's timeout value (one of the ProtocolManager variables).
initExtensions("timeout", function(app){

    app.protocolManager.JAS_TIMEOUT = 35000;
}
Registering the Extension Point
Registering the Extension point involves calling the registerExtension method with the name of the Extension point and a callback function. This causes the callback to be called when the framework is about to create the DOM element for the relevant page element.
In the following example, the passwordValidation Extension is used to override the shortTextInputRenderer, which is the Extension point responsible for creation of the Text input field. The passwordValidation Extension attaches a password strength widget checker (passStrengthify) to the password input field:
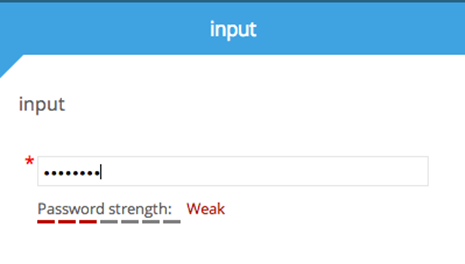
First, the framework’s renderer is called, returning the input element. Then the Extension point (if registered) is called with the context (ctx parameter) together with the input element. This code enables:
Ignoring the element by returning another created element instead
Modifying the element passed by the framework
Appending to this element other DOM elements to enrich the UI experience
Returning the element to the caller allows the chain to be continued either to the next Extension registered to this Extension point, or to the framework so it can place this DOM element in the appropriate parent DOM element.
initExtensions("passwordValidation", function(app){

 app.registerExtension(“shortTextInputRenderer",function(ctx, element) {
     if (ctx.choice.textInput.textInputFormat == "PASSWORD") {
         $(‘input',element).passStrengthify();
     }
     return element;
 });

});
Note
Every renderer has its own structure of context variables. For a list of renderers and special Extension points, refer to Using Extensions to Override Elements.
Sample Application Extensions
This section provides some examples of Application Extensions. Use the sample code to become familiar with different cases, so you can see the coding style and learn best practices for writing your own Extensions.
The first example, which is similar to the passwordValidation example used above, shows how to intercept the Next button click for all password fields. When the user tries to press the Next button, the length of the entered password is checked. If the password is less than eight characters, a modal message is issued and the user is prevented from proceeding to the next page of the Interaction.
The code example shows how to:
Handle all password fields and read their values
Cancel Next button navigation
Display a modal popup message
// Modify the shortTextRenderer for password fields
 app.registerExtension("shortTextInputRenderer", function(ctx, element){
    if (ctx.choice.textInput.textInputFormat == "PASSWORD") {
 // Override the next button.
       app.nextButton.click(function(e){
 // Check that the password is longer then 7 chars
    if ($('input',element).val().length < 8) {
       // Less then 8 chars, show modal message
       $.dynamic_popup(
       {
          'buttons': [({'label':'OK'})],
          'header' : "Password's Strength",
          'content' : 'The password is too short'
       });
 // Prevent the event from being processed further,
 thus preventing moving to the next page
       e.preventDefault();
    }
   });
  }
  return element;
 });
The next example shows how to modify the table shown in a Collection Display page by adding a summary line at the bottom of the table. The code example shows how to:
Intercept the creation of the table
Aggregate values from the table data
Change the table layout by adding a new line at the bottom of the table
app.registerExtension("collectionRenderer", function(ctx, table) {
   var sum = 0;
   for (var row in ctx.contentSection.sectionChoices) {
       var price = ctx.contentSection.sectionChoices[row].collectionItem.price;
       sum+= parseInt(price);
   }
   var totalRow = $('<tr>').css('font-weight','bold');
   totalRow.append($('<td>').html('Total'));
   totalRow.append($('<td>').html(sum));
   // Append the row to the bottom of the table
   $('tbody',table).append(totalRow);
   return table;
});