Adding and Editing a Return Data Element
When answering a Start Data Flow API information request, you use the Return Data Element to return the information in one or more variables, as needed.
You can add multiple Return Data Elements to any Data Flow. However, a Return Data Element must be the last step in the Flow.
You add a Return Data Element when building or editing a Data Flow, using the Return Data Element navigation logic step.
Creating a Return Data Element
At the top left of the Flow Map, click the round Add Steps Toolbox icon. The Add Steps Toolbox opens.
From the Logic Elements group, select and drag the Return Data Element to the desired location on the Flow Map. The Return Data Element Editor opens:
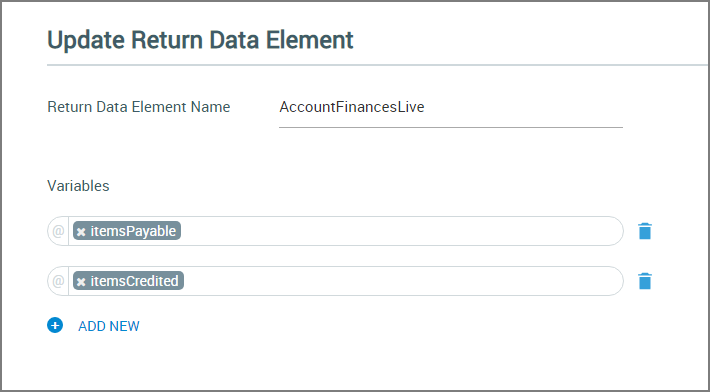
In the Return Data Element Name field, enter a unique name for the Element. This is a required field.
In the Variables section, select or create one or more variables that will be used to return the data that was produced by the Data Flow.
When you create a variable that will be associated with the Data Flow, you can use the same variable name that is used in that Data Flow's API URL parameters. The Return Data Element parses the data received by matching the URL parameter name to the variable name.
To assign multiple variables, click Add New next to the Plus
 icon below each variable.
To delete a variable, click on the Trash
 icon at the top right side of the variable.
To save the Return Data Element, click Create. The Return Data Element is added to the Flow Map.
Editing a Return Data Element
Open the Data Flow containing the Return Data Element that you wish to change.
From the Flow Map, either:
double-click the element, or
right-click the element and click the Edit
 icon from the menu that appears.
The Return Data Element Editor opens.
Make the desired changes in the Editor.
To save your changes, click Update. The Return Data Element is updated on the Flow Map.
Deleting a Return Data Element
Open the Data Flow containing the Return Data Element that you wish to delete.
From the Flow Map, select or hover over the element and then right-click.
Click the Delete
 icon from the menu that appears. A warning message will be displayed asking you to confirm the deletion.
Click Yes to confirm deletion.
A Data Flow Example Use Case
A Data Flow will typically return information that is needed by an external user.
For example, we can return the financial summary of a customer's account, based on real-time information retrieved from a secure server, as seen below.
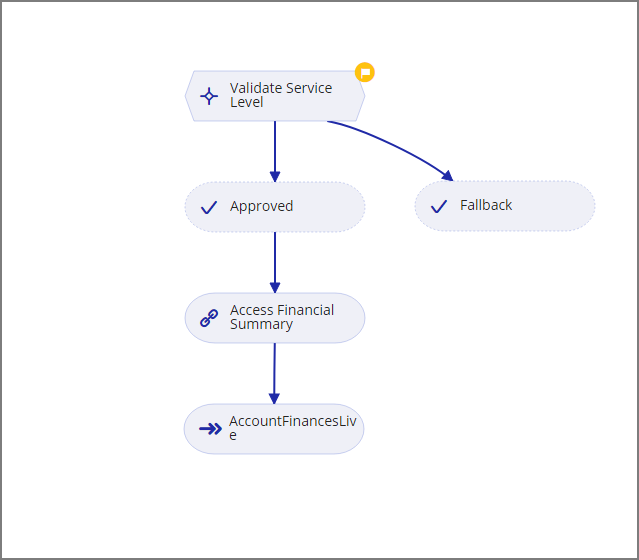 |
The Data Flow API call specifies the associated customer account number along with optional parameters which will hold the financial data returned (e.g., payable items and credited items).
In our example, the Validate Service Level Decision Point ensures that the customer's service level allows access and return of their financial data. If not, the Data Flow finishes without returning information.
Next, we use the Access Financial Summary Integration Point to query the secure server that holds the customer's financial data. Both payable and credited items are mapped to a Collection variable.
Finally, we use the Account Finances Live Return Data Element (see the sample dialog above) to return JSON data in response to the API call.
Note
When it is finished, a Data Flow returns requested information to the external caller, however it does not store the information and cannot make it available to another X-Designer Flow. In order to pass information from the Data Flow to other Flows, create a Sub-Flow step and select a Service Flow to execute inside it for this purpose.