Bulk User Creation Using Okta Auth0
Run PowerShell as an administrator.
Run the below command to set the execution policy (This is required to proceed with the installation):
Set-ExecutionPolicy Bypass -Scope Process
Run the below command to install Chocolatey:
Set-ExecutionPolicy Bypass -Scope Process -Force; [System.Net.ServicePointManager]::SecurityProtocol = [System.Net.ServicePointManager]::SecurityProtocol -bor 3072; iex ((New-Object System.Net.WebClient).DownloadString('https://chocolatey.org/install.ps1'))Run the below command to install jq:
choco install jq --force -version 1.6
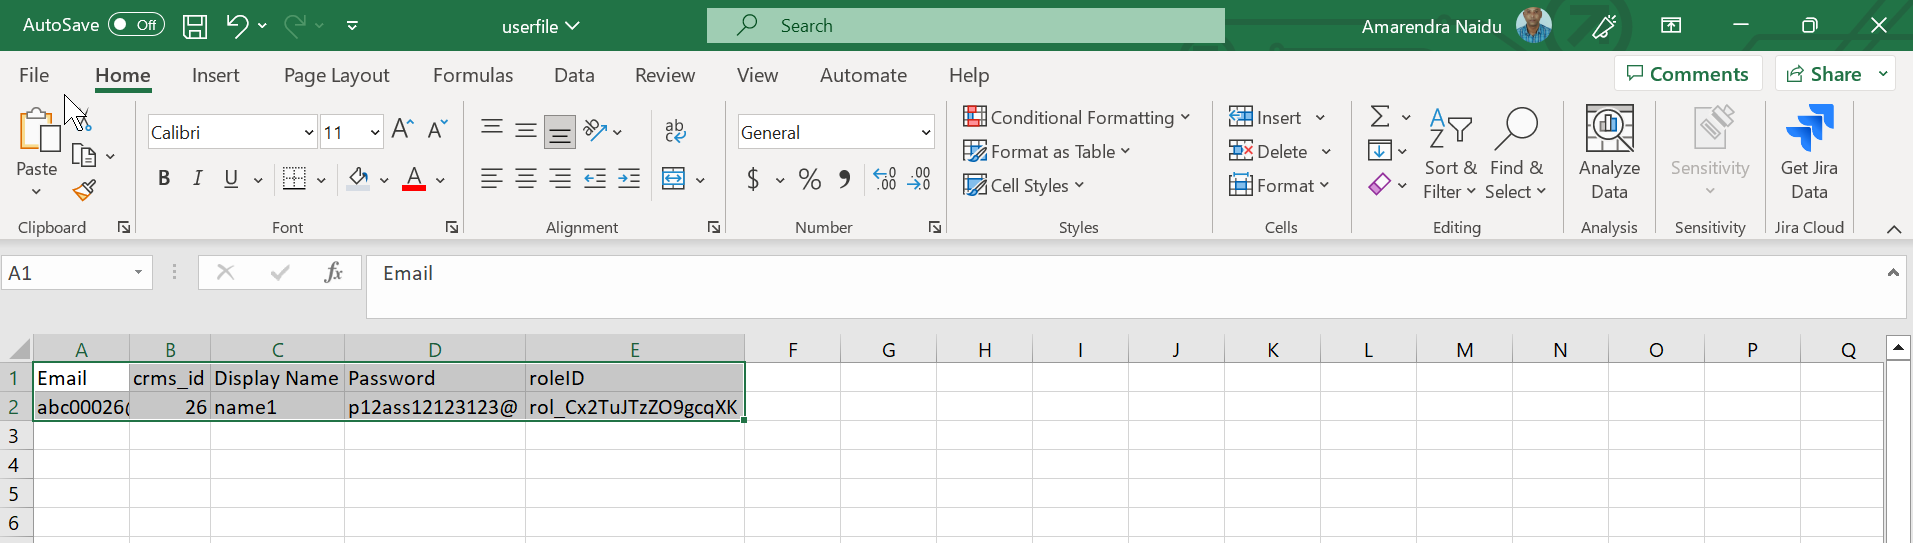
Create a CSV file with the user details that follow:
Email
crms_id
Display Name
Password
roleID
A screenshot of a sample user CSV file is shown below for reference:
Important
All the user detail fields are mandatory.
Copy the CSV and shell script files into a single folder.
Run the bulk API shell script file in Git Bash. To run this file, you need to provide the hostname.
Use the below shell script for dev and staging environments:
#! /bin/bash
count=0

hostname=$1;

echo "getting access token"
#for fetching access token
	access_response=$(curl -X POST \
  'https://dev-g2j5mu2z.us.auth0.com/oauth/token' \
  --header 'Accept: */*' \
  --header 'content-type: application/json' \
  --data-raw '{
  "client_id": "LOwJoTXBVEbtPW648GS0UeWkkNj4kHD9",
  "client_secret": "1xWAkM6A6gvlPWGpukKtTIzbbGk0F8ob21NVgDPQSEZ6OW5zsk2un6xAbGg74zz3",
  "audience": "https://dev-g2j5mu2z.us.auth0.com/api/v2/",
  "grant_type": "client_credentials"
	}' | jq)

#echo $access_response
access_token=$(jq -r '.access_token' <<<"$access_response")
#echo $access_token

echo ""


while IFS="," read -r email crmid name password roleid
do
start=$(date +%s)

#for creating user
echo "Creating users with values : Email="$email" crmid="$crmid" name="$name " password="$password

	user_response=$(curl -X POST \
  'https://dev-g2j5mu2z.us.auth0.com/api/v2/users' \
  --header 'content-type: application/json' \
  --header 'Authorization: Bearer '$access_token'' \
  --data-raw '{
  "email": "'$email'",
  "user_metadata": {
    "client_id": "'$crmid'"
  },

  "blocked": false,
  "email_verified": false,
  "app_metadata": {},
  "name": "'$name'",
  "connection": "Username-Password-Authentication",
  "password": "'$password'",
  "verify_email": false
 }')

#echo "user creation response - " $user_response

user_id=$(jq -r '.user_id' <<<"$user_response")

echo "user id "$user_id

#echo  "testing data" $roleid

echo ""
echo "Assigning roles to user:" $user_id

string_roleid=$(echo $roleid)
#roleid=rol_Cx2TuJTzZO9gcqXK

#user_id="auth0|6419aa54c9d8b3d9cc7bc13b"

#for Assigning Roles to user
	role_response=$(curl --write-out %{http_code} --silent --output /dev/null -X POST \
  'https://dev-g2j5mu2z.us.auth0.com/api/v2/users/'$user_id'/roles' \
  --header 'content-type: application/json' \
  --header 'Authorization: Bearer '$access_token'' \
  --data-raw '{"roles": ["'$string_roleid'"]}')


#echo "Role assign response " $role_response
if [ 204 == $role_response ]
then
    echo "Role Assignment successfull"
else
    echo "Role assignment FAILED for userid ="$user_id
fi

  #--data-raw '{"roles": ["'rol_Cx2TuJTzZO9gcqXK'","'rol_Cx2TuJTzZO9gcqXK'"]}'
#rol_Cx2TuJTzZO9gcqXK
 #echo $roleid

 echo ""

#For Sync User
echo "Sync User"
 curl -X POST \
  ''$hostname'/cms/configuration/sync-user' \
  --header 'X-Username: '$user_id'' \
  --header 'Authorization: Bearer l!5ZElx+DJy3#9</gZA_V9q5d2=hD9'

echo ""
end=$(date +%s)
echo "Elapsed Time: $(($end-$start)) seconds"
echo ""

done < <(tail -n +2 Userfile.csv)
Use the below shell script for production environment:
#! /bin/bash
count=0

hostname=$1;

echo "getting access token"
#for fetching access token
	access_response=$(curl -X POST \
  'https://uniphore.us.auth0.com/oauth/token' \
  --header 'Accept: */*' \
  --header 'content-type: application/json' \
  --data-raw '{
  "client_id": "7fPif7vK0IBLO9JnzjVRebKWCcWzZ42p",
  "client_secret": "JvvnOsU1Ch5ZSR95QoEmOsxxqkWfPt9ZN16VTCPX_WbKULG8YDLlYTqUwhz8zqZq",
  "audience": "https://uniphore.us.auth0.com/api/v2/",
  "grant_type": "client_credentials"
	}' | jq)

#echo $access_response
access_token=$(jq -r '.access_token' <<<"$access_response")
#echo $access_token

echo ""


while IFS="," read -r email crmid name password roleid
do
start=$(date +%s)

#for creating user
echo "Creating users with values : Email="$email" crmid="$crmid" name="$name " password="$password

echo 'Creating users'
	user_response=$(curl -X POST \
  'https://uniphore.us.auth0.com/api/v2/users' \
  --header 'content-type: application/json' \
  --header 'Authorization: Bearer '$access_token'' \
  --data-raw '{
  "email": "'$email'",
  "user_metadata": {
    "client_id": "'$crmid'"
  },

  "blocked": false,
  "email_verified": false,
  "name": "'$name'",
  "connection": "Username-Password-Authentication",
  "password": "'$password'",
  "verify_email": false
 }')

echo "user creation response - " $user_response

user_id=$(jq -r '.user_id' <<<"$user_response")

echo "user id "$user_id

#echo  "testing data" $roleid

echo ""
echo "Assigning roles to user:" $user_id

string_roleid=$(echo $roleid)
#roleid=rol_Cx2TuJTzZO9gcqXK

#user_id="auth0|6419aa54c9d8b3d9cc7bc13b"

echo "Role id to assign" $string_roleid

#for Assigning Roles to user
	role_response=$(curl --write-out %{http_code} --silent --output /dev/null -X POST \
  'https://uniphore.us.auth0.com/api/v2/users/'$user_id'/roles' \
  --header 'content-type: application/json' \
  --header 'Authorization: Bearer '$access_token'' \
  --data-raw '{"roles": ["'$string_roleid'"]}')


echo "Role assign response " $role_response
if [ 204 == $role_response ]
then
    echo "Role Assignment successfull"
else
    echo "Role assignment FAILED for userid ="$user_id
fi

  #--data-raw '{"roles": ["'rol_Cx2TuJTzZO9gcqXK'","'rol_Cx2TuJTzZO9gcqXK'"]}'
#rol_Cx2TuJTzZO9gcqXK
 #echo $roleid

 echo ""

#For Sync User
echo "Sync User"
 curl -X POST \
  ''$hostname'/cms/configuration/sync-user' \
  --header 'X-Username: '$user_id'' \
  --header 'Authorization: Bearer l!5ZElx+DJy3#9</gZA_V9q5d2=hD9'

echo ""
end=$(date +%s)
echo "Elapsed Time: $(($end-$start)) seconds"
echo ""

done < <(tail -n +2 Userfile.csv)
An example of a successful output is shown below:
